> For the complete documentation index, see [llms.txt](https://docs.appmixer.com/llms.txt). Markdown versions of documentation pages are available by appending `.md` to page URLs; this page is available as [Markdown](https://docs.appmixer.com/getting-started/services.md).
# Connector Configuration
Appmixer includes a variety of ready-to-use connectors, with some being immediately operational while others necessitate user authentication with third-party systems (such as Slack, Gmail, Teams, and many others). This authentication process typically employs the OAuth 2 protocol.
Appmixer features an internal Authentication Hub, functioning as an authentication proxy, which simplifies the setup process by eliminating the need to register your own OAuth credentials with third-party services. This means all OAuth-based connectors offered by Appmixer are ready to use right out of the box. However, should you prefer to use your own OAuth credentials for enhanced customization or compliance reasons, you have the flexibility to do so. This can be done for all or selected connectors by specifying your OAuth credentials (`clientId` and `clientSecret`) as outlined below.
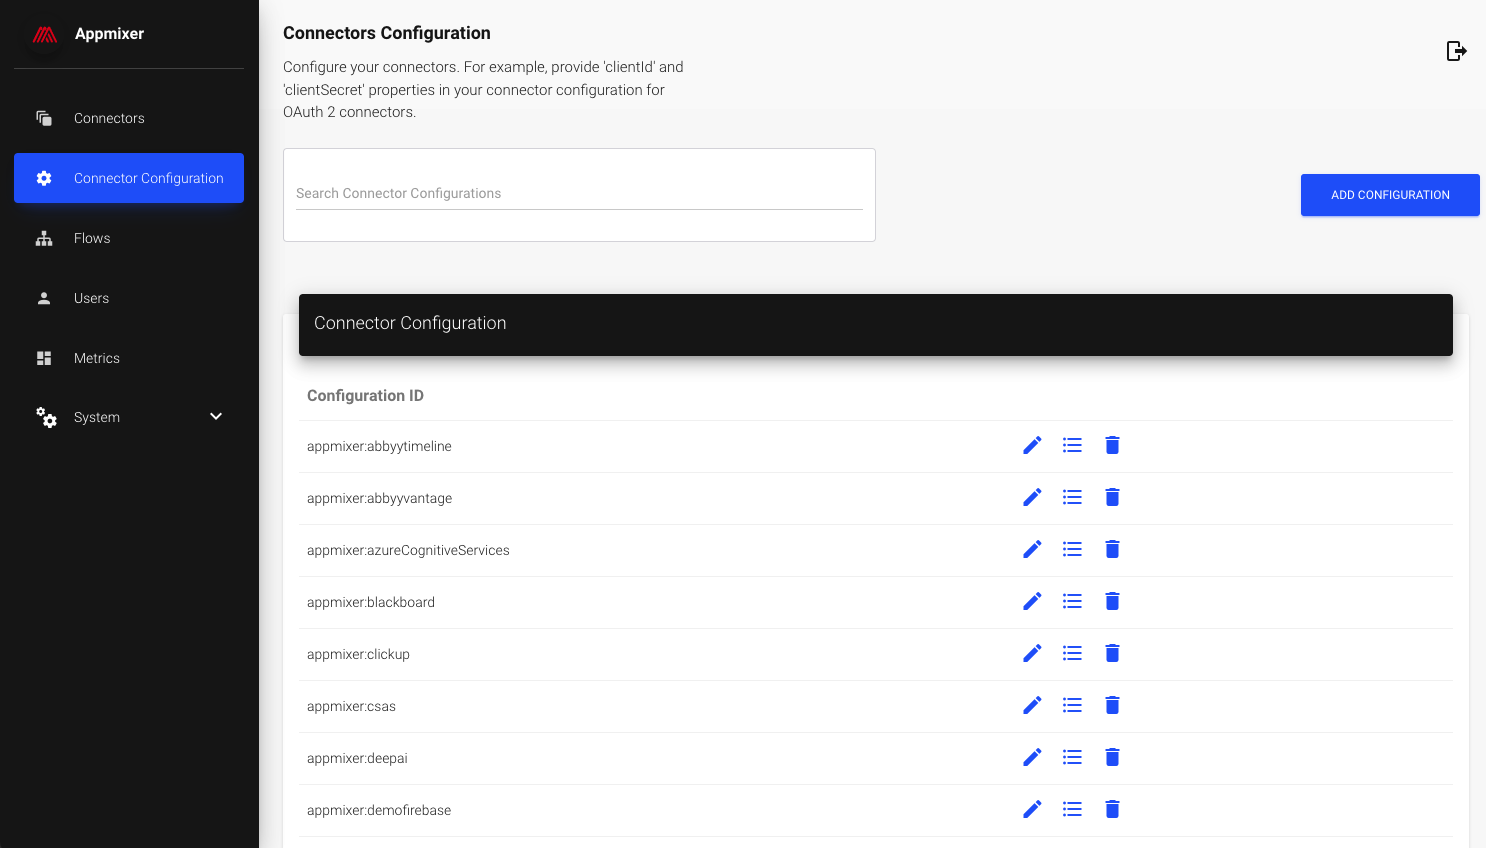
*The Connector Configuration* is available via the [Appmixer Backoffice](/appmixer-backoffice/getting-started.md) interface:
## Custom OAuth Credentials
{% hint style="info" %}
For detailed information on configuring specific connectors, please consult the [App Registration](broken://pages/-MLCAo3id2r0BFBhIsTS) section of our documentation. This section will guide you through the necessary steps and provide insights on setting up each connector according to your needs.
{% endhint %}
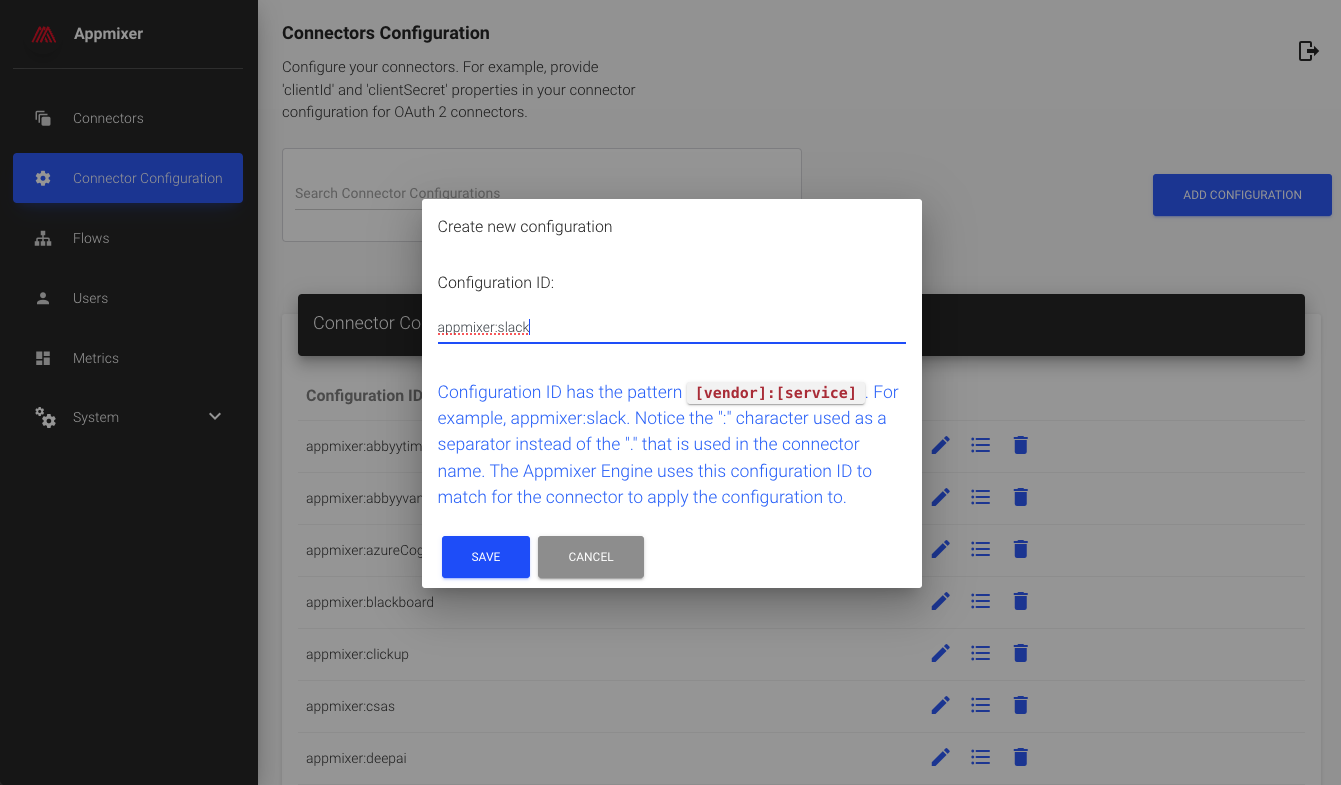
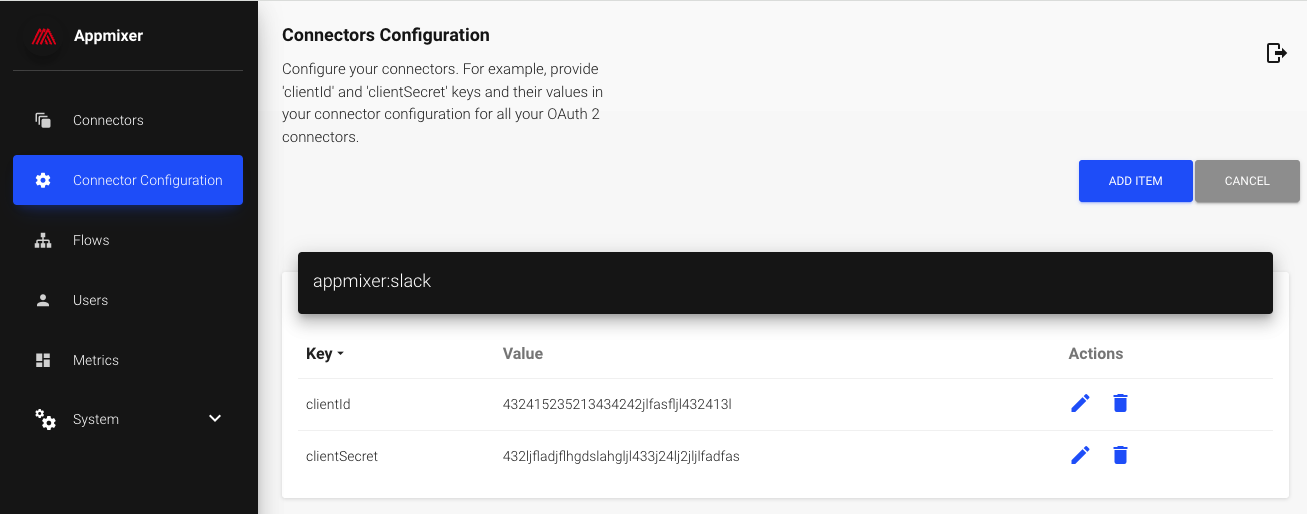
Appmixer offers several methods for configuring the OAuth credentials, with the Appmixer Backoffice being the simplest. For instance, if you're looking to use Slack components, you'll first need to register your application on the Slack developer portal, where you'll receive a clientId and clientSecret. After obtaining these, you can save them into Appmixer as follows:
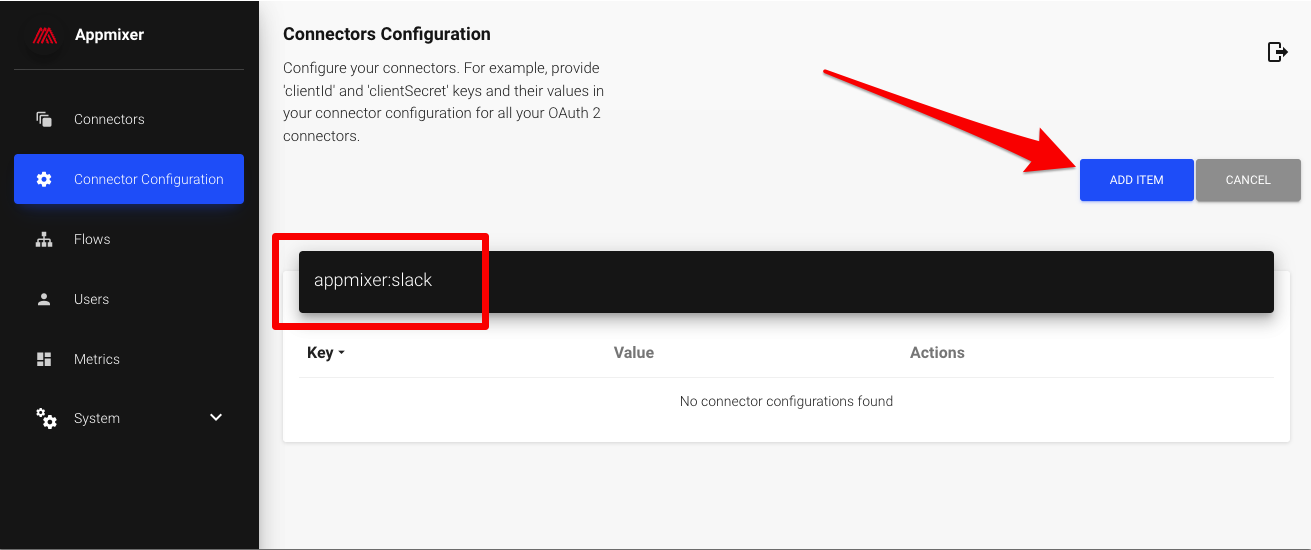
For the Configuration ID, use `appmixer:slack`. You are now ready to add the Slack OAuth app `clientId` and `clientSecret`.
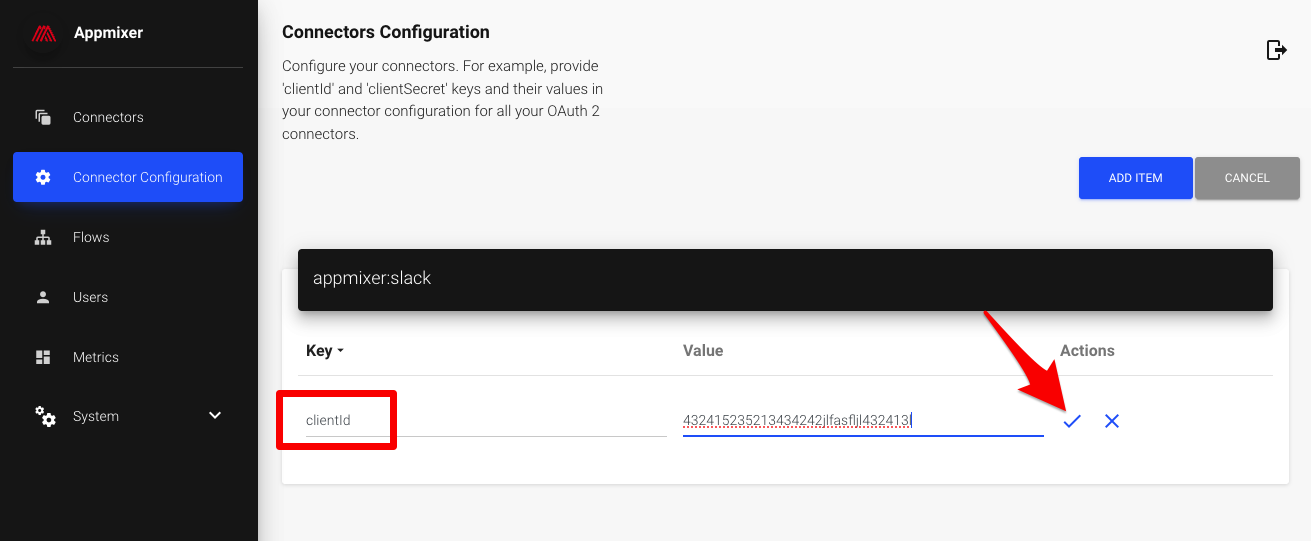
Add a key named `clientId` (it's crucial to use exactly `clientId`, not `clientID` or any other variation) and assign it the `clientId` you received from Slack.
Following that, add the `clientSecret` you received from Slack.
Once you've added the `clientId` and `clientSecret`, you're all set to utilize the Slack components within Appmixer.
{% hint style="info" %}
It's possible to include any key/value pairs in this configuration. These pairs will be accessible within your component's code via the `context.config` object (or `context.auth`), and in the case of `auth.js` files, directly within the `context` object.\
\
This method proves particularly beneficial for API key-based authentications in your custom connectors when you prefer not to present your end-users with a form to enter their own API key. Instead, opting to use a single, global API key for all users allows them to freely use the connector without the necessity for individual authentication. This approach enhances user convenience by simplifying access and usage of the connector, ensuring a seamless experience without compromising on security or functionality.\
\
A prime example is the DeepAI component. For utilizing the Deep AI API, an API key is required. However, instead of having your users supply this API key individually, you might prefer to use a single API key across all users for simplicity and ease of management. This setup allows for a more streamlined user experience, with further details available in the [documentation](broken://pages/-MLCAo3j07cXqYS_PeoH).
Additionally, for components using OAuth2 authentication, you have the option to redefine the default `callbackUrl` (redirect URL). This flexibility allows you to customize the authentication process to better fit your application's workflow.
{% endhint %}
## Connectors Using Appmixer-Managed API Keys
A few connectors call third-party APIs with an API key provided by Appmixer, so your end-users can use them right away without connecting an account of their own. These keys are shared by every tenant, so the Appmixer engine enforces a usage limit on them. The limit applies per Appmixer tenant and is shared by all users and flows of that tenant.
When a limit is reached, the engine does not fail the flow. The [quota manager](/building-connectors/quotas-and-limits.md) holds the message in a queue and processes it once the time window allows, so the flow only slows down. The third-party API is never called beyond the limit. The exception is the Email connector, where the Appmixer Cloud e-mail service rejects requests above its hourly limit and the component reports an error.
If you need higher limits, you can switch any of these connectors to your own key. Create a Connector Configuration entry in the Backoffice (or via the [Connector Configuration API](/api/service-configuration.md)) with the Configuration ID and keys listed below. The connector picks the configuration up automatically, no re-installation is needed.
* **Email** (`appmixer.utils.email`, SendEmail). By default e-mails are sent through Appmixer's Mailchimp Transactional (Mandrill) account from `no-reply@appmixer.com`. Limit: 100 e-mails per hour, and 700 e-mails per day. Above 100 per hour the component fails with a rate-limit error and the engine retries the message later. Your own key: Configuration ID `appmixer:utils:email`, key `apiKey` set to your Mailchimp Transactional API key, and optionally `fromEmail` for the sender address. With your own key the e-mails are sent directly through your Mailchimp account and the hourly limit no longer applies.
* **Weather** (`appmixer.utils.weather`). Uses OpenWeatherMap. Limit: 60 requests per minute. Your own key: Configuration ID `appmixer:utils:weather`, key `apiKey` set to your OpenWeatherMap API key.
* **Language** (`appmixer.utils.language`). Uses Google Cloud Translation and Natural Language APIs. Limit: 10 000 requests per day. Your own key: Configuration ID `appmixer:utils:language`, keys `clientEmail`, `privateKey` and `projectId` of a Google Cloud service account with the Cloud Translation API and Cloud Natural Language API enabled.
* **AI utilities** (`appmixer.utils.ai`, SendPrompt, GenerateImage, CreateSpeech, CreateTranscription, DescribeImages, Moderate, TransformTextToJSON). Uses OpenAI. No default key is provided and the engine enforces no limit; the limits of your OpenAI account apply. Configuration ID `appmixer:utils:ai`, key `apiKey` set to your OpenAI API key. You can also override the model per component with the keys `SendPromptModel`, `GenerateImageModel`, `CreateSpeechModel`, `CreateTranscriptionModel`, `DescribeImagesModel`, `ModerateModel` and `TransformTextToJSONModel`.
* **Azure Cognitive Services** (`appmixer.azureCognitiveServices`). Limit: 20 requests per minute and 5 000 requests per month. Your own key: Configuration ID `appmixer:azureCognitiveServices`, keys `key` and `endpoint` of your Azure Computer Vision resource.
* **Screenshot API** (`appmixer.screenshotapi`). Limit: 100 screenshots per month. Your own key: Configuration ID `appmixer:screenshotapi`, key `apiToken` set to your screenshotapi.net token.
{% hint style="info" %}
The Configuration ID is derived from the connector name: `appmixer.utils.weather` reads `appmixer:utils:weather`, `appmixer.screenshotapi` reads `appmixer:screenshotapi`. Values are available to the connector's code in `context.config` (alias `context.auth`) regardless of whether the component declares an `auth` or `authConfig` section.
{% endhint %}
## Domain Verification
In scenarios where third-party developer consoles require the verification of domain ownership for domains used as callback URLs in OAuth-registered applications, you might face challenges (for example with configurations like the [Google OAuth app](broken://pages/-MN8amHEyPvnn7hVNecE#domain-verification)). Given that your Appmixer tenant operates under the domain of your `[TENANT_API_URL]` and you lack access to this domain's DNS settings, your options for domain verification can seem limited.
To facilitate this process, the [Appmixer Backoffice](/appmixer-backoffice/getting-started.md) includes a tool designed specifically for domain verification purposes. This tool enables you to upload a file that the third-party service has generated for verification. Once uploaded, this file becomes accessible at the root of your domain. The third-party service verifies domain ownership by checking for the presence of this file at the specified root location on your domain, thus confirming that you indeed control the domain. This public file method provides a straightforward solution for verifying your Appmixer tenant domain without the need for DNS access.
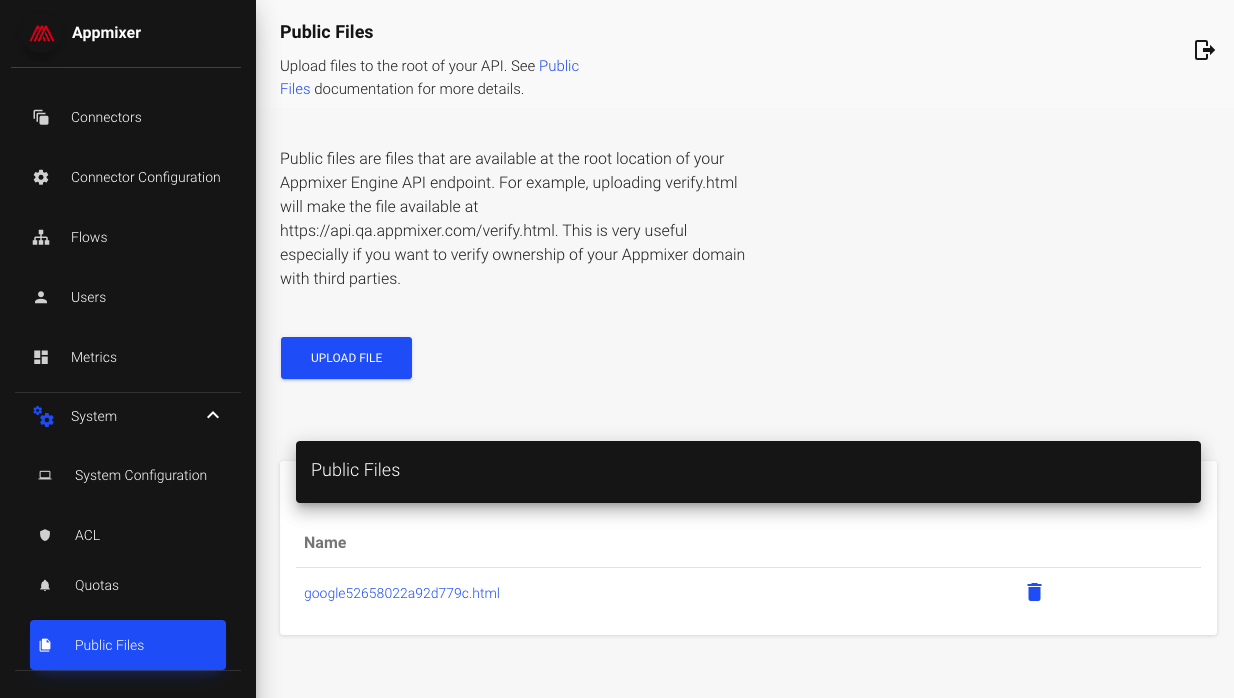
To upload a public file to the root location, navigate to the Appmixer Backoffice interface and select the "System -> Public Files" option from the left menu. On this page, you'll find the functionality to upload your files.
Once you've uploaded your files through the Appmixer Backoffice, they will be accessible via your Appmixer Tenant API URL. For instance, if you upload a file named `google52658022a92d779c.html`, it can be accessed at `[TENANT_API_URL]/google52658022a92d779c.html` as well as at the well-known directory URL `[TENANT_API_URL]/.well-known/google52658022a92d779c.html`. This accessibility ensures that third-party services can easily verify domain ownership by locating the specified file at your domain's root or the well-known directory.
For customers managing their own Appmixer installations, there's flexibility to adjust where these public files are hosted through the `PUBLIC_FILES_PREFIX` system configuration option. This setting allows you to tailor the file access paths to suit your infrastructure requirements, providing further control over how you manage domain verification and public file accessibility.
---
# Agent Instructions
This documentation is published with GitBook. GitBook is the documentation platform designed so that both humans and AI agents can read, navigate, and reason over technical content effectively. Learn more at gitbook.com.
## Querying This Documentation
If you need additional information that is not directly available in this page, you can query the documentation by asking a question.
Perform an HTTP GET request on the following URL with the `ask` and `goal` query parameters:
```
GET https://docs.appmixer.com/getting-started/services.md?ask=&goal=
```
`ask` is the immediate question: it should be specific, self-contained, and written in natural language.
`goal` is what the user is ultimately trying to achieve, the reason they need the answer. Sharing it helps GitBook give you a better, more relevant answer. A goal is most helpful when it describes the outcome the user wants rather than restating the question. For example, with `ask=how do I create an API token`, a goal like `automate deployments from our CI pipeline` lets GitBook tailor the answer to that use case.
The response will contain a direct answer to the question and relevant excerpts and sources from the documentation.
Use this mechanism when the answer is not explicitly present in the current page, you need clarification or additional context, or you want to retrieve related documentation sections.