Appmixer is a white-label AI workflow automation platform built for SaaS vendors. It lets you embed a fully native AI workflow automation hub directly into your product — so your users can automate workflows, connect third-party apps, and run AI agents, all without leaving your platform.
Appmixer is available as a cloud solution or as a self-hosted deployment, giving you full control over your data and infrastructure.
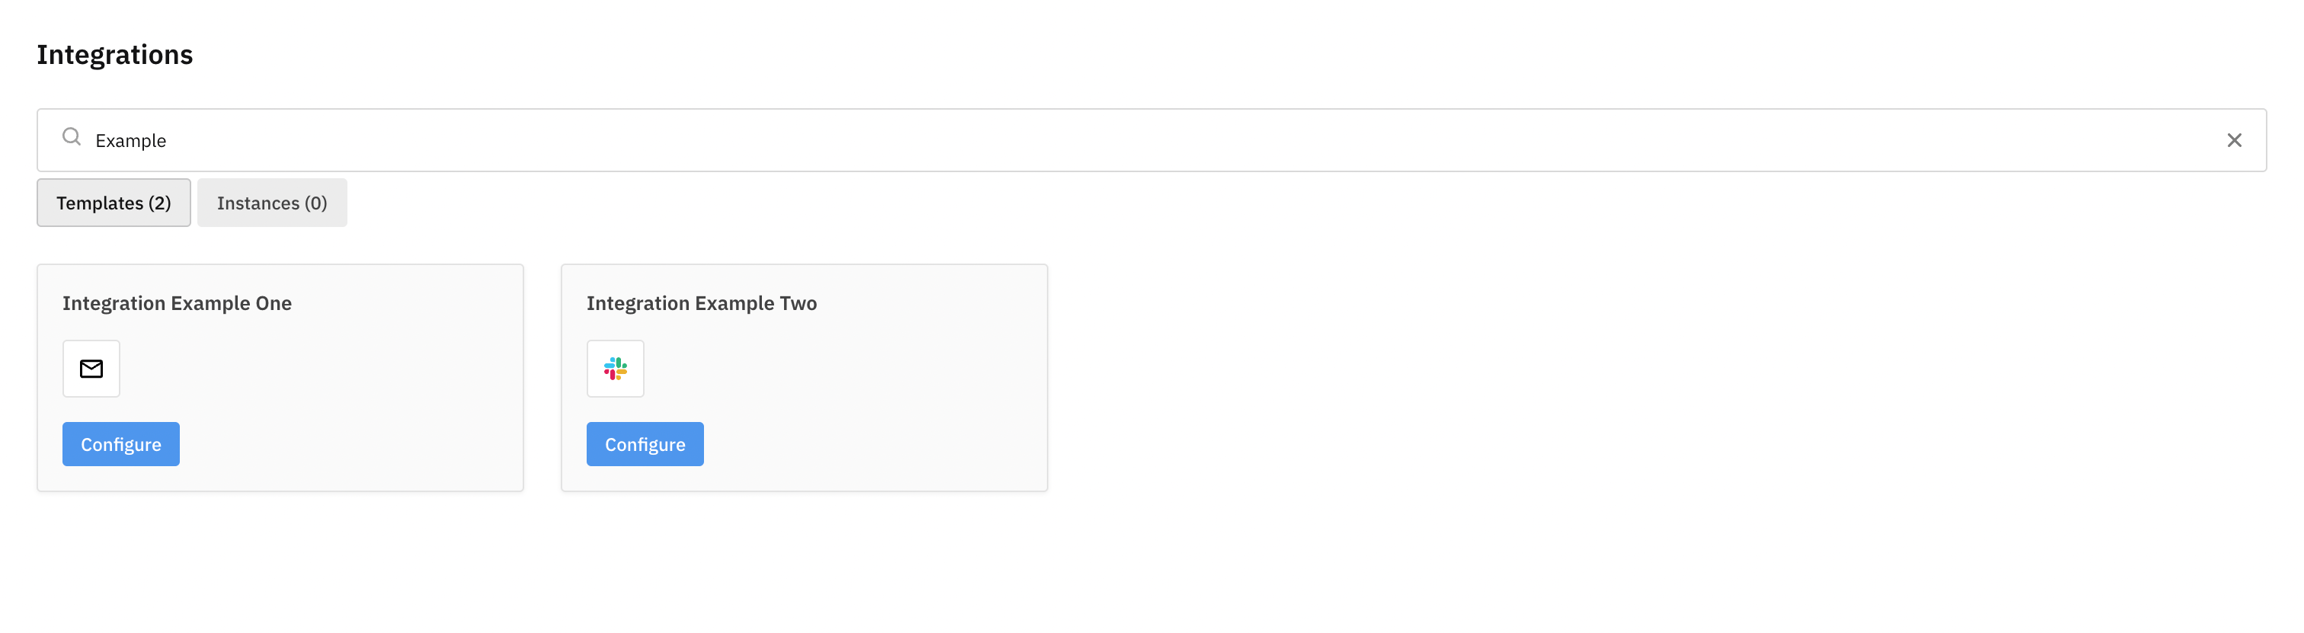
Start by building some automation templates for your Automation Hub.
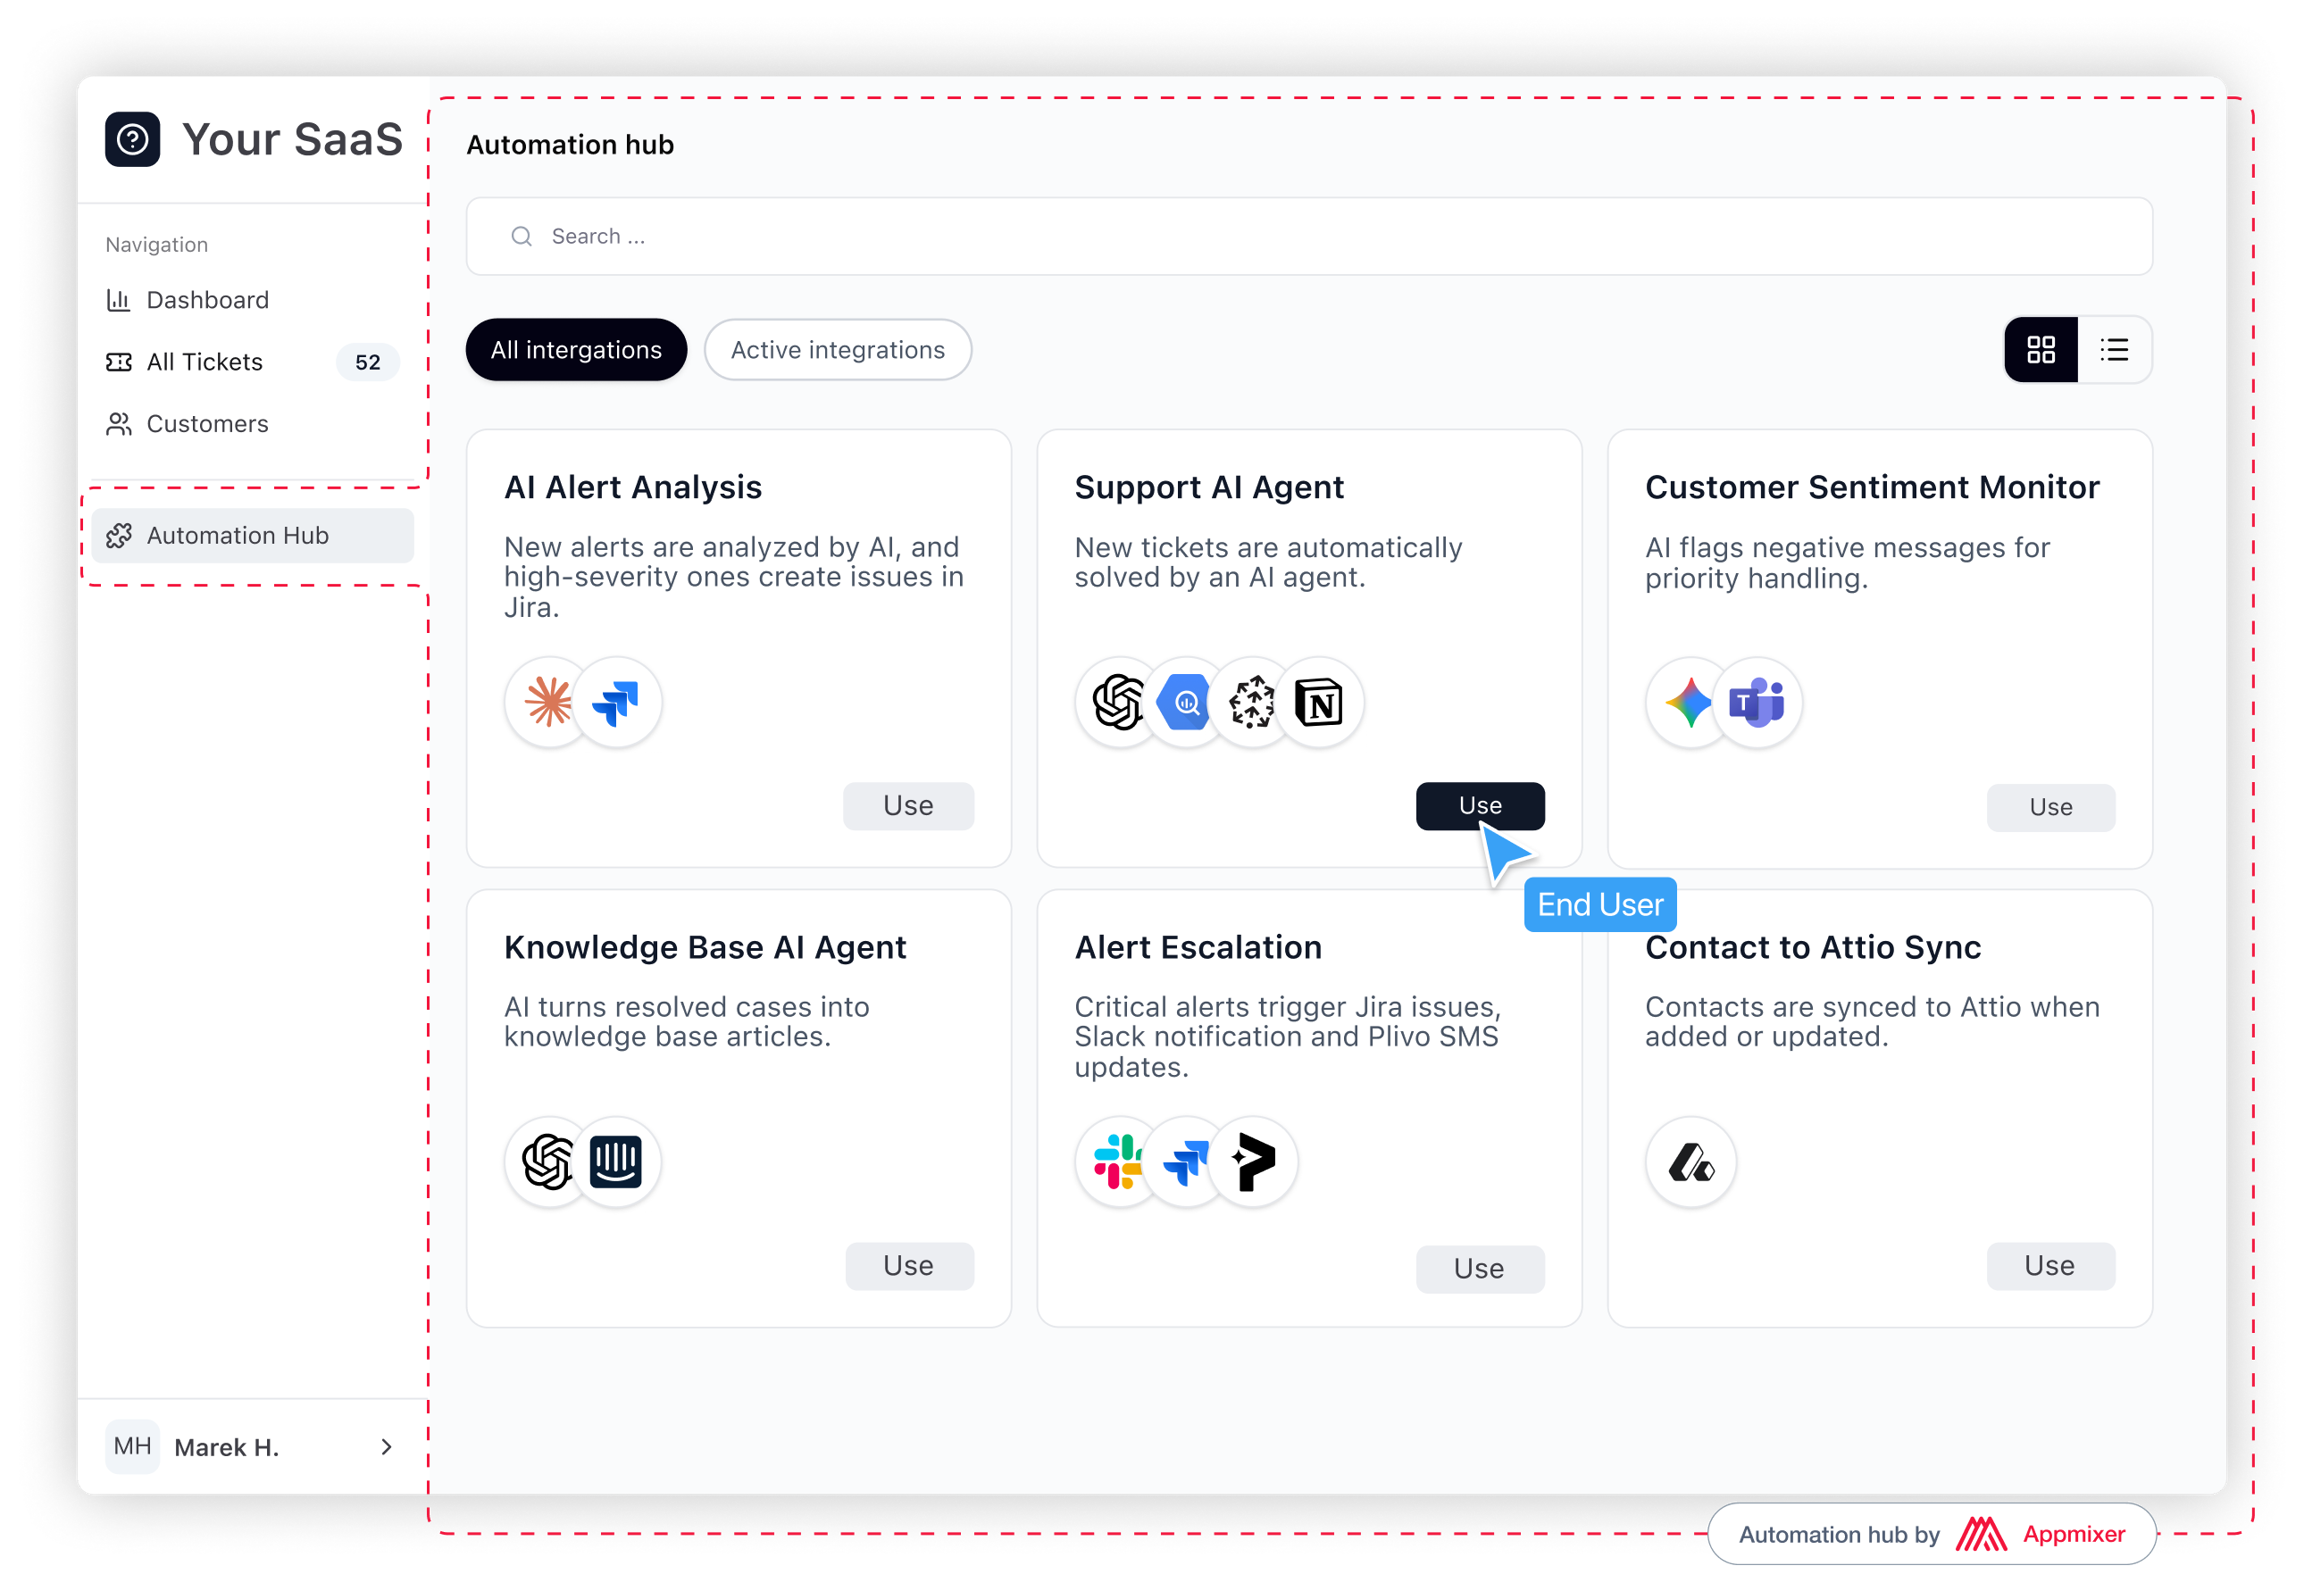
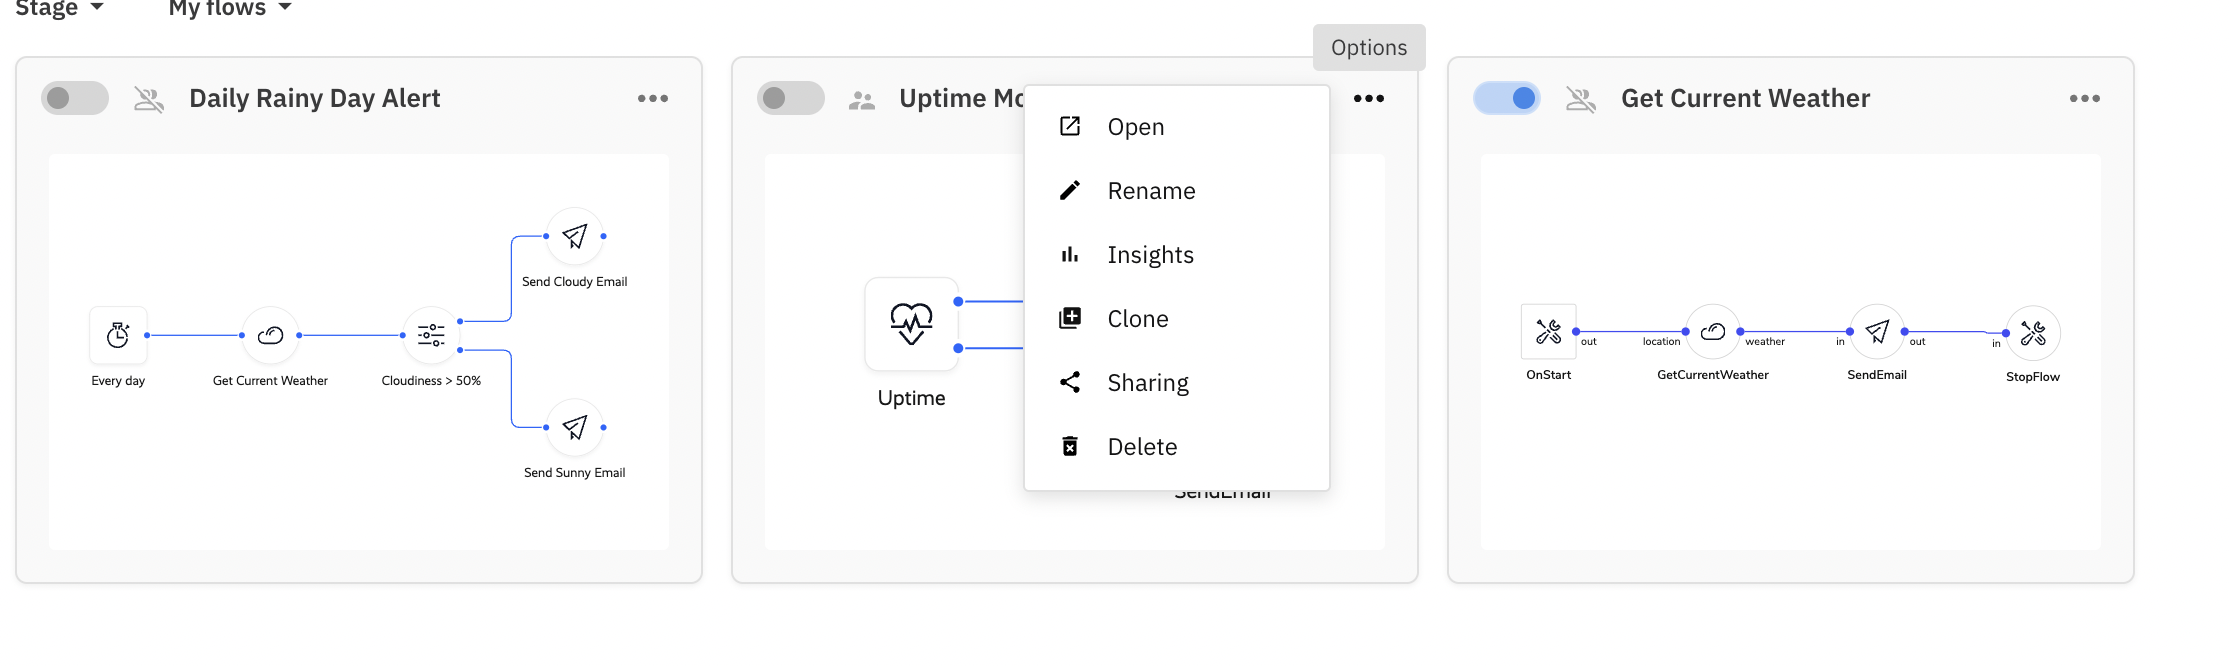
Build Your Automation Hub
The Automation Hub is a one-stop shop for automations and AI agents for your end users.
Browse and start Automations pre-built by your team
Customize pre-built Automations
Manage Logs and Accounts for their Automations
Your team can easily manage the Hub:
Organize automations into categories (shown as tabs in the Hub)
Adjust the look and feel of the Hub
Monitor health and statistics of Hub Automations
Define who can access specific automations
Allow or Disable customization of pre-built templates by end-users
Customize and Share Your Hub
All published templates are available in the Automation Hub - an all-in-one embeddable widget that you can use to present automations to your end users.
The Automation Hub provides these features to your users out of the box:
Starting and managing automations including logs and accounts
Searching and filtering
Customization of pre-built automations (you can choose to enable or disable this option)
Use the Preview button on the Dashboard, in the Templates section or in the Hub Settings to check how the Automation Hub looks.
Design and Feature Customizations
Use the options in the Automation Hub Settings section to adjust the page structure and design.
Text and toggles in the Hub
Use the options on the page to adjust:
Header and subheader (show/hide and text)
Default layout (grid or list)
Show/hide Logs and Connections tabs
Organizing Automations into Categories
Automations can be organized into tabs for easier access to specific types of automations such as CRM, Notifications, AI or other.
To organize and assign categories:
Assign a category to a template in the Templates section: Select the Manage categories option in the context menu of a template in the Templates section. Select an existing category or add a new one.
Define tab name and select a category in the Tabs section: Enter the name and select one of the available categories in the dropdown
Theme
Use the Theme Options section to customize colors and fonts.
Feature Customizations
Use these options to define how much customization is available to your end-users.
Customization of automations in the Hub has two levels.
Allow customization of pre-built automations
Users can see the "backend" of an automation and make changes to the nodes on the editor canvas.
Available in the context menu of each automation as Customize in Editor
Allow creating custom automations from scratch
Users can build completely new automations by choosing the nodes themselves on the editor canvas.
Available as the Create my own button in the Hub.
All the customization options are reflected in the Embed your Hub section on the page, so that you can explore the embed code before starting your implementation.
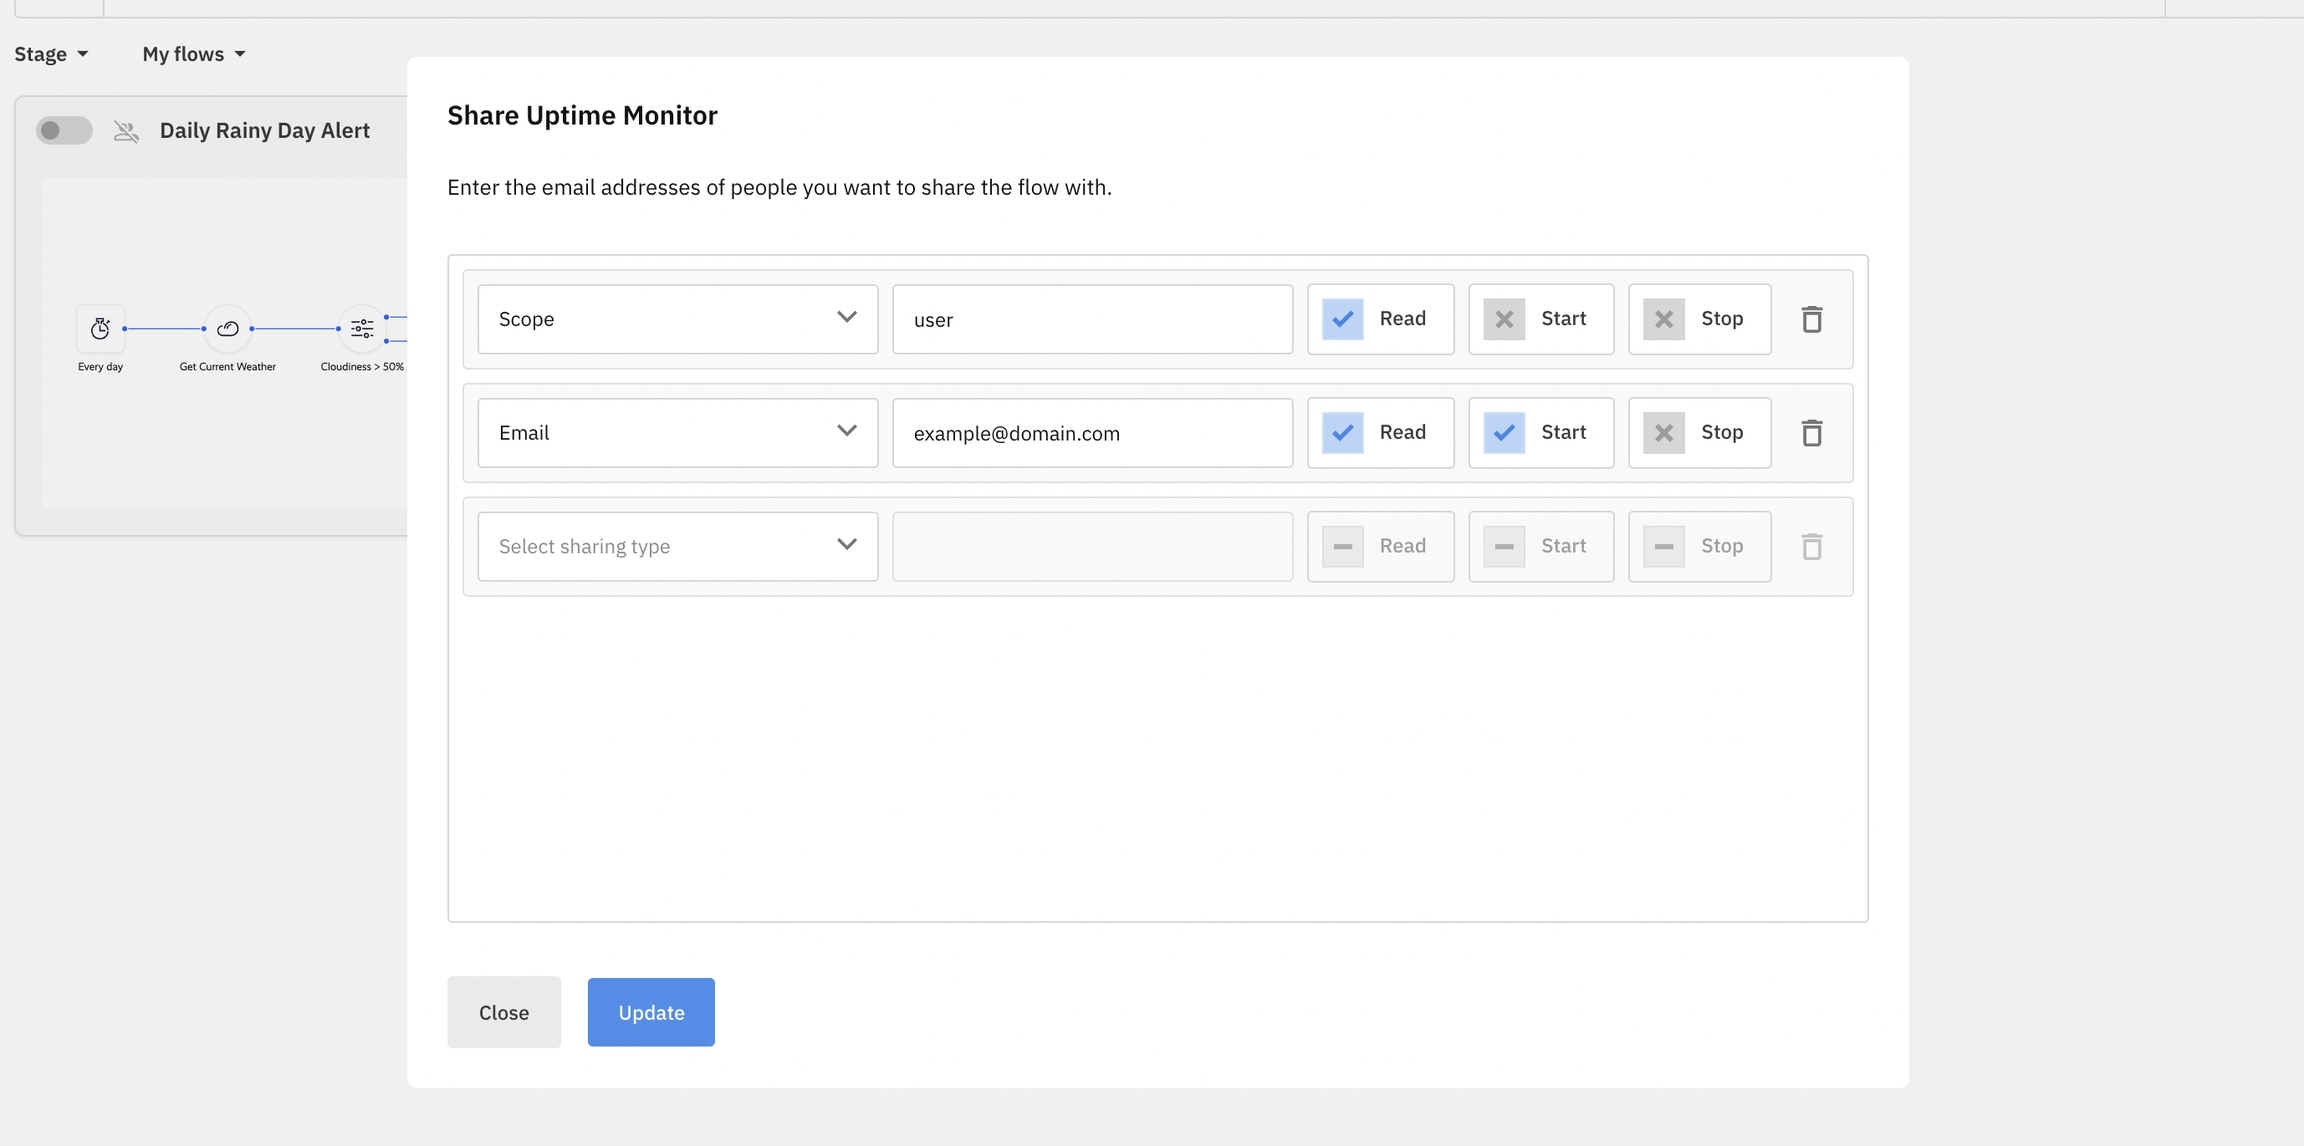
Sharing the Hub
You can easily share the Hub with others so that they can try and deploy pre-built automations even without signing up for the Appmixer Studio.
To share access to the Hub:
Add their email address in the Sharing Options section in the Hub Settings
Click the Share Hub button to copy a shareable link
Once they verify their email, they will get full access to the Hub
Embed Your Automation Hub
The Automation Hub embeddable widget combines these features for your end-users:
Browse and start Automations pre-built by your team
Customize pre-built Automations
Manage Logs and Accounts for their Automations
As you customize the Hub options such as layout, design and automation categories (tabs), the embed code shown in the Settings page will dynamically change.
You can copy the code from the Settings page or use this example code:
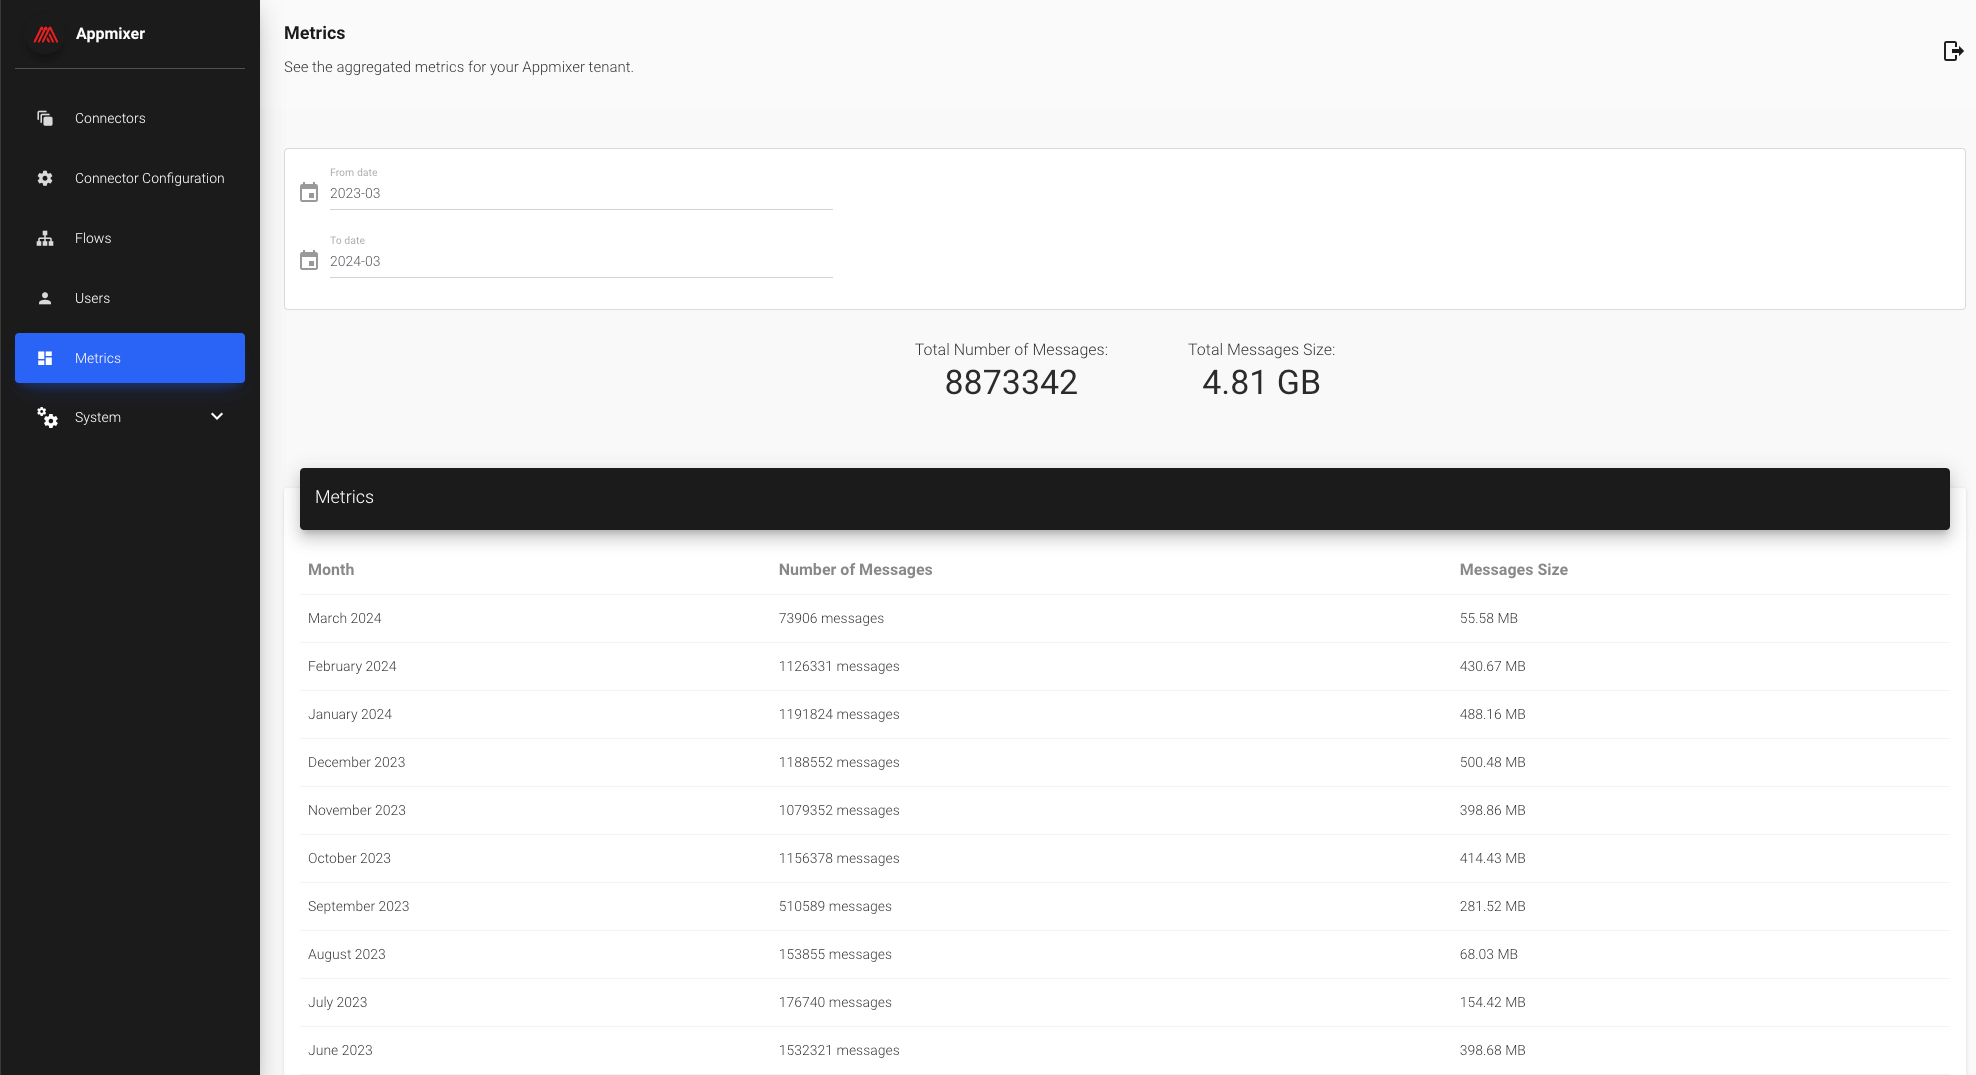
The Analytics dashboard gives you a real-time view of how your end users are engaging with your Automation Hub - what's running, what's being adopted, and where issues are occurring.
Access Analytics from the Automation Hub section in the main navigation menu.
What you'll find
Summary metrics
Four tiles at the top of the page give you an at-a-glance health check of your Hub:
Total Running Instances — the number of active integration instances currently running across all your end users
Active Users (Last 30d) — how many users have been active in the past 30 days, with a percentage change compared to the previous period
Data Messages (Last 30d) — total data messages processed, with a percentage change compared to the previous period
Success Rate (Last 30d) — the share of flow runs that completed without errors
Template lists
Below the summary tiles, four lists give you a deeper breakdown by template:
Most Popular Templates — ranked by number of active instances
Most Active Templates — ranked by volume of data messages processed
Template Adoption — ranked by new activations in the last 30 days
Success Rate — ranked by the percentage of successful (error-free) runs
Each list defaults to highest-to-lowest order. Click the sort icon to toggle the direction — useful when you want to surface your least-adopted or most error-prone integrations.
How to use this
Spot adoption gaps. The Template Adoption list shows which integrations your end users are actually activating. If a template you've invested in isn't being picked up, that's a signal to revisit its description, positioning, or discoverability in the Hub.
Find reliability problems early. The Success Rate list is your fastest path to identifying broken or underperforming integrations. Sort lowest-to-highest to surface the most problematic ones and investigate via Logs.
Understand engagement trends. Active Users and Data Messages both include a 30-day delta, so you can see whether engagement is growing or declining without running any additional queries.
Access analytics via API
All metrics shown on this page are also available via the Appmixer REST API. If you're building custom dashboards or integrating Hub analytics into your own admin tooling, see the Analytics API reference for available endpoints.
Access Appmixer REST API
Appmixer offers a REST API that mirrors the functionalities accessible through its UI. This API enables advanced customizations, additional automations, and scripting capabilities for enhanced integration flexibility.
The base URL for the Appmixer REST API varies according to your specific Appmixer tenant. The URL format is as follows:
https://api.YOUR_TENANT.appmixer.cloud
The majority of the Appmixer API endpoints require authentication using an access token associated with an Appmixer user account. Certain endpoints may require that this user to has the admin scope; specific requirements are detailed at each endpoint's documentation. To obtain a user's access token, sign in using the user's credentials:
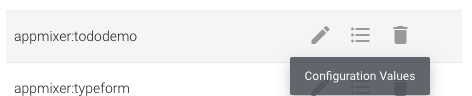
Global configuration for your connectors. If a component contains either an auth section or authConfig section, values for the specified service will be injected into the `context.config` object.
Only users with admin scope can use these endpoints.
Creates a new configuration for a service. The only required parameter on the payload is the serviceId. The rest of the payload can be any key/value pairs that will be the desired configuration for the service. For example:
{"serviceId": "appmixer:google","clientID": "my-global-client-id","clientSecret": "my-global-client-secret"}
Request Body
Name
Type
Description
whatever
string
Any value for the whatever-key
serviceId
string
The serviceId. It should be in the form vendor:service. Example: appmixer:google
Updates the stored configuration for the given service. The payload should contain the whole configuration, as the payload content will overwrite the configuration stored under the service.
Public files are files that are available at the root location of your Appmixer Tenant API endpoint. For example, uploading verify.html will make the file available at API_URL/verify.html.
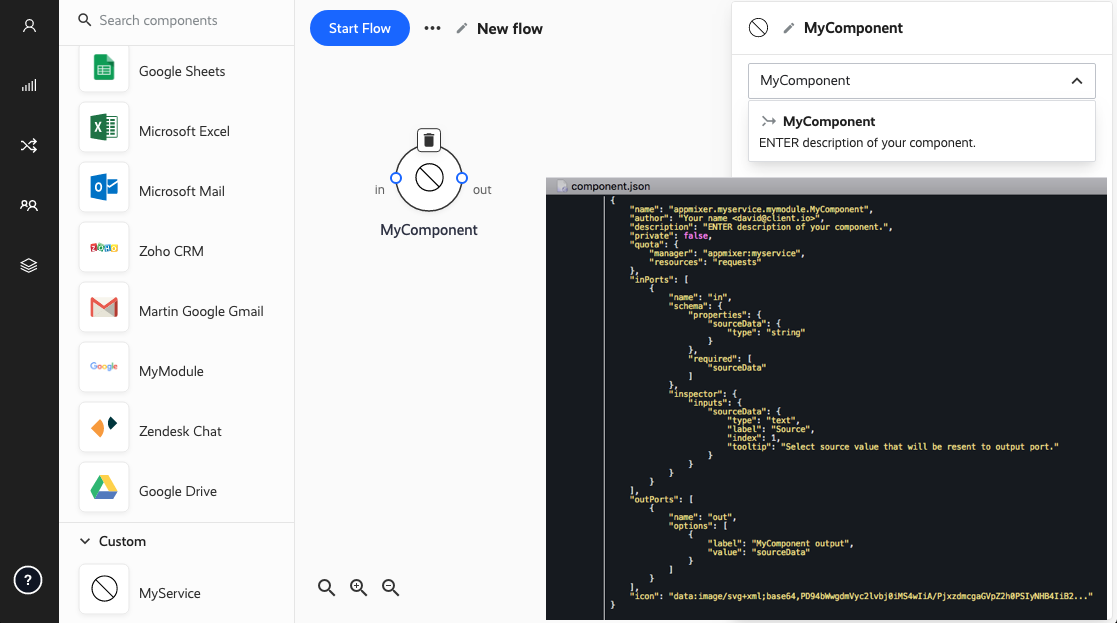
The component manifest provides information about a component (such as name, icon, author, description and input/outputs definition) in a JSON text file. The manifest file must be named component.json.
The name of your component. The name must have the following format: [vendor].[service].[module].[component]. Note that all the parts of the name must contain alphanumeric characters only. For example:
The vendor part of the component name is the ID of the author of the component set. service and module allows you to organize your components into categories. These categories not only help you keep your components in a tidy hierarchical structure but it also has a meaning in that you can share your authentication and quota definitions between modules and components (more on that later). component describes the actual component activity.
label
(optional)
The label of your component. If not label is specified, then last part of name will be used when component is dropped into Designer. If your component name is appmixer.twitter.statuses.CreateTweet then CreateTweet will be name of the component unless you specify label property. This allows you to use spaces as opposed to the name property.
{ "label": "Create Tweet" }
icon
The icon representing the component in the UI. It must be in the Data URI image format as described here: https://en.wikipedia.org/wiki/Data_URI_scheme. image/png or image/svg+xml image types are recommended. Example:
The auth.service identifies the authentication module that will be used to authenticate the user to the service that the component uses. It must have the following format: [vendor]:[service]. The Appmixer engine looks up the auth.js file under that vendor and service category. auth.scope provides additional parameters to the authentication module. See the Authentication section for more details.
When auth is defined, the component will have a section in the Designer UI inspector requiring the user to select from existing accounts or connect a new account. Only after an account is selected the user can continue configuring other properties of the component.
Connected Accounts
quota
Configuration of the quota manager used for this component. Quotas allow you to throttle the firing of your component. This is especially useful and many times even necessary to make sure you don't go over the limits of the usage of the API that you call in your components. Quota managers are defined in the quota.js file of your service/module. Example:
Dynamic values
The {{}} can be used in any property within the quota definition. And values from two objects - the user's metadata, and the account's profileInfo can be used there. The following example shows how to dynamically select a resource based on the value of the user's metadata.tier .
The quota.js file with the rules for the previous example could look like this:
The other object that can be used here is the profileInfo.
quota.manager
The name of the quota module where usage limit rules are defined.
quota.resources
One or more resources that identify rules from the quota module that apply to this component. Each rule in the quota module can have the resource property. quota.resources allow you to cherry-pick rules from the list of rules in the quota module that apply to this component. quota.resources can either be a string or an array of strings.
Dynamic values. Sometimes, different users have different quotas for the same service.
quota.scope
This scope instructs the quota manager to count calls either for the entire application (service) or per user. Currently, it can either be omitted, in which case the quota limits for this component apply to the whole application, or it can be { "userId": "{{userId}}" } . In this case, the quota limits are counted per Appmixer user. The last option is { "componentId: "{{componentId}}" }. In that case, the quota limits are counted per component.
tick
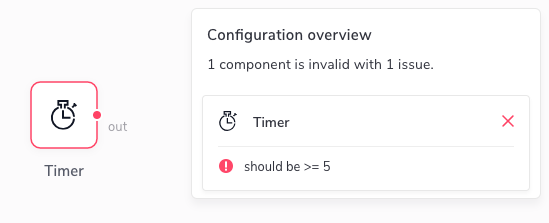
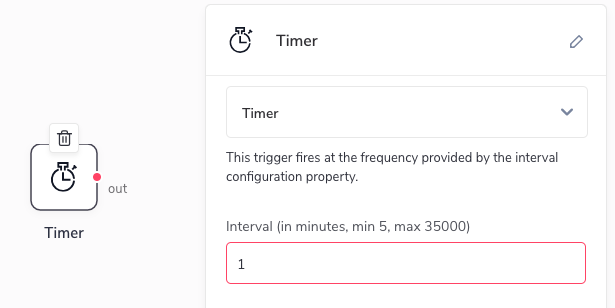
When set to true, the component will receive signals in regular intervals from the engine. The tick() Component Virtual method will be called in those intervals (see Component Behaviour). This is especially useful for trigger-type of components that need to poll a certain API for changes. The polling interval can be set by the COMPONENT_POLLING_INTERVAL environment variable (for custom on-prem installations only). The default is 60000 (ms), i.e. 1 minute.
private
When set to true, the component will not be visible to end users.
webhook
Set webhook property to true if you want your component to be a "webhook" type. That means that context.getWebhookUrl() method becomes available to you inside your component virtual methods (such as receive()). You can use this URL to send HTTP requests to. See the Behaviour section, especially the context.getWebhookUrl() for details and example.
httpRequestMethods
By default, you can send GET, POST, PUT, or DELETE HTTP requests to a component. With the property httpRequestMethods you can define, which HTTP methods are allowed. Additionally, you can add support for the OPTIONS method:
{
"name": "appmixer.utils.http.WebhookWithOPTIONS",
"description": "Support for OPTIONS and POST",
"webhook": true,
"httpRequestMethods": [ "POST", "OPTIONS" ],
...
}
state
Set state property to { persistent: true } to tell the engine not to delete component state when flow is stopped. See context.state for more information.
author
The author of the component. Example:
{
"author": "David Durman <david@client.io>"
}
localization
An optional object containing localization strings. For example:
For more information about component localization, refer to the Custom Component Strings section.
Dependencies
Components can use 3rd party libraries which are defined in the standard package.json file. An example:
The package.json file from the example above tells Appmixer to load the twilio library that the appmixer.twilio.sms.SendSMS component requires for its operation.
Note that the appmixer pack command from the Appmixer CLI ignores the node_modules directory when creating the zip archive representing your custom component. This is intended since when you publish a component to your Appmixer tenant, Appmixer will automatically download dependencies specified in the package.json file.
If you're using a Self-Managed Appmixer package, you should link your own Appmixer JavaScript SDK from your own Appmixer Studio URL (i.e. instead of https://my.YOUR_TENANT.appmixer.cloud, you will reference your own Studio URL). Alternatively, you can download the appmixer.js file and link to it from whatever location you will put it in.
Advanced Usage
Download appmixer.es.js ES module and include the files in your project:
Defines custom query parameters for retrieving files.
Example:
Events
flow:open
Triggered when the user selects a flow associated with a file listed in the widget.
Example
Custom API
Appmixer SDK allows you to override API methods used by the SDK instance. This can be handy in edge case scenarios where you need to override the API requests and their parameters or response values.
Setting a custom API option
Custom API is represented as an object composed of asynchronous methods that you set on your Appmixer SDK instance using the api option:
var myCustomApi = {
/* the key must match an existing API method */
myCustomApiMethod(/* arguments of the original method */) {
return new Promise((resolve) => {
resolve(myCustomResponse);
});
}
}
/* Use a custom API on the entire SDK instance */
var appmixer = new Appmixer({ api: myCustomApi });
/* Use a custom API on a particular SDK UI widget */
var designer = new appmixer.ui.Designer({ api: myCustomApi });
{
"quota": {
"manager": "your-service",
// Before the quota request is created, the system will check the user's
// metadata.tier value. If set, it will be used as a 'resources' value.
// If not, the value 'basic' will be used.
"resources": "{{userMetadata.tier || 'basic'}}",
"scope": {
"userId": "{{userId}}"
}
}
}
{
"quota": {
"manager": "your-service",
// Before the quota request is created, the system will check the user's
// account profileInfo.tier value. If set, it will be used as a 'resources' value.
// If not, the value 'basic' will be used.
"resources": "{{profileInfo.tier || 'basic'}}",
"scope": {
"userId": "{{userId}}"
}
}
}
/* Create "Designer". */
var designer = appmixer.ui.Designer({
el: '#your-designer',
options: designerOptions(),
api: {
// extending the updateFlow request
updateFlow(flowId, update) {
// at this place you can call your own API every time the flow
// gets updated
// carefully catch errors, timeouts ... so calling your
// external API does not affect the Designer behaviour
console.log('Calling your own API.');
console.log(JSON.parse(JSON.stringify(update)));
// in order to update the flow in Appmixer, call the Flow API
return this._request({
url: `${this.get('baseUrl')}/flows/${flowId}`,
method: 'PUT',
data: update
});
}
}
});
Build and Publish a Template
This tutorial will guide you through the process of creating, testing, and publishing your first Automation Template:
Build a template using the Appmixer no-code Studio.
Parametrize your template by adding fields to gather information from your end-users through an easy-to-use web form (Wizard).
Test the Automation Template
Publish your Template to your end-users for immediate use.
See a preview of how your template will be shown to your end-users
Explore our demo content or build from scratch
The Get Started section on the Dashboard of Appmixer Studio provides examples of automation templates. Each one has built-in notes describing how to use it
This tutorial explains how to build one of the demo templates from scratch, specifically the one called Get Slack Notifications for Hot Leads.
Template Overview - Slack Notifications for Hot Leads
This template processes newly created contacts as external events. This simulates a real-world scenario where you would send these events via HTTP requests from your application code. The automation template examines each contact for the presence of a hotLead parameter. If this parameter is set to true, the contact is then forwarded to Slack.
Create an Automation Template
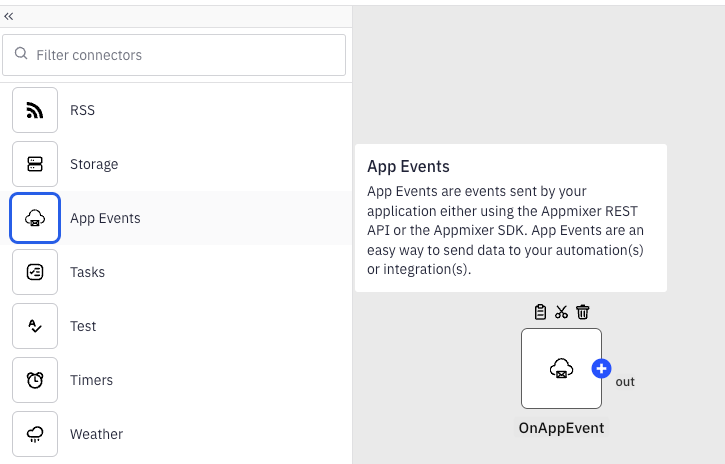
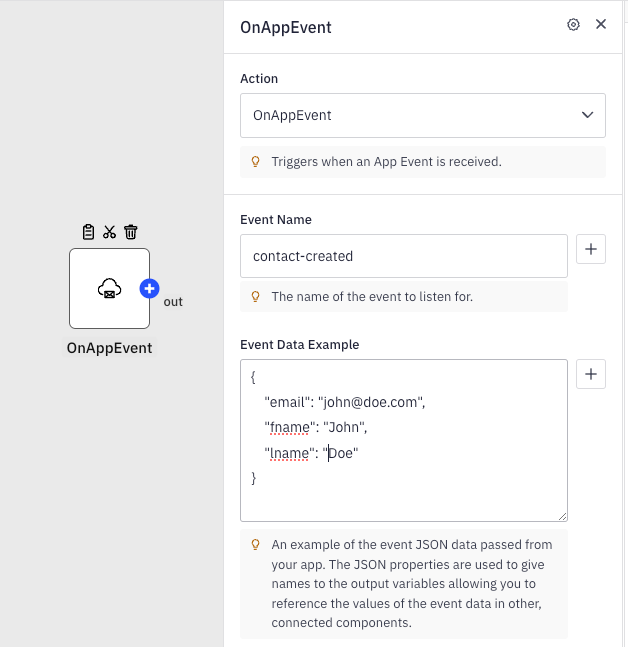
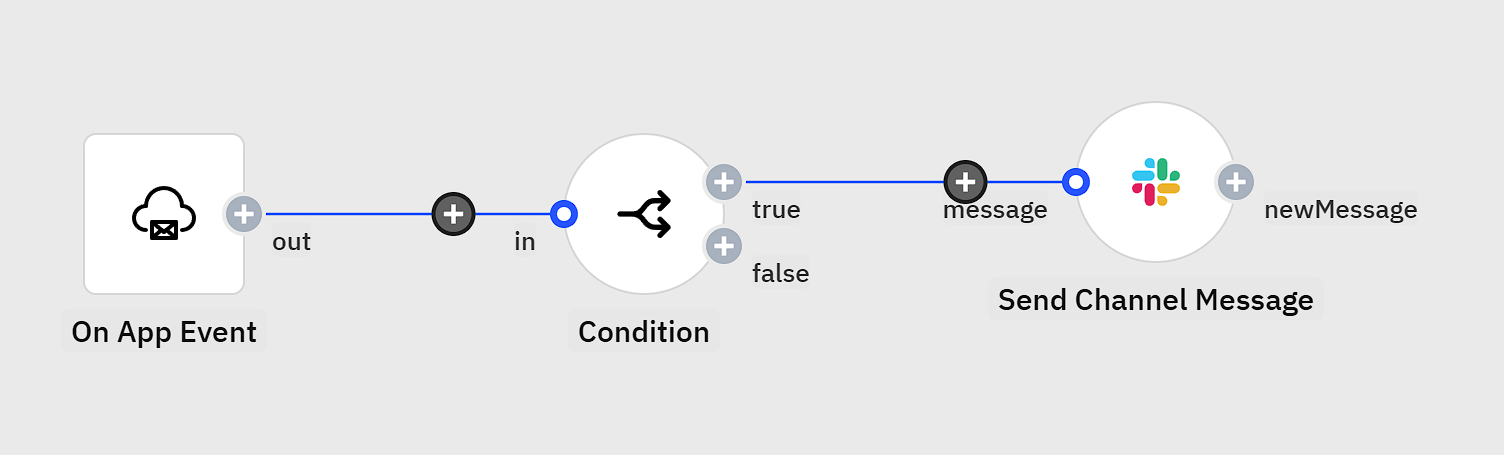
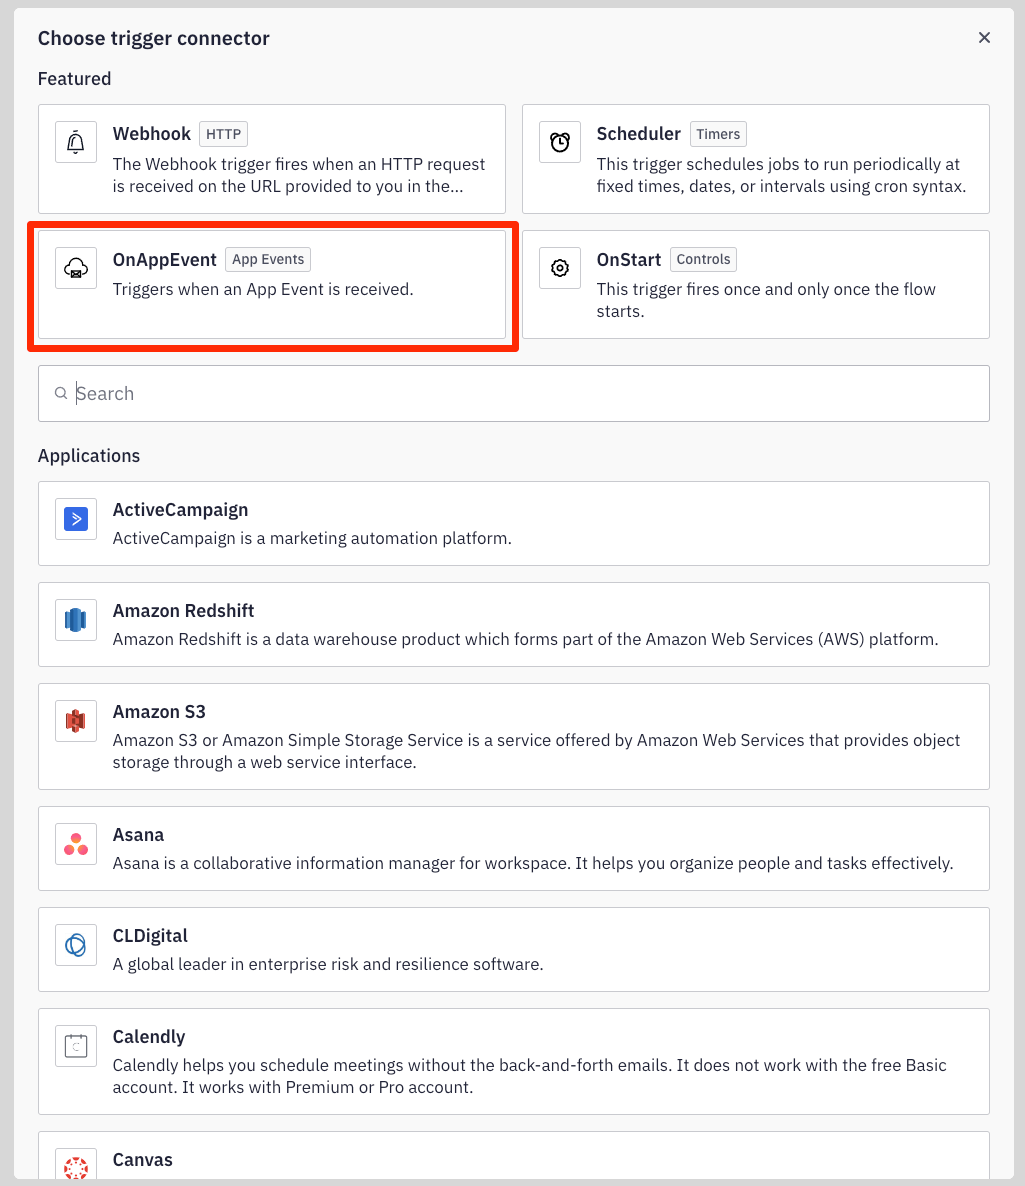
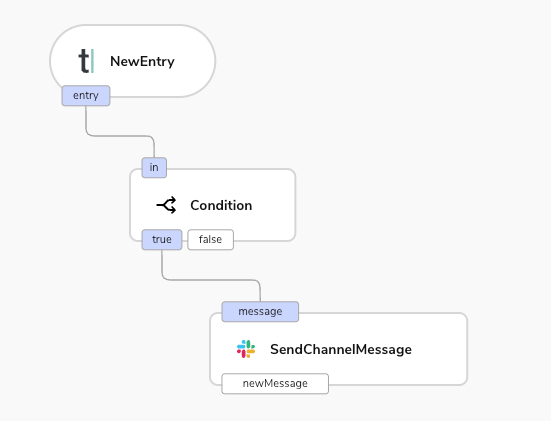
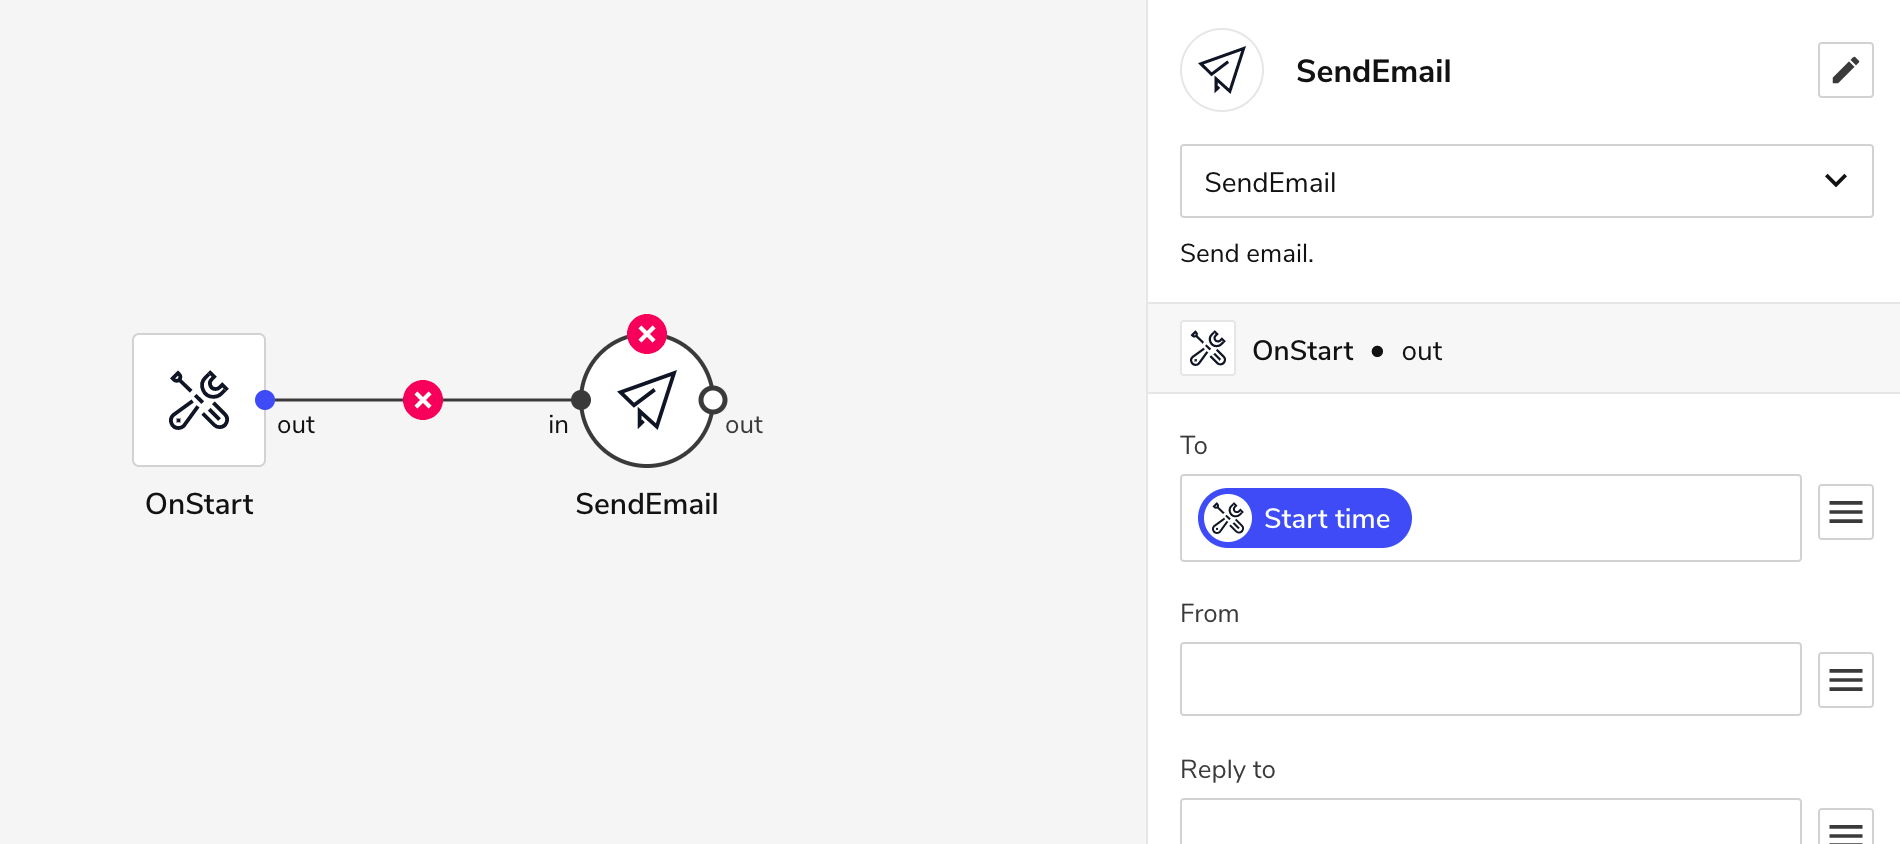
From the Templates page in the Build section, click the "New Template" button located in the top right corner. Then, select the OnAppEvent trigger from the Trigger selector. Utilizing App Events represents the simplest method for sending data to Appmixer.
You can also pick ready-to-use templates from our Get Started section on the Dashboard
Configure the OnAppEvent trigger by setting the Event name to contact-created.Use { "first": "John", "last": "Doe", "hotLead": true } as the Event Data Example. This data sample will enable us to reference the specific data fields later in the template workflow.
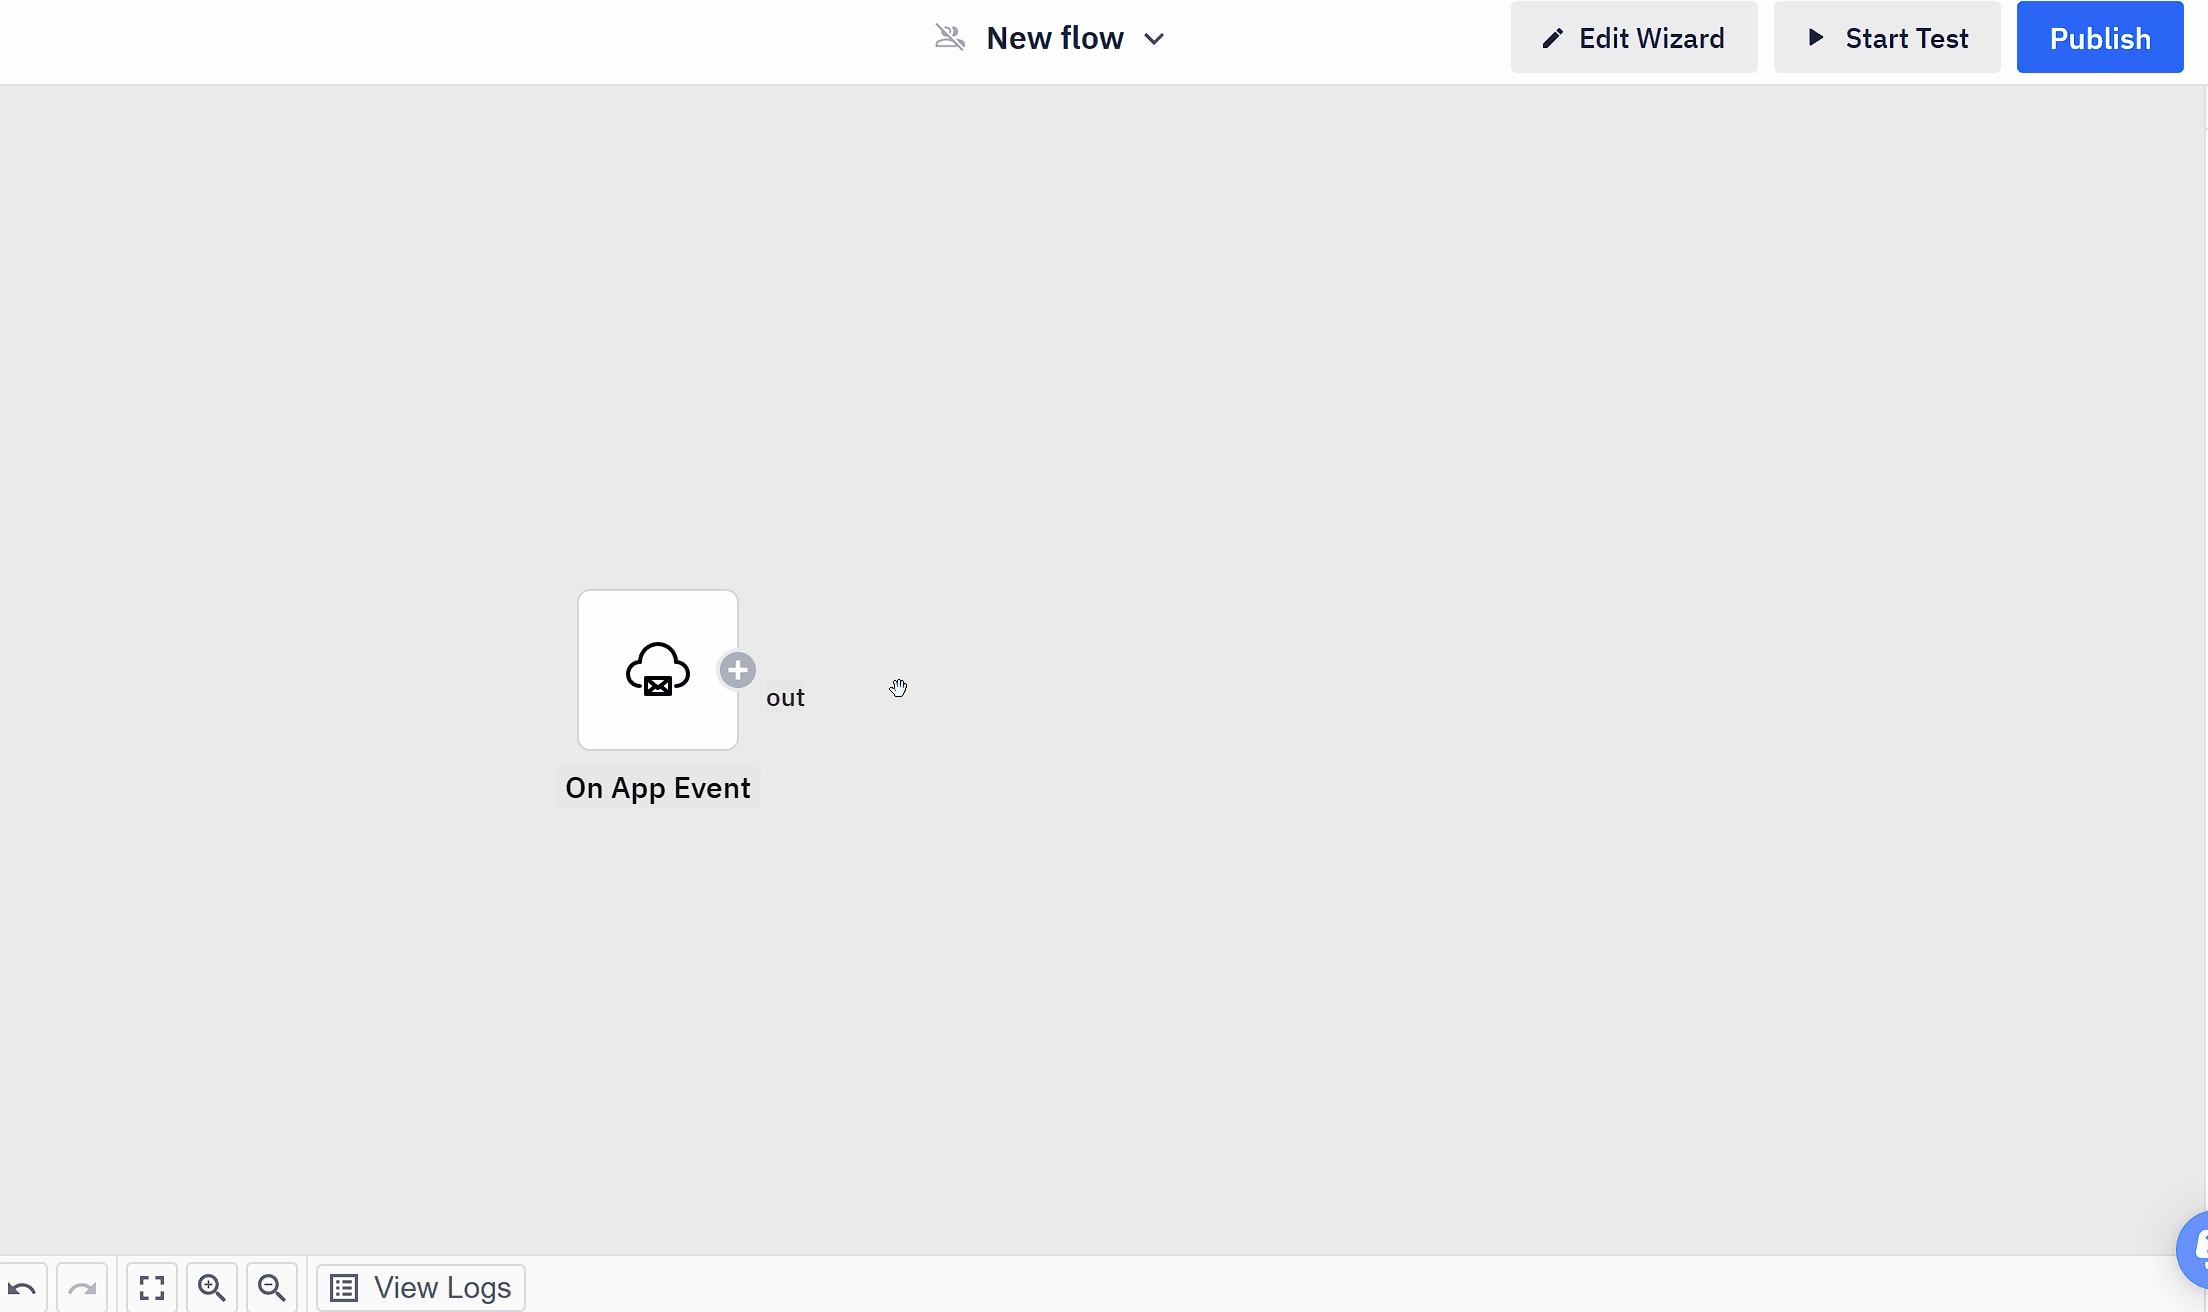
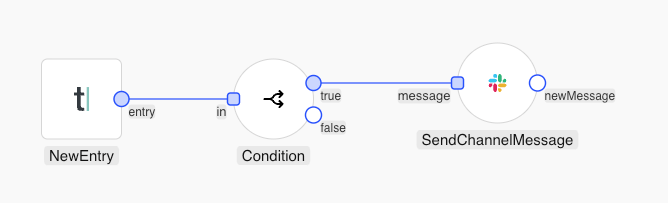
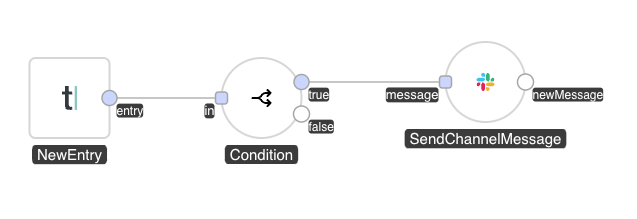
Next, add the Condition component to your flow. Do this by clicking Add Step on the right side of the On App Event component. Then type in "condition" and select it.
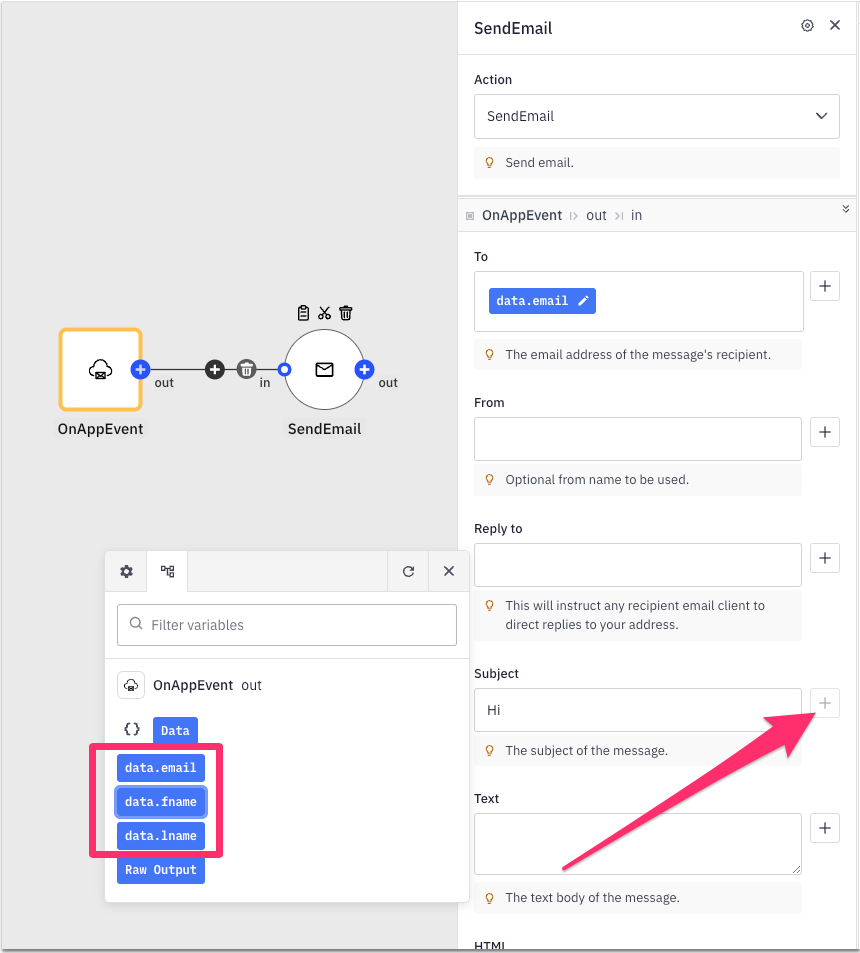
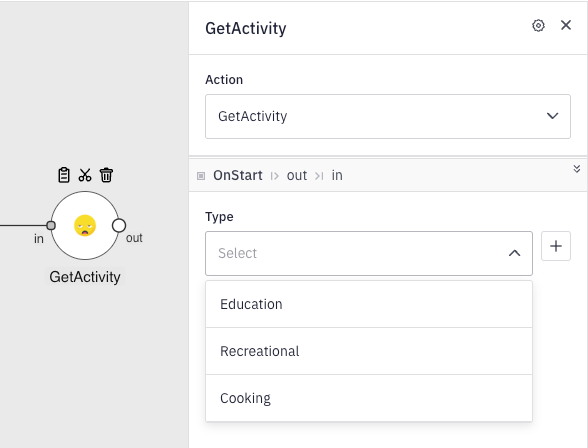
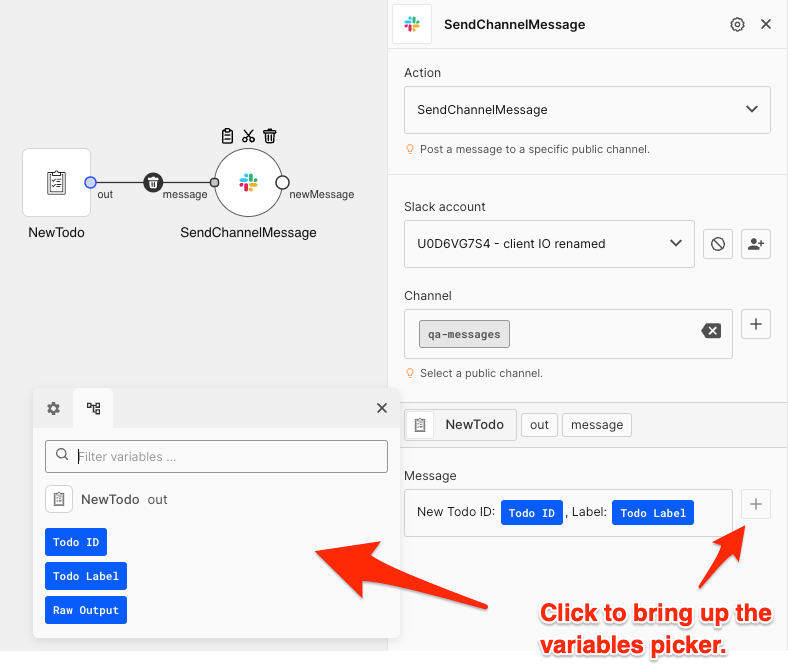
Configure the Condition component to check whether the hotLead property from the OnAppEvent trigger is set to true. Use the "+" button next to any configuration field. This feature allows you to reference data from any component earlier in the template flow (data variables), regardless of its depth in the workflow.
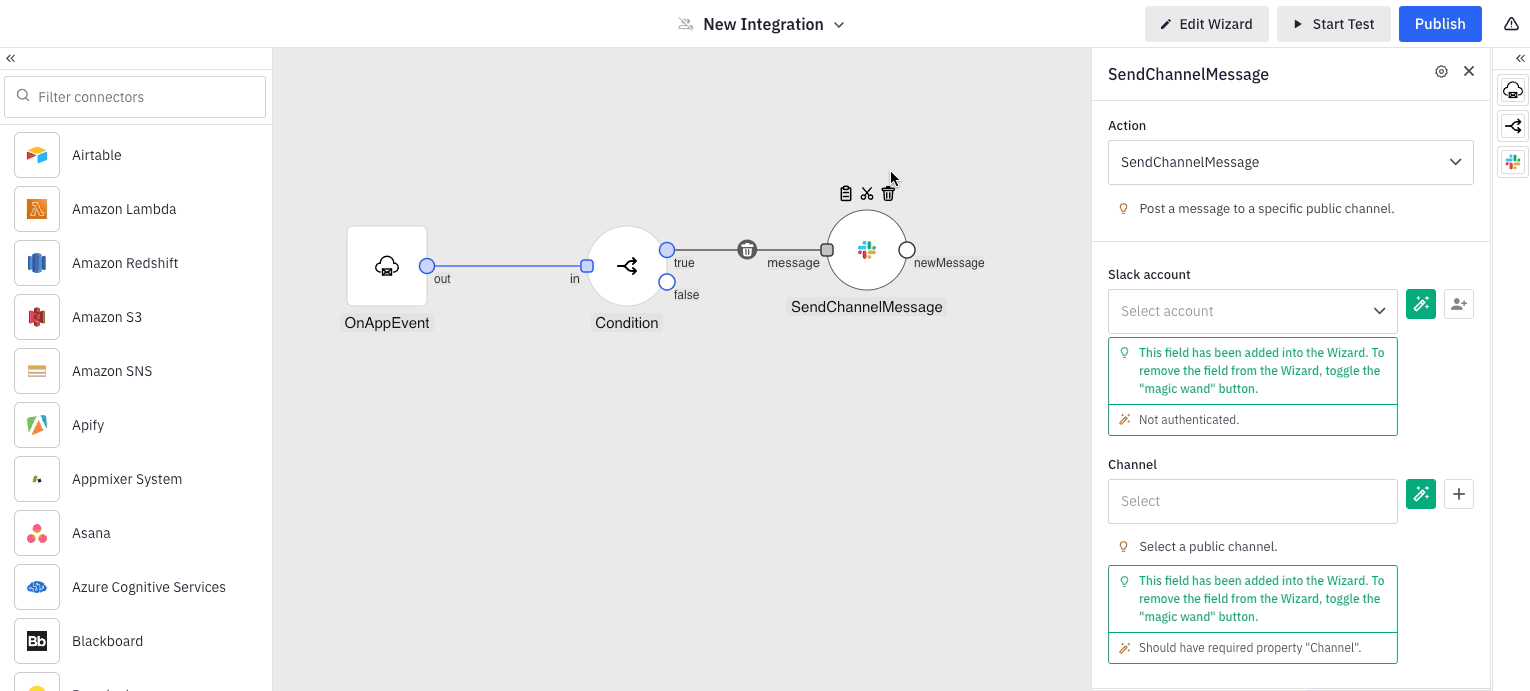
Next, click Add Step on the true output port of the Condition step. Then, find the Slack - Send Channel Message component:
Select Configuration Fields to Collect from your End-Users
The next step is to setup the Slack - Send Channel Message component. This component includes three configuration fields:
Slack account
Slack channel
Message
These fields should not be hardcoded by the template creator. Instead, they are intended to be customizable by the end-user. This means the end-user will authenticate with their own Slack account, choose their desired Slack channel, and tailor the message to be sent.
To allow end-users to configure fields, click on the Add to template checkbox next to each field. This will add the fields to the Configuration Wizard (the final product of this setup) for end-user customization:
Predefine values for your users
You can make it easier for your users by choosing default values for any field. To do this, simply enter a value into the field. For example, we'll set a default value for the "Slack message" field as seen on the screenshot above.
Apply data transformations
Additionally, you have the option to apply data transformations to any data variable. To do this, click on the desired variable, which will open the Modifiers panel. Here, you can define a sequence of modifiers that will be applied in the specified order once the automation template is activated and the data becomes available. For our scenario, we aim to transform the last name of the incoming contact to uppercase.
Finally, edit the name of the automation template:
Refine the template wizard
At this point, our automation template is ready - let's check the appearance of the final configuration web form (Wizard) as it will be presented to our end-users.
Click Edit Wizard to open the Wizard Builder dialog to:
Add and reorder fields
Setup custom labels, tooltips and placeholders
Set advanced options (more details below)
See a live preview of the wizard
Advanced wizard options
For each field, you can set advanced options. For account/authentication fields, you can also choose to share an account with the end-users of the template.
Share account with all template users
Use this option to share your account with the end-users of this integration template. This means that end-users will not connect their own accounts, but use the shared account used by the author of the template.
Hide tooltip
Use this option to completely hide the tooltip for a field in the wizard UI.
Disable variables
Use this option to prevent end users from adding data variables in a field.
Restrict variables
Use this option to define which components within the template will be available as a source of variables within that field, i.e. only allow users to map variables from a specific component(s).
Disable modifiers
Use this option to prevent users from applying data transformations to variables within that field.
For our template, you can for example rename the default "Channel" and "Message" fields within the wizard to "Slack Channel" and "Slack Message," respectively.
Test your Template
Next, proceed with a live test of the automation template. Click the "Start Test" button at the top of the page to initiate the template within your user context (as the template creator). This action will launch the Wizard in its defined state, allowing you to configure the necessary fields. Once the test of the automation template is activated, you can put yourself in the shoes of your users and test it.
With our test currently running, you have the ability to manually initiate the OnAppEvent trigger. This is achieved by sending a custom App event to the active test automation. To do this, click the "Test" button located at the top of the interface, which will open the Test menu. From here, choose "Send App Event." For the Event name, enter "contact-created," and for the Event Data, use an example such as { "first": "John", "last": "Smith", "hotLead": true }. After submitting the event, monitor your Slack channel to verify that the contact information has been successfully posted.
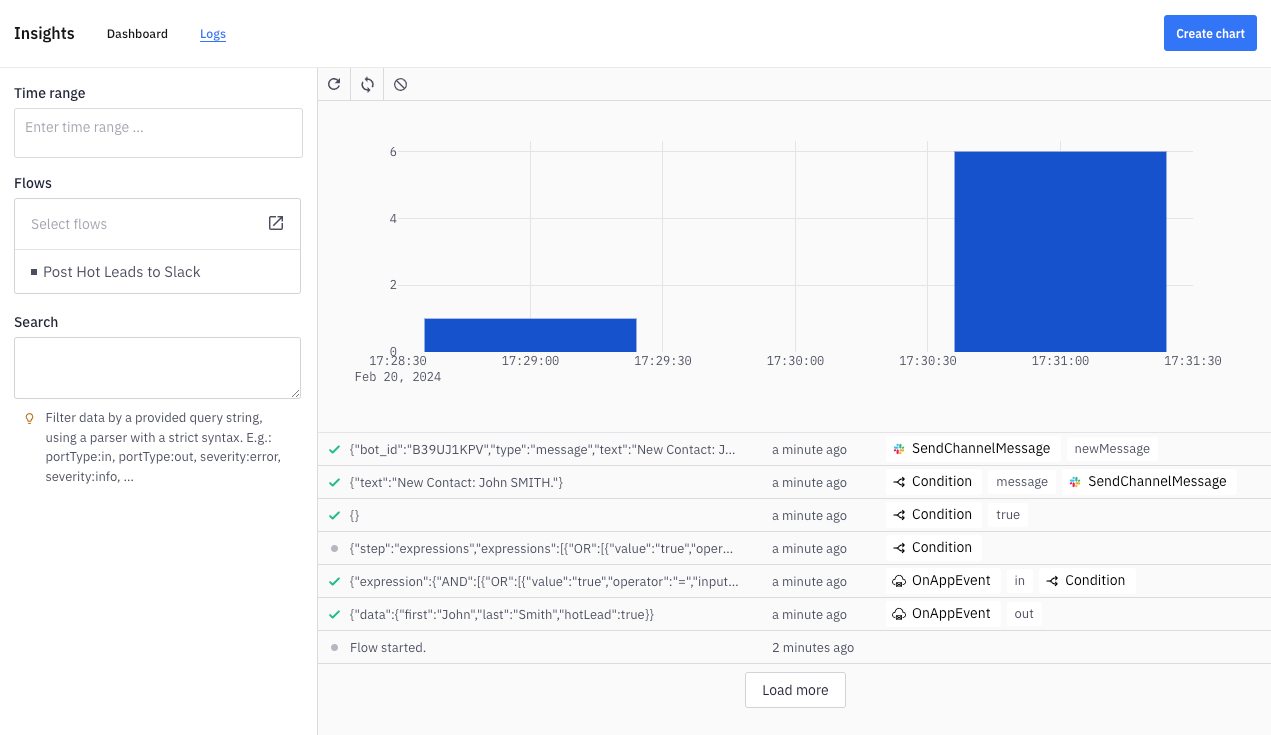
Additionally, you can view the activity of your running test template by navigating to "Test" and then selecting "Insights" from the menu:
Publish your Template to your End-Users
Now that your template is ready and has been thoroughly tested, you are all set to publish it for your end-users. Click Publish on the right side of the upper toolbar.
Set target users
You can publish a template to all your users, or uncheck the All users option and choose from these options:
User
Scope
Domain
Update existing instances
Check this option to push your update to existing instances, i.e. end-user automations created from your template. For this option, you can also set if in-progress data should be kept or deleted for running instances.
Please note that it is not possible to force updates that would touch end-user configuration, i.e. values and variables in configuration fields.
Preview the Template
Please note, if Appmixer has not yet been embedded into your product, you can easily open a preview of the Automation Hub by clicking the Preview button in the Templates section or on the Dashboard.
Build and Run an Automation
This tutorial is designed to walk you through the process of building your first automation. Whereas integrations consist of predefined workflows that end-users can easily activate via a web form, automations are a powerful tool for enhancing your internal business operations. They allow you to link applications and services used within your organization or to launch bespoke business logic that meets your unique requirements.
Automation Overview
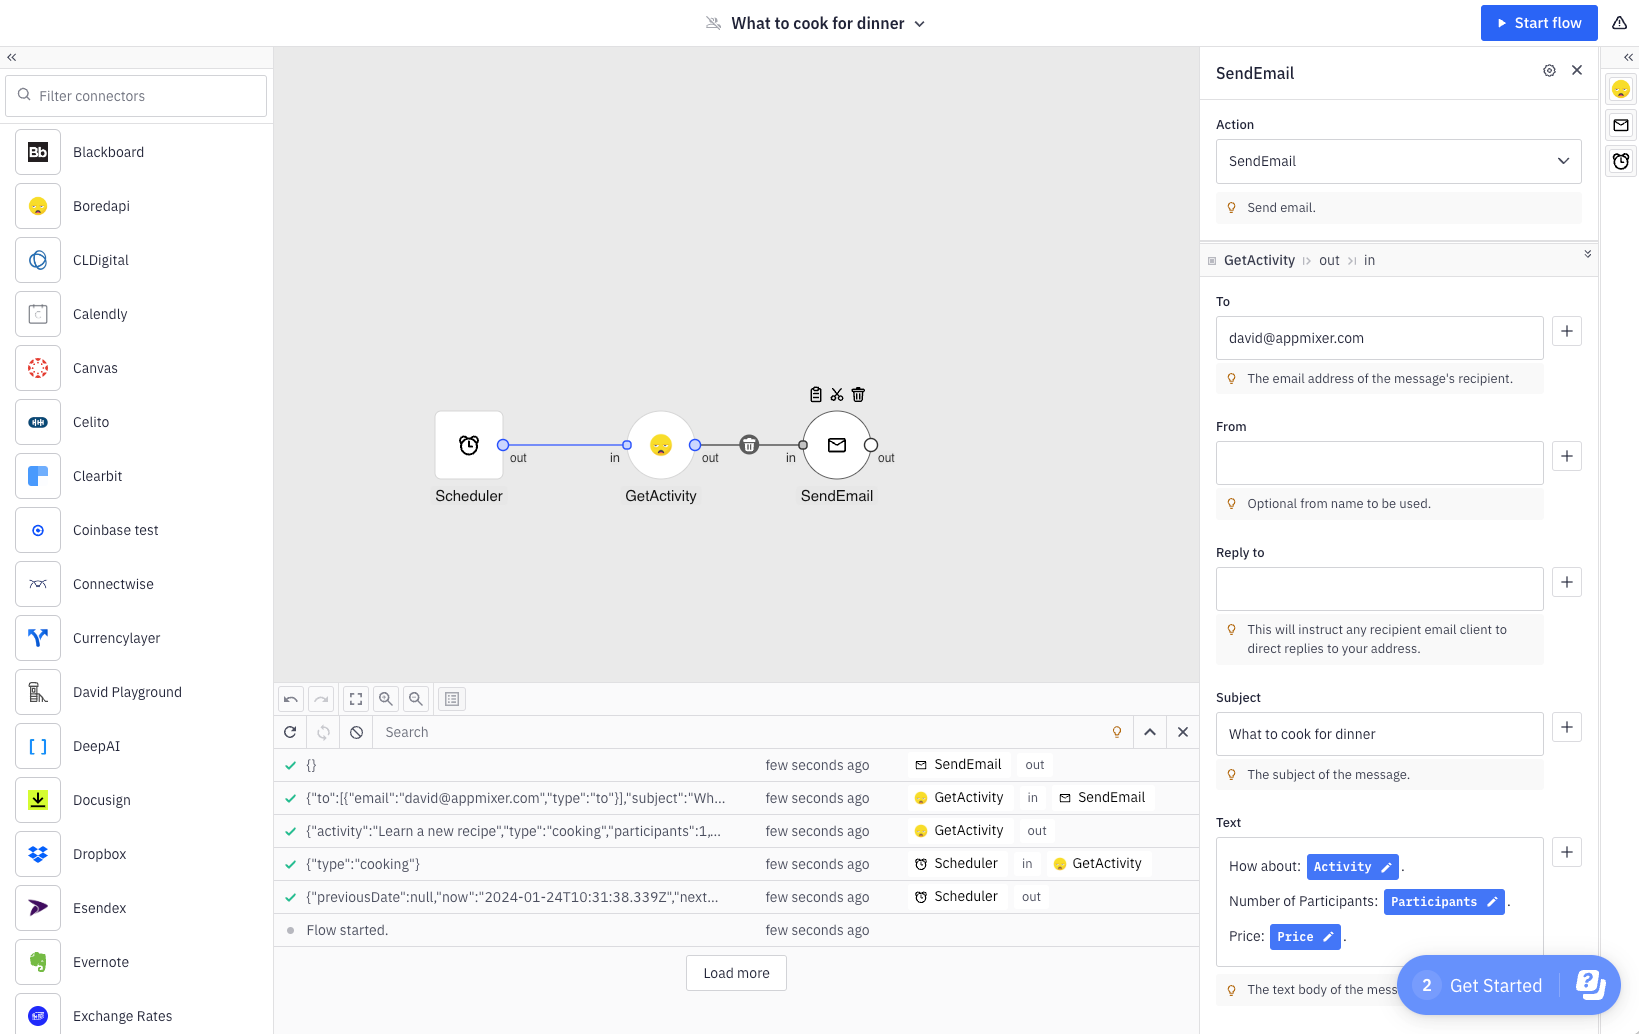
In this tutorial, we'll construct an automation designed to gather customer feedback via Typeform, relay each piece of feedback as a Slack notification, and automatically generate a GitHub issue based on the customer's response to the question: "What improvements or additional features would you like to see in future updates?". Utilizing OpenAI's ChatGPT, the generated ticket will be structured as a comprehensive user story, encompassing title, role, goal, reason, acceptance criteria, and test case.
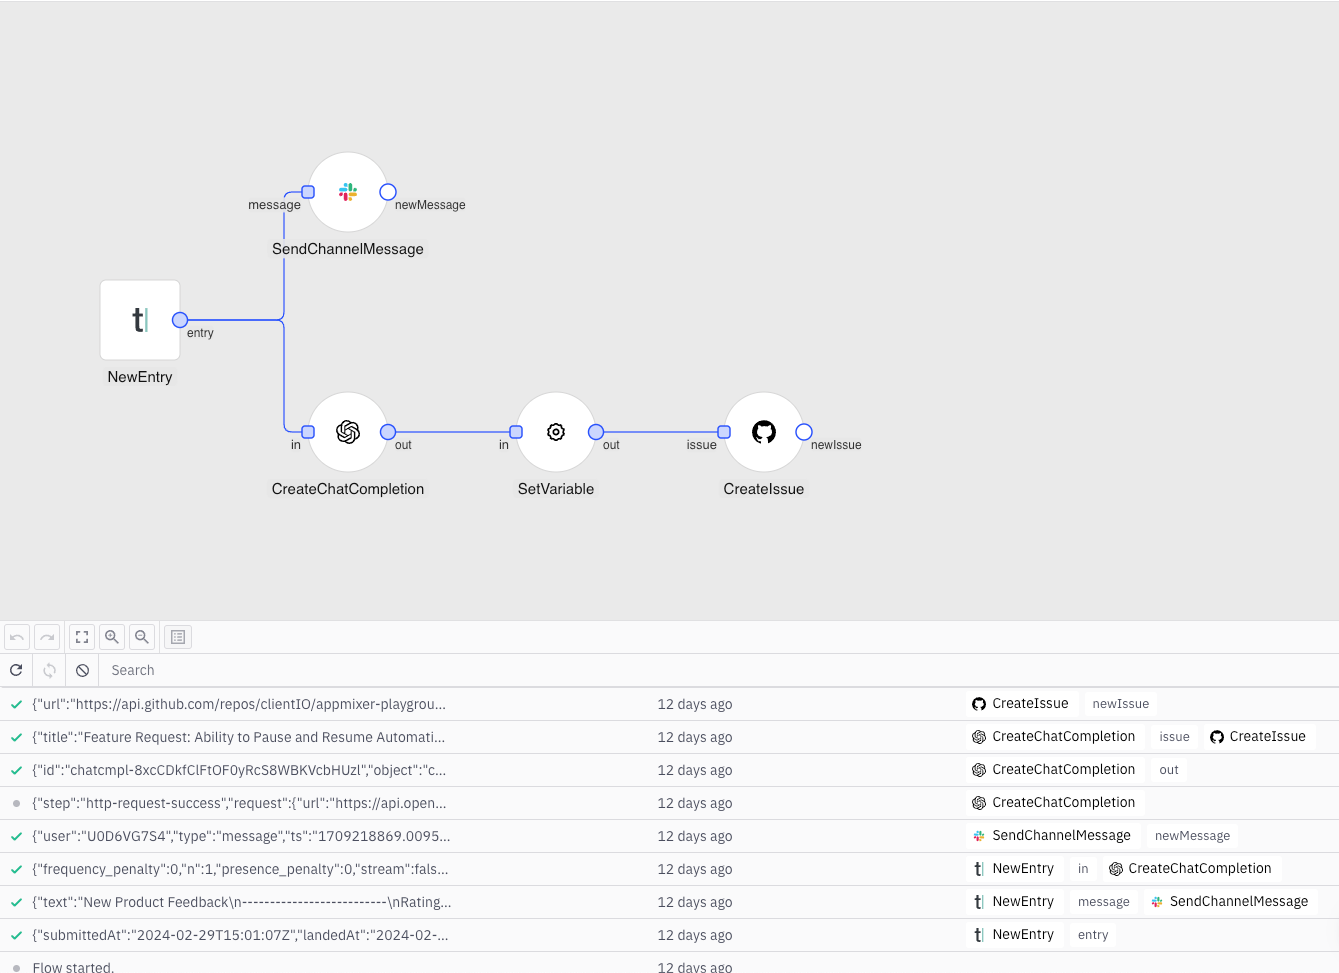
Let's delve into the specifics of the automation flow:
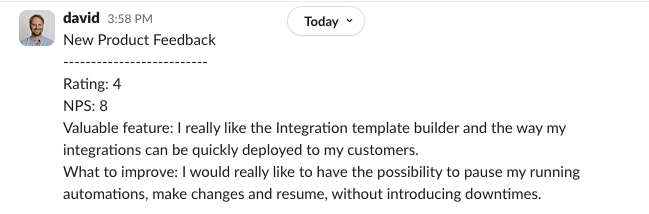
Here's the first piece of customer feedback collected through our Typeform:
As a consequence, we received a notification in Slack:
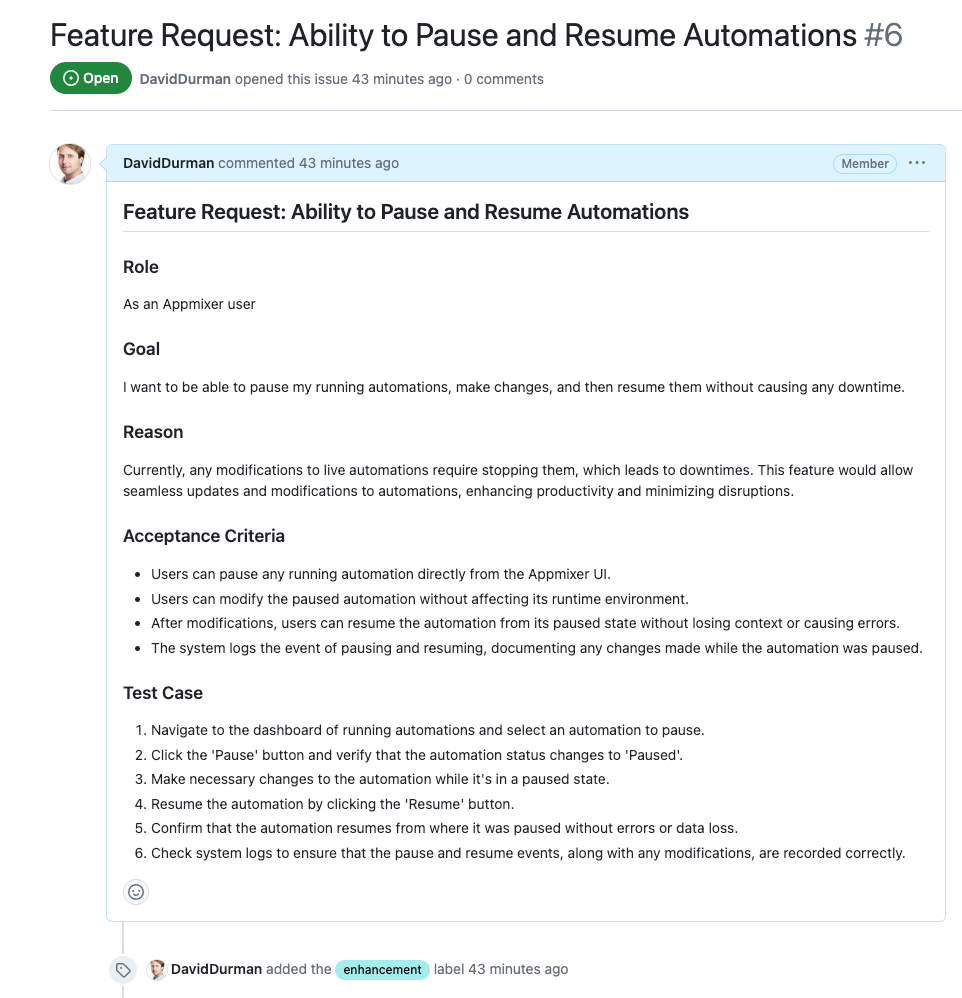
Furthermore, a new GitHub Issue was created containing this content:
A Step-by-step Guide
The upcoming sections will walk you through the steps required to build the aforementioned automation from start to finish.
Select a trigger
Every automation begins with a trigger, which initiates the automation flow. Typically, triggers can capture data from external sources—like a Webhook trigger or a Gmail - New Email trigger—or they can be based on time events, such as a Scheduler or Timer. This setup allows you to program your automations to run at predetermined times, for instance, "every day" or "each week on Monday at 2pm". A unique trigger type is the "On Start" trigger, which activates immediately when your automation flow is started. This is particularly useful for batch operations that you intend to run only once or for debugging purposes.
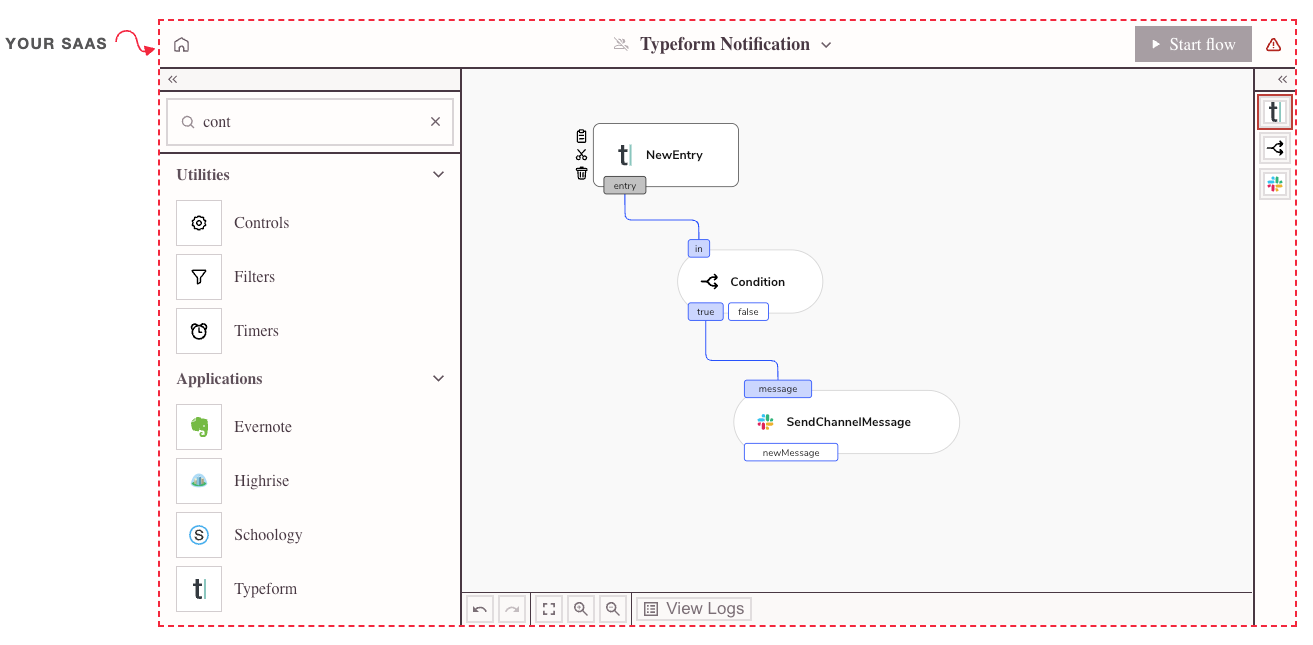
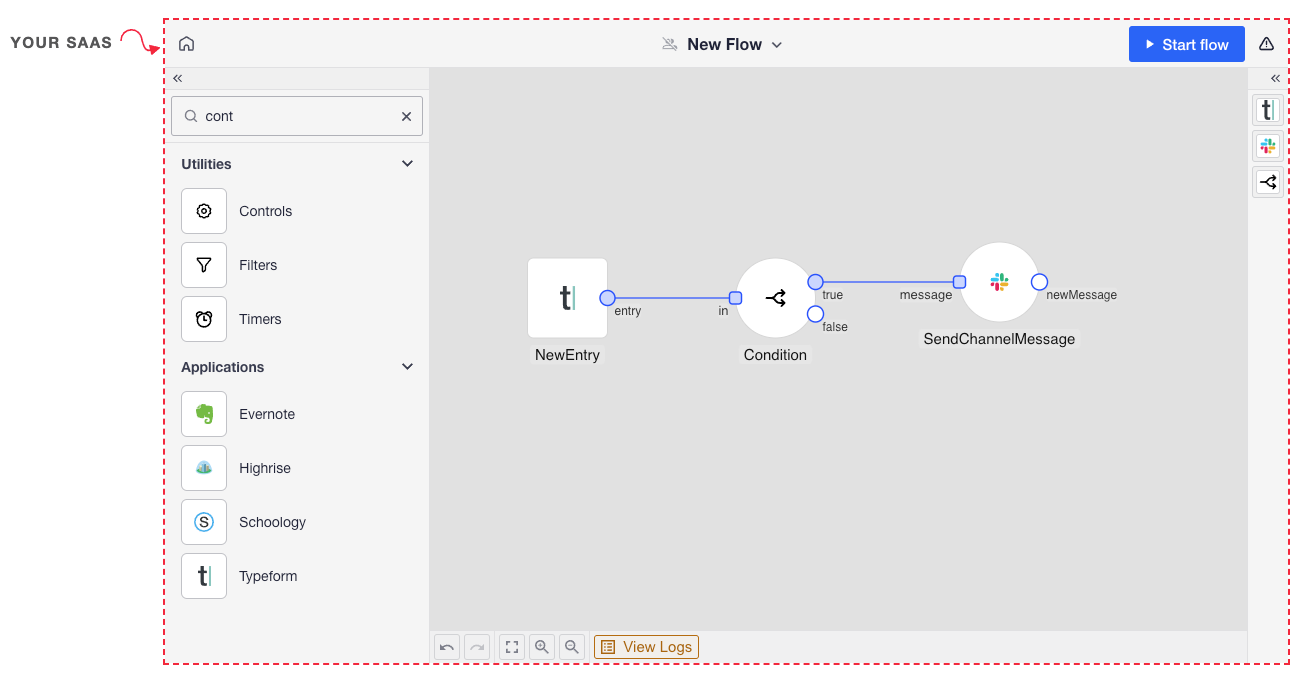
To start building an automation, go to the Automations page and select "Create Automation". This will lead you to the Automation Designer. The first item you'll encounter there is the Trigger Selector. Look up "Typeform" and choose the "New Entry" trigger.
Select a trigger in your Automation
In the Configuration Inspector on the right, authenticate with Typeform and select one of your forms:
Authenticate and configure your trigger
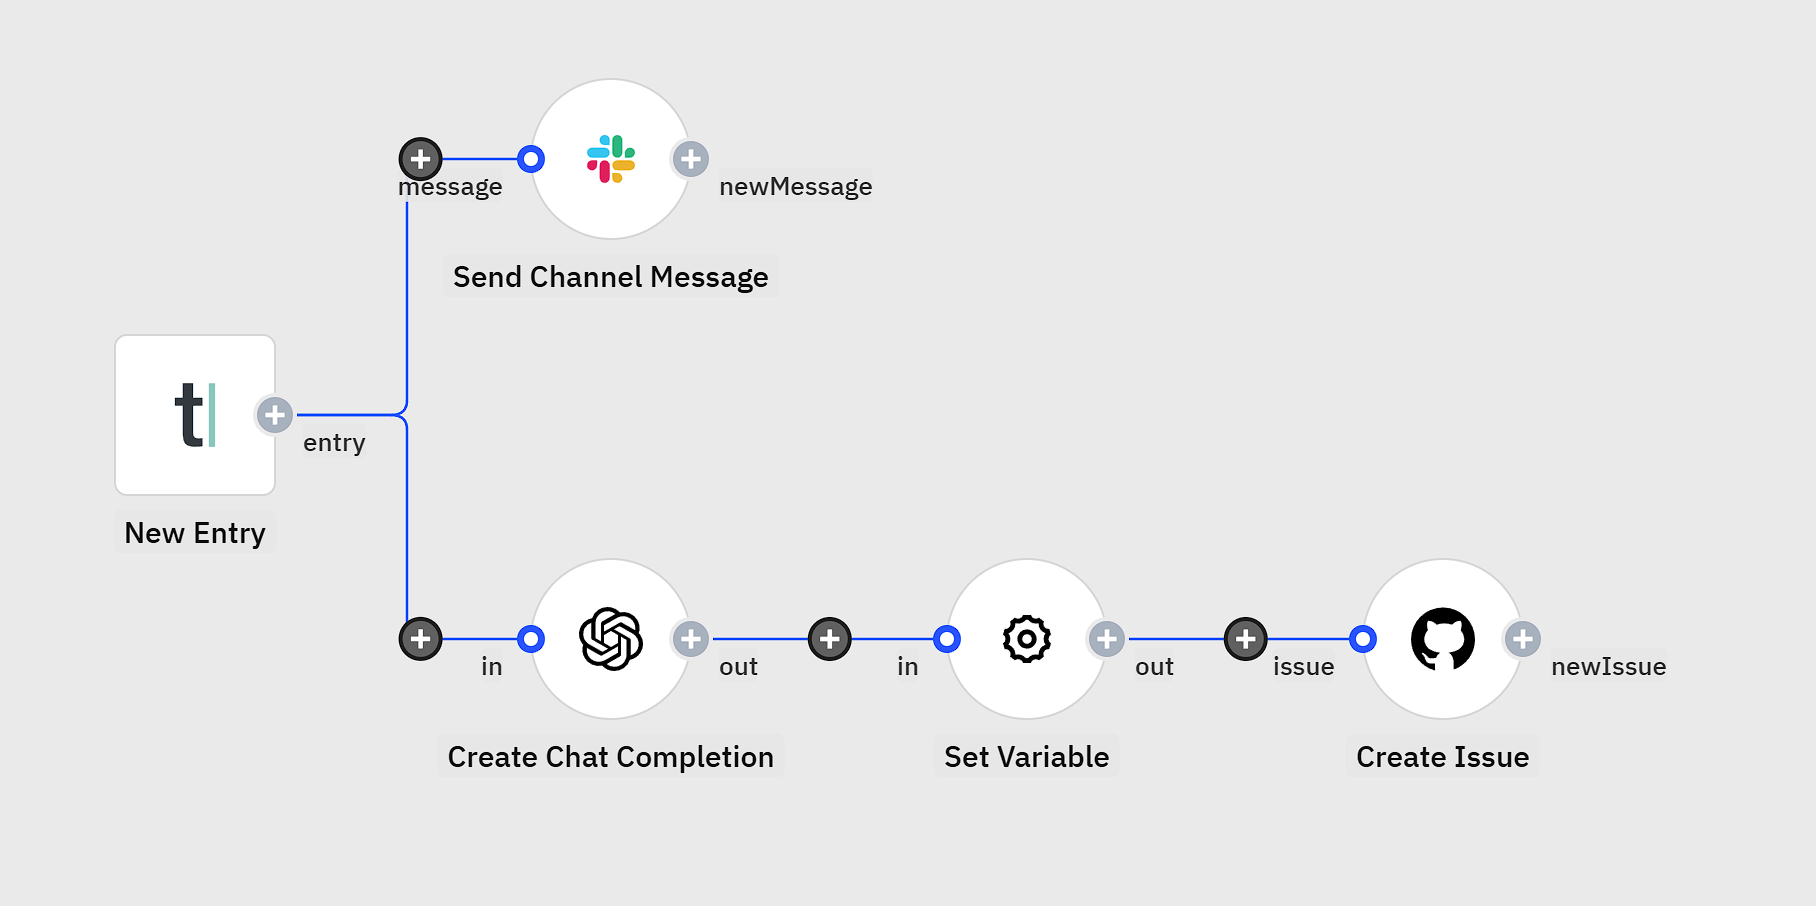
Add Actions
Click Add Step on the side of the New Entry trigger and find Slack. Pick the Send Channel Message action. Authenticate with your Slack account and select a Slack channel to direct your notifications:
Click the "+" button next to the Slack message field to include data placeholders for each Typeform question. These placeholders will be substituted with real data once the automation executes and retrieves customer feedback from Typeform:
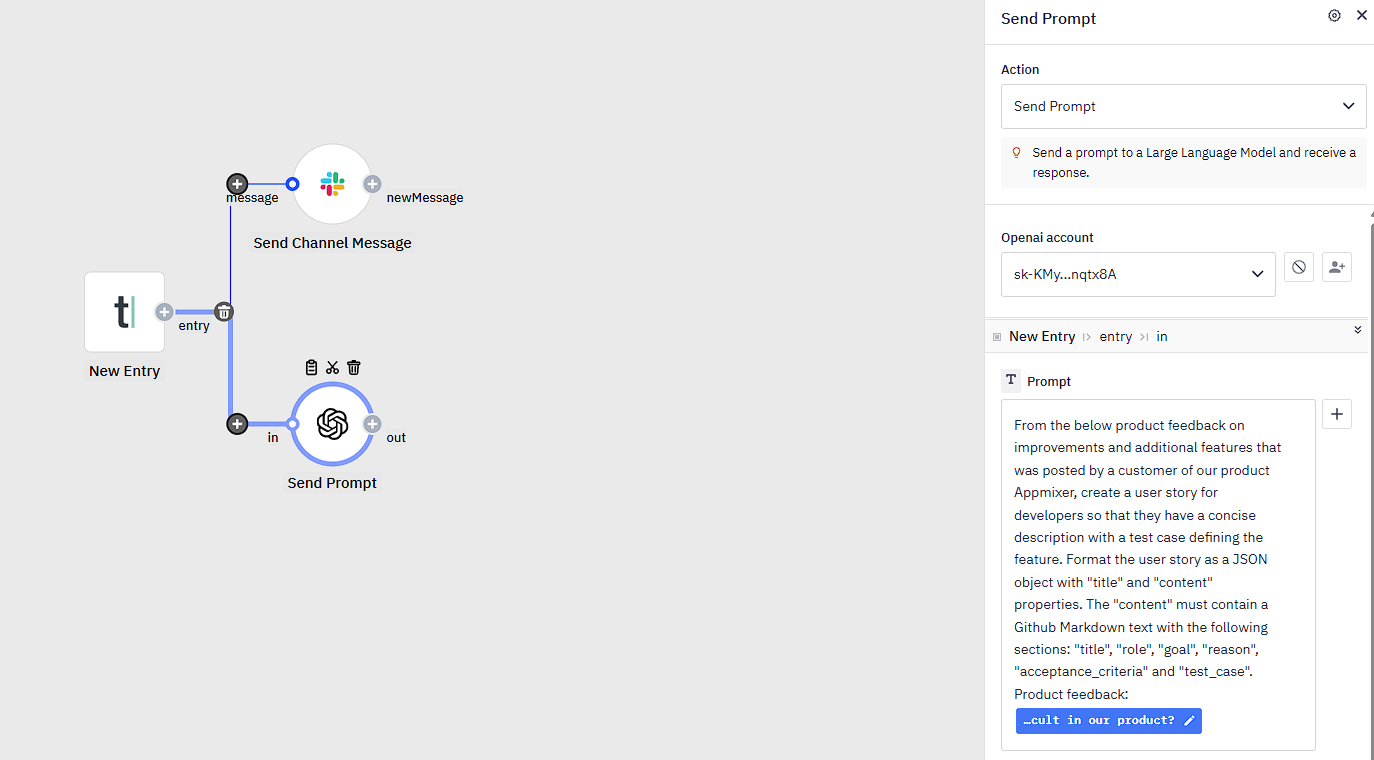
Similarly, add the OpenAI - Send Prompt action. Configure the model, set the response type to json_object, and define the prompt as follows:
You can copy paste the prompt from here: From the below product feedback on improvements and additional features that was posted by a customer of our product Appmixer, create a user story for developers so that they have a concise description with a test case defining the feature. Format the user story as a JSON object with "title" and "content" properties. The "content" must contain a Github Markdown text with the following sections: "title", "role", "goal", "reason", "acceptance_criteria" and "test_case". Product feedback: <map your data variable from the form here>
The goal is to have ChatGPT generate a JSON comprising two fields: "title" and "content." This JSON will then be seamlessly integrated into the "Github.CreateIssue" action. The structure of our output JSON should resemble the following:
Create new variables and transform data with Modifiers
When your automation flow includes a component that outputs data you need to alter and then utilize the modified data across various configuration fields, employing the Control.SetVariable component proves beneficial. This component enables you to define custom variables, which can subsequently be referenced by name in other linked components. This approach is particularly advantageous when you aim to use transformed data in several locations, as it obviates the need to replicate the same modifications for a single variable across multiple fields.
In our scenario, we intend to capture the output of the ChatGPT completion (ChatGPT's response) in a variable named result. This allows us to conveniently reuse this data for both the title and description fields when we're ready to create our GitHub issue.
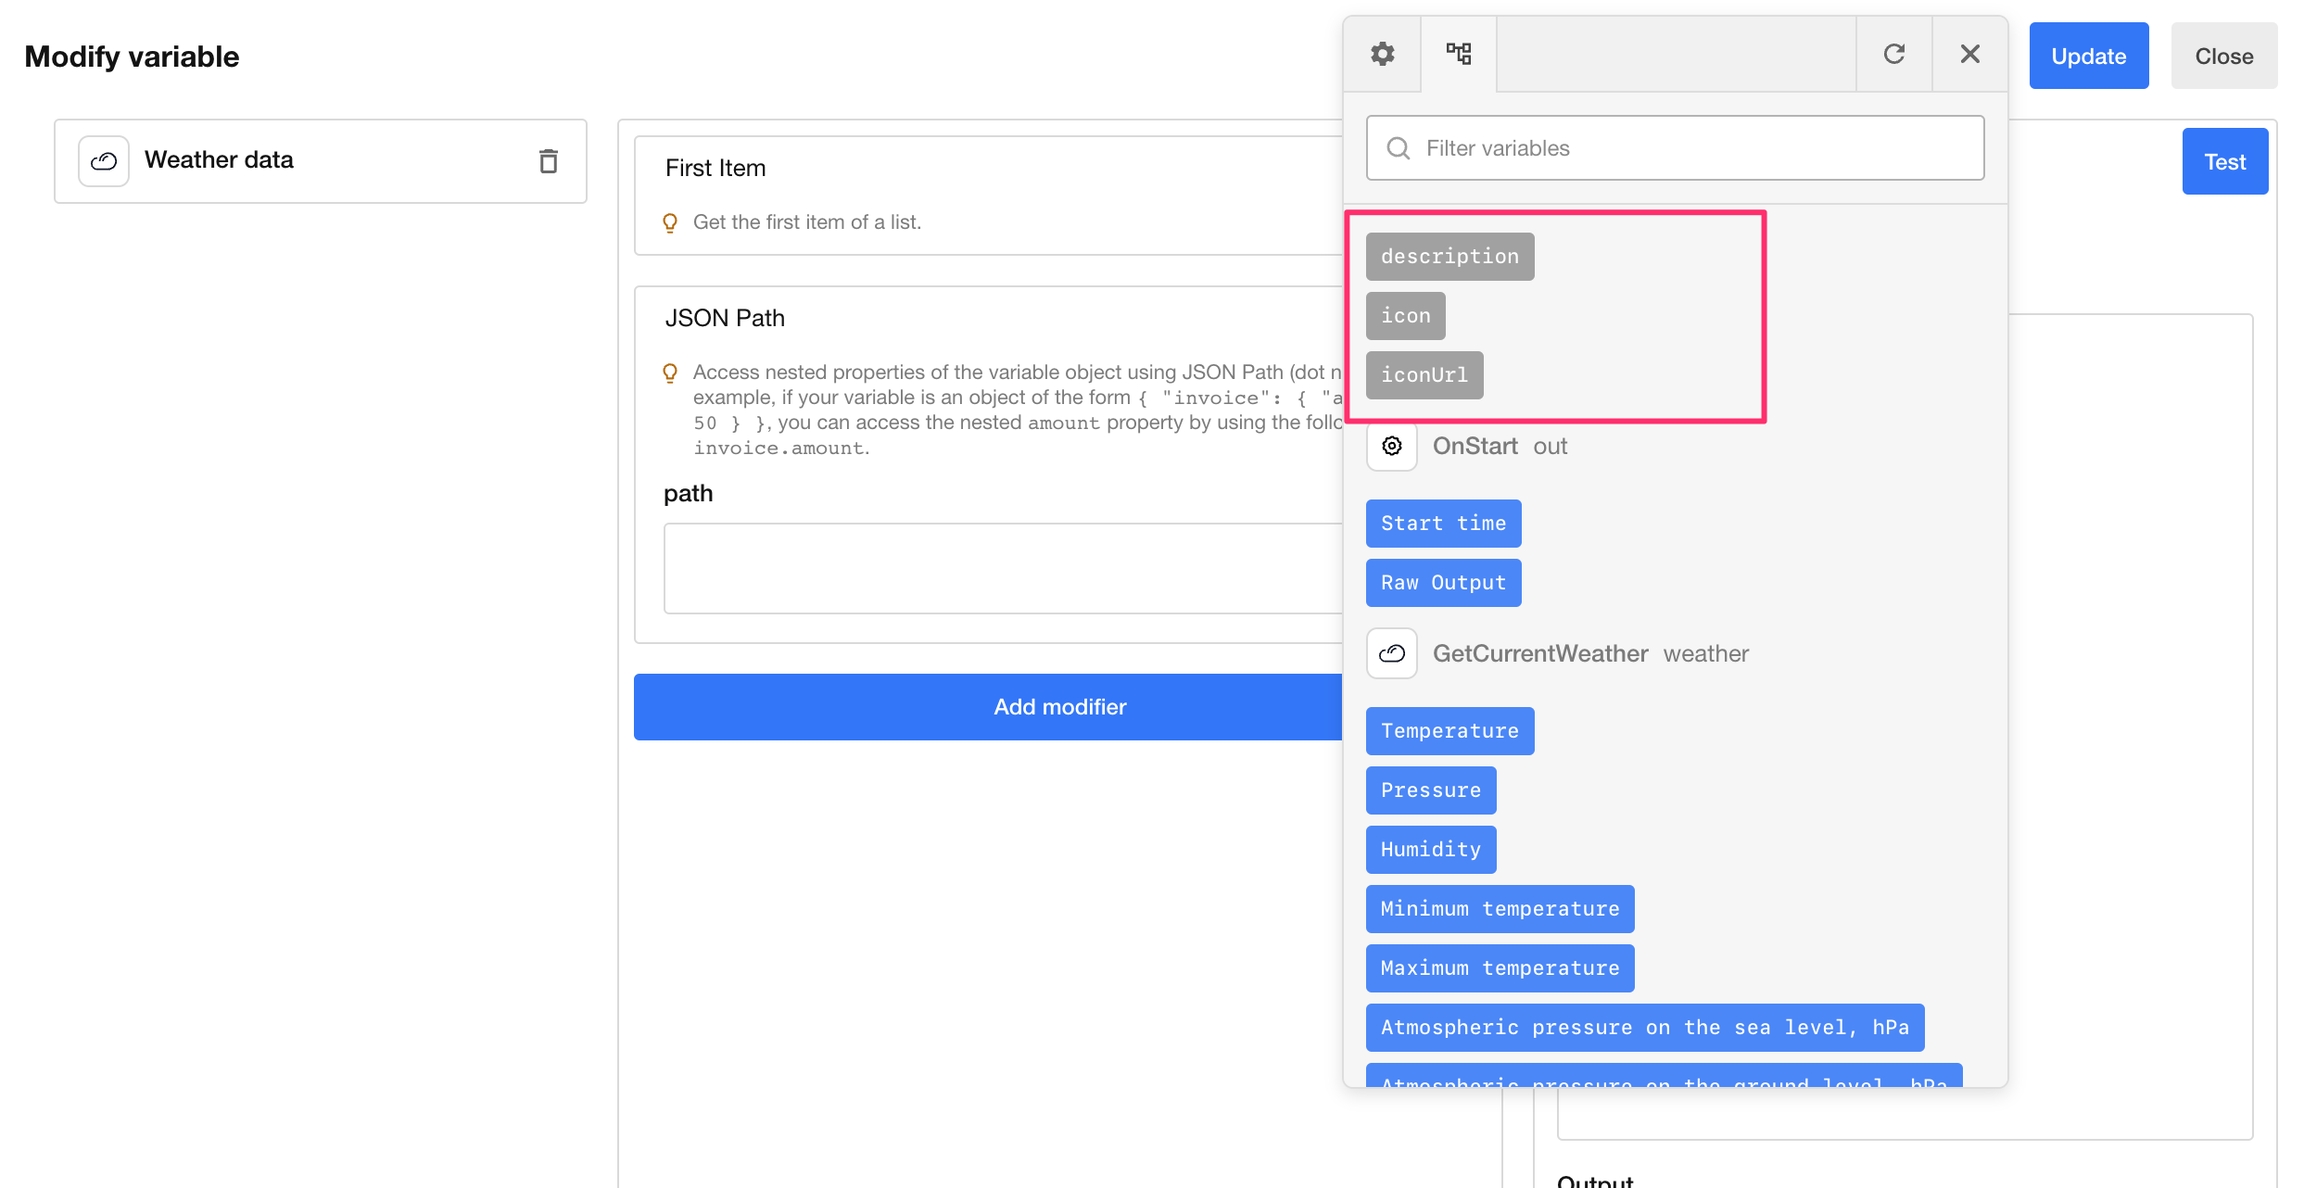
Given our interest in only the first choice, and considering that the message content of this choice is a JSON string (as specified in our prompt to ChatGPT), we need to manipulate the Choices variable to extract our desired JSON. To transform data within Appmixer, simply click on a variable to access the Modifiers panel and then sequentially apply the necessary modifiers, akin to how formulas are utilized in an Excel sheet. In our case, we will employ the sequence of modifiers: First Item -> JSON Path -> Parse. This sequence will allow us to select the first item from the Choices list, extract the message.content from this item, and finally parse the message.content into a JSON object for later use. It is crucial to note that ChatGPT outputs a JSON string, not a JSON object, necessitating the Parse modifier to convert the text into structured data.
Finalize our Workflow Automation
The final step involves creating a GitHub Issue using the title and content (in Markdown) generated by our AI. Navigate through the interface to locate the GitHub connector, then drag and drop it onto the canvas. Select the "CreateIssue" action and assign response.title and response.content (the JSON fields generated by ChatGPT) to the corresponding fields within the "Github.CreateIssue" action. As an additional step, choose the "enhancement" label from the selection box to categorize our GitHub issues as enhancements.
Start and Monitor Your Automation
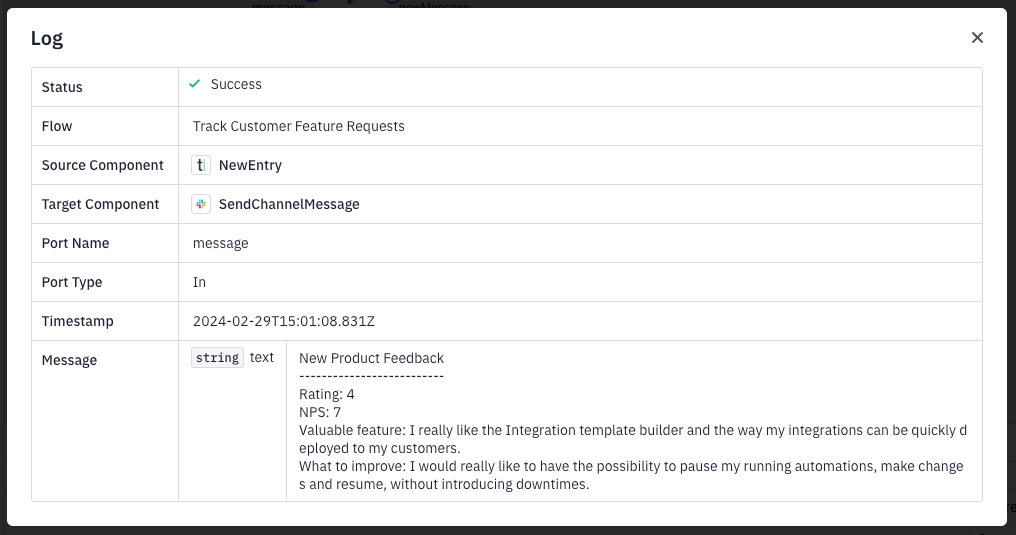
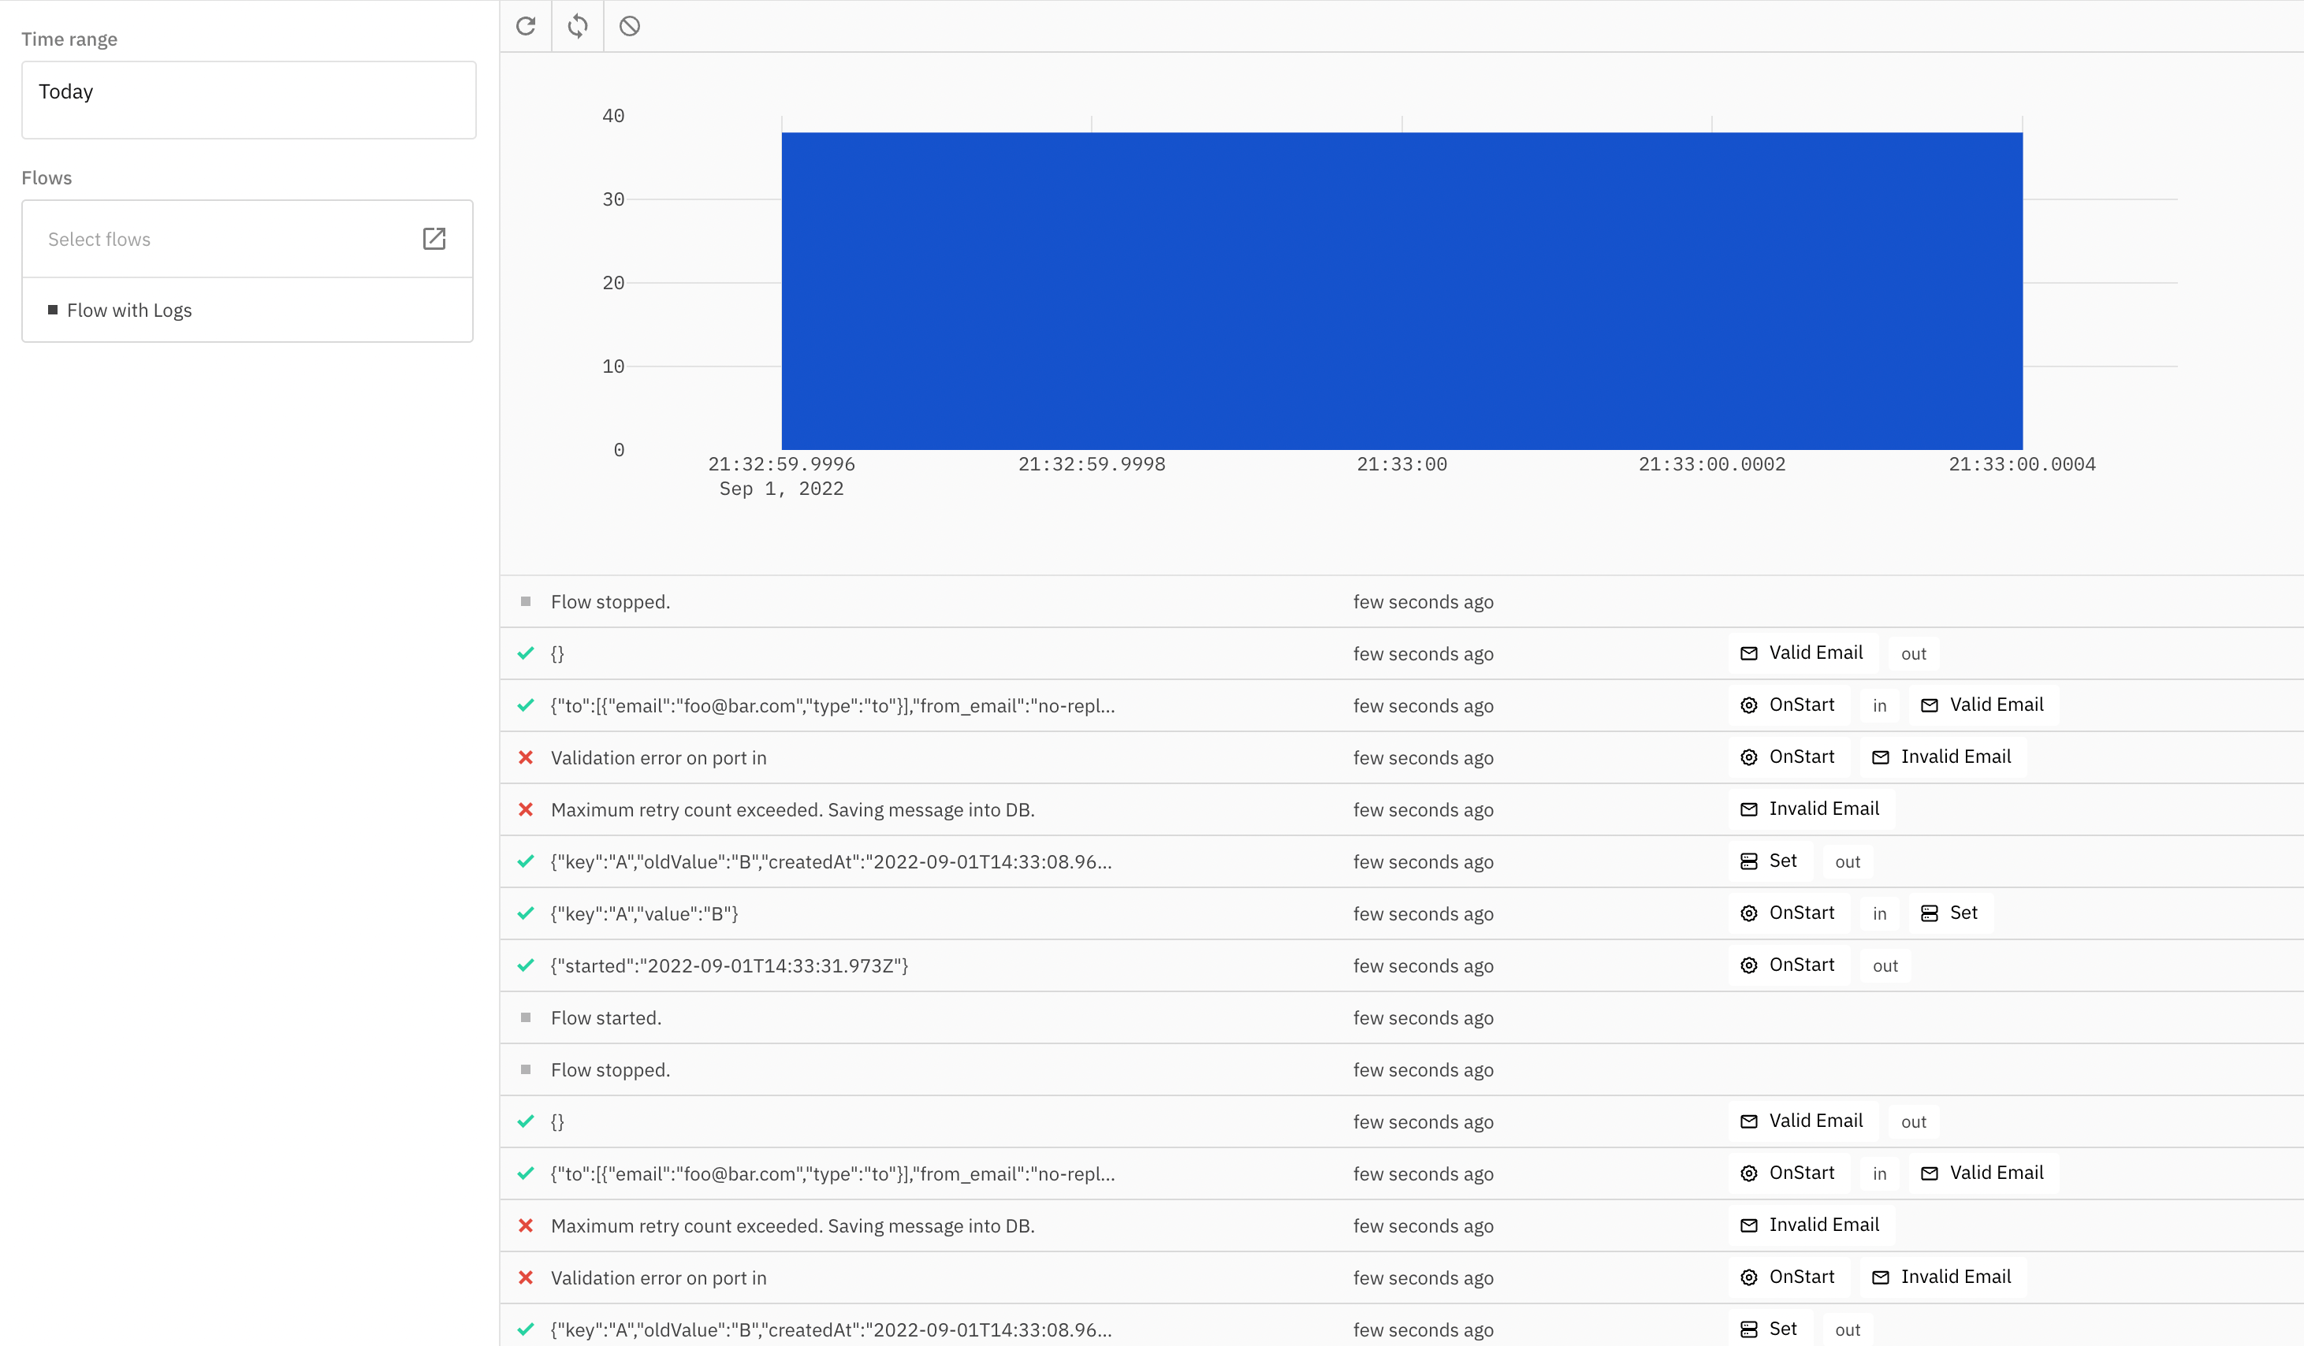
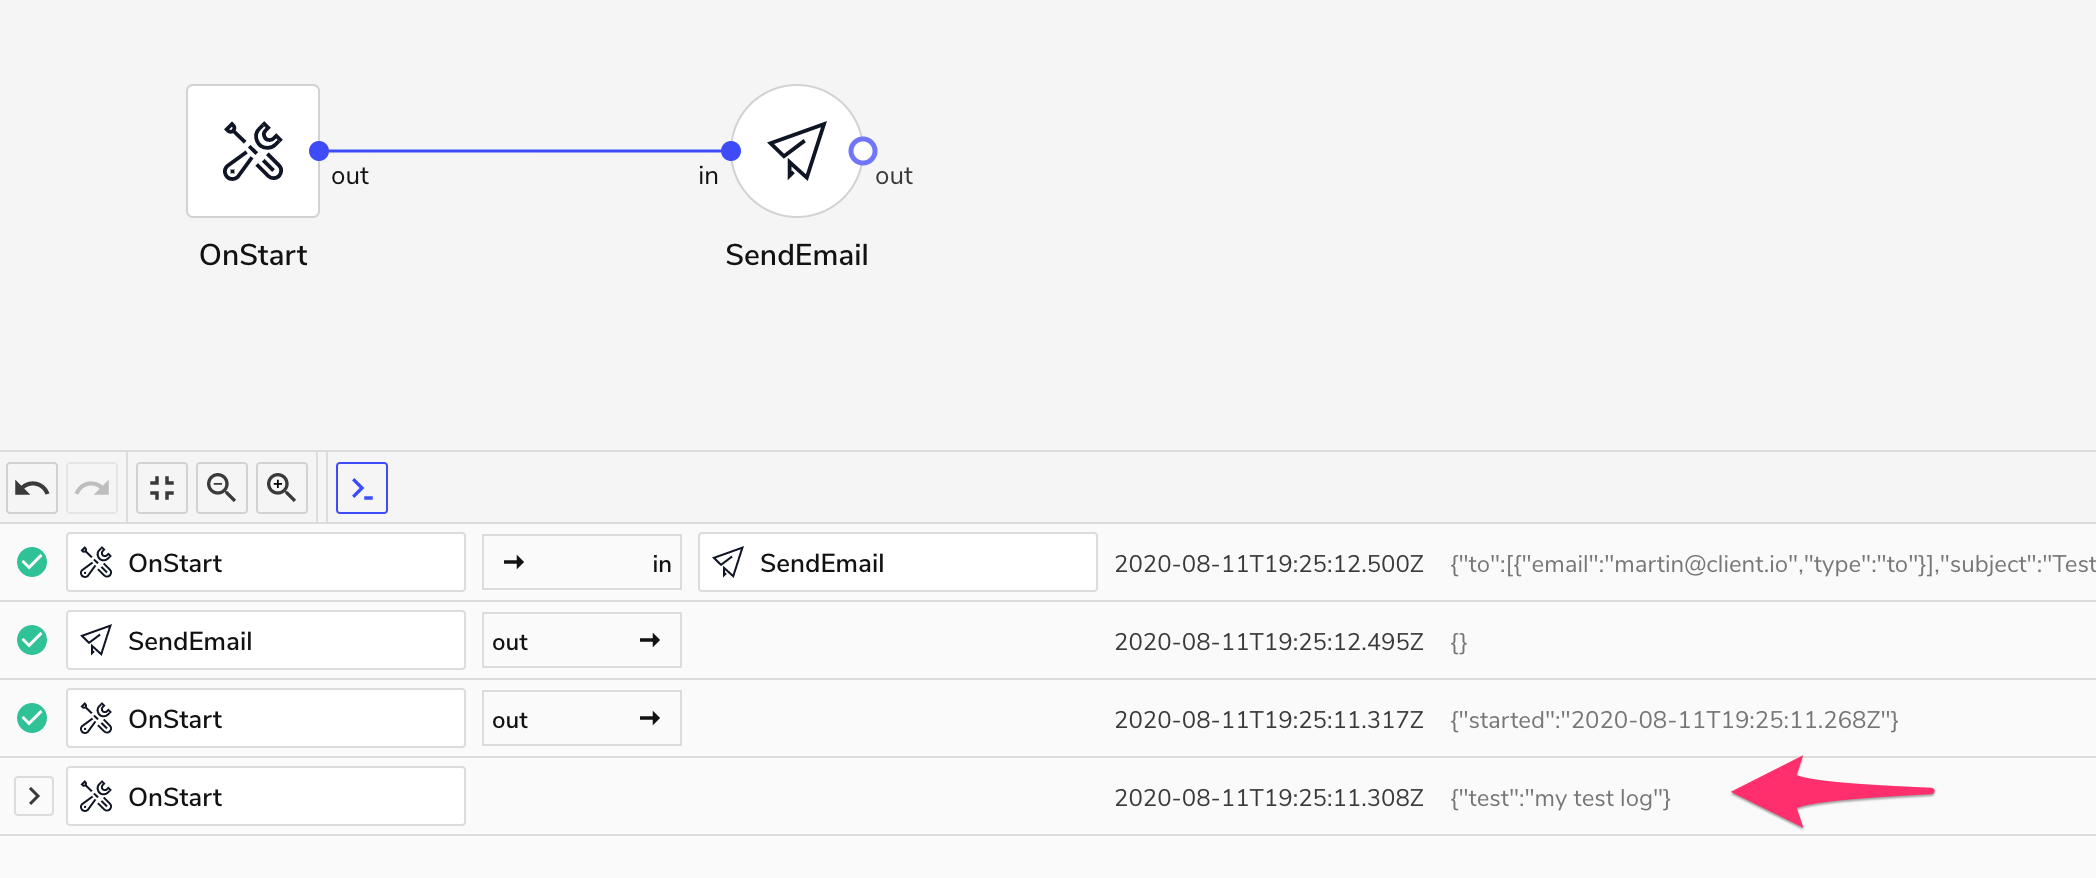
Your automation is now set up and ready to be launched. Begin by giving it a distinctive name; this can be done by double-clicking on the default "New flow" title and renaming it to something more descriptive, like "Track Customer Feature Requests". To activate your automation, click the "Start flow" button located in the top right corner. You'll notice the log panel opens at the bottom displaying the initial log entry: "Flow started". As customer feedback starts coming in through our Typeform web form, the log panel will populate with entries detailing the actions taken within the flow. These logs provide insights into each component's input, the data transmitted between components, and the output generated, offering a comprehensive view of the automation's operation:
Clicking any log entry will reveal a panel that offers additional details.
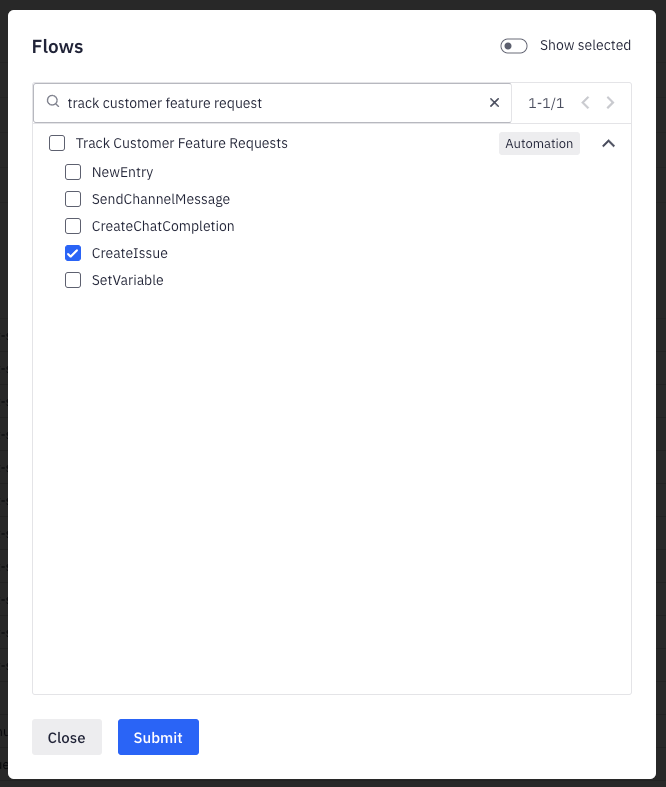
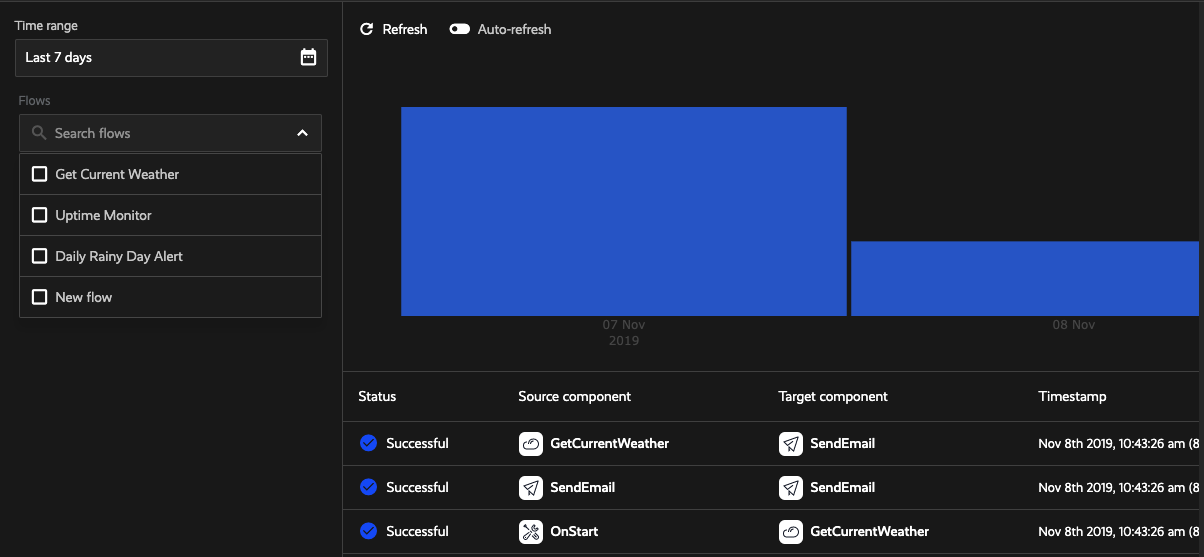
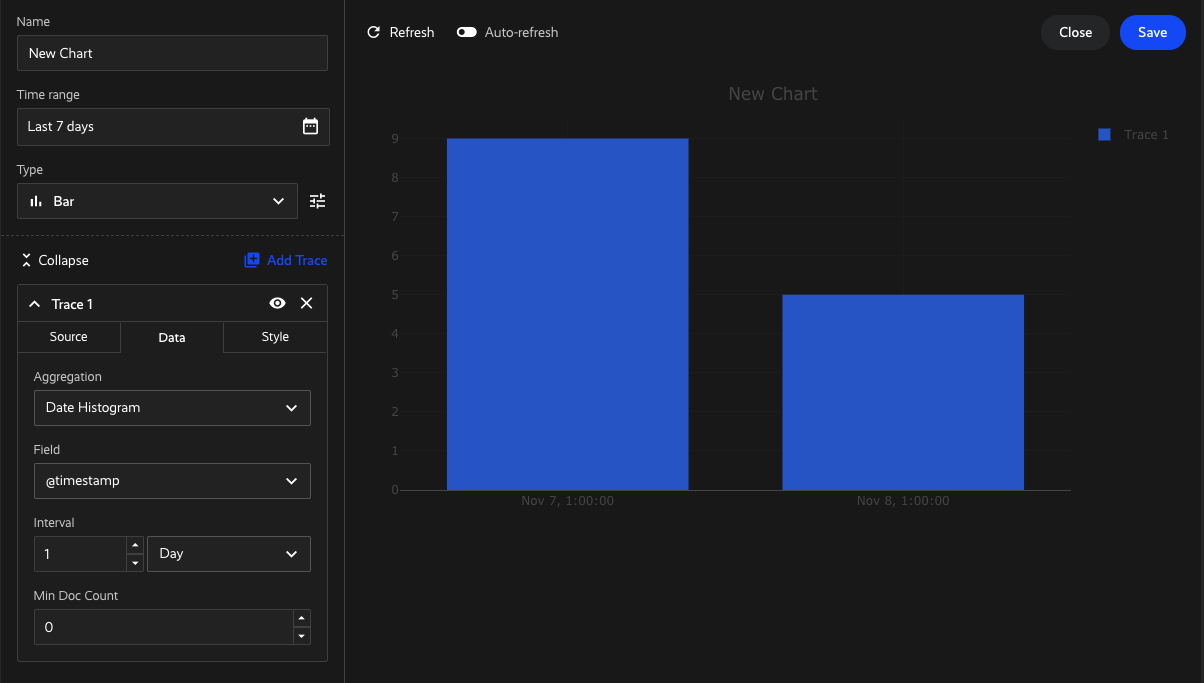
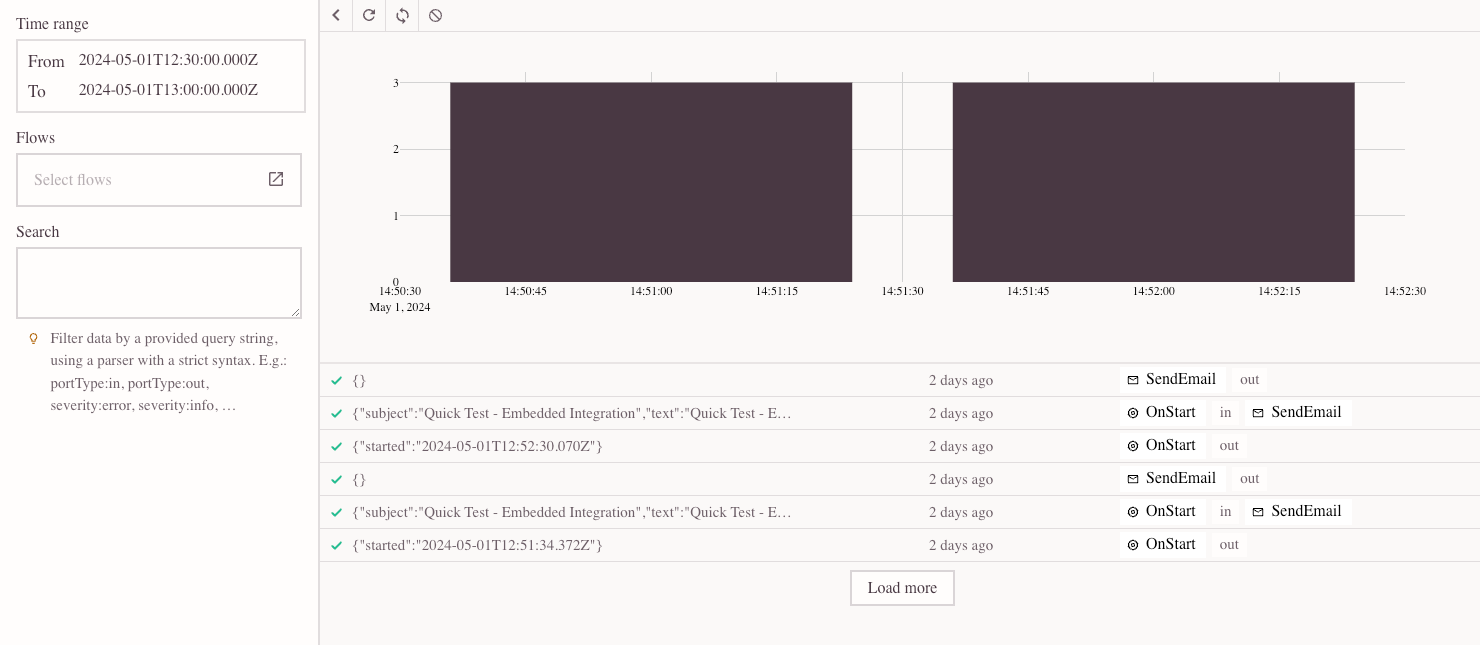
Additionally, you can visit the Insights page to access enhanced filtering options and gain improved visibility into your logs. For instance, if you're specifically interested in logs pertaining to the CreateIssue component, you can utilize the Flows selector in the left panel. This allows you to select and view logs exclusively for the component of interest.
This action will produce a filtered list of logs:
Additionally, the Time range picker allows you to choose any date interval you're interested in for viewing the logs.
Lastly, you can search for specific strings using the Search filter to find particular entries in the logs.
Build and Run an AI agent
What This AI Agent Does
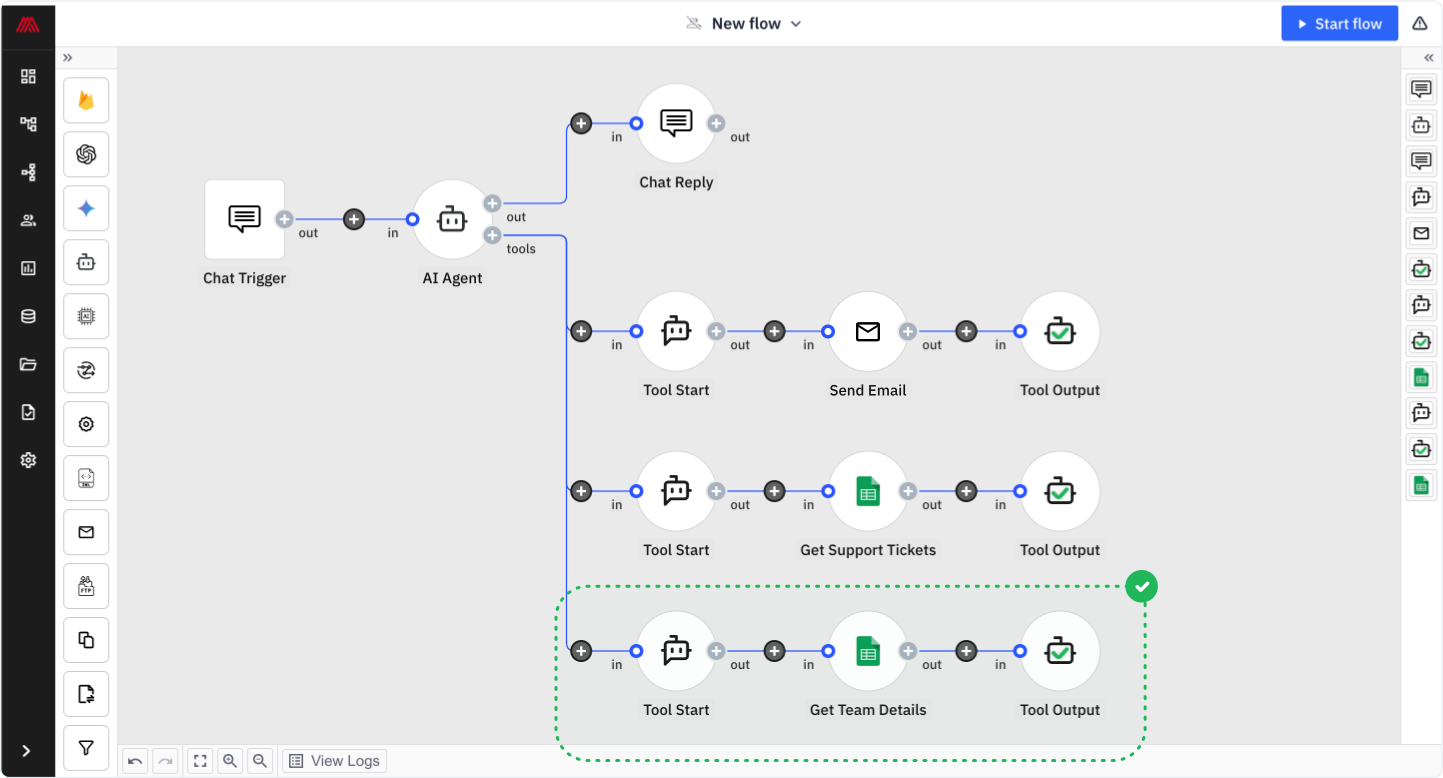
In the following sections, you'll learn how to build a support AI agent that can access your data—specifically, support tickets and details about your development teams, including their roles and the contact information of the team lead.
This AI agent can analyze support tickets (e.g., identifying the biggest pain points your customers faced in the past month) and take action—such as suggesting product improvements based on the most common issues and sending those suggestions to the relevant team lead responsible for that part of your application.
Sounds useful? Let’s build it!
Step 1: Setting Up the AI Agent
To begin, we'll create a new workflow in Appmixer, our no-code AI agent builder.
Choosing a Trigger
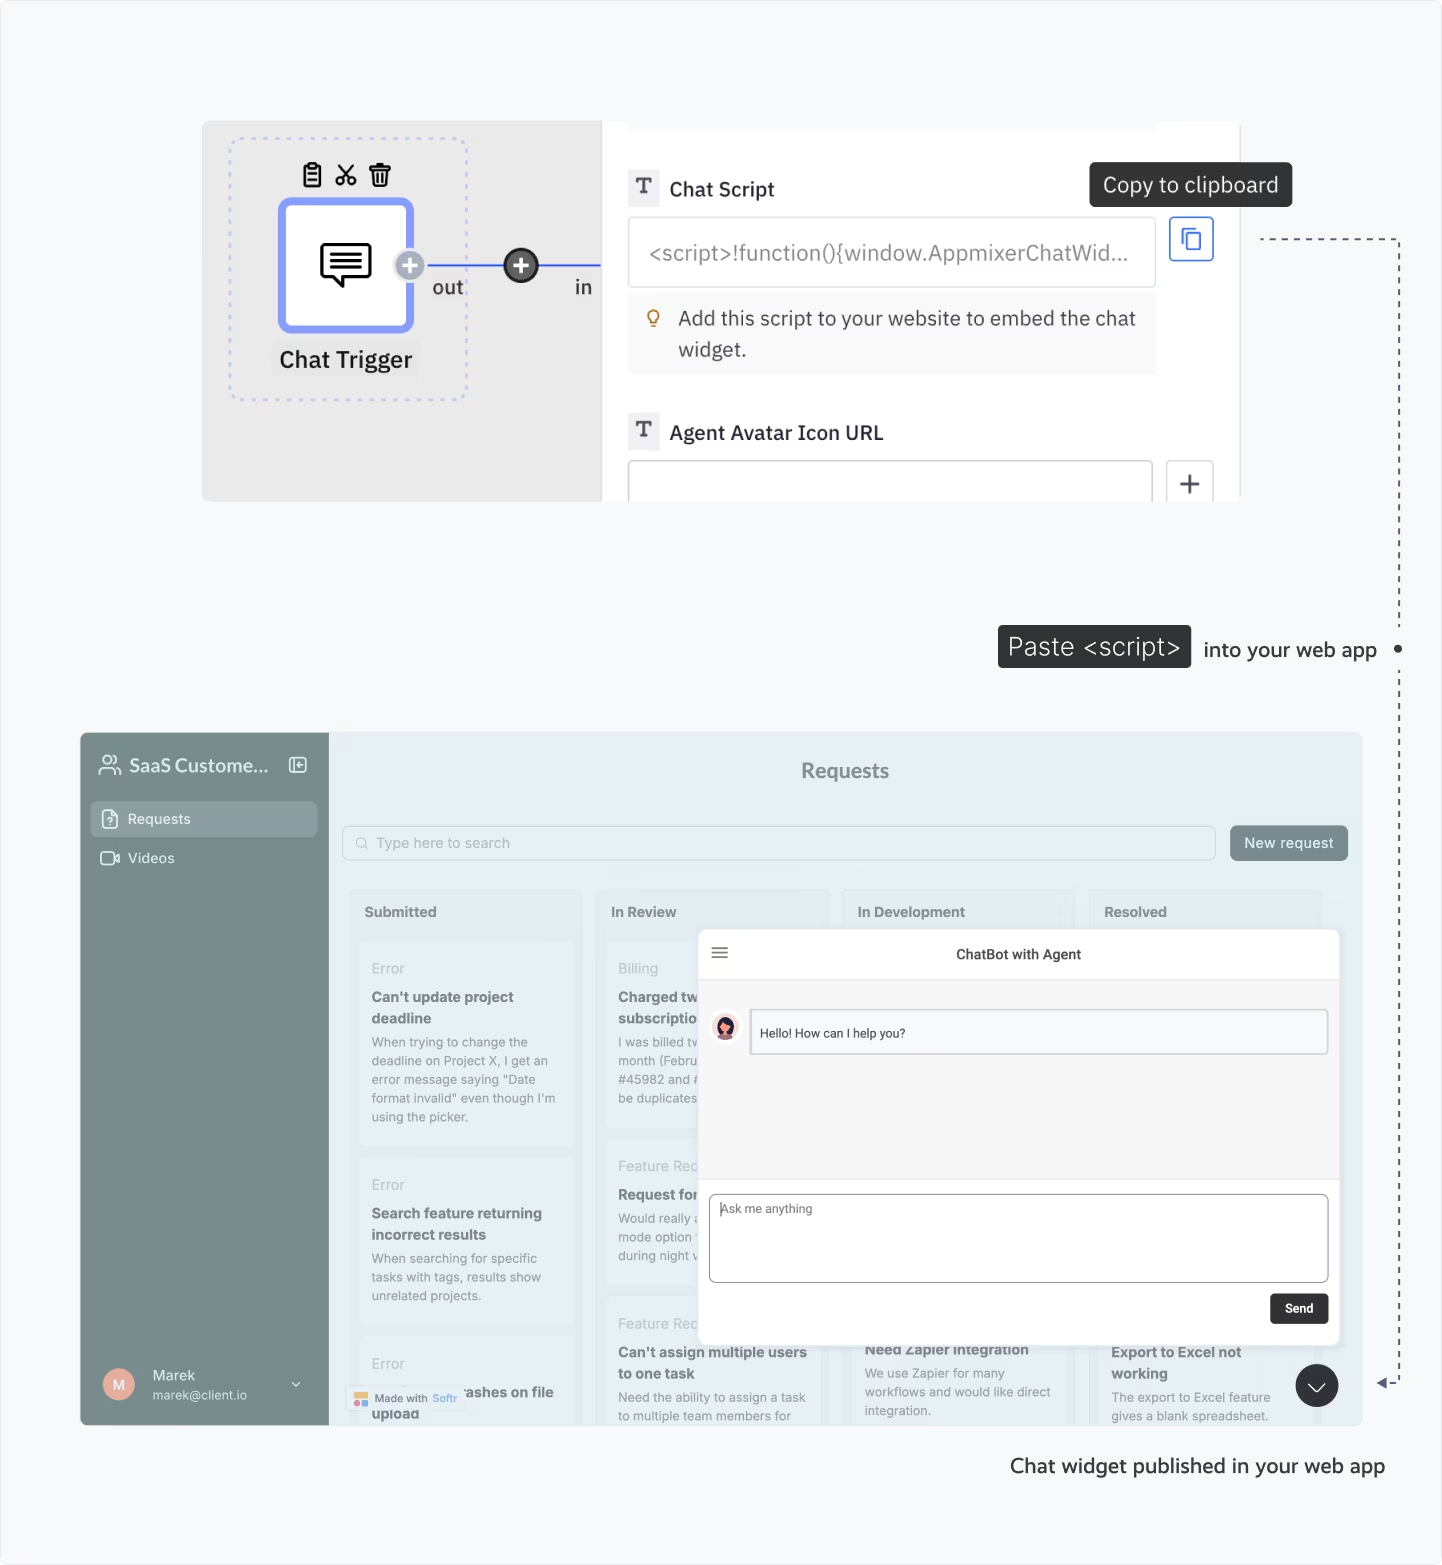
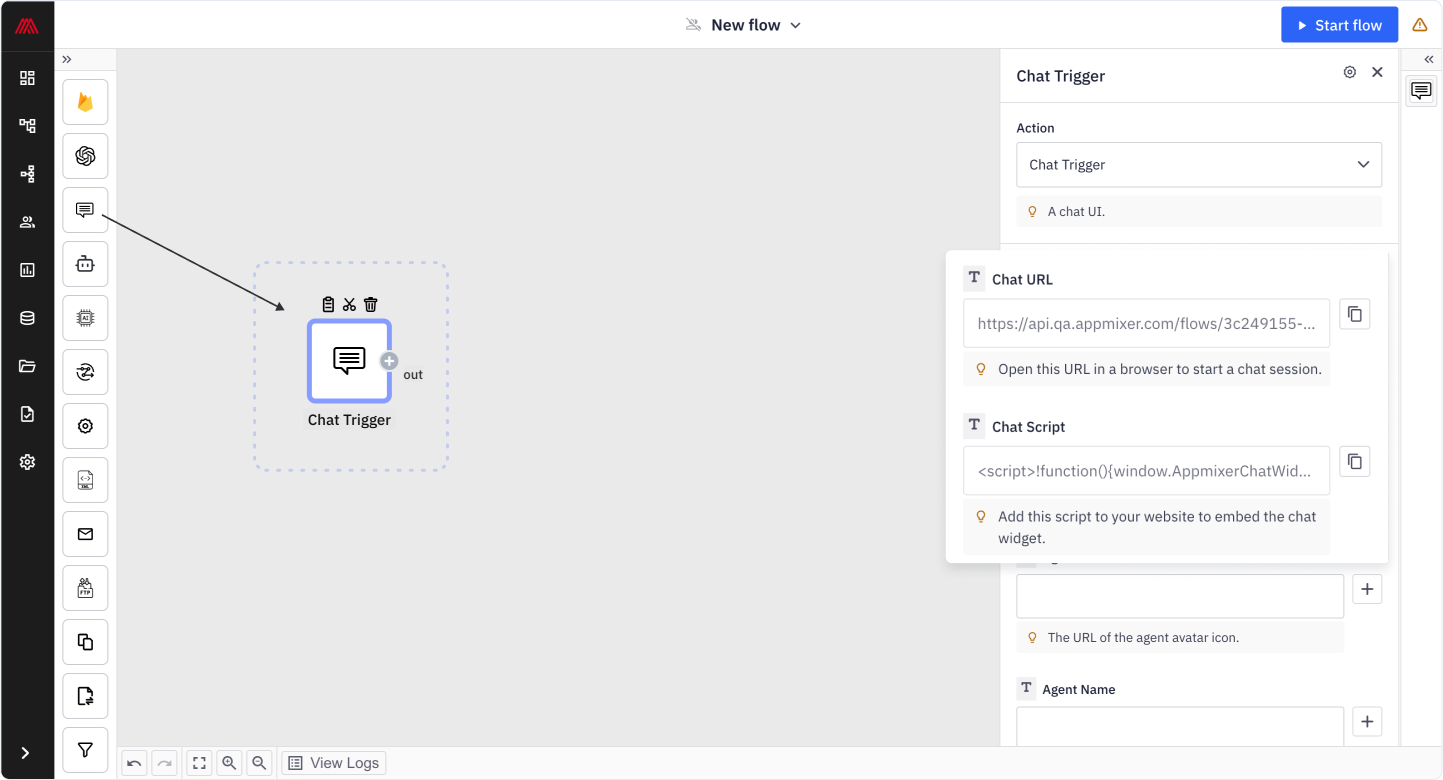
The first step is defining what will activate the agent. In this demo, we use a chat widget as the trigger, but you can also trigger the agent based on other events—for instance, new emails, new tasks, or scheduling the agent to run at a specific date and time.
Once the chat trigger is selected, Appmixer provides a chat URL and a chat script that allows you to integrate the chat widget into any web application.
Adding the AI Agent
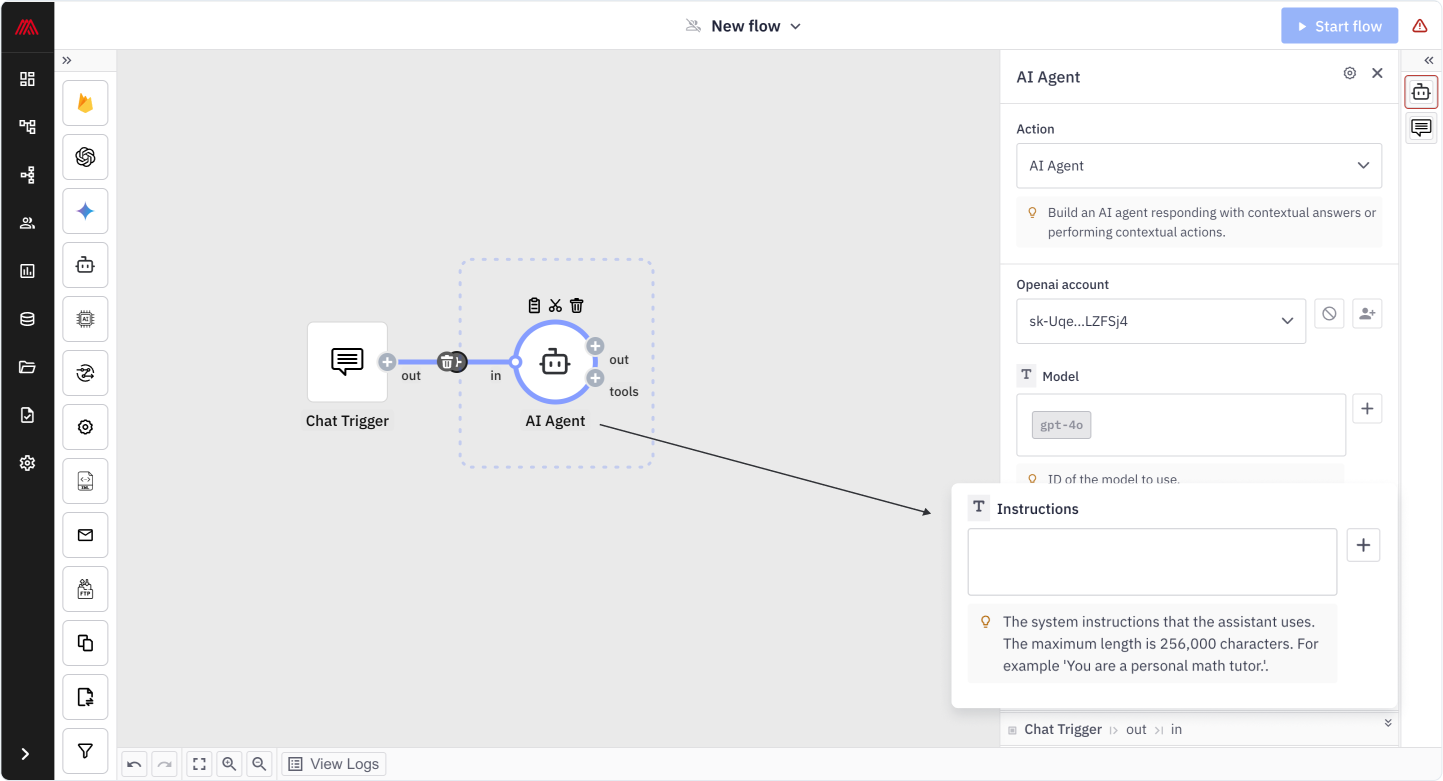
Now, let’s add the central component—the AI agent itself. Appmixer supports various large language models (LLMs), including OpenAI, Claude, Gemini, and more. For this demo, we'll use an OpenAI model.
We define the agent's instructions, specifying its role and scope. The key to building a reliable AI agent is providing detailed and structured instructions so that responses are consistent and accurate. Each message from the chat is processed based on these instructions, ensuring contextual understanding.
Instructions: This field defines how the AI agent should behave each time it performs a task. It specifies the agent’s role, scope, and operational constraints, ensuring it follows predefined guidelines while executing its tasks.
👉 Copy and paste the instructions to build the same AI agent in Appmixer:
You are a helpful assistant specializing in Product Insights. As an AI assistant you analyze support tickets to identify patterns and generate product improvement suggestions. You have access to two data sources: a support tickets database containing customer feedback and issues, a product teams directory with information about team responsibilities.
When responding to queries, first analyze the ticket data to identify common themes. Then, when asked for recommendations, match issues to the appropriate product teams, and generate specific, actionable product improvement suggestions. For each suggestion, identify the responsible team lead's email address, format your suggestion professionally, and include data-backed reasoning. Always be concise and specific in your responses, providing relevant statistics from the ticket data and clear implementation recommendations.
Finally, when asked to send an email with recommendations to a team lead, send the generated suggestions to the team lead of the relevant product team. Always reply confirming that you have sent the email and say to which email address you have sent it.
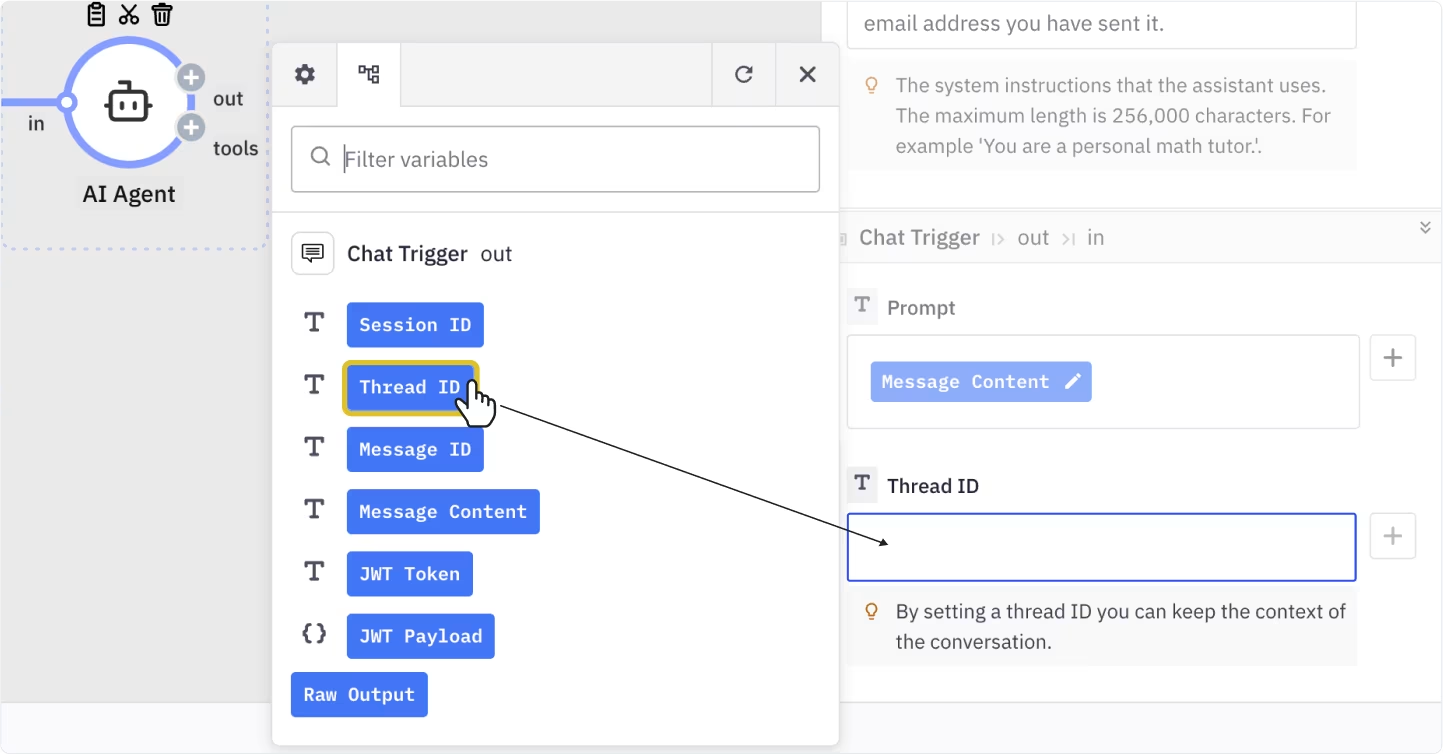
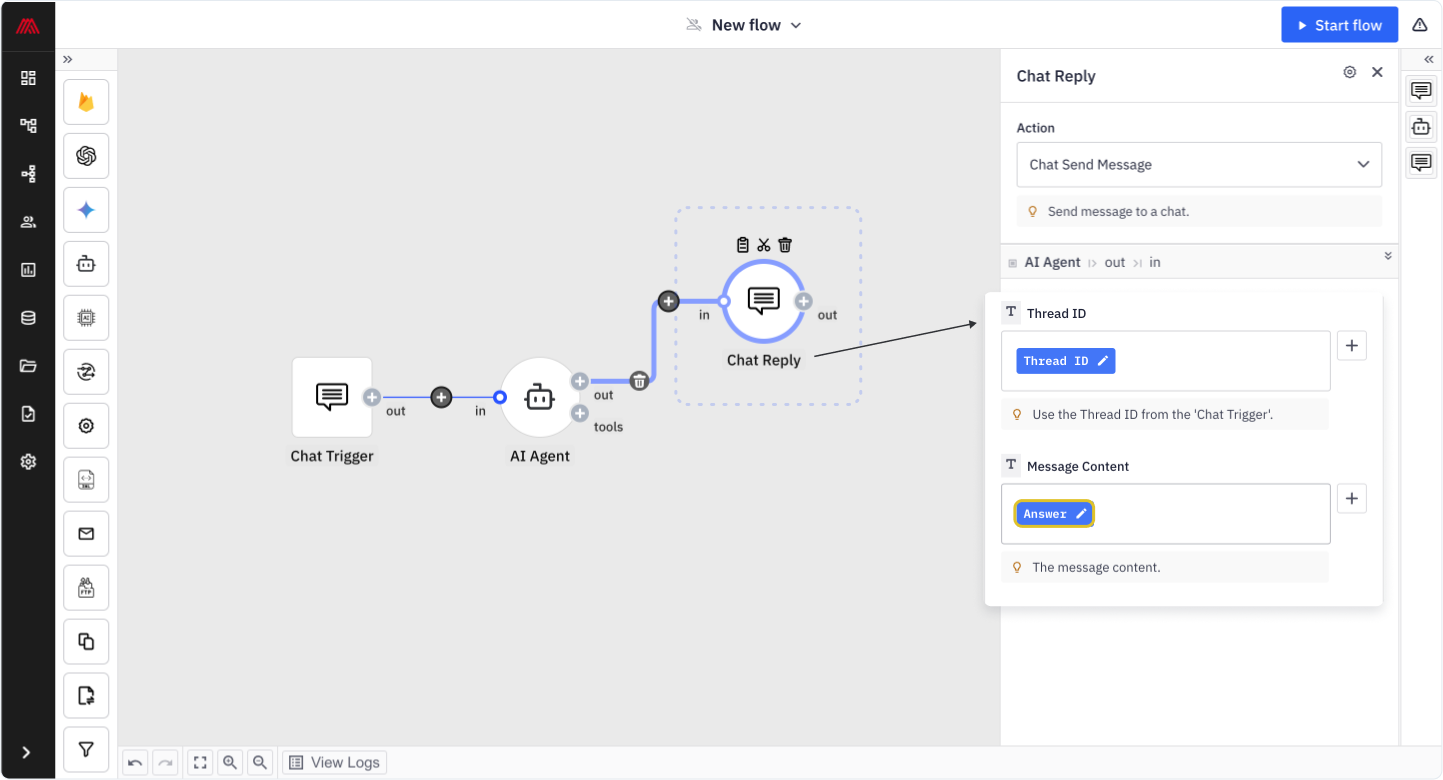
In the Prompt field, we'll use the dynamic field from the Chat trigger. This will be the actual message that you or your users type in the chat.
To maintain conversation continuity, we set the Thread ID field, which allows the agent to remember the context of ongoing interactions.
Handling the Agent’s Responses
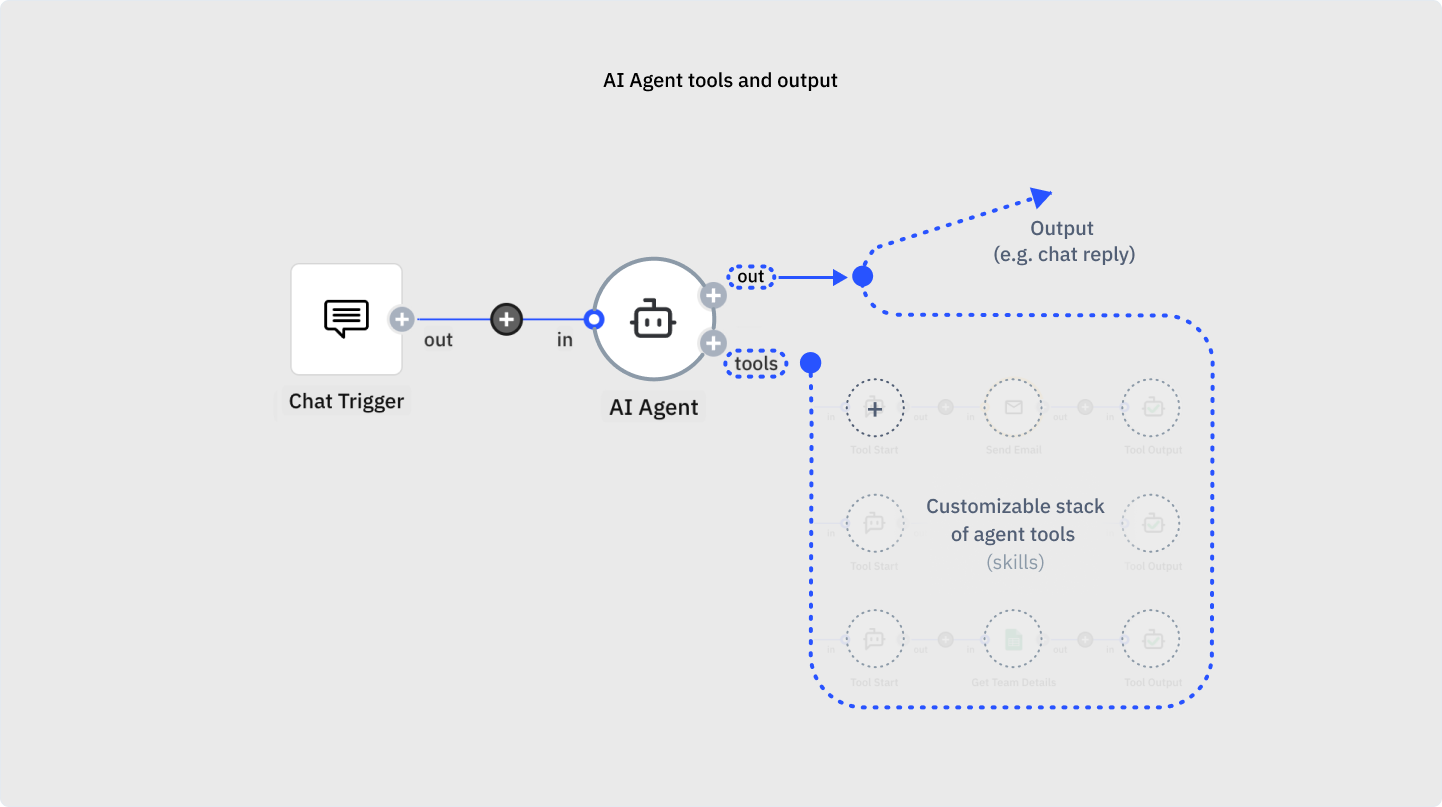
The agent has two output ports:
Out: This sends the agent's answers to the chat widget (or any other tool, such as sending a message to Slack).
Tools: This is where we connect the agent to our data and services, whether first-party or third-party.
To complete the chat functionality, we add a Chat Reply component, linking it to the thread ID and the agent’s response output.
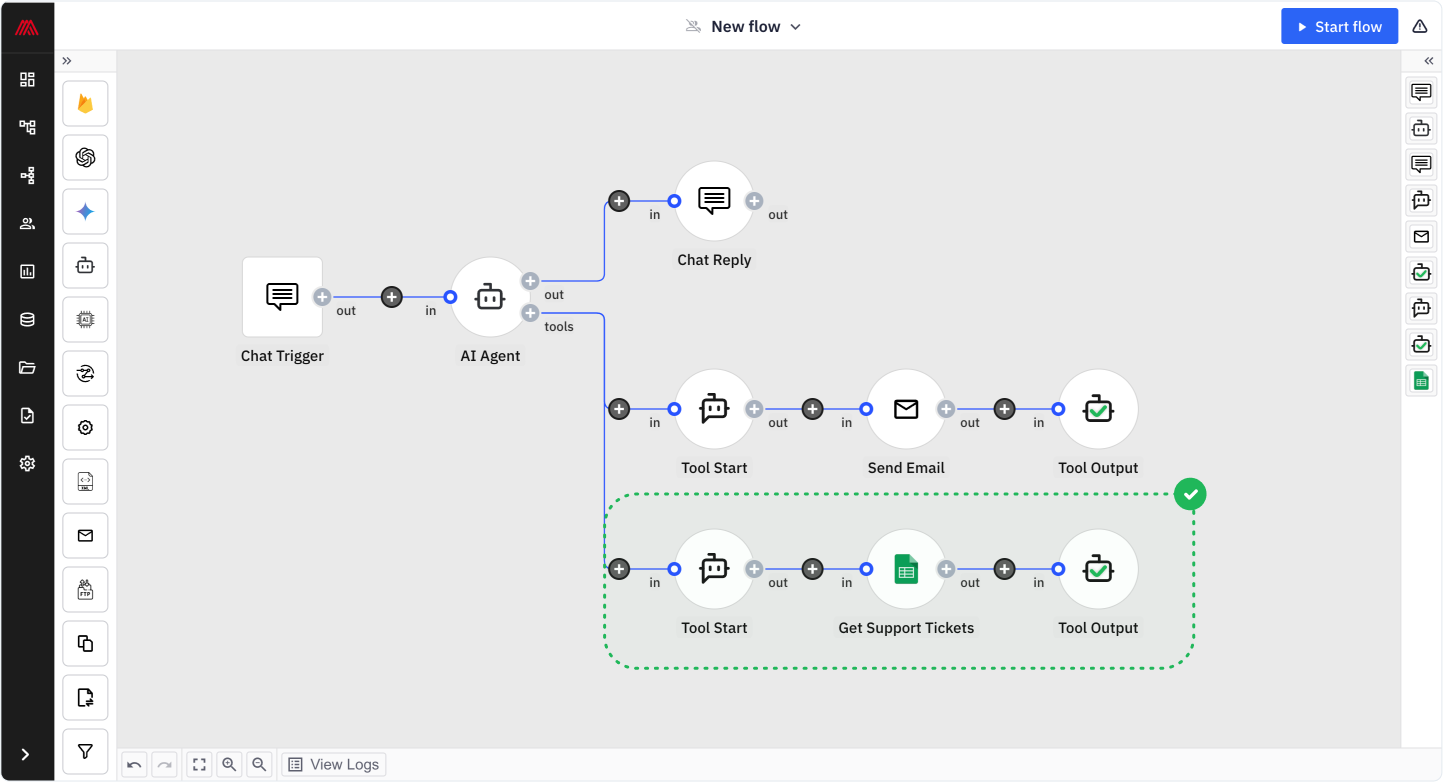
Step 2: Adding Skills to the AI Agent
While our agent can now respond to general questions, we want it to perform real tasks, such as analyzing data and sending emails.
Connecting to External Tools
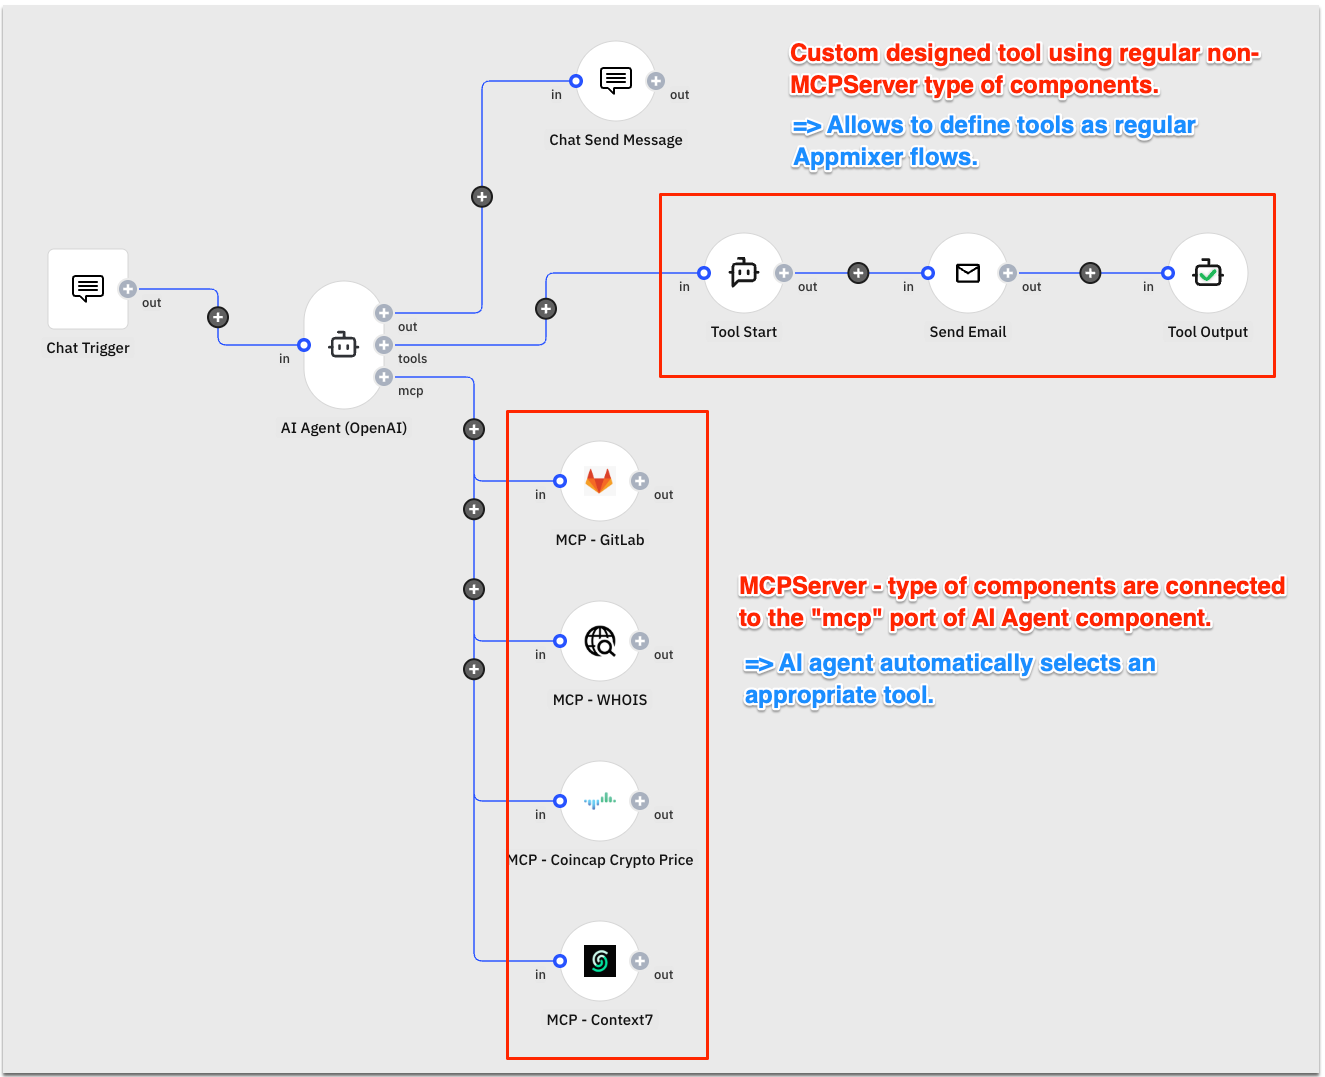
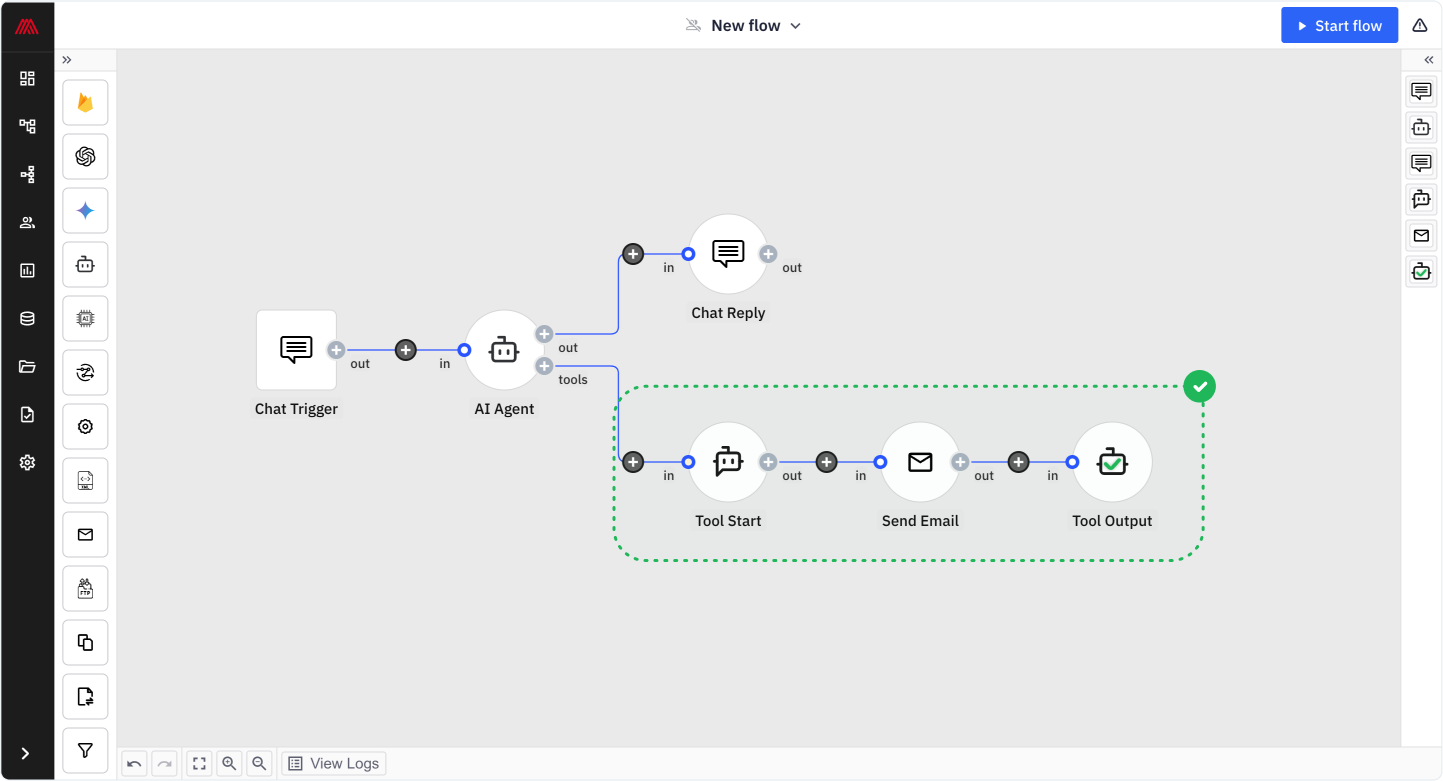
Under the Tools port, we can add multiple integrations. Whenever the AI agent receives a request, it checks for relevant tools and uses them as needed.
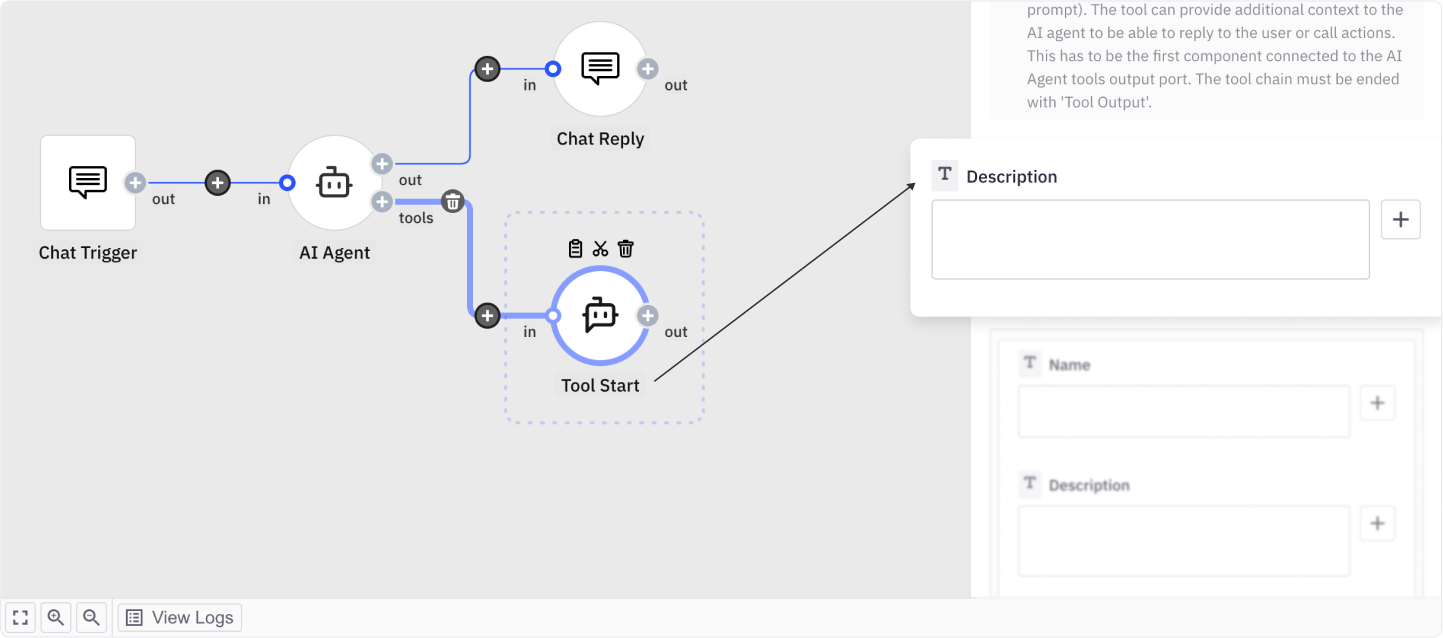
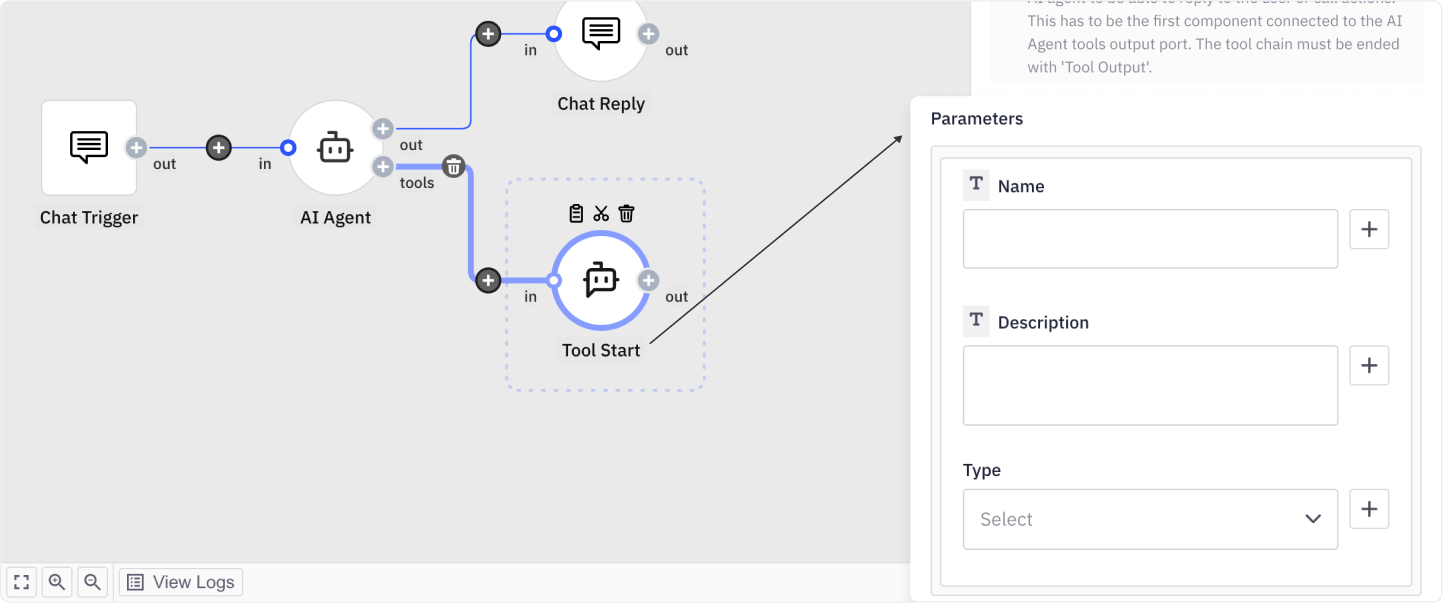
In order to add tools to the AI agent, you need to get familiar with two terms:
Tool description: This serves as a guideline for the AI agent, explaining what a specific tool does. It is set at the Tool Start component level. For example, if a tool sends notifications to Slack, its description could be: "This tool sends notifications to Slack." The AI agent uses this information to determine when to utilize the tool to complete a task.
And second, we use something called Parameters in the Tool Start component.
Parameters: Dynamic fields that we want the AI agent to figure out from the user prompt and then later use in the tools. For instance, if we want the agent to lookup products in our database, we need to set up Product Name on the Tool Start level, let the agent fill the value from the user prompt and then use it to do the lookup.
Sending Emails
Add a Tool Start component and define it as “Send emails to the product team.”
Define parameters such as recipient, subject, and body, allowing the AI to dynamically generate content.
Use the Send Email step to structure and send the email.
Add a Tool Output component to send confirmation back to the agent.
👉 Copy and paste the tool description to build the same AI agent in Appmixer:
Send emails to the product team.
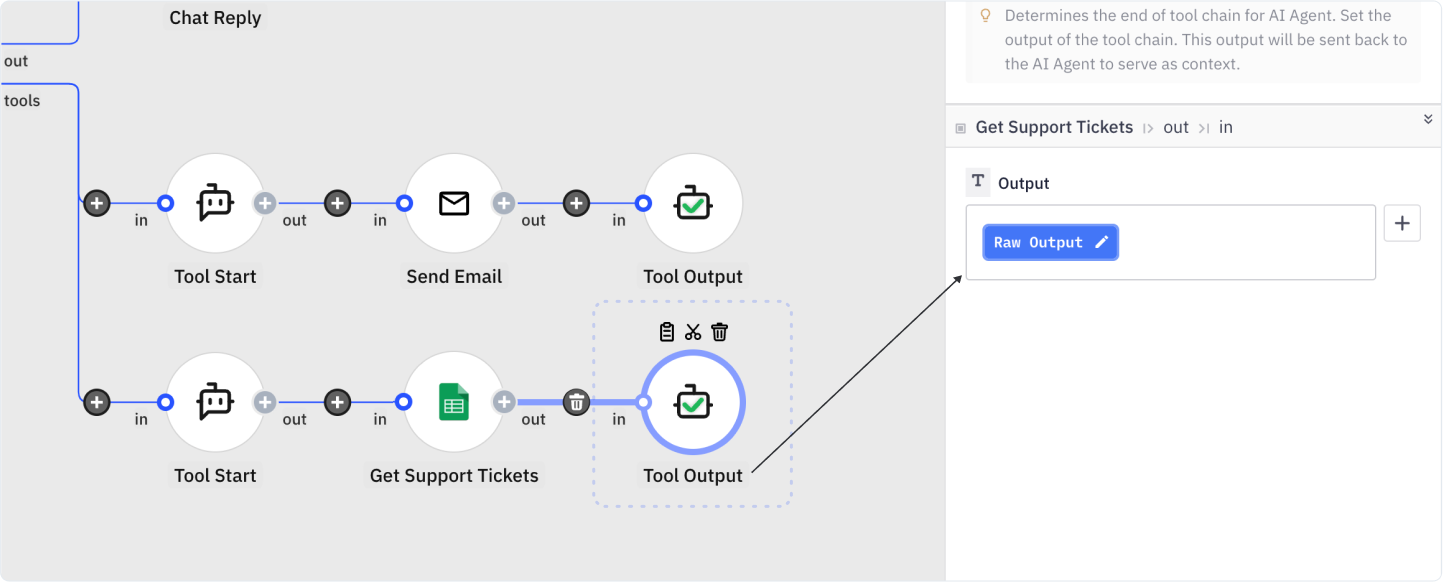
Analyzing Support Tickets
Add another Tool Start component and describe its function as retrieving support tickets.
Connect a Google Sheets Get Rows component to fetch past support tickets.
Configure the Tool Output to send ticket data to the agent, enabling it to analyze trends.
👉 Copy and paste the tool description to build the same AI agent in Appmixer:
Read the support tickets submitted by users last month.
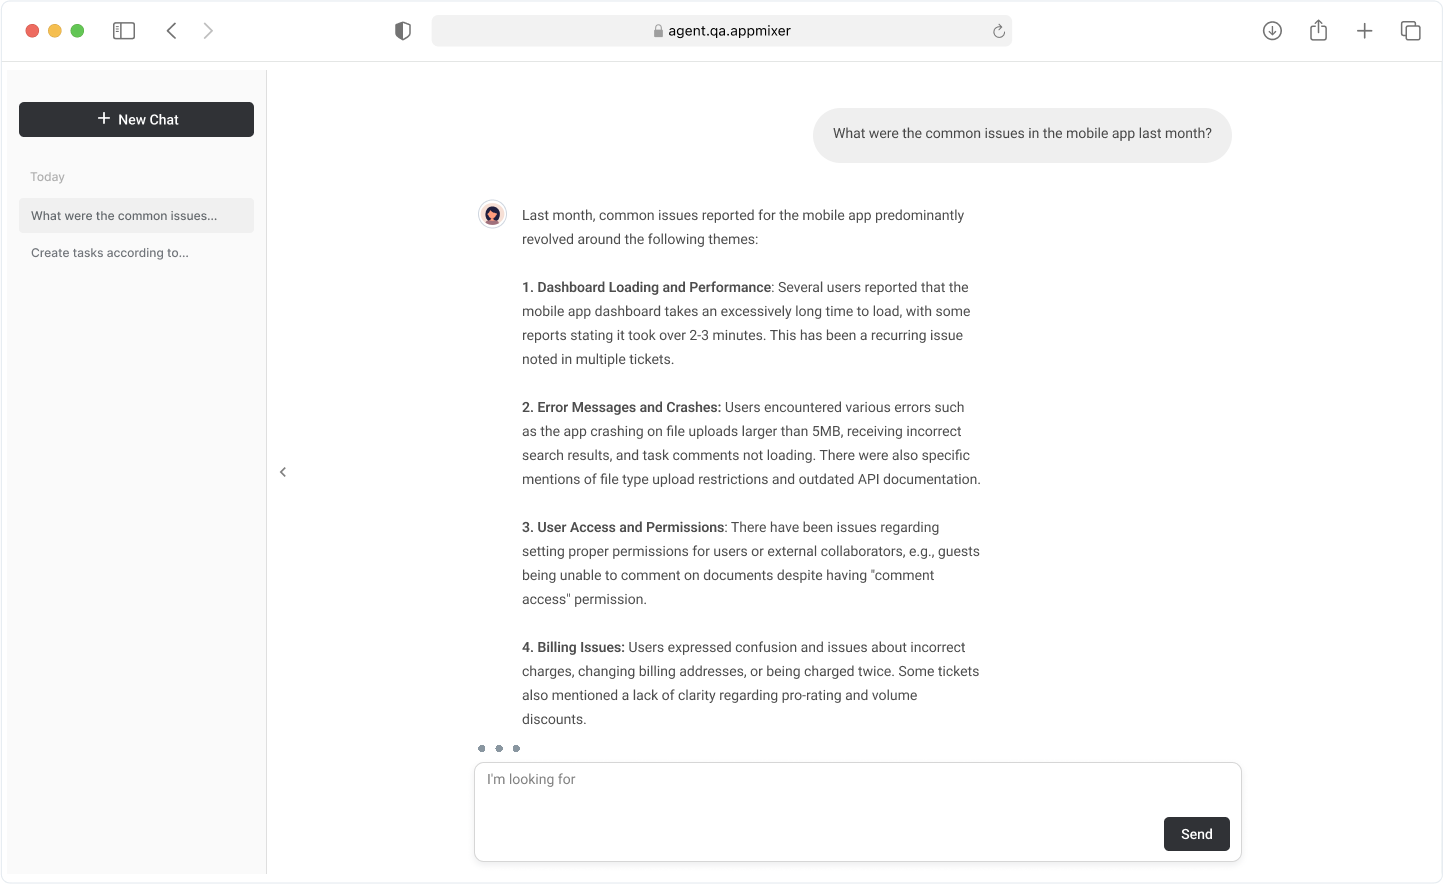
Once all components are set up, it’s time to test our AI agent using the Chat URL.
For example, we can:
Ask it about common issues in the mobile app from past support tickets.
Request product improvement suggestions based on user feedback.
Instruct it to send these suggestions to the mobile app team.
For deployment, we take the provided HTML embed script from the chat trigger setup and add it to our web application. This allows our AI agent to be accessible wherever it is needed, providing automated insights and executing tasks in real time.
Expanding Your AI Agent’s Capabilities
The modular nature of Appmixer's no-code builder allows for easy expansion.
For instance, you can:
Integrate vector database for large-scale data retrieval.
Connect additional execution tools like task assignment in Asana, ClickUp, or Jira.
Create multi-agent workflows where each AI agent specializes in a different function, such as:
Scraping websites
Generating marketing content
Analyzing market trends
Writing product specifications
Monitor & Troubleshoot
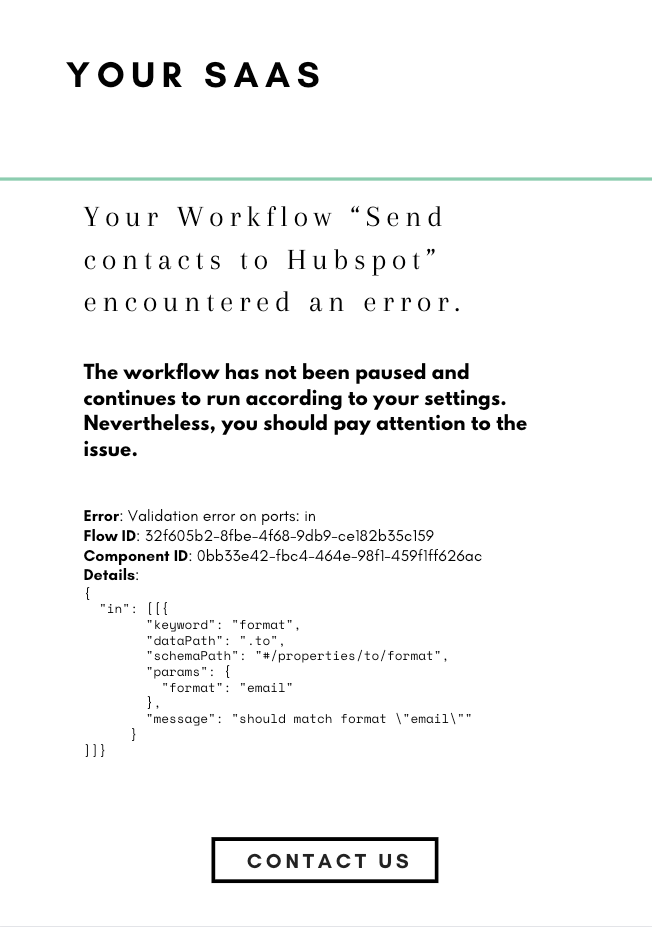
Being equipped to troubleshoot your customers' integrations is crucial, as there are myriad reasons why integrations might encounter issues. The most frequent problems stem from integration misconfigurations, your end-users revoking previously granted permissions, alterations in third-party apps leading to the use of outdated data, service outages, and various other factors. When your customers encounter difficulties, it's essential to have the necessary tools to investigate and understand the causes of these issues. This tutorial is designed to provide you with the knowledge and resources needed for effective troubleshooting.
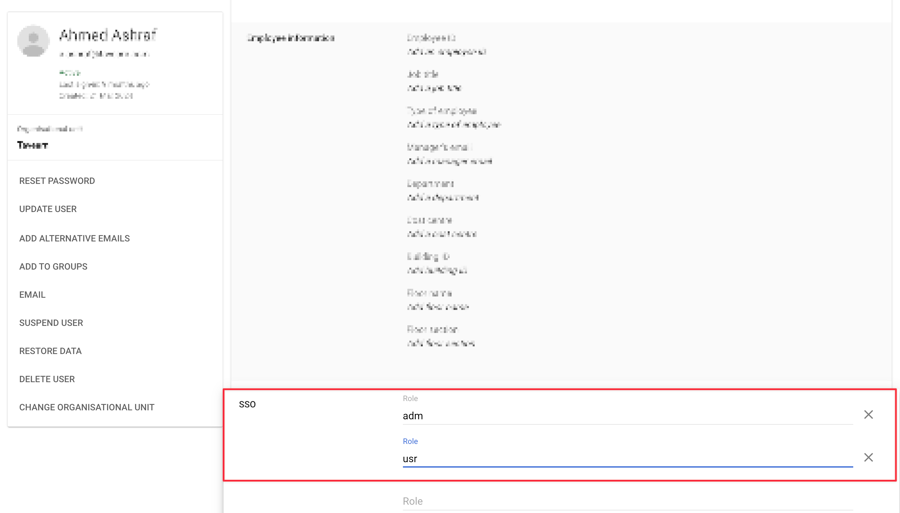
Look up your users
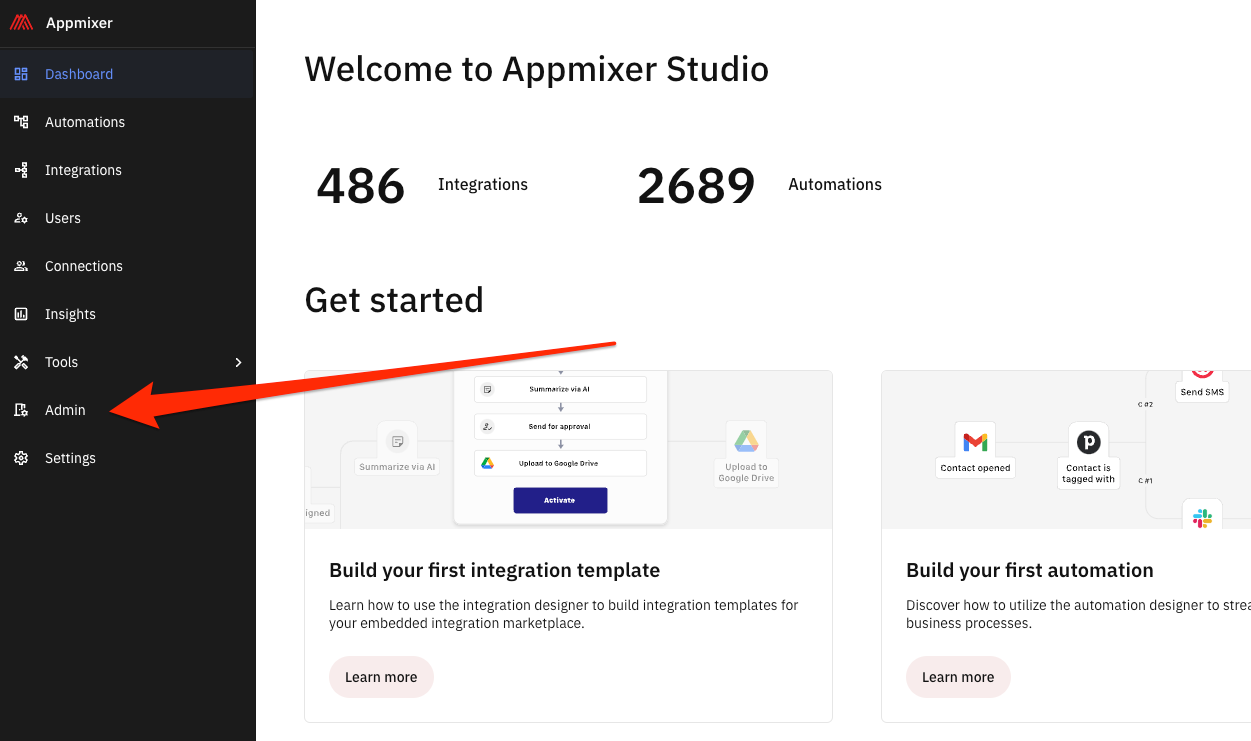
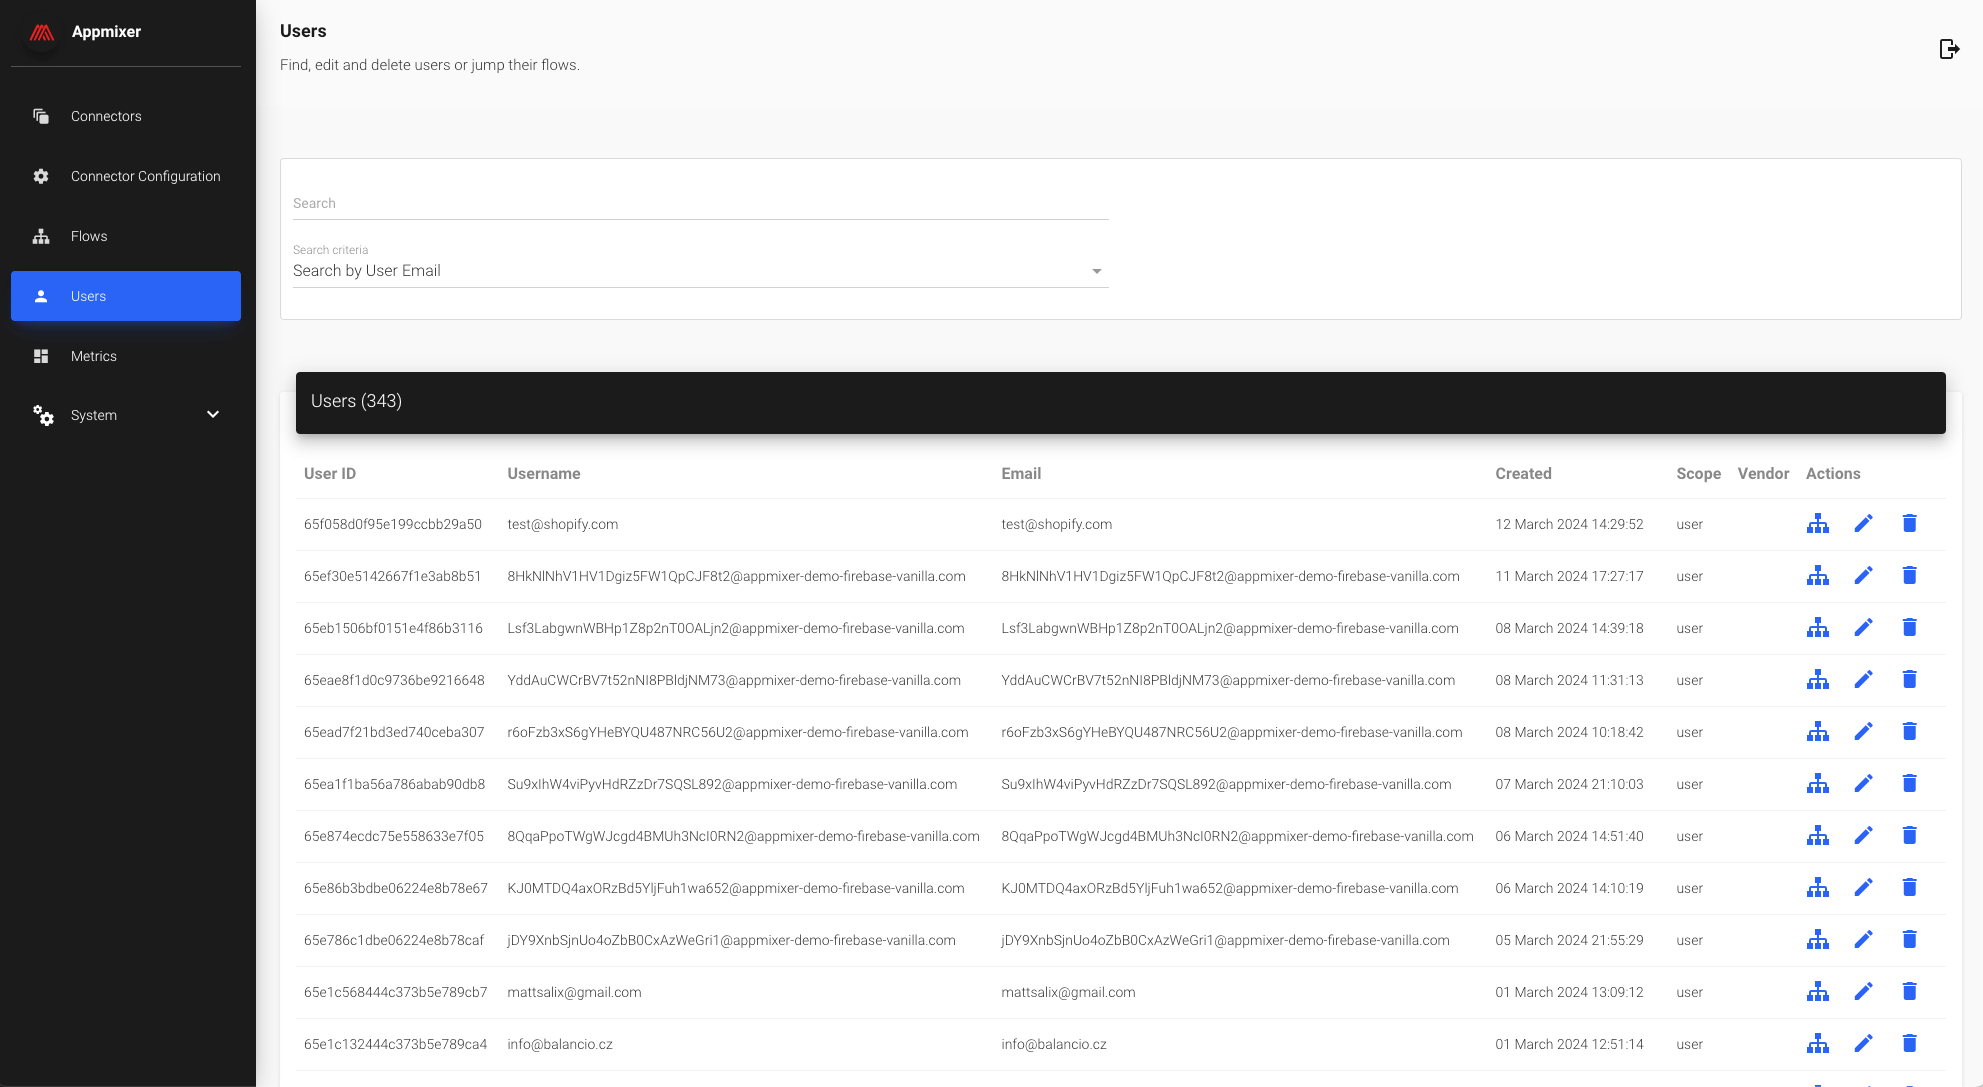
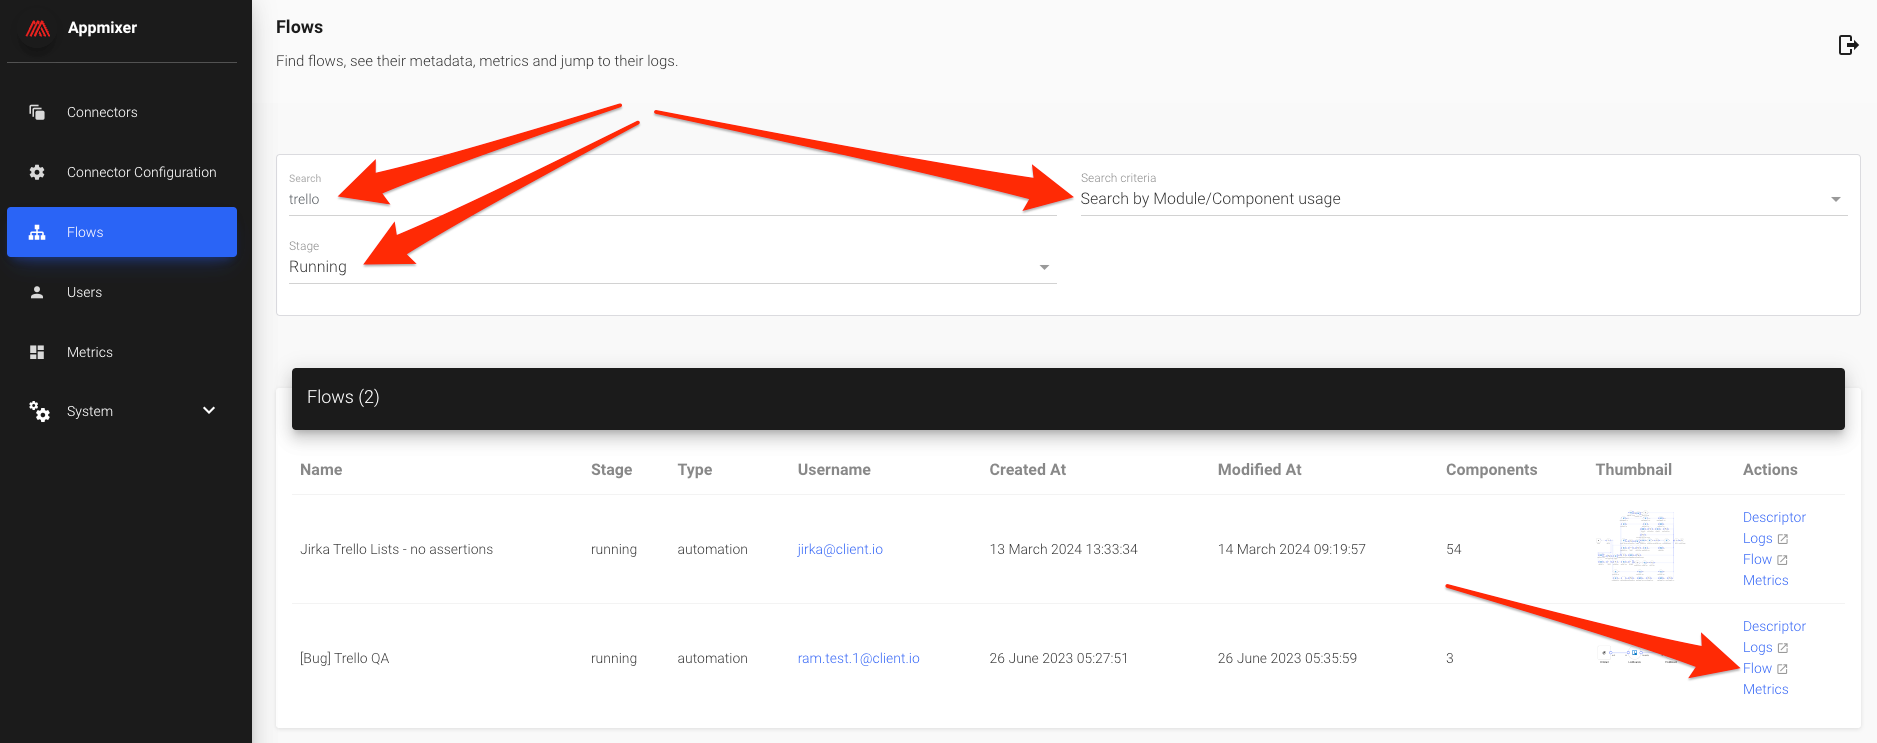
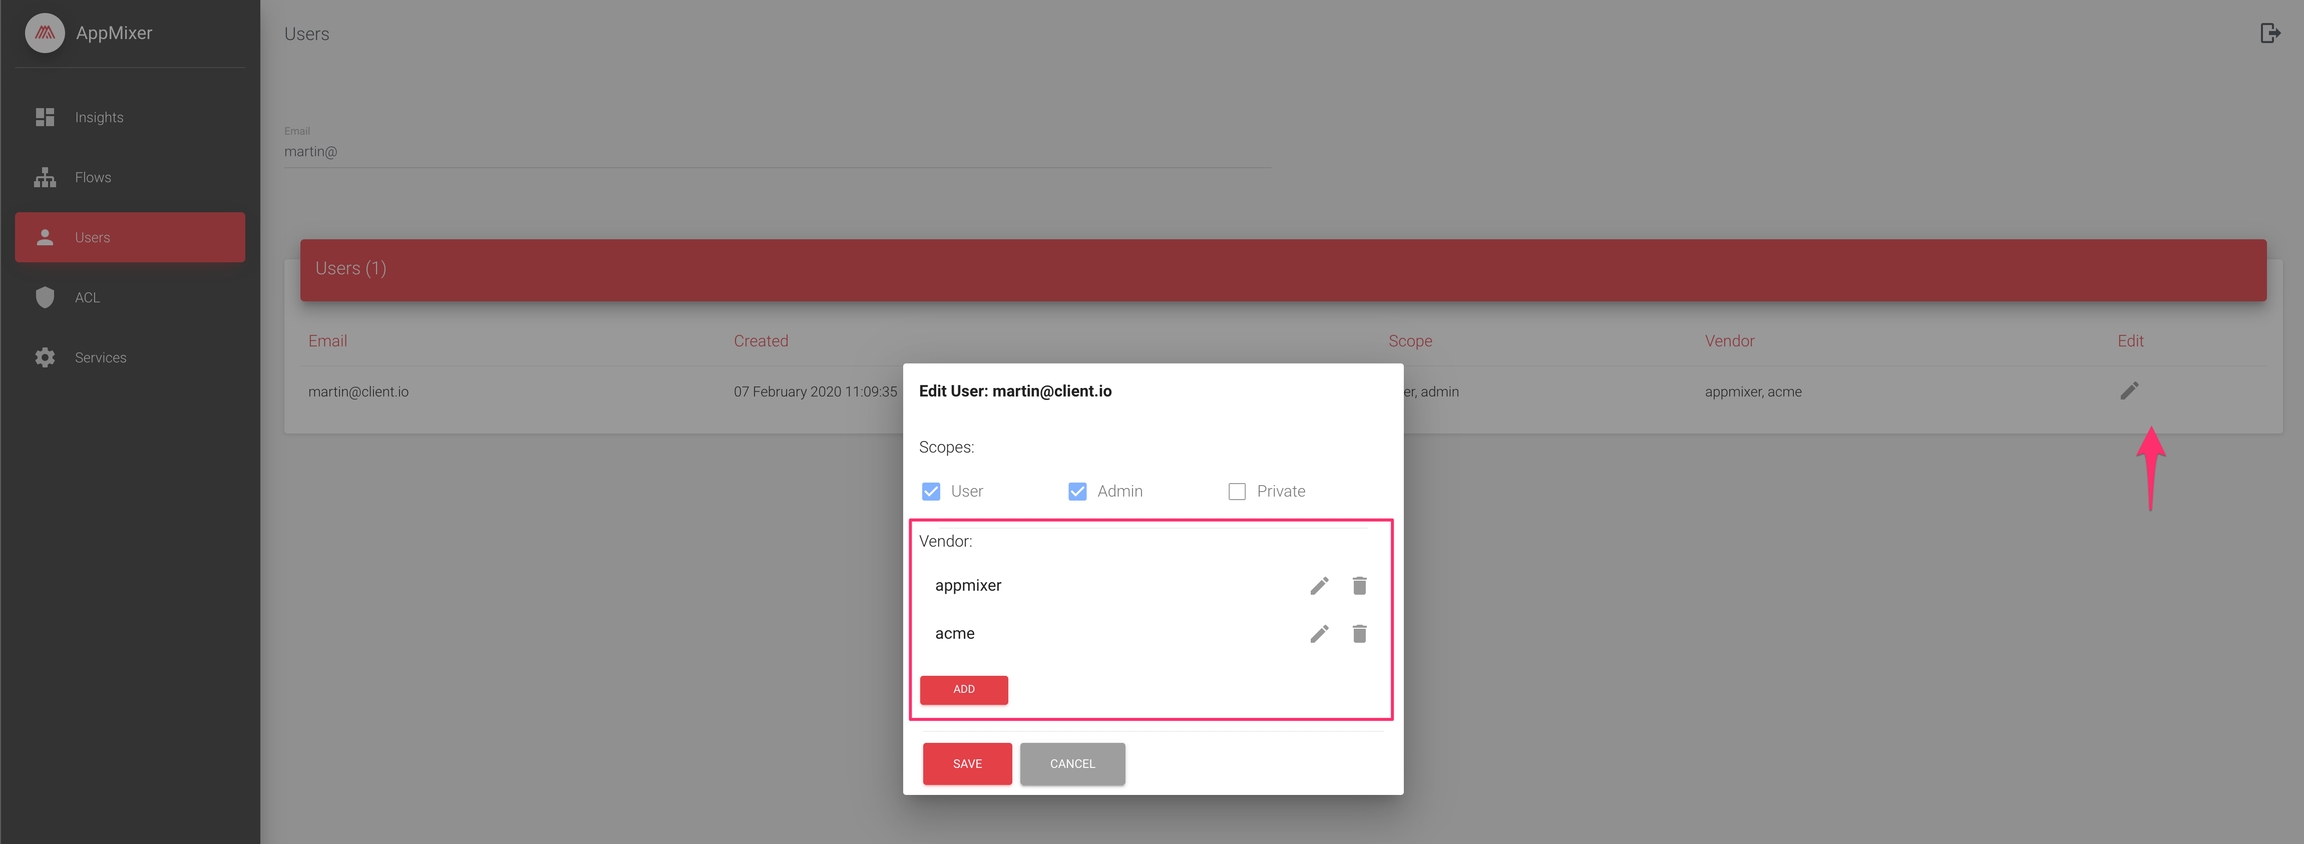
To access information on your end-users, navigate to the "Admin" interface within the Appmixer Studio and proceed to the "Users" page. Please note, you must possess admin user privileges to access the "Admin" interface:
In the "Users" section, you'll find a comprehensive list of all users within the system. The interface allows you to search for users based on multiple criteria, with email being the most common search parameter. Upon locating a user, you can click on the Flows icon () to view all the flows associated with that user, including integration instances and automations.
Inspect Flows (integrations or automations)
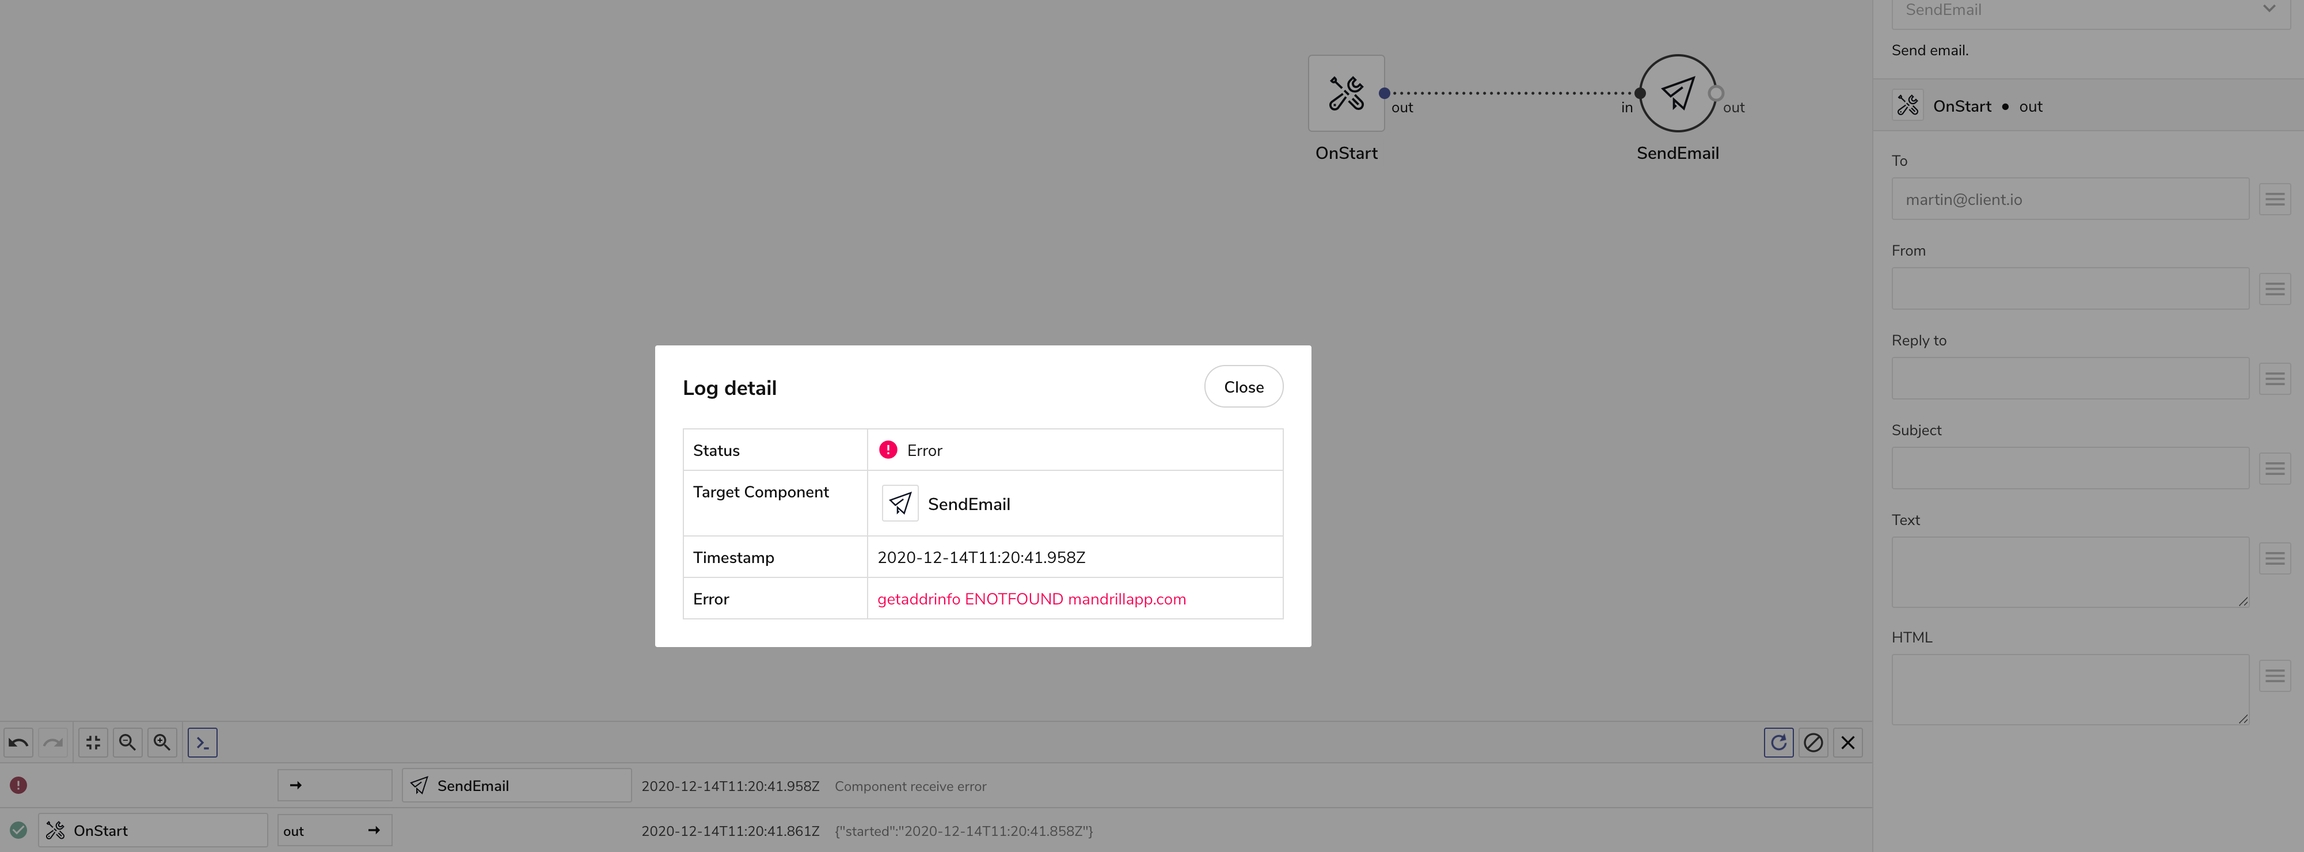
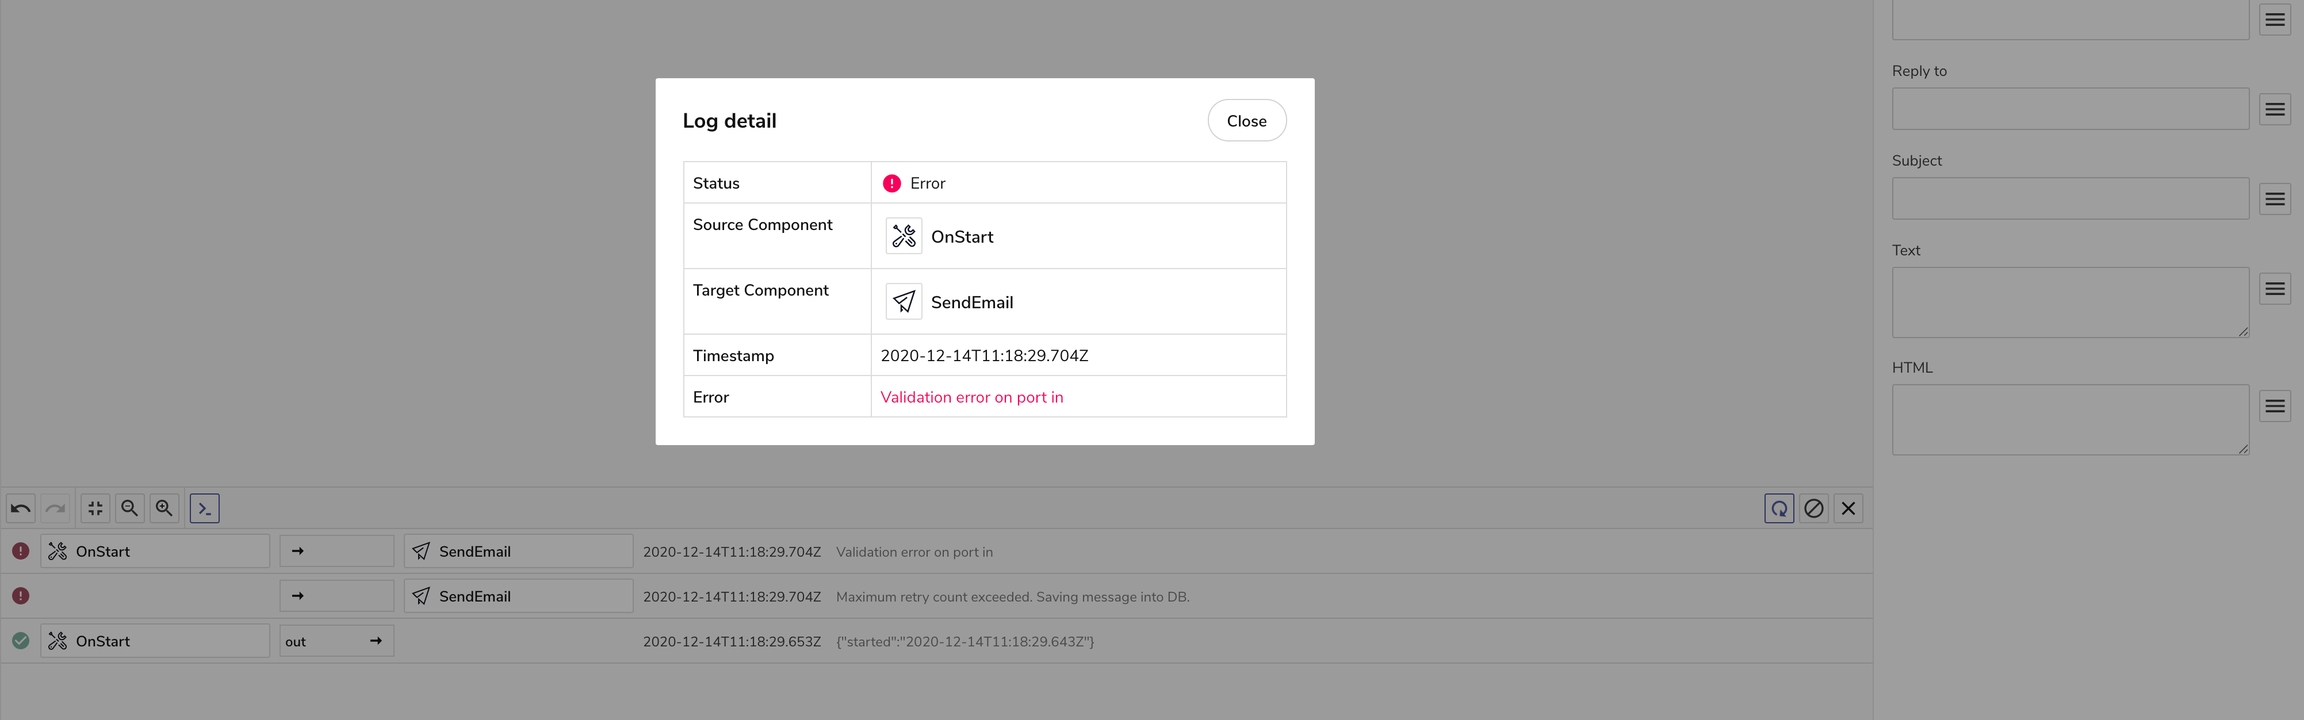
After locating the flow you intend to troubleshoot, proceed to examine the flow's logs and configuration. Click on the "Logs" link to view the flow's logs, and utilize the "Flow" link to inspect the flow's configuration in the Appmixer Designer.
As an Appmixer admin user, you have the capability to directly make minor adjustments to a flow from within the designer. However, it's important to recognize the boundaries of such modifications. For instance, re-authenticating to the applications within the flow is not possible, as authentication was initially performed by the end-user. Additionally, altering the flow's structure is discouraged, as it may necessitate new inputs from the end-user. Focus on implementing small, necessary corrections, and guide the end-user to undertake more significant changes by re-configuring their integrations according to your instructions.
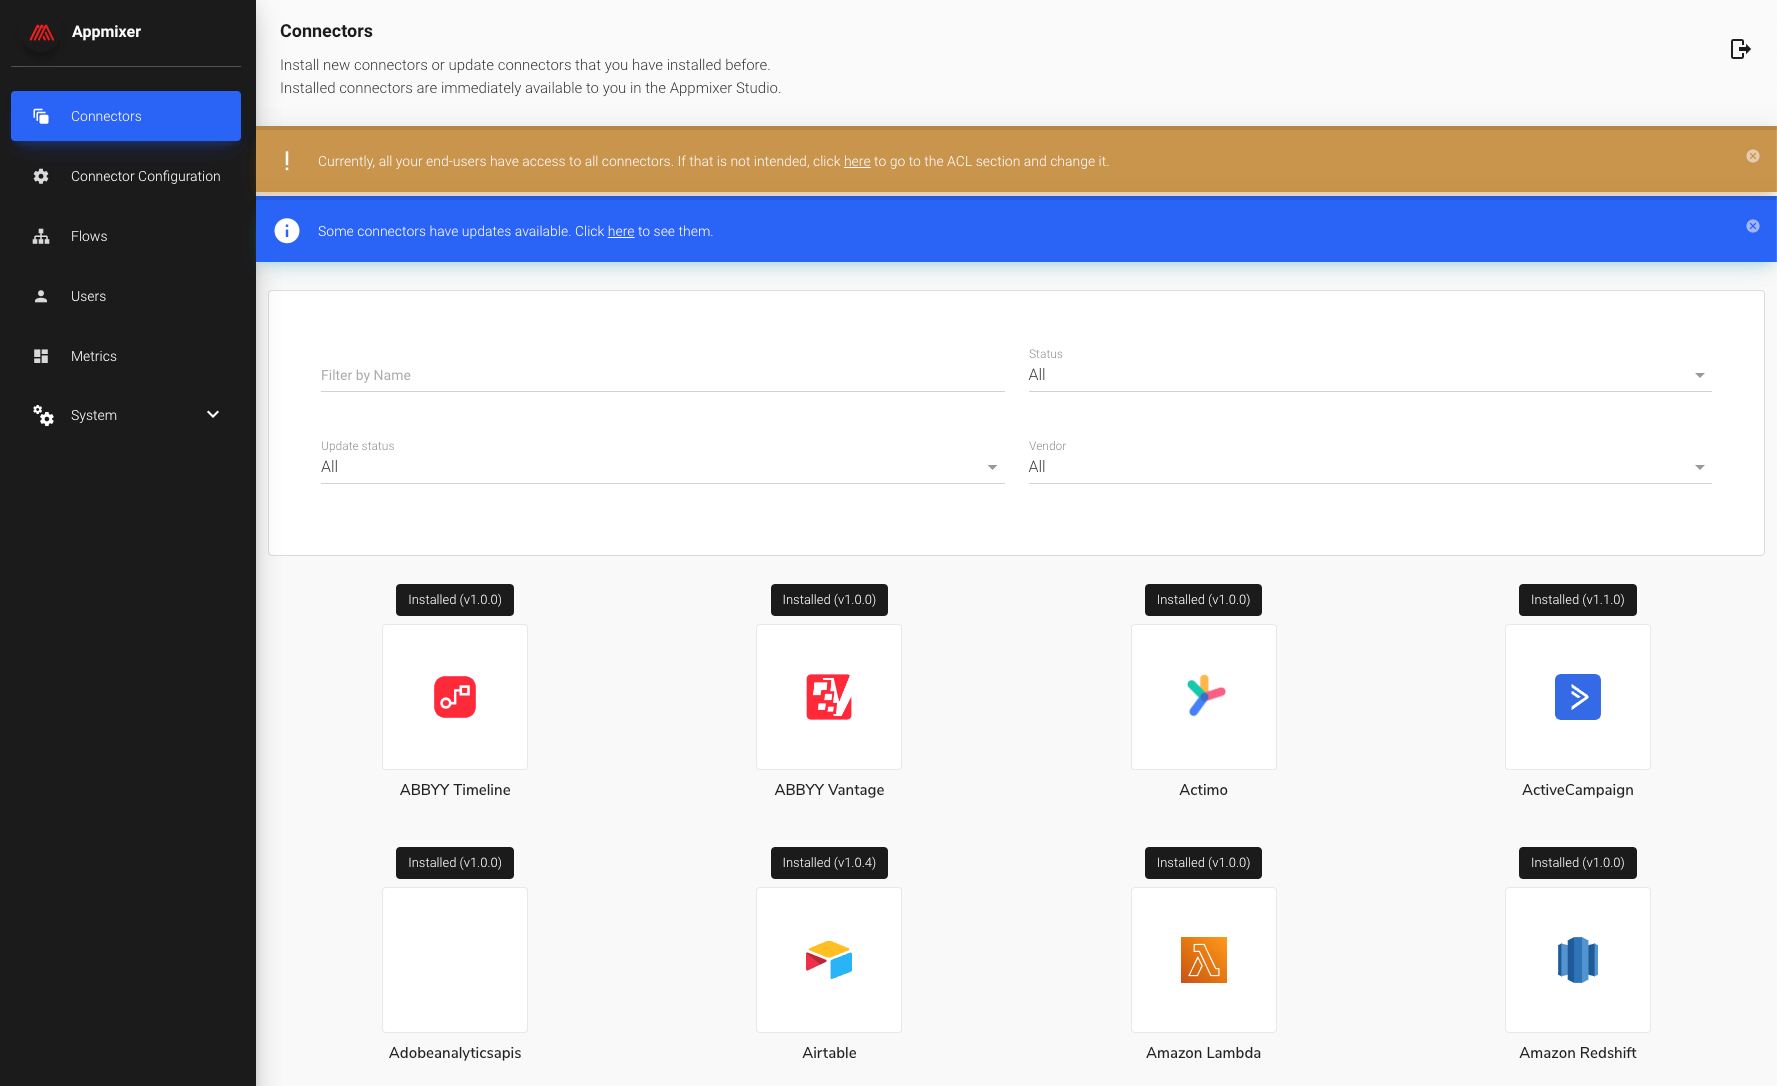
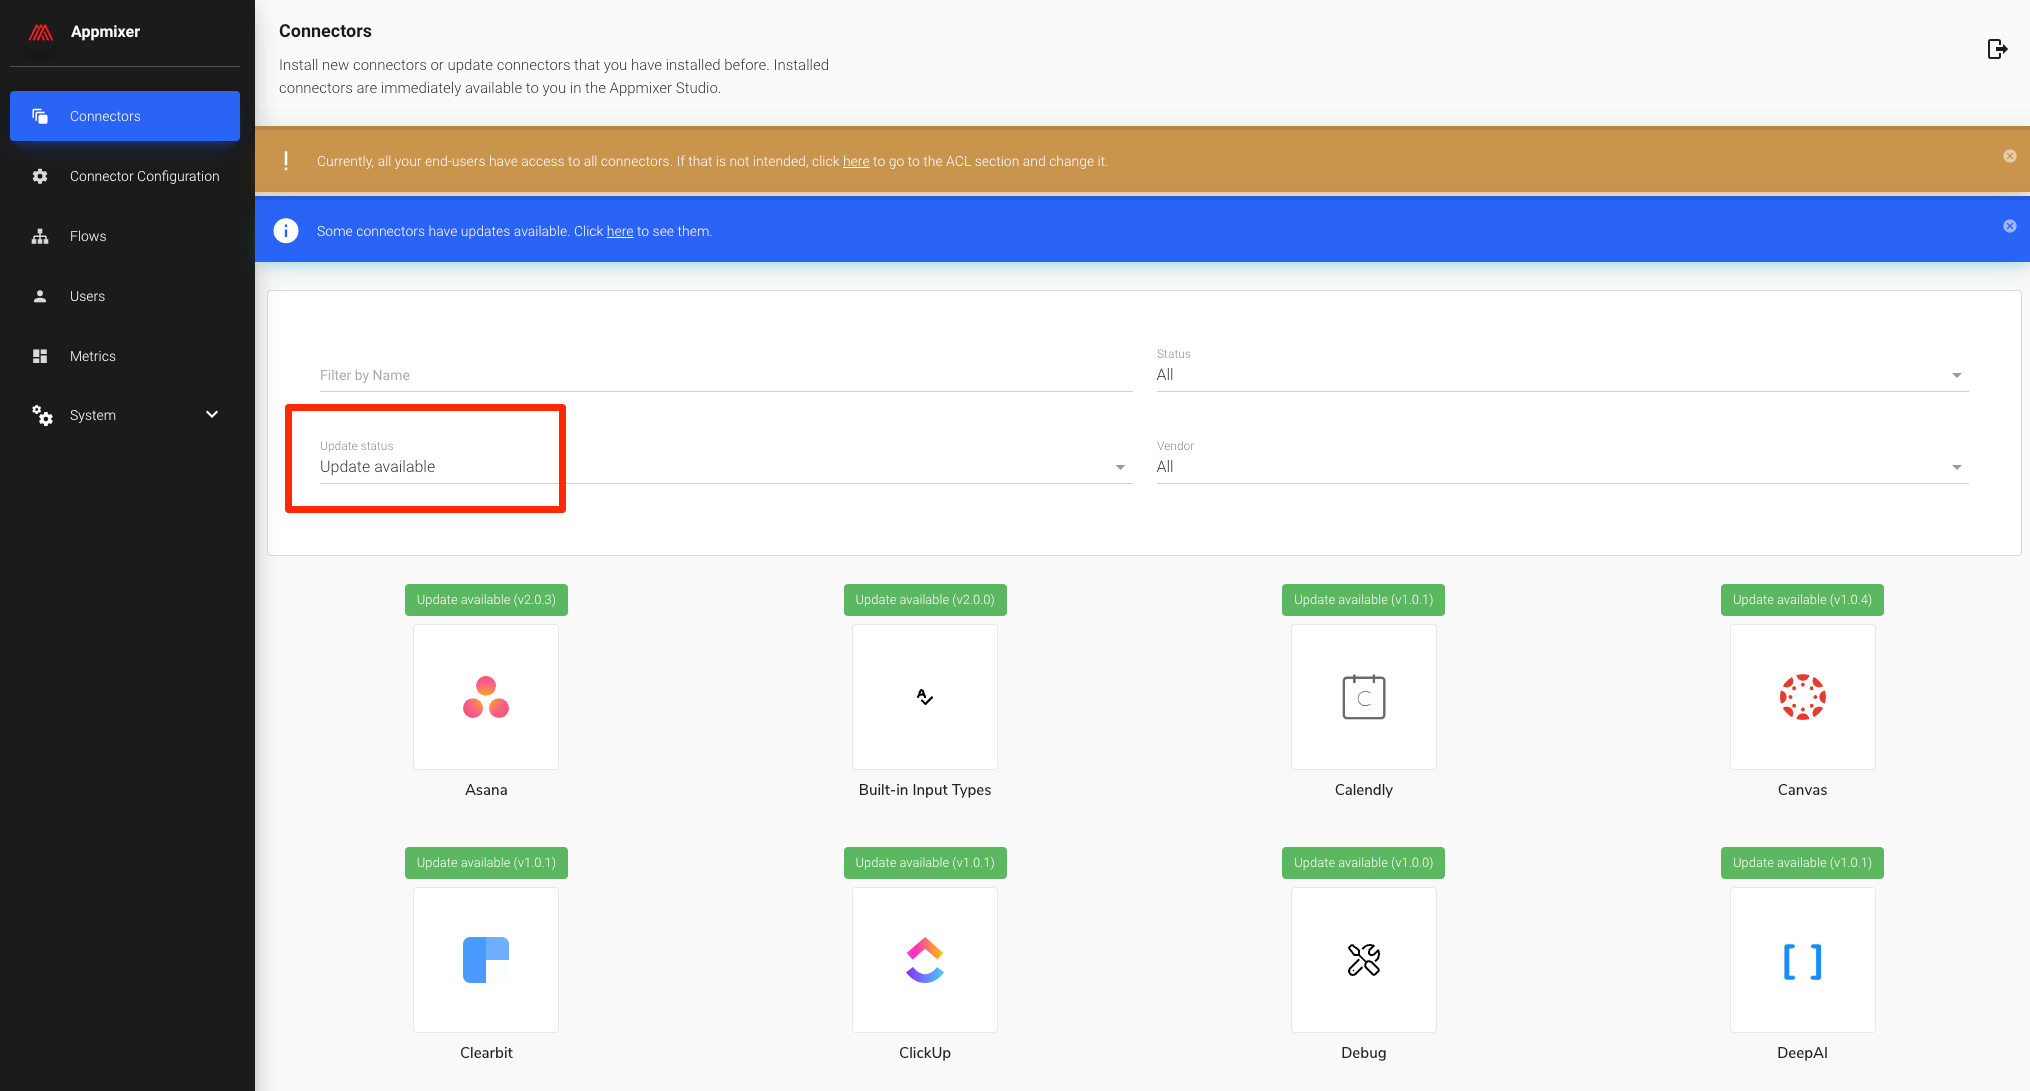
Install and Update Connectors
Manage the modules available in the system.
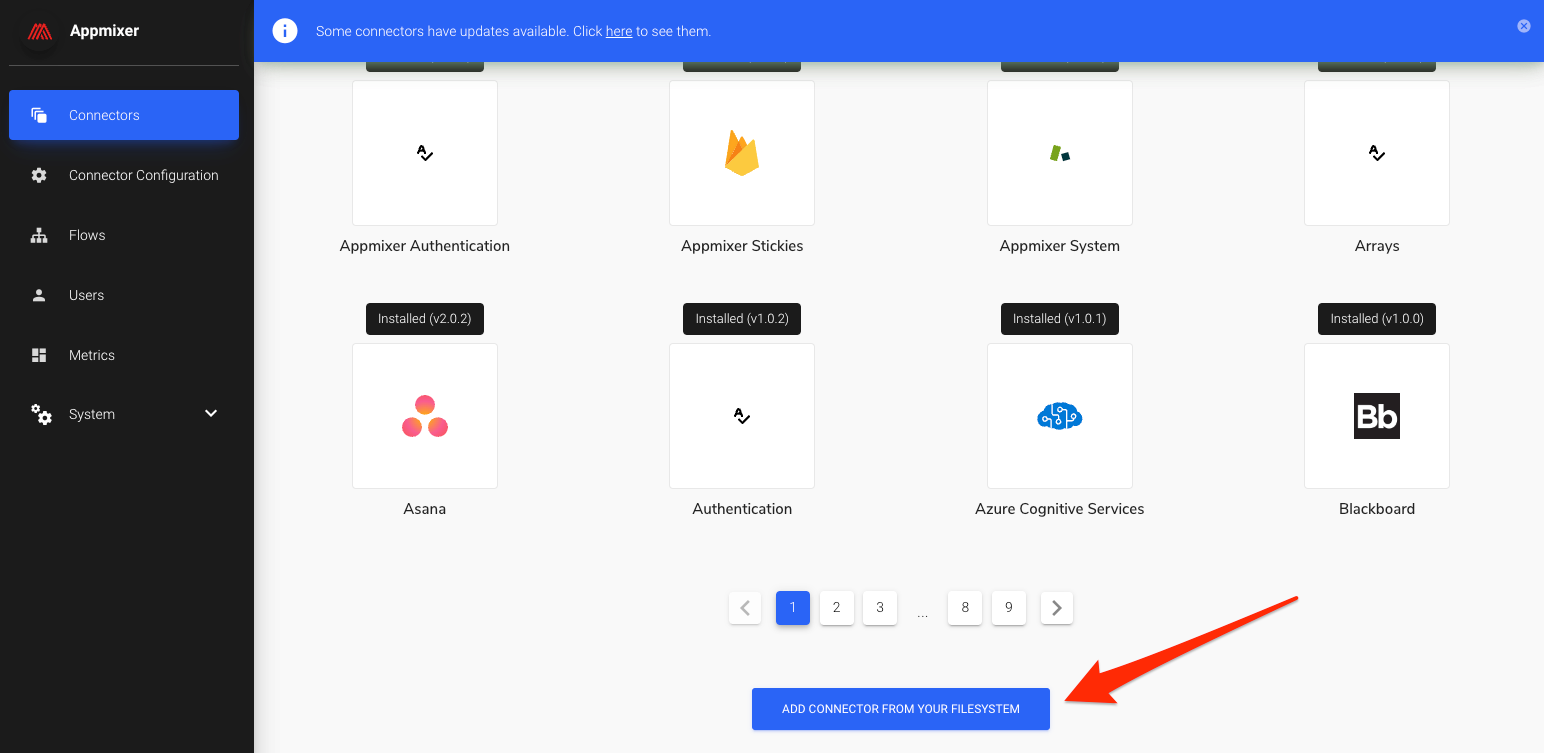
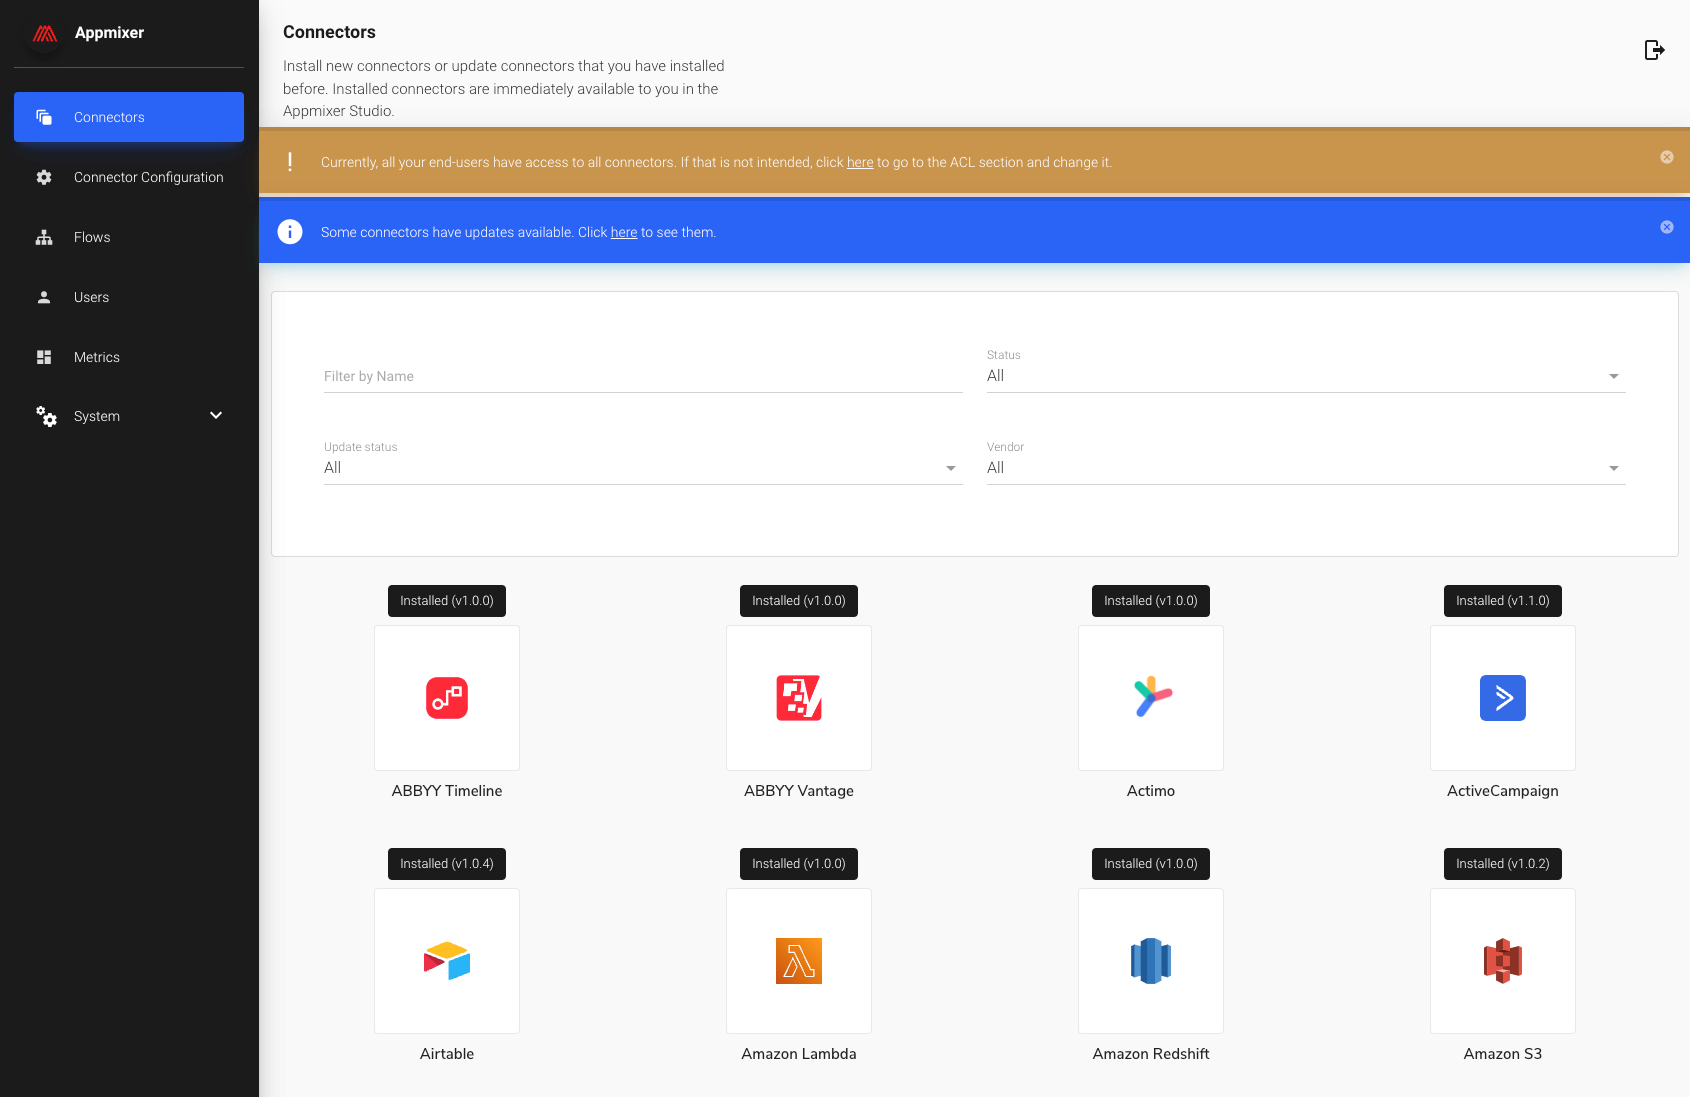
The "Connectors" section of the interface shows all available connectors that you can manage, including options to install, update, or remove them. Connectors that are already installed will display an "Installed" badge at the top. Furthermore, you have the ability to search for connectors based on various criteria, such as their name or installation status, to easily find the ones you're interested in managing.
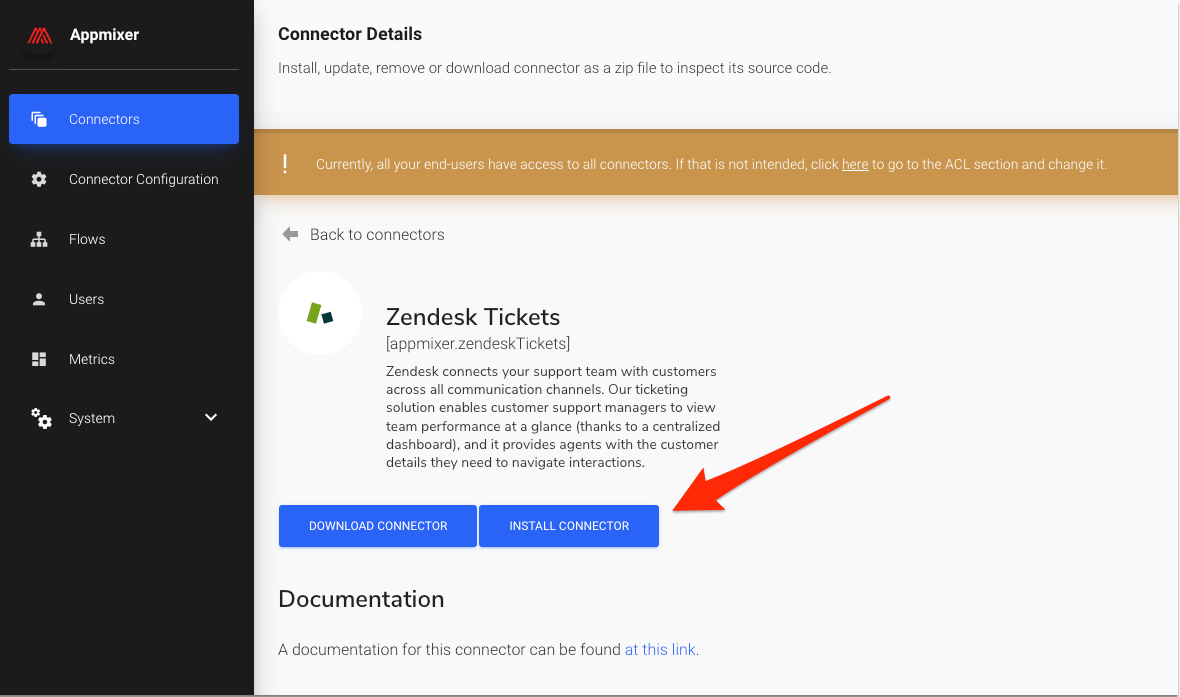
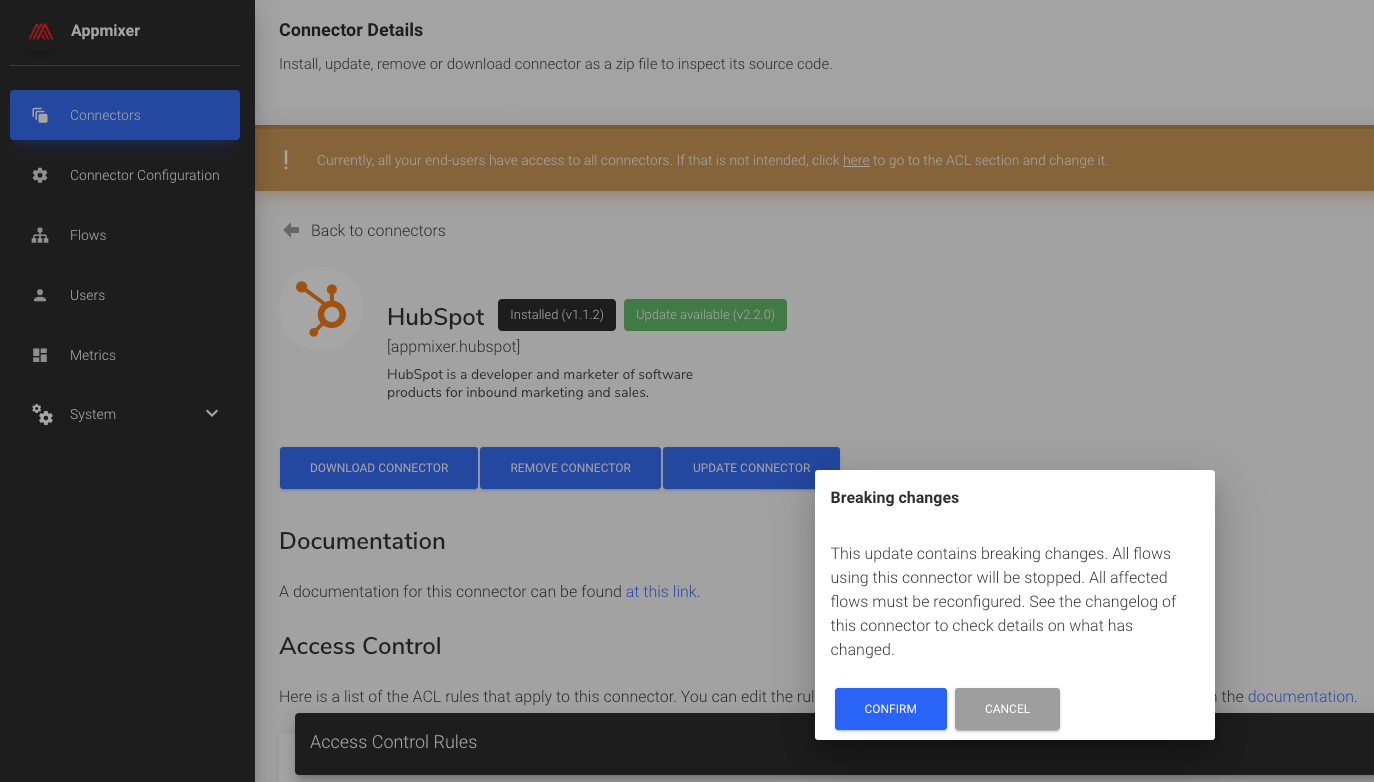
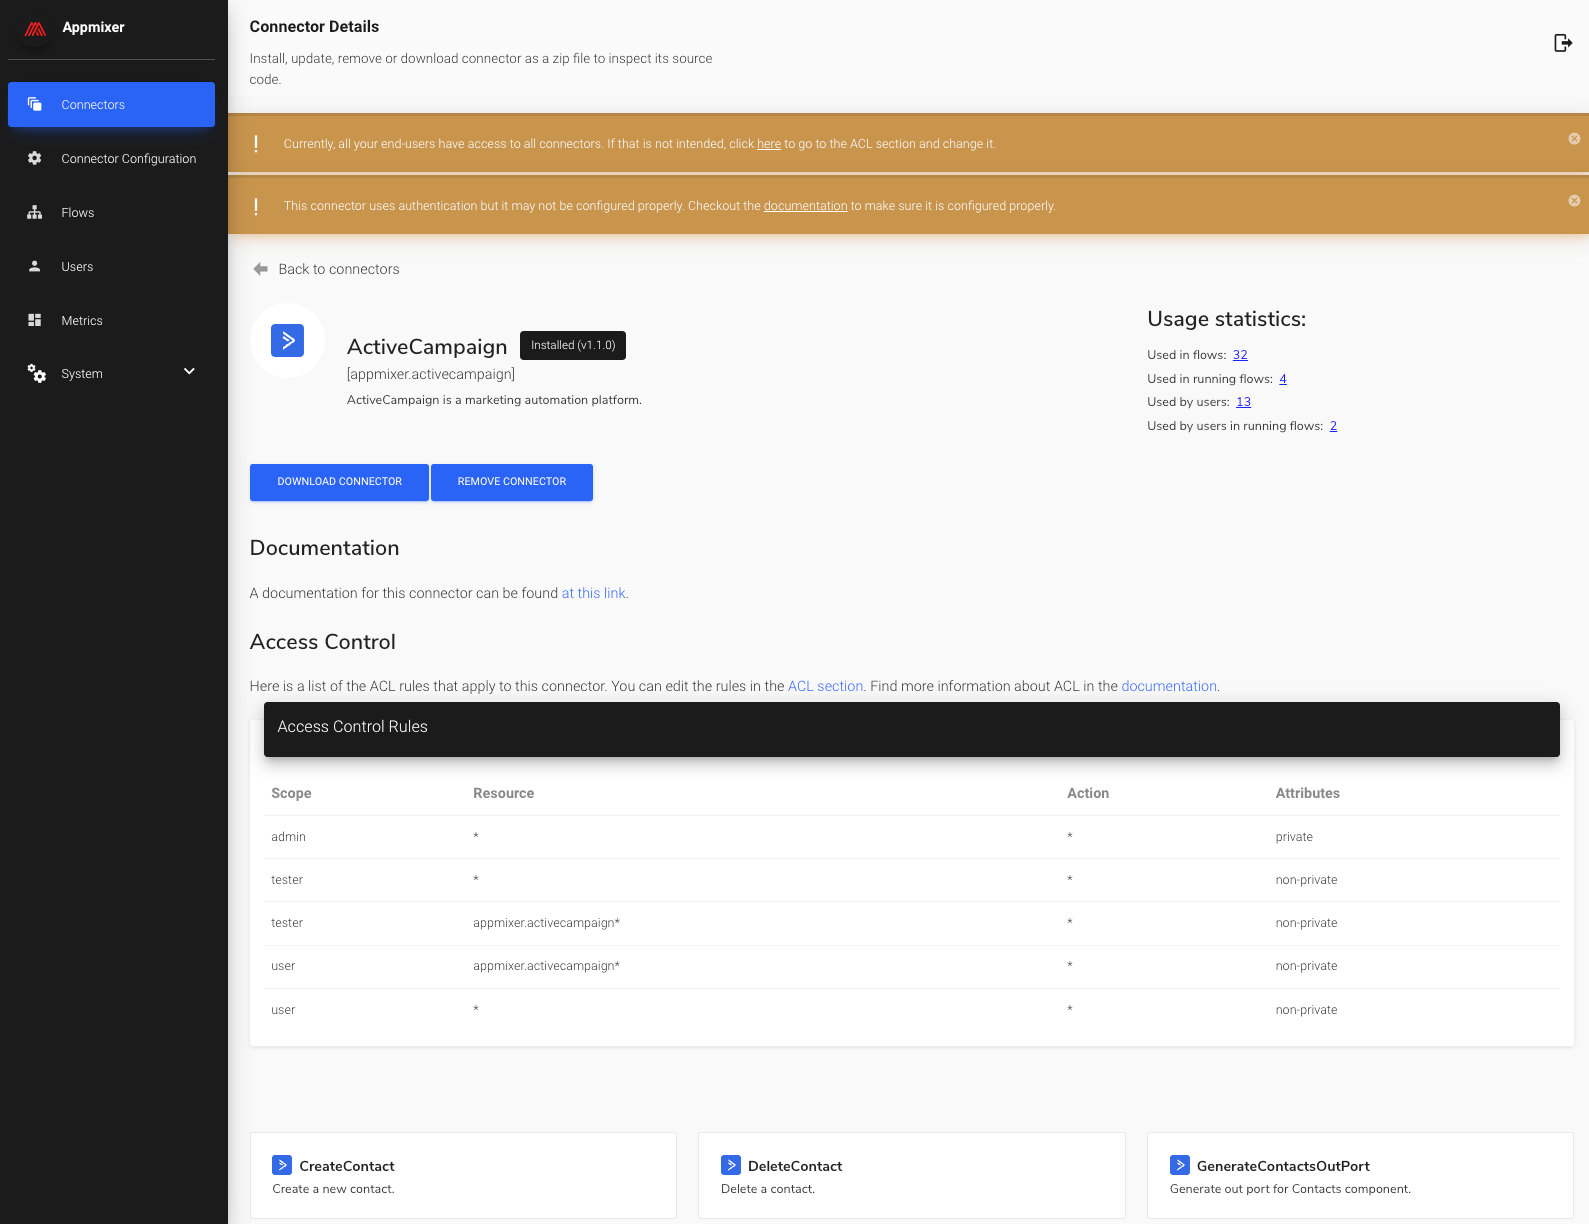
Clicking on any connector will redirect you to that connector's detailed page, where you can find more information and manage settings specific to that connector.
On the connector's detail page, you will find a comprehensive description of the connector, along with options to download the connector as a zip file, and to install, update, or remove the connector from your Appmixer tenant. Additionally, the page provides a list of the connector's components, including actions and triggers, complete with their respective descriptions. This information aids in understanding the functionality and potential use cases of each component within your workflows.
To install new connectors, simply click the "Install Connector" button found on the Connector details page.
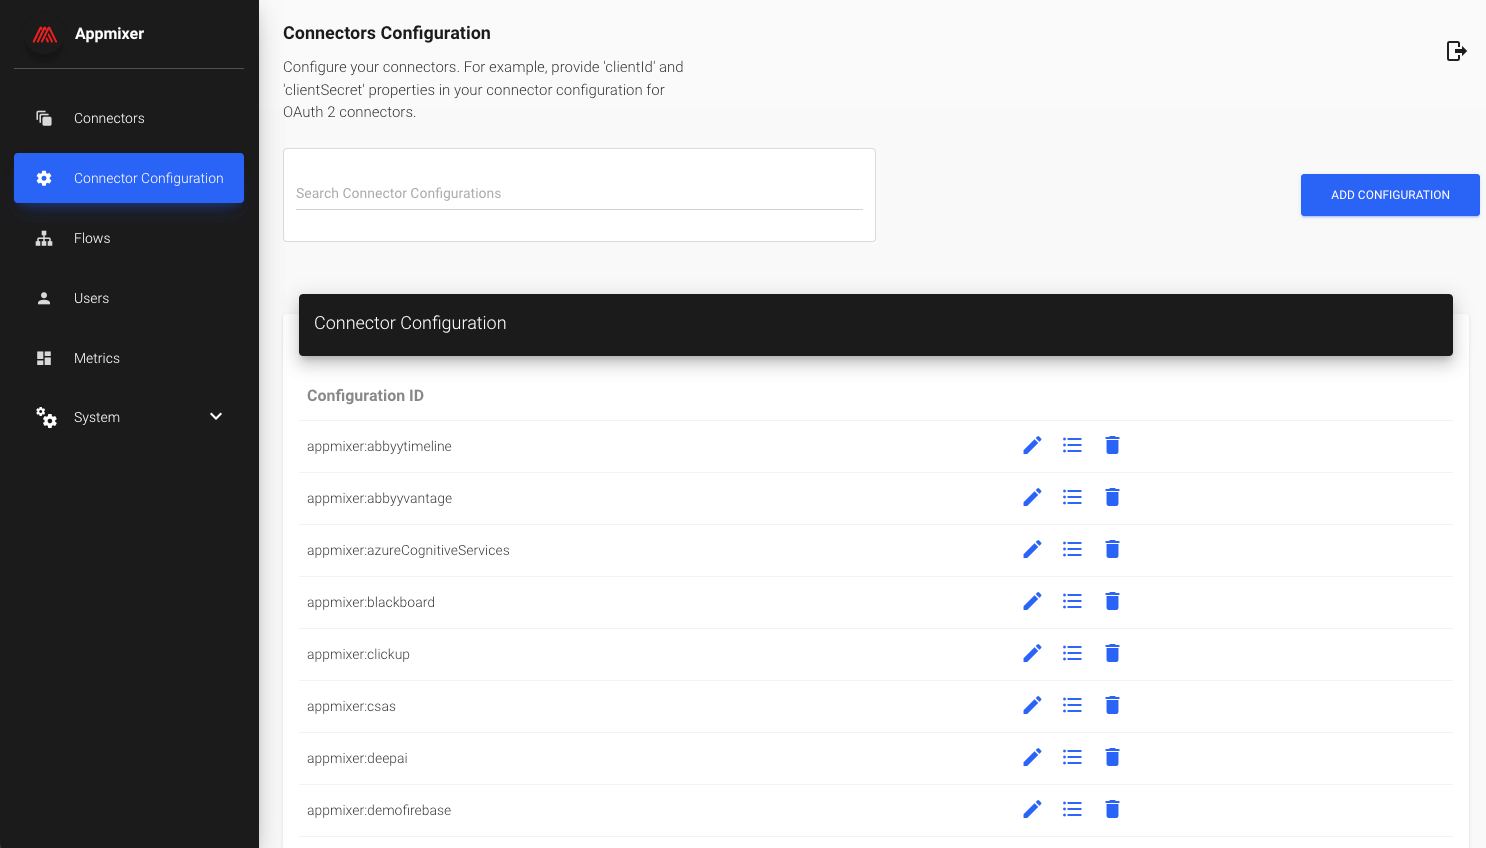
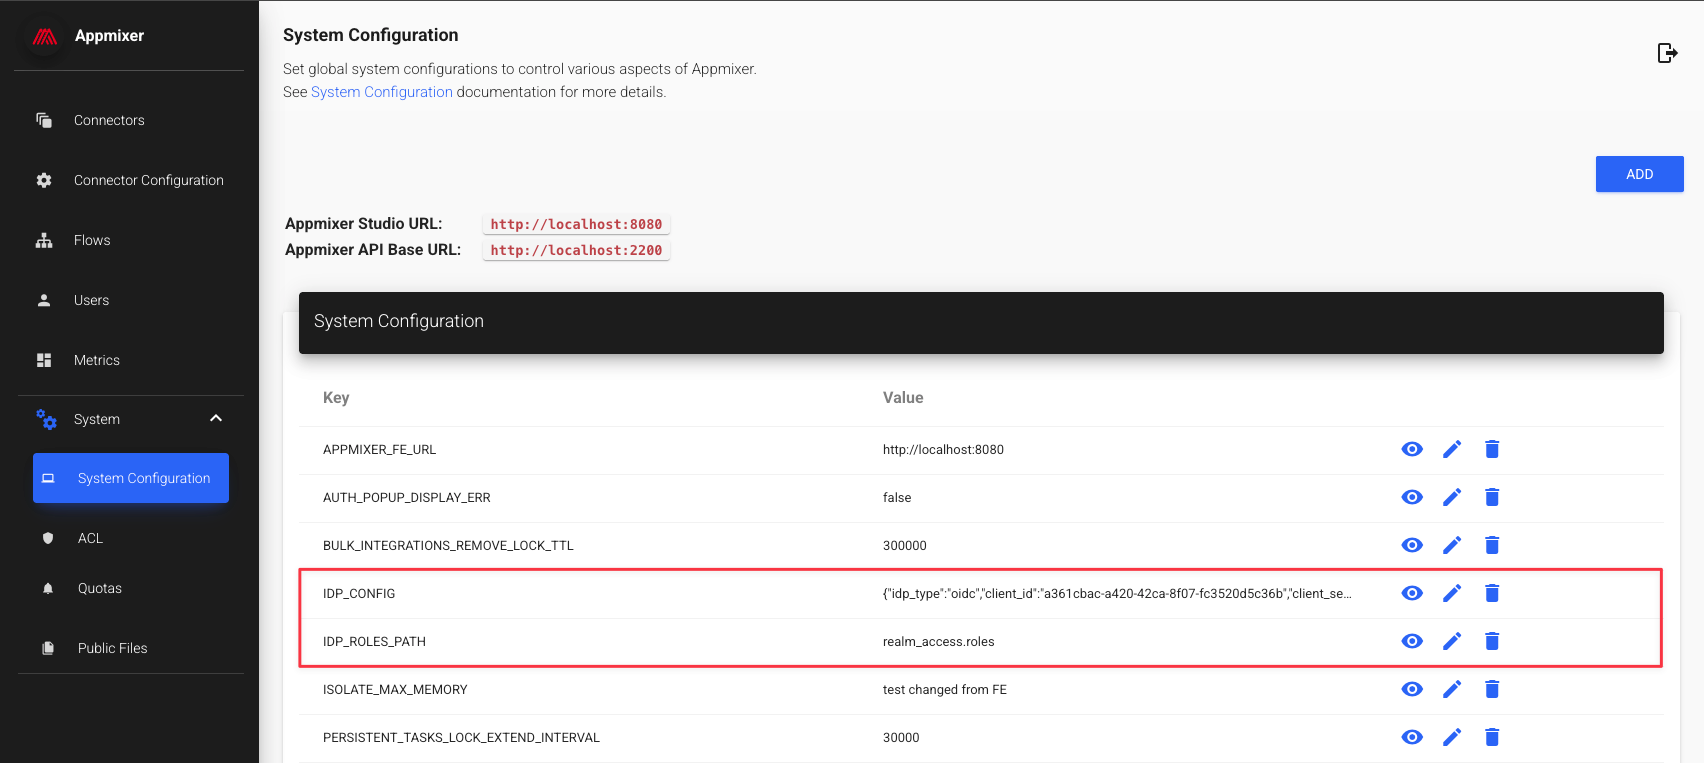
Connector Configuration
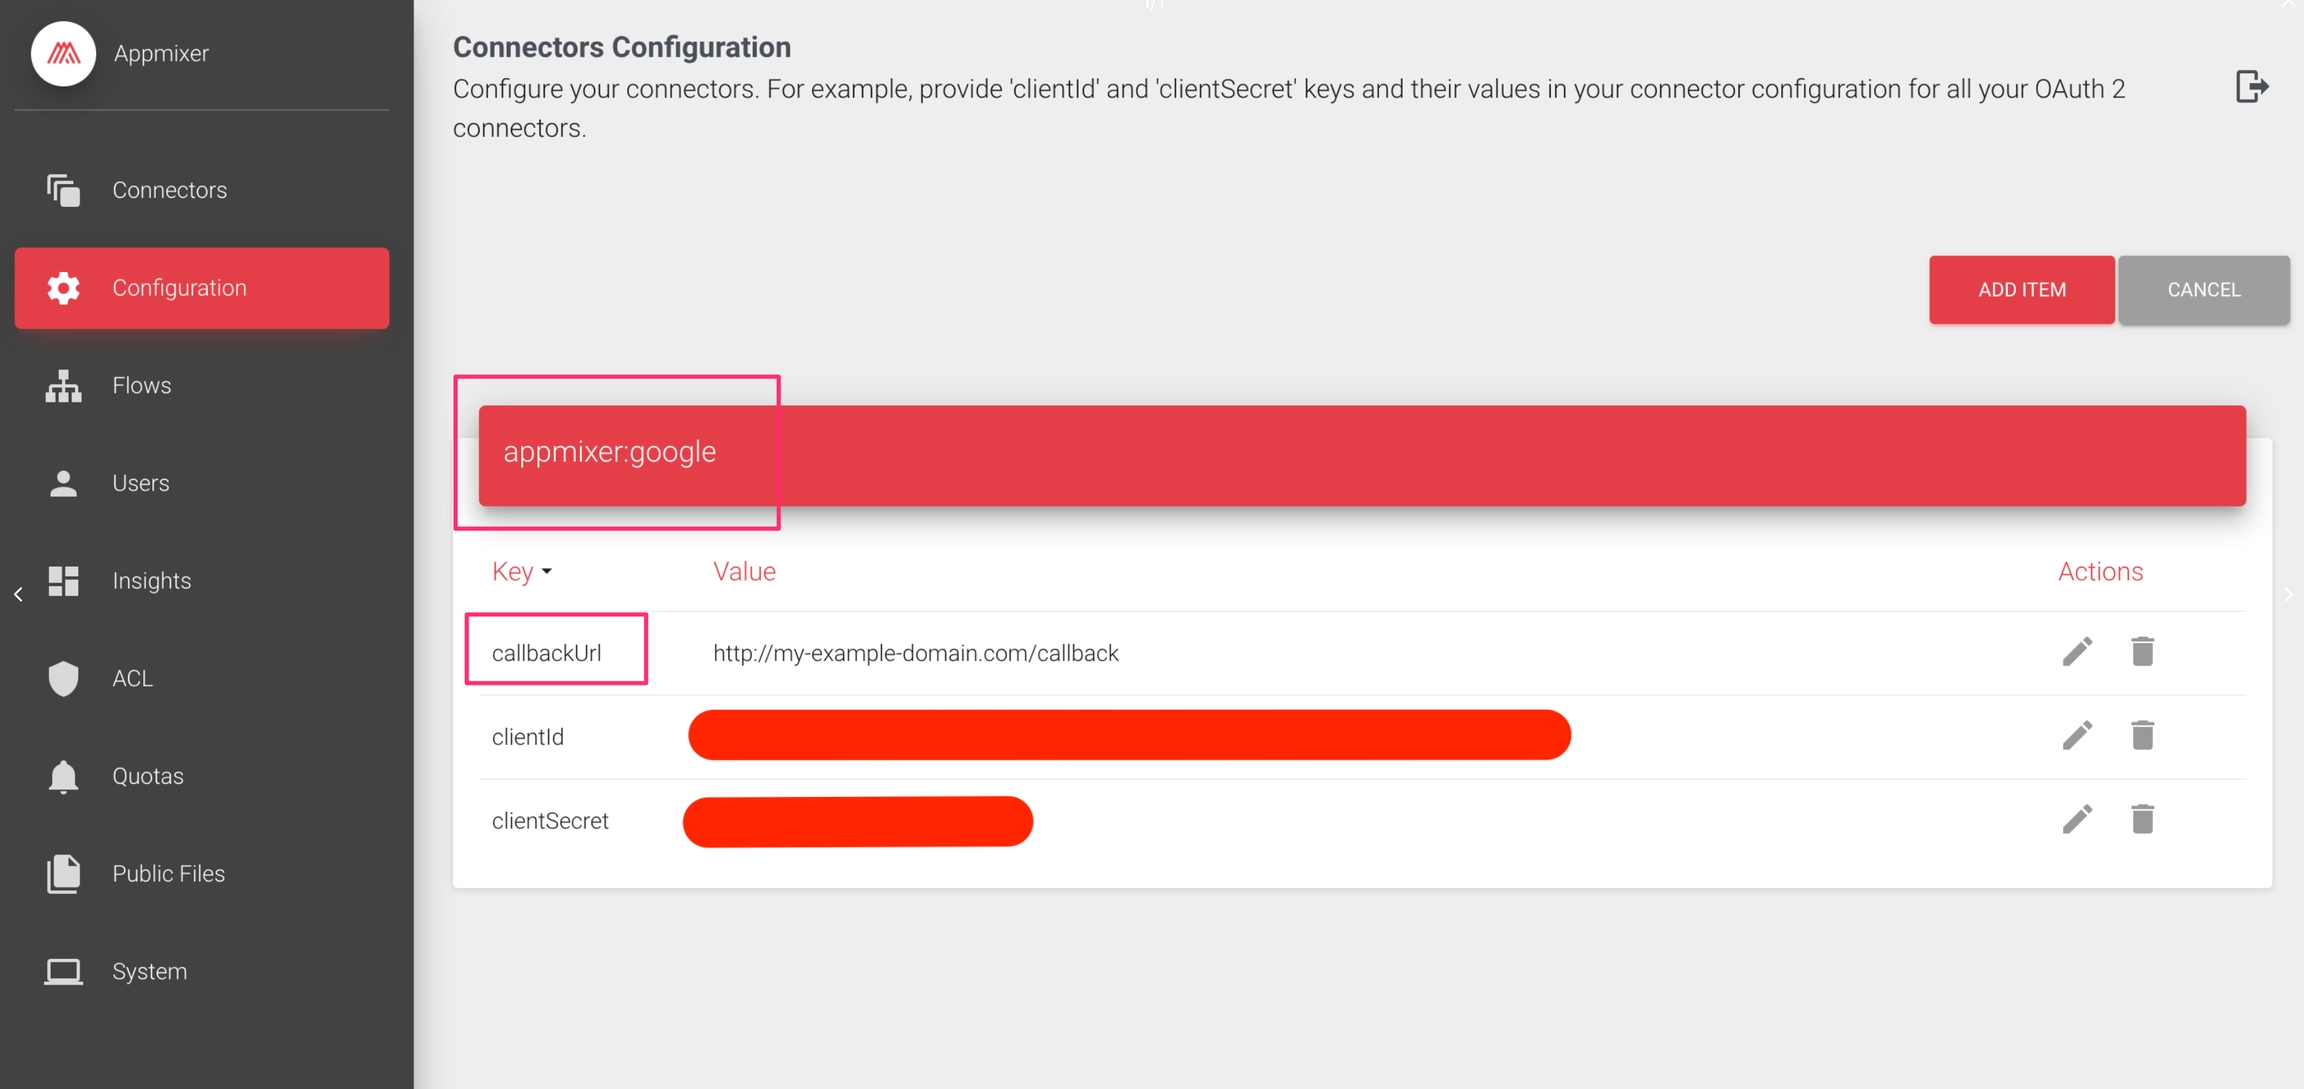
Appmixer includes a variety of ready-to-use connectors, with some being immediately operational while others necessitate user authentication with third-party systems (such as Slack, Gmail, Teams, and many others). This authentication process typically employs the OAuth 2 protocol.
Appmixer features an internal Authentication Hub, functioning as an authentication proxy, which simplifies the setup process by eliminating the need to register your own OAuth credentials with third-party services. This means all OAuth-based connectors offered by Appmixer are ready to use right out of the box. However, should you prefer to use your own OAuth credentials for enhanced customization or compliance reasons, you have the flexibility to do so. This can be done for all or selected connectors by specifying your OAuth credentials (clientId and clientSecret) as outlined below.
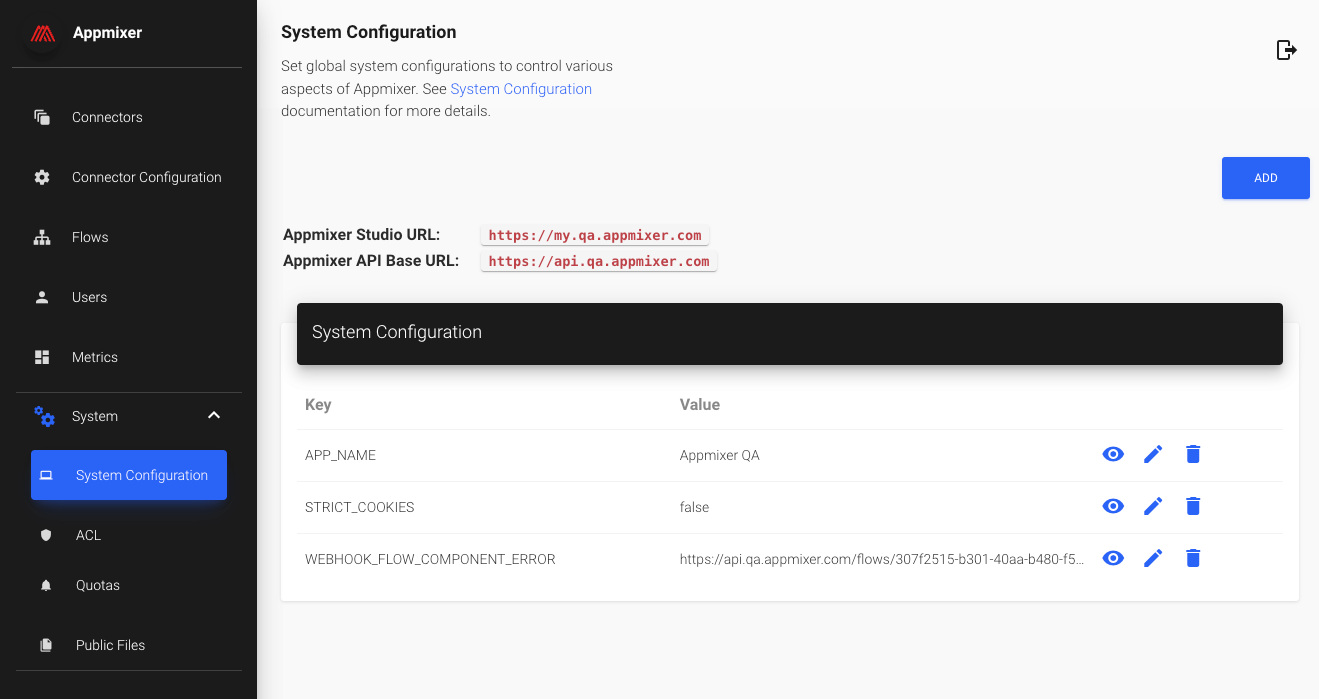
The Connector Configuration is available via the Appmixer Backoffice interface:
Custom OAuth Credentials
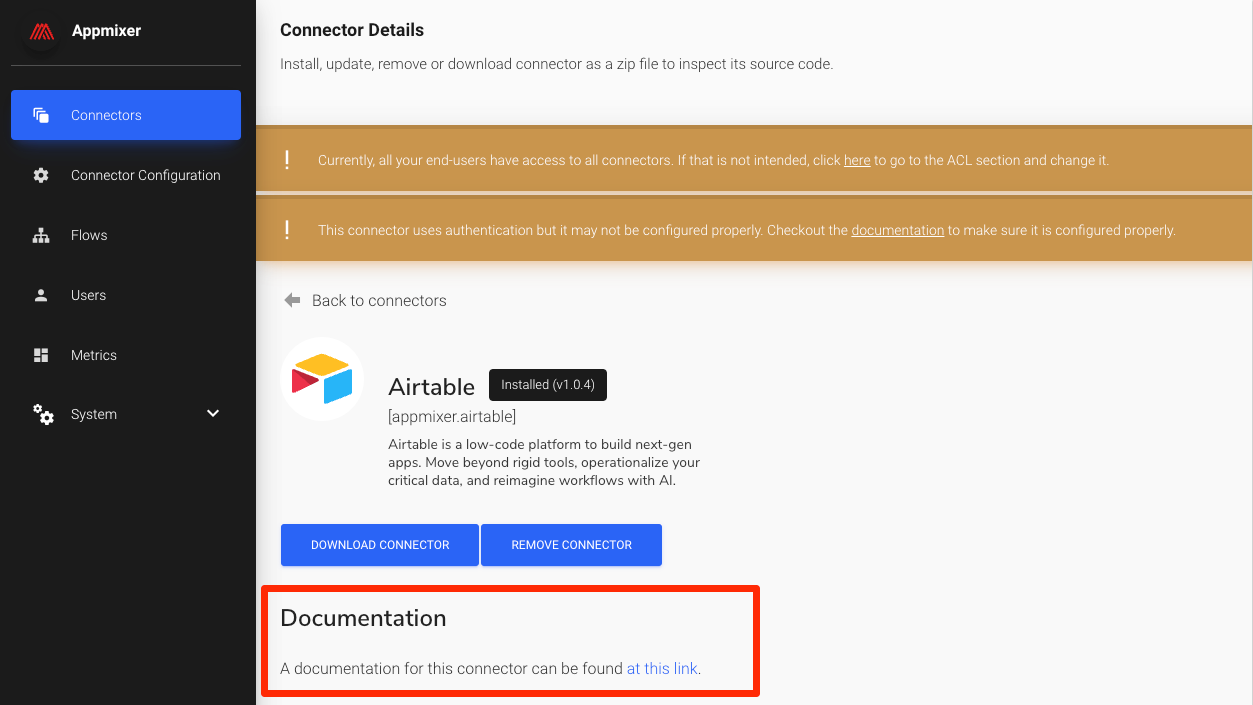
For detailed information on configuring specific connectors, please consult the section of our documentation. This section will guide you through the necessary steps and provide insights on setting up each connector according to your needs.
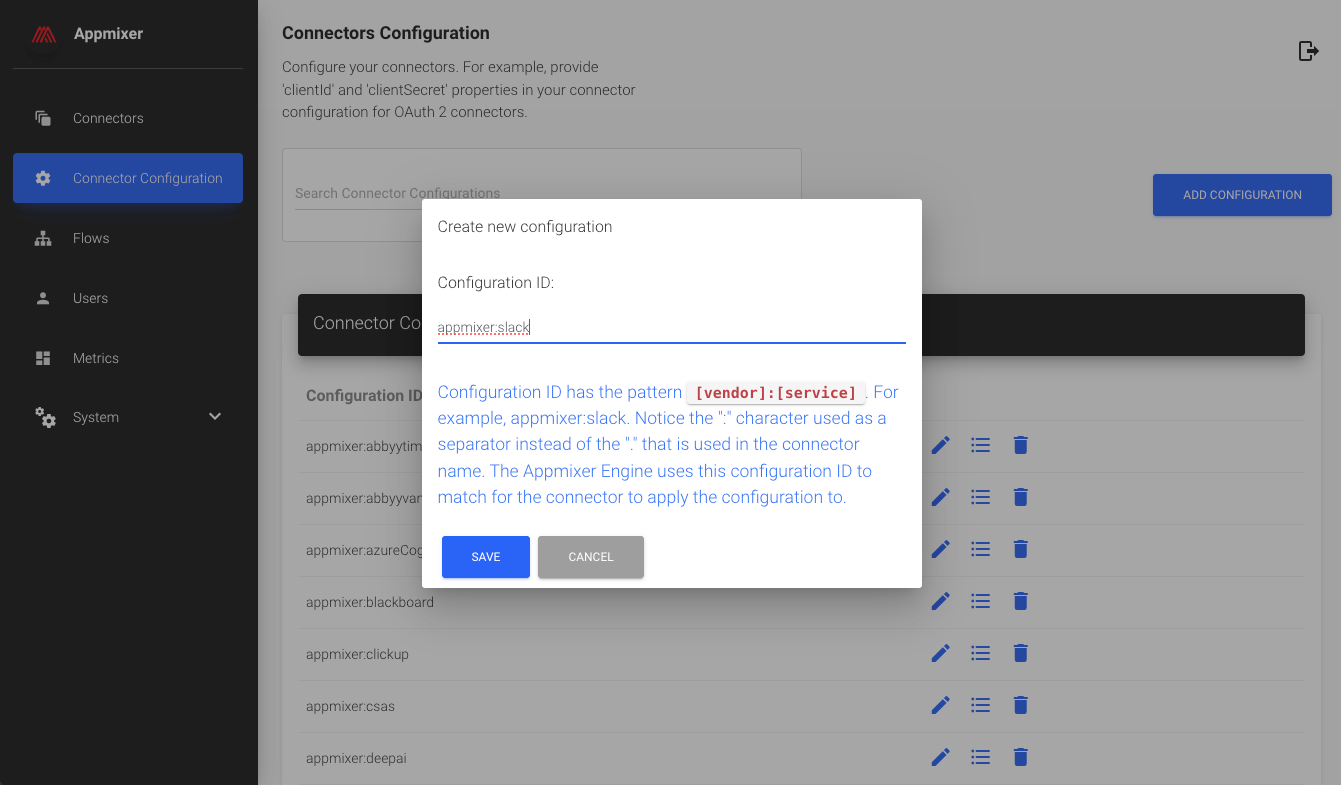
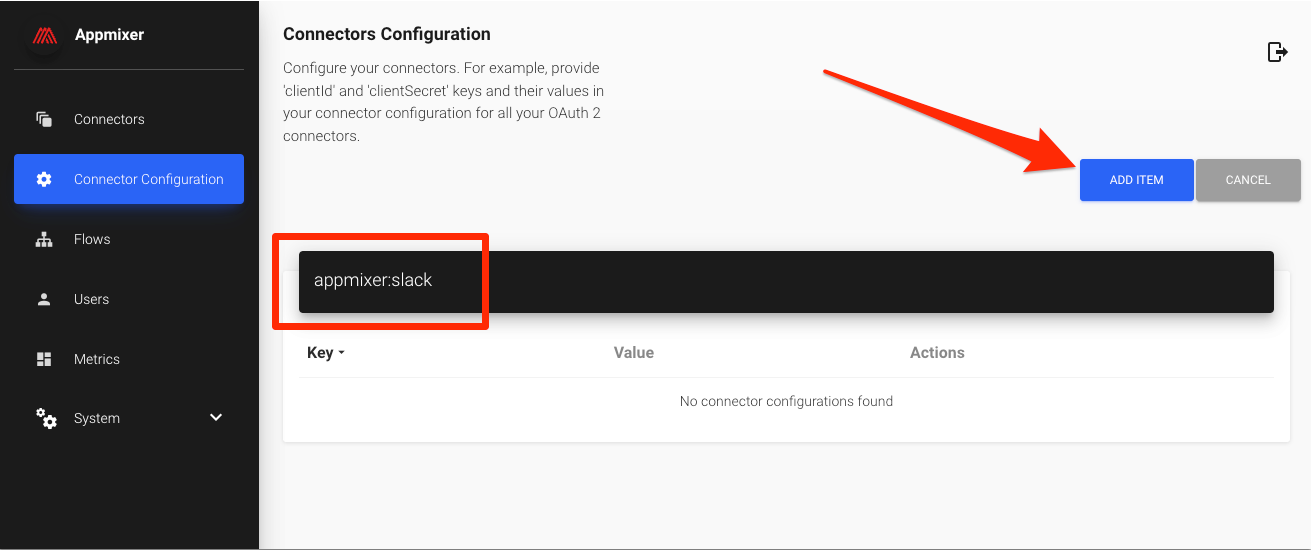
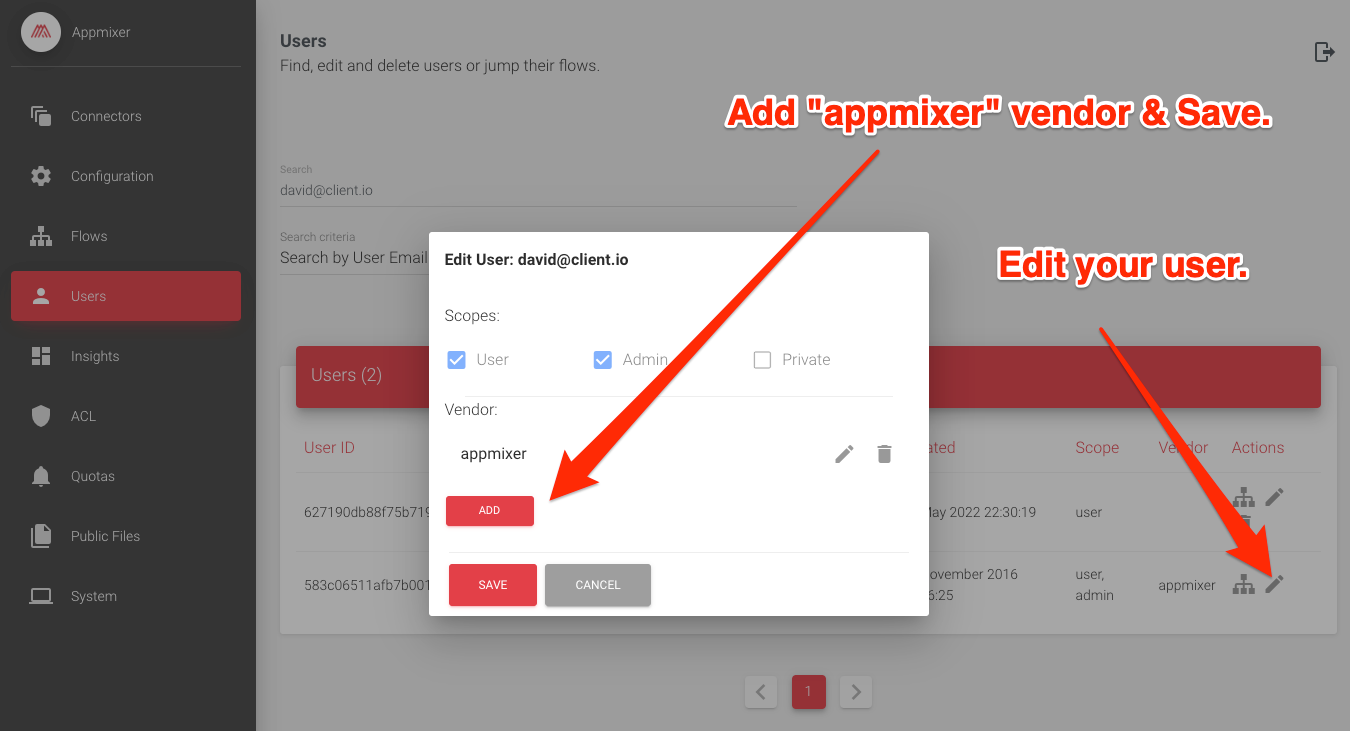
Appmixer offers several methods for configuring the OAuth credentials, with the Appmixer Backoffice being the simplest. For instance, if you're looking to use Slack components, you'll first need to register your application on the Slack developer portal, where you'll receive a clientId and clientSecret. After obtaining these, you can save them into Appmixer as follows:
For the Configuration ID, use appmixer:slack. You are now ready to add the Slack OAuth app clientId and clientSecret.
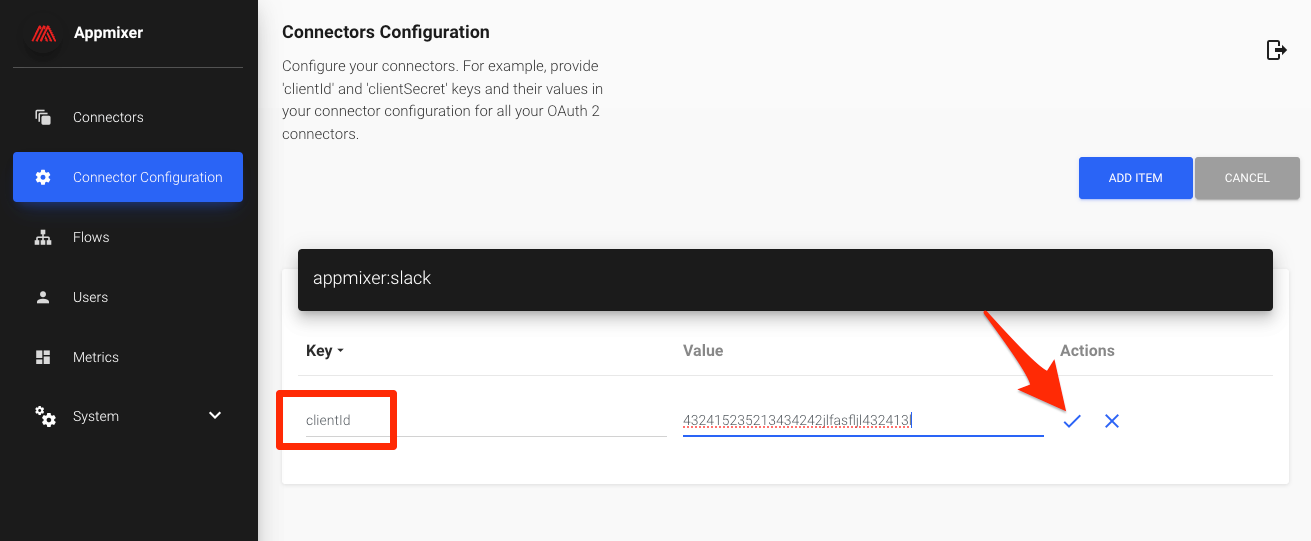
Add a key named clientId (it's crucial to use exactly clientId, not clientID or any other variation) and assign it the clientId you received from Slack.
Following that, add the clientSecret you received from Slack.
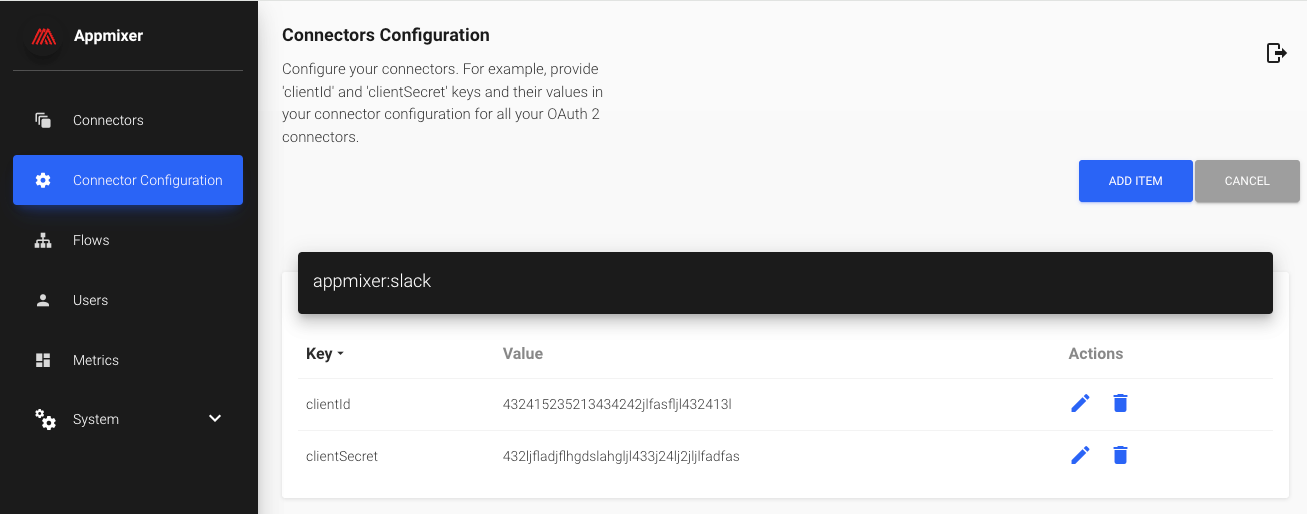
Once you've added the clientId and clientSecret, you're all set to utilize the Slack components within Appmixer.
It's possible to include any key/value pairs in this configuration. These pairs will be accessible within your component's code via the context.config object (or context.auth), and in the case of auth.js files, directly within the context object.
This method proves particularly beneficial for API key-based authentications in your custom connectors when you prefer not to present your end-users with a form to enter their own API key. Instead, opting to use a single, global API key for all users allows them to freely use the connector without the necessity for individual authentication. This approach enhances user convenience by simplifying access and usage of the connector, ensuring a seamless experience without compromising on security or functionality.
A prime example is the DeepAI component. For utilizing the Deep AI API, an API key is required. However, instead of having your users supply this API key individually, you might prefer to use a single API key across all users for simplicity and ease of management. This setup allows for a more streamlined user experience, with further details available in the .
Domain Verification
In scenarios where third-party developer consoles require the verification of domain ownership for domains used as callback URLs in OAuth-registered applications, you might face challenges (for example with configurations like the ). Given that your Appmixer tenant operates under a domain such as api.YOUR_TENANT.appmixer.cloud and you lack access to this domain's DNS settings, your options for domain verification can seem limited.
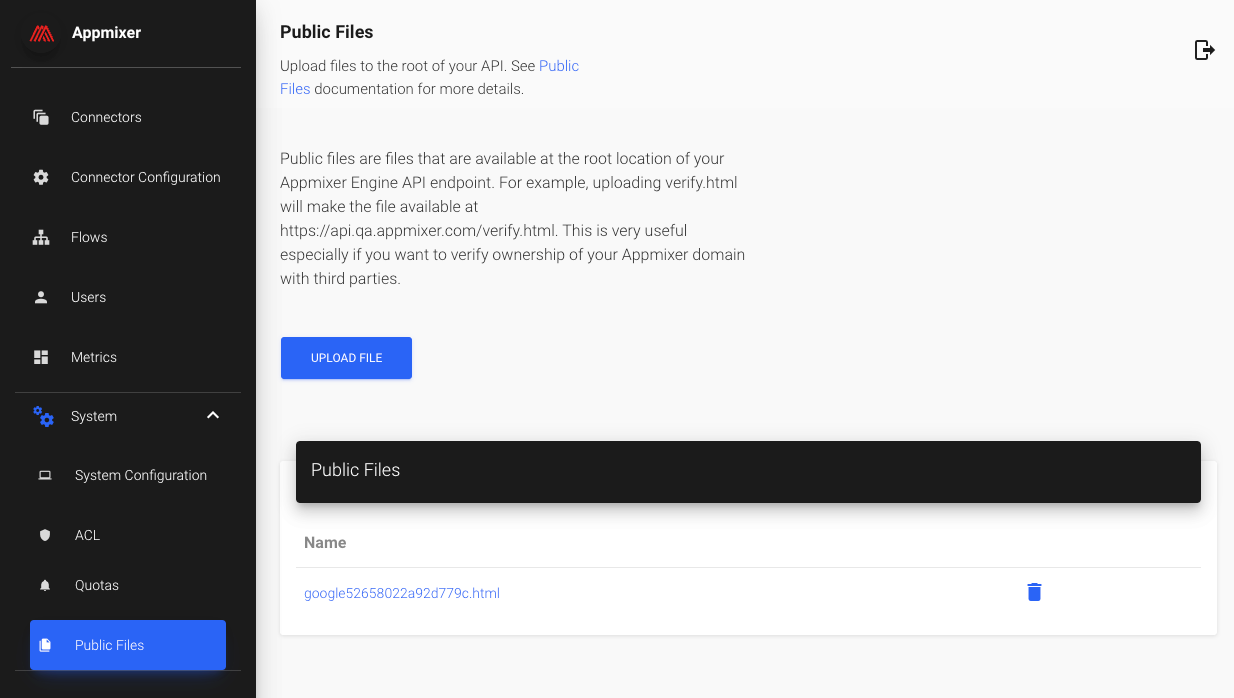
To facilitate this process, the Appmixer Backoffice includes a tool designed specifically for domain verification purposes. This tool enables you to upload a file that the third-party service has generated for verification. Once uploaded, this file becomes accessible at the root of your domain. The third-party service verifies domain ownership by checking for the presence of this file at the specified root location on your domain, thus confirming that you indeed control the domain. This public file method provides a straightforward solution for verifying your Appmixer tenant domain without the need for DNS access.
To upload a public file to the root location, navigate to the Appmixer Backoffice interface and select the "System -> Public Files" option from the left menu. On this page, you'll find the functionality to upload your files.
Once you've uploaded your files through the Appmixer Backoffice, they will be accessible via your Appmixer Tenant API URL. For instance, if you upload a file named google52658022a92d779c.html, it can be accessed at https://api.YOUR_TENANT.appmixer.cloud/google52658022a92d779c.html as well as at the well-known directory URL https://api.YOUR_TENANT.appmixer.cloud/.well-known/google52658022a92d779c.html. This accessibility ensures that third-party services can easily verify domain ownership by locating the specified file at your domain's root or the well-known directory.
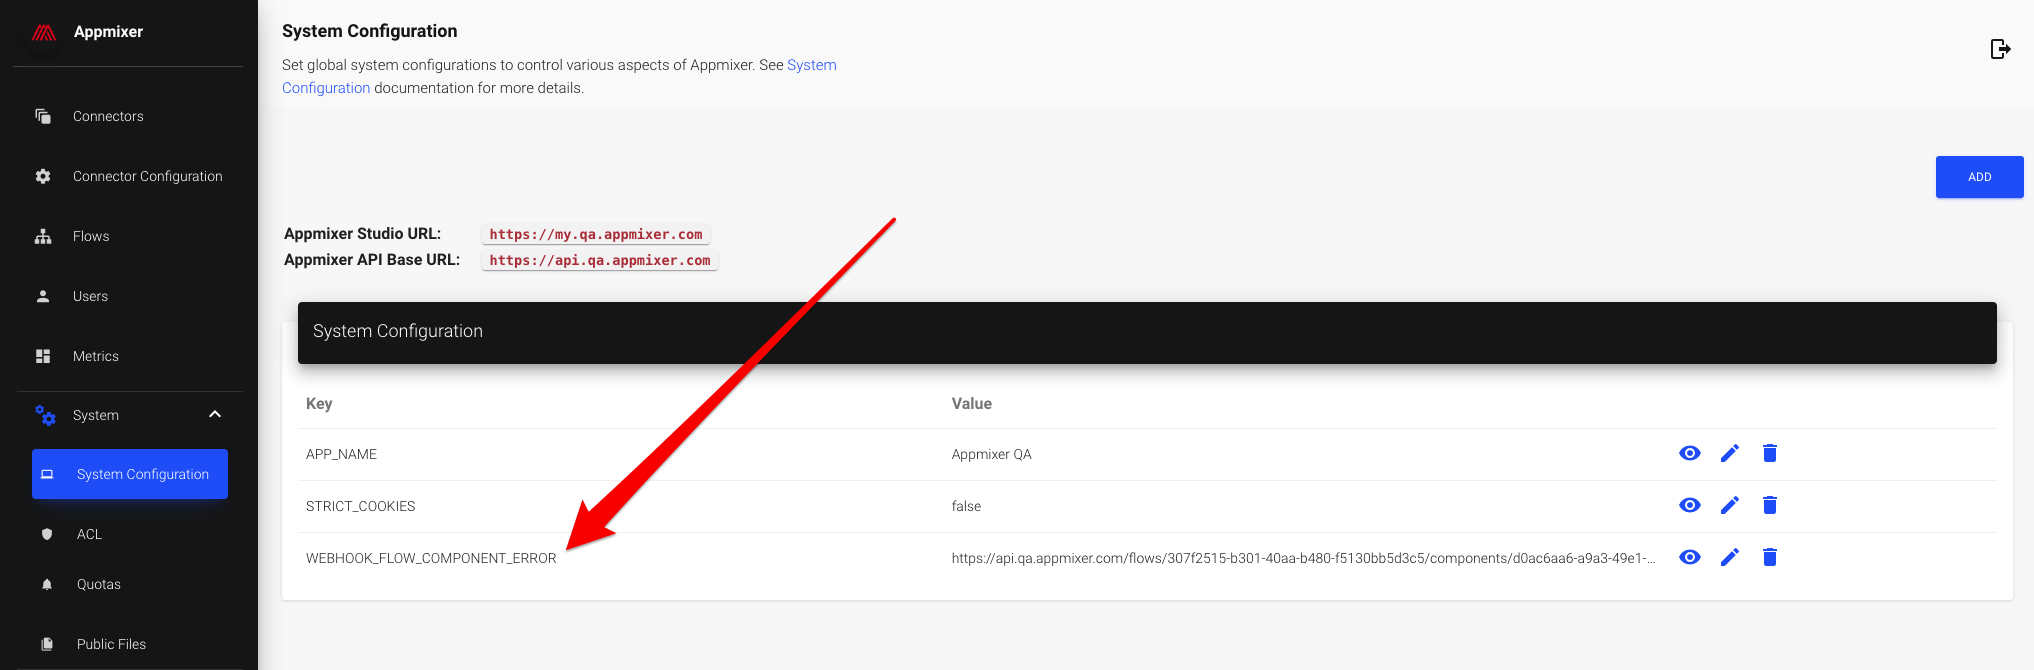
For customers managing their own Appmixer installations, there's flexibility to adjust where these public files are hosted through the PUBLIC_FILES_PREFIX system configuration option. This setting allows you to tailor the file access paths to suit your infrastructure requirements, providing further control over how you manage domain verification and public file accessibility.
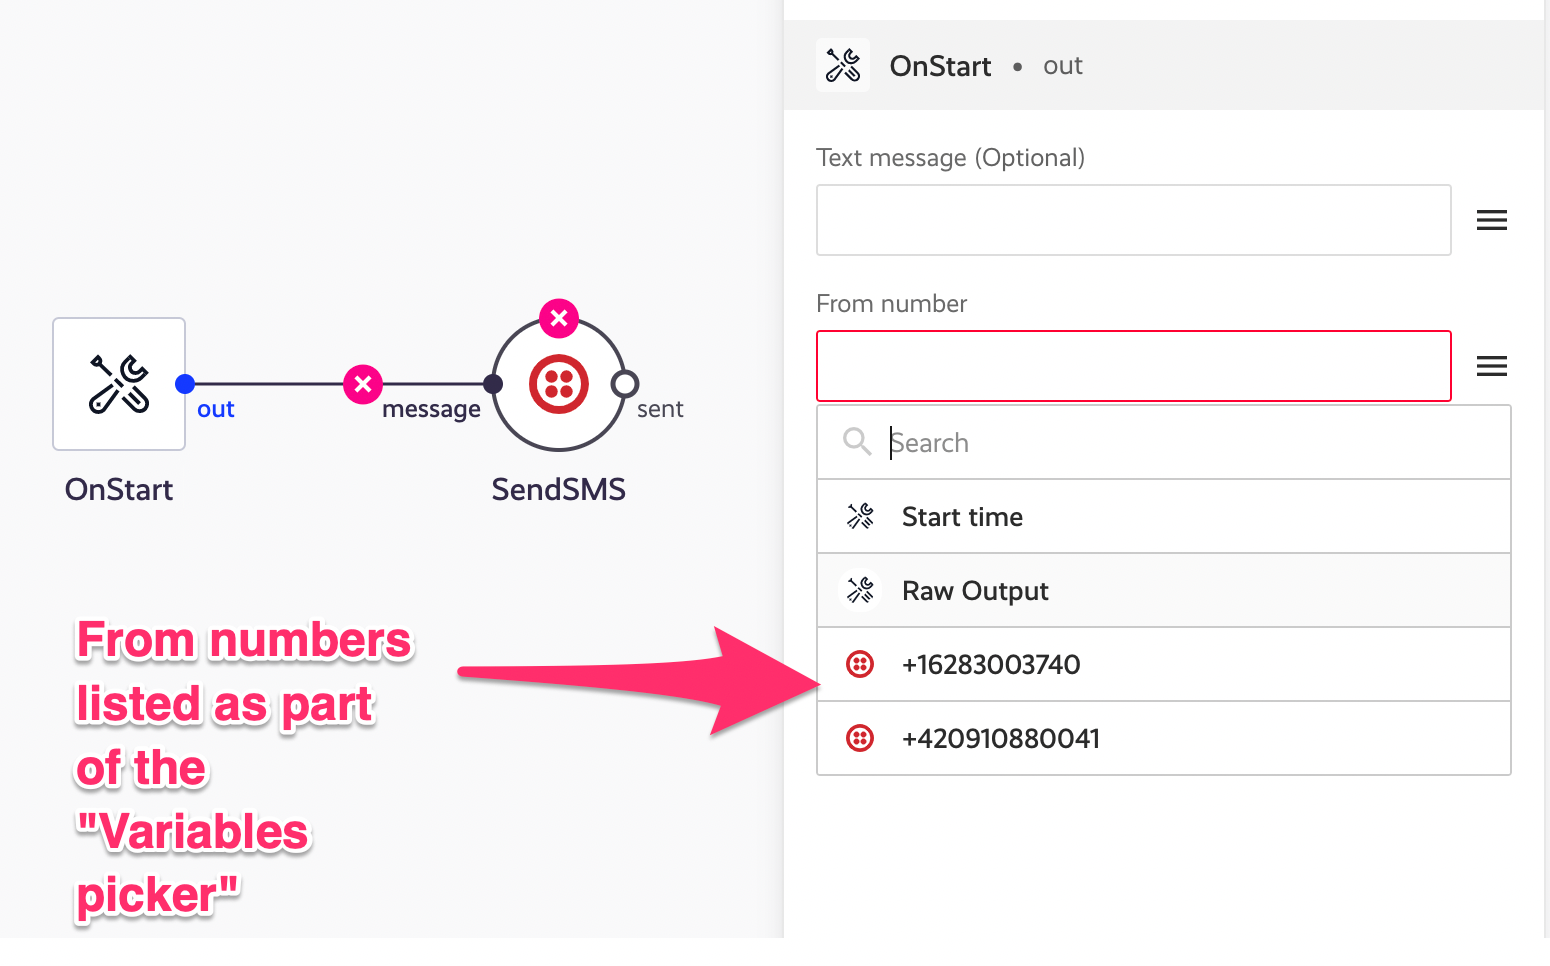
Use App Events
App Events provide the simplest method for sending data to Appmixer. To utilize App Events, select the OnAppEvent trigger from the Utilities category of connectors:
Note that another convenient way to trigger your automations is by using the Webhook component from the HTTP module. However, the Webhook component may not be as effective for building integration templates. This is because when integrations are activated by end-users, the Webhook component generates a new URL each time since each activated integration is a new instance derived from the template. Consequently, the Webhook URL displayed in the inspector panel (configuration panel) during template creation will not match the URLs in the actual integration instances.
In contrast, the OnAppEvent trigger creates a named webhook, allowing you to target a specific user with specific events and data by calling it with the actual end-user access token.
In summary, if you only care about automations where the webhook URL is known, you can use Webhook. If you build integration templates, use OnAppEvent instead.
Assign a meaningful name to your app event and consider providing sample data. Although including sample data is optional, it facilitates referencing the data from the app event in subsequent components.
Providing an Event Data Example populates all detected JSON fields as variables in subsequent connected components. This allows you to easily use and reference these data placeholders throughout your integration, ensuring that the necessary information is accessible and can be dynamically incorporated into various parts of your workflow. This practice enhances the configurability and functionality of your automations by clearly mapping out how data flows between components.
Triggering OnAppEvent using Appmixer SDK
Once your automation or integration templates are built, published, and users begin activating your integrations, you can trigger app events by using the appmixer.api.sendAppEvent(EVENT, DATA) function provided by the client-side Appmixer SDK. This function enables you to programmatically send events and associated data through your application, facilitating real-time interaction and response within your integrations.
This triggers all the integrations or automations associated with the user who is authenticated with the access token used in the SDK, specifically targeting those that begin with the OnAppEvent configured with the Event Name set to contact-created.
You can also trigger the event by using the built-in UI in Appmixer Studio:
Open the Integration Designer in Studio and create a new integration with an OnAppEvent trigger.
Instead of publishing, click Start Test to run a temporary test instance of your integration.
While the test is running, click Test → Send App Event in the top bar.
Enter the event name (as configured in your trigger) and any test data you want to send.
Submit the form to trigger your integration test and observe the results before publishing.
Triggering OnAppEvent using HTTP requests
Alternatively, you can trigger the OnAppEvent from either client-side or backend-side code by sending an HTTP POST request to the endpoint https://YOUR_APPMIXER_TENANT_API_URL/plugins/appmixer/utils/appevents/events/EVENT. When making this request, include the event data in the payload. This method allows you to directly interact with the Appmixer system via HTTP, providing flexibility to trigger events from various parts of your application infrastructure.
If you don't have the access token for a virtual user, you can obtain it by using their username and password to call the Sign-in endpoint. This process involves submitting the necessary credentials to authenticate the user, after which the endpoint will provide an access token. This token can then be used to authorize subsequent actions or API calls under that user's identity.
Authentication
The vast majority of API endpoints within the Appmixer require an access token to execute the calls. The following methods explain how to create a user and obtain the access token through the sign-in endpoint.
Sign in a user with credentials and get their access token.
curl -XPOST "https://api.appmixer.com/user/auth" -H "Content-type: application/json" -d '{ "username": "abc@example.com", "password": "abc321" }'
You can sign in either with your username and password or with your email and password.
Name
Type
Description
POSThttps://api.YOUR_TENANT.appmixer.cloud/user
Create user. By default, this endpoint is open (does not require authentication). This can be changed by setting the API_USER_CREATE_SCOPE . If you set the value of API_USER_CREATE_SCOPE to for example admin, then an admin token will be required to call this API.
curl -XPOST "https://api.appmixer.com/user" -H "Content-type: application/json" -d '{ "username": "abc@example.com", "email": "abc@example.com", "password": "abc321" }'
Name
Type
Description
or
To protect against abuse, this endpoint implements rate limiting for unauthenticated signup requests (public user registration). Rate limiting applies two layers of protection:
Email-based rate limiting: Limits signup attempts per email address
IP-based rate limiting: Limits signup attempts per IP address
Rate limits can be configured using environment variables:
Email-based limits:
USER_SIGNUP_RATE_LIMIT_EMAIL - Maximum signups per email (default: 10)
USER_SIGNUP_RATE_LIMIT_EMAIL_WINDOW_MS - Time window in milliseconds (default: 3600000 = 1 hour)
IP-based limits:
USER_SIGNUP_RATE_LIMIT_IP - Maximum signups per IP address (default: 50)
USER_SIGNUP_RATE_LIMIT_IP_WINDOW_MS - Time window in milliseconds (default: 3600000 = 1 hour)
See in the configuration guide for more details.
When a rate limit is exceeded, the API returns:
HTTP Status: 429 Too Many Requests
Error Message: Descriptive message indicating which limit was exceeded
Example responses:
Email limit: "Too many signup attempts for this email address. Please try again later."
IP limit: "Too many signup attempts from your IP address. Please try again later."
GEThttps://api.YOUR_TENANT.appmixer.cloud/user
Get user information.
curl "https://api.appmixer.com/user" -H "Authorization: Bearer [ACCESS_TOKEN]"
Files
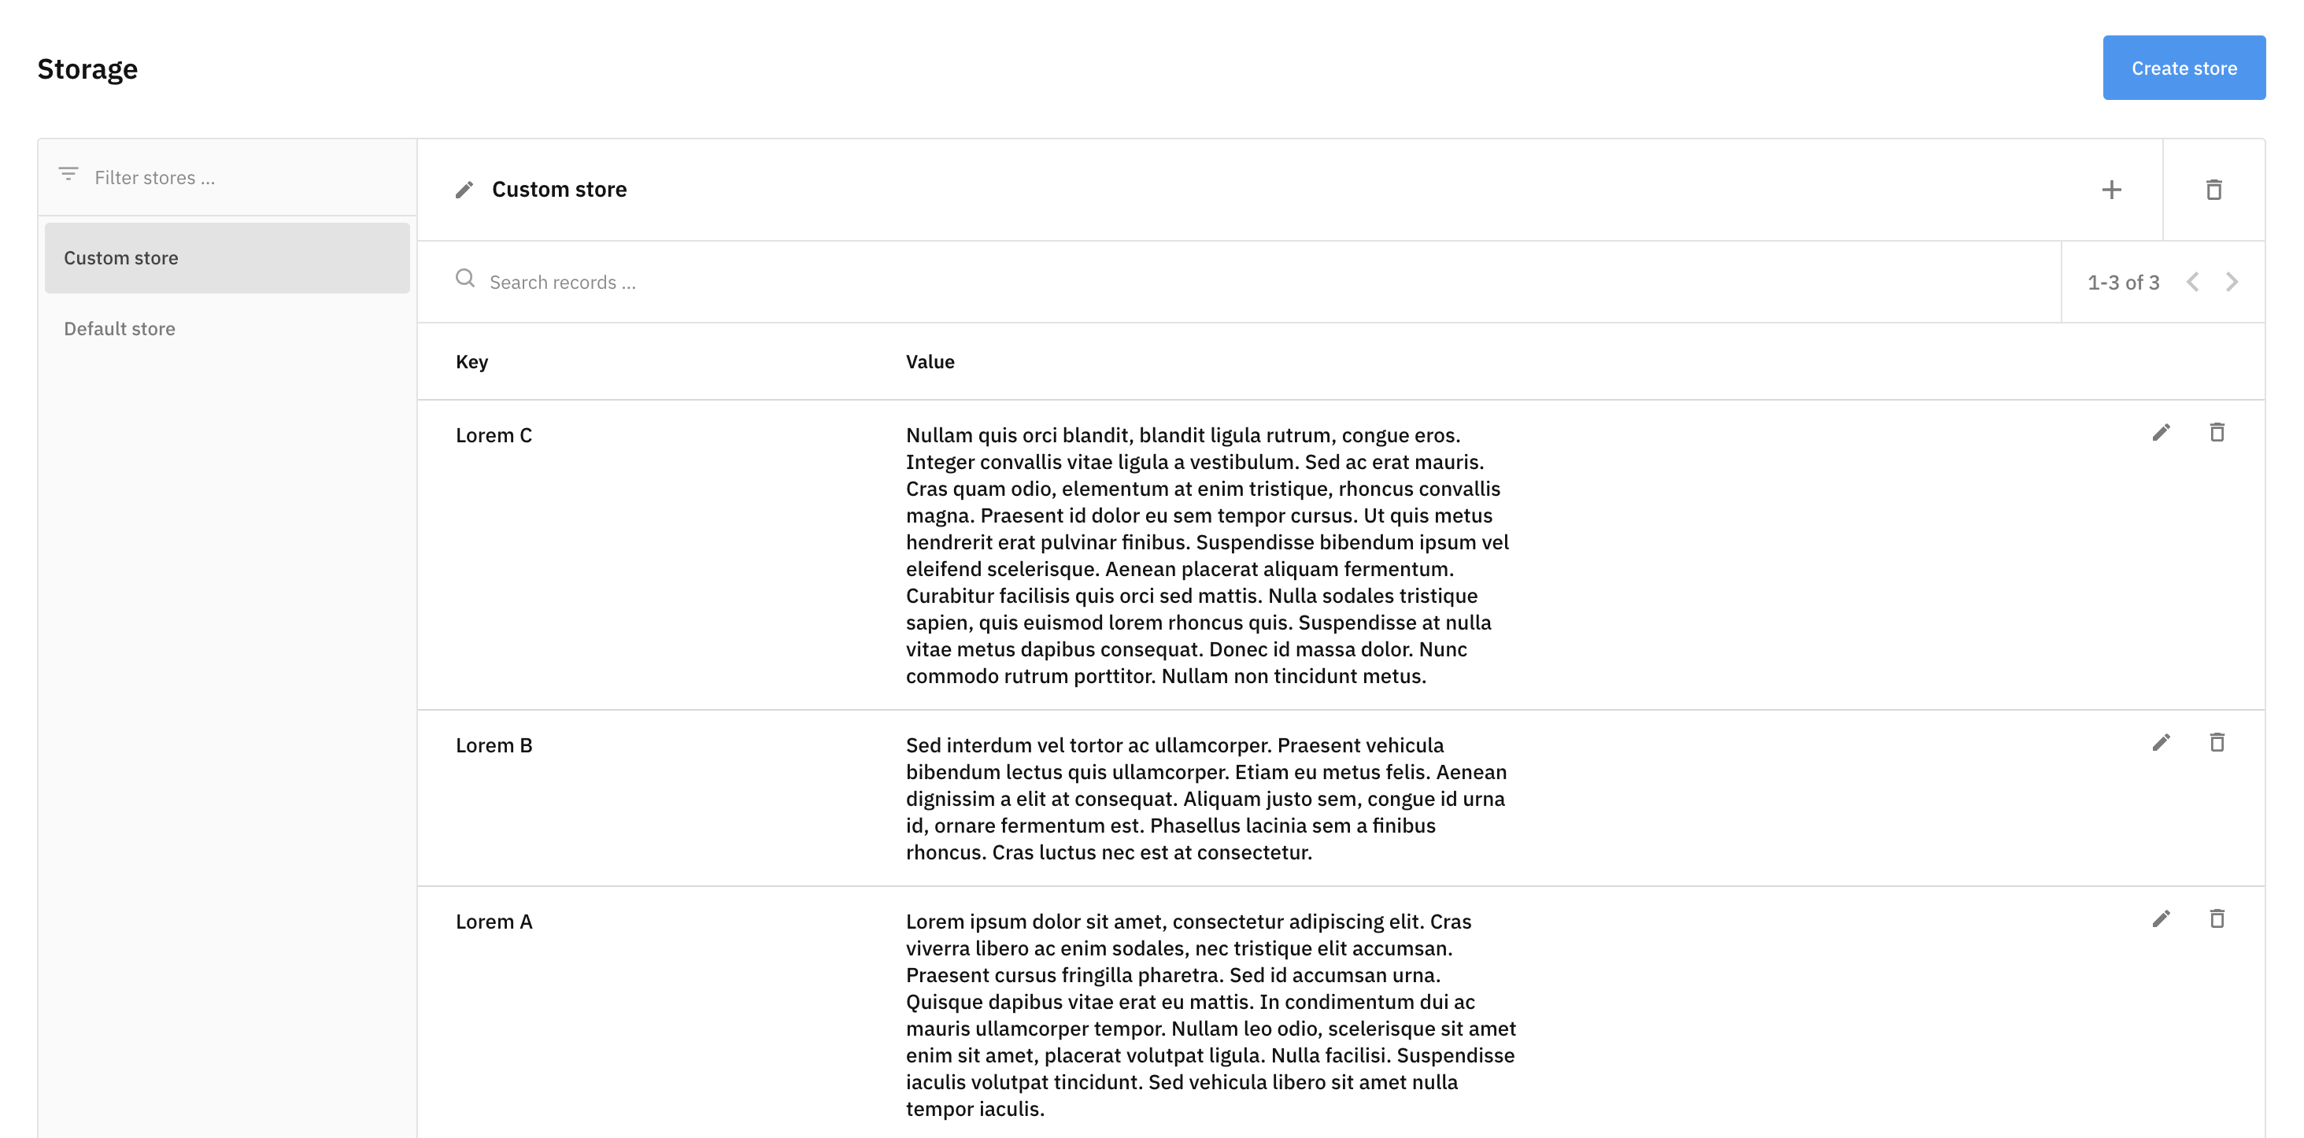
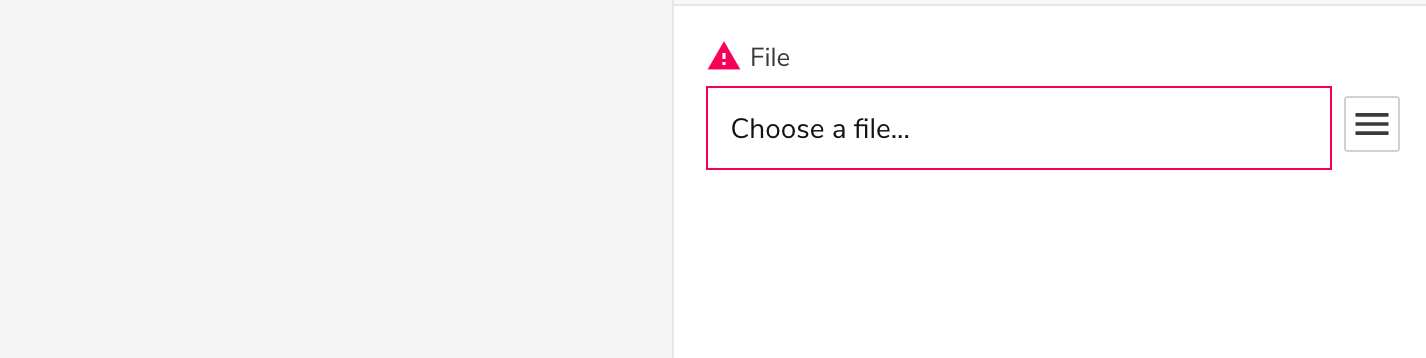
Appmixer allows you to upload files to use them in your flows.
Get the information for the specified file. Note that the file content is not included.
Name
Type
Description
ACL
ACLs can be used to control access to connectors by users or group of users or access to any other Appmixer functionality via limiting the API routes the users can use (API/UI).
Get available values for resource property for an ACL rule. This is used for building UI in Backoffice for setting ACL rules. Restricted to admin users only.
Get available values for action property for an ACL rule. This is used for building UI in Backoffice for setting ACL rules. Restricted to admin users only.
Get available values for attributes property for an ACL rules. This is used for building UI in Backoffice for setting ACL rules. Restricted to admin users only.
Name
Type
Description
Flow
All integration templates and automations are internally represented as flows. A flow consists of an orchestrated pattern of business activity enabled by interconnecting components together that transform input data (coming from trigger-type of components), perform actions, store data and/or load data to external systems.
Flow
Appmixer provides an interpreter for running flows and UI to manage flows.
Flow Descriptor
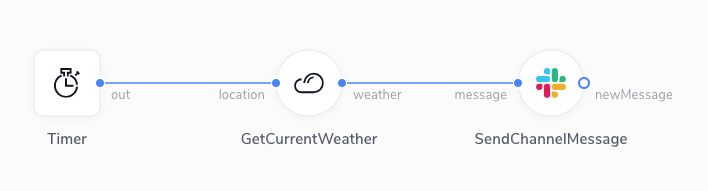
Flows are represented as JSON objects in the Appmixer engine. The JSON object is called "flow descriptor" in the Appmixer jargon and for the example image above, it may look like this:
The flow descriptor contains information about the components in the flow and their types, how they are interconnected (source), their properties (config.properties) and data transformation for all input ports (config.transform).
Component
Components are the building blocks of integrations and automations in Appmixer. Each component in a flow reacts on incoming messages, processes them and produces outgoing messages. User can wire components together to define complex workflows and integrations. Usually, components call external APIs but they can also do some internal processing, logic or scheduling.
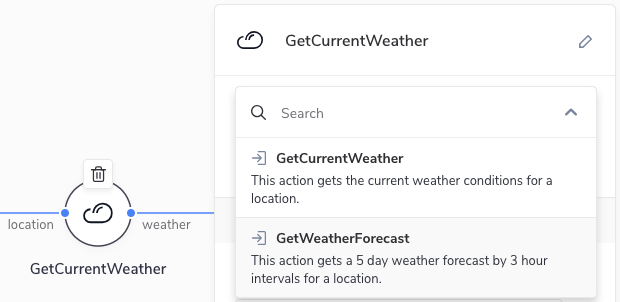
Flow
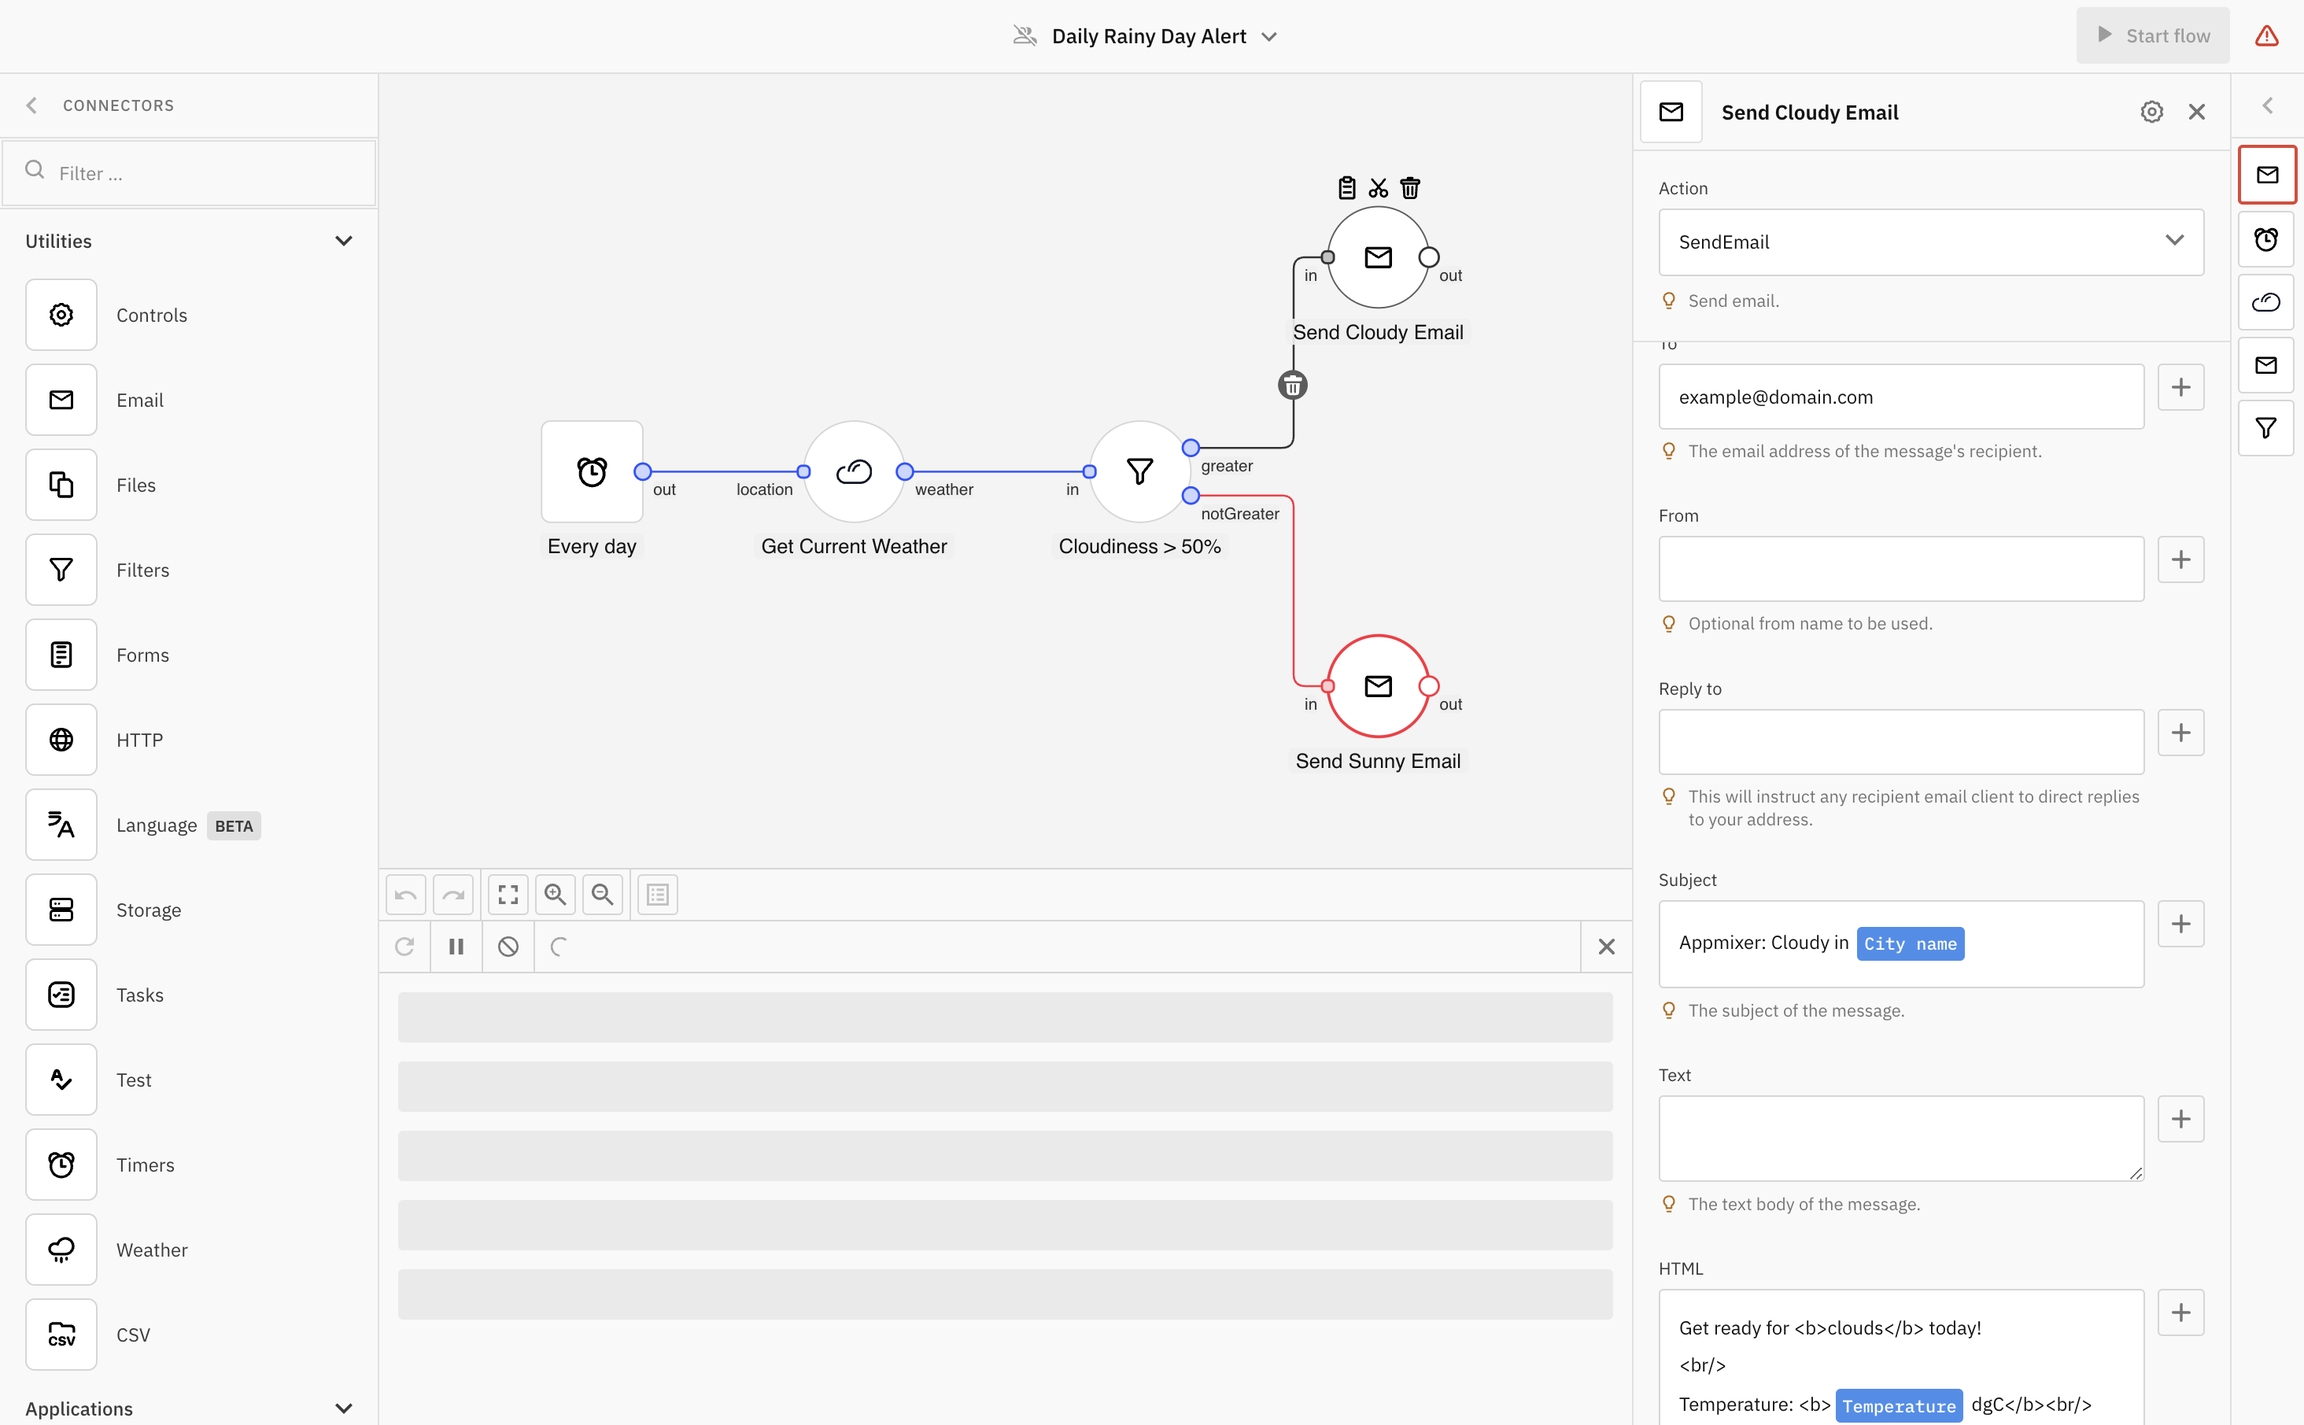
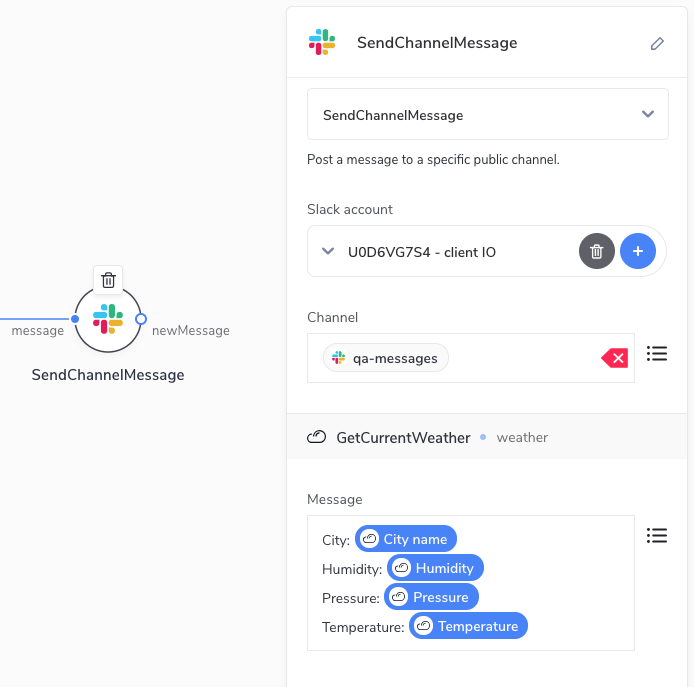
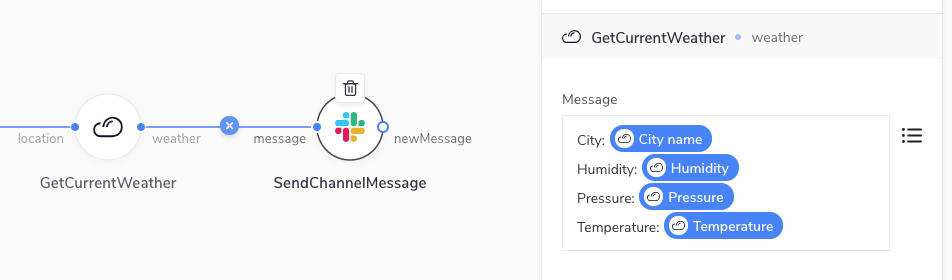
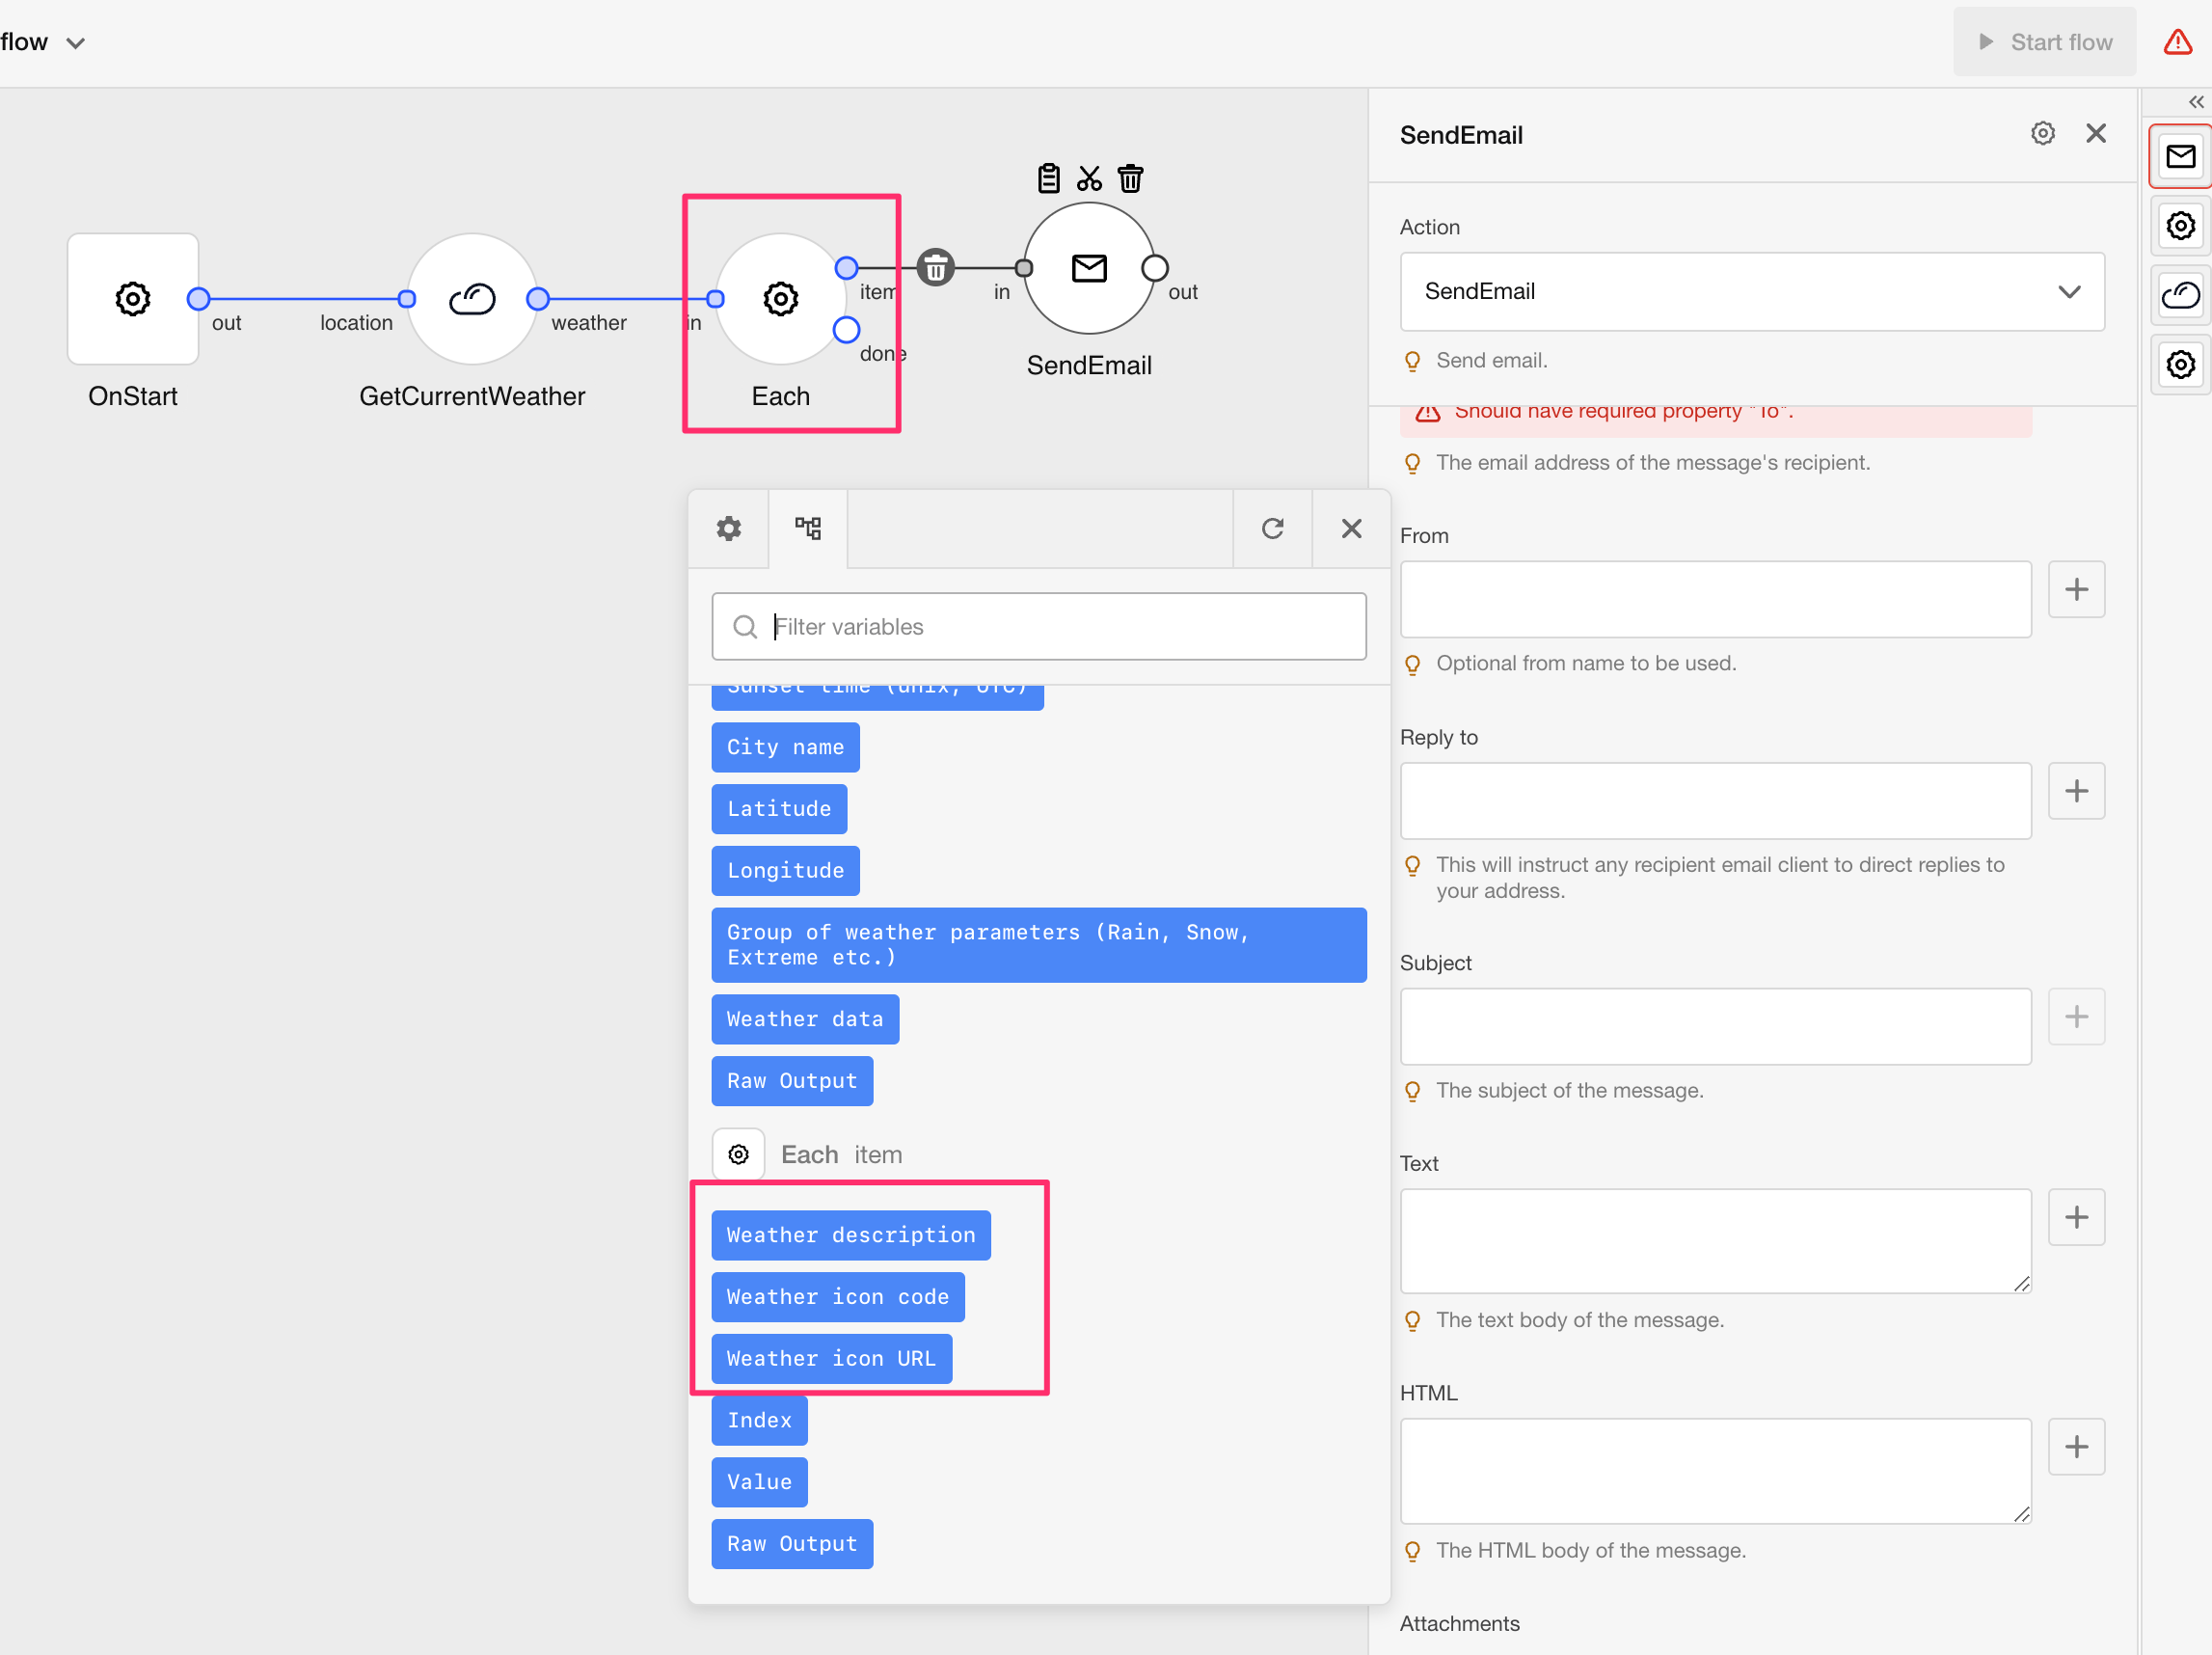
Take the example above. There are three components in the flow. The first one (Timer) we call a trigger because it does not have any input ports and so the component generates outgoing messages based on its internal logic. In our case, the Timer component sends messages to its output port out in regular intervals that the user can specify in the UI. As soon as a message leaves an output port, it travels through all the connected links to input ports of other connected components. In our scenario, when a message leaves the out port of our Timer, it goes to the location input port of the GetCurrentWeather component. As soon as the GetCurrentWeather component receives a message on its input port, it starts processing it. In this case, it requests current weather information from the https://openweathermap.org API. Once a response is received from the API, the component continues to send the result to its output port weather. Note that the location for which we're requesting the current weather can be specified by the user in the UI. The process then repeats for all the other connected components until no message is generated on an output port or there is no other component connected.
Inspector panel
To make our example flow complete, it is important to note that any component can be configured using data generated on output ports of any component back in the chain of connected components. In our example, our SendChannelMessage component sends a message on Slack channel #qa-messages with text containing the city, humidity, pressure and temperature as it was received from the weather API. The user configures the flow in the designer UI simply by selecting placeholders (variables in the Appmixer jargon) that will eventually be replaced when the flow goes to the running state and the actual data is available.
Components have some important properties that we should mention before diving into the details:
Components don't know about each other. All components are totally independent and loosely coupled. They only react on incoming messages and produce outgoing messages. The linkage between components is not internal to the components themselves but rather a mechanism of the Appmixer internal engine and its protocol.
Components are black-boxes to the Appmixer engine. The engine does not know and also does not need to know what components internally do and how they are implemented. It only wires them together through ports and makes sure messages are always delivered and in the right order.
Basic Structure
Introduction
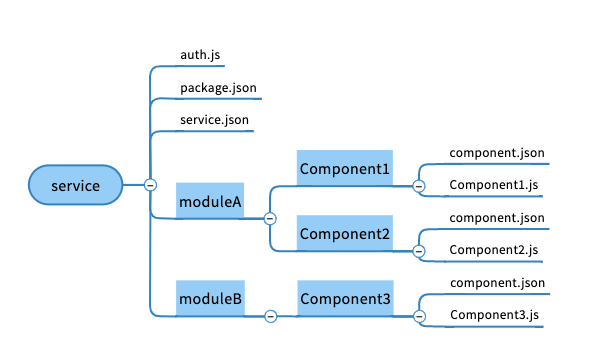
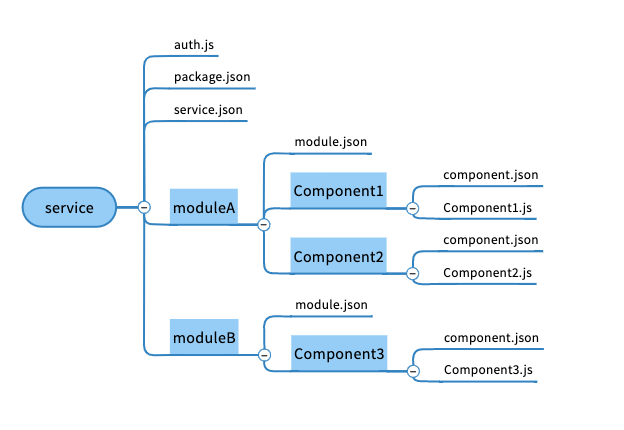
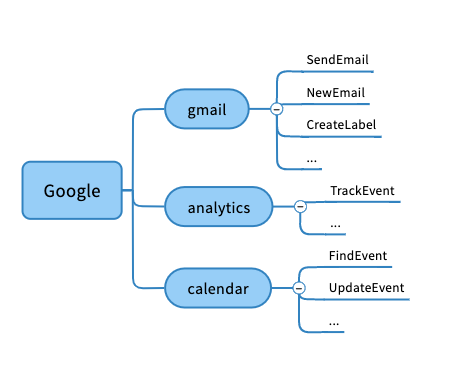
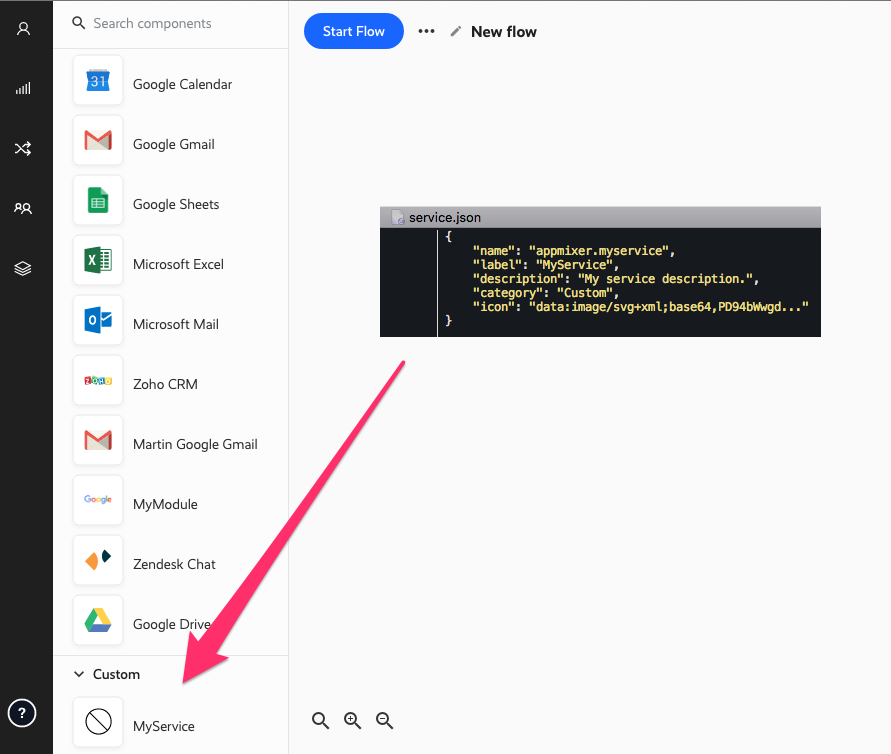
Connectors in Appmixer are structured into "services", "modules" and "components" hierarchy. Each service can have multiple modules and each module can have multiple components. For example, "Google" service can have "gmail", "calendar" or "spreadsheets" modules and "gmail" module can have "SendEmail", "NewEmail" and other components:
Services, modules and components hierarchy
This hierarchy is reflected in the directory structure of component definitions. Typically, services and modules are structured in two ways. Either the service itself appears as an "app" in Appmixer or modules are separate apps. If a module has its own manifest file (module.json), it is considered a separate app in Appmixer.
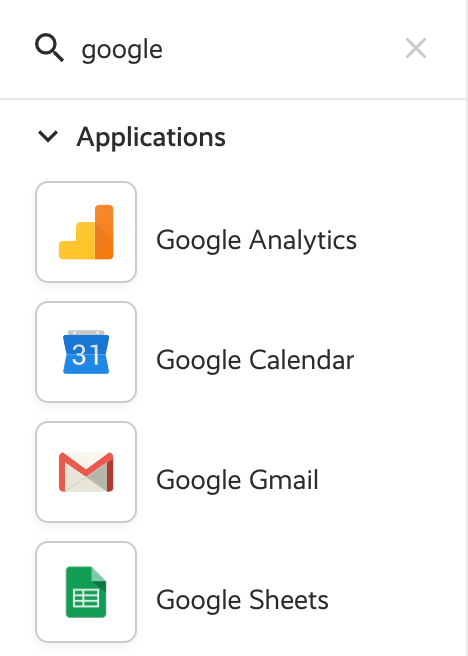
For example, in case of Google, we want to have separate apps for each module (GMail, Calendar, Analytics, ...):
Google modules
But in case of Twilio, we may just want to have one app and all the actions/triggers as different components of the Twilio app:
As mentioned in the previous section, services, modules and components must follow the service/module/component directory structure. The following images show the two different ways you can structure your services (i.e. modules as separate apps or a service as one single app).
Service manifest is defined in the service.json file. The file has the following structure:
Available fields are:
Field
Description
Module manifest is defined in the module.json file. The file has the following structure (similar to the service.json file):
Available fields are:
Field
Description
description
Description of your component. The description is displayed in the Designer UI inspector panel like this:
Component Description
The description should not be longer than a sentence or two. Example:
{
"description": "This action gets the current weather conditions for a location."
}
marker
The marker icon that can be added to the component in the UI to give some extra context. The most common use case is to display e.g. a "Beta" badge to tell the user that this component is in beta. The marker must be in the Data URI image format as described here: https://en.wikipedia.org/wiki/Data_URI_scheme. image/png or image/svg+xml image types are recommended. The marker icon is displayed in the top right corner of the component shape.
Example:
Fire patterns is an advanced configuration of a component that allows you to define when your component is ready to fire (ready to process input messages). Fire patterns can make the engine to hold input messages on components input ports until the pattern matches and then send the messages to the component in bulk. Fire patterns are defined as an array or a matrix. An example of fire patterns may look like this:
{
"firePatterns": ['*', 1]
}
The fire pattern above is interpreted as follows: The component processes messages only if the first input port has zero or more messages waiting in the queue and at least one message waiting in the second input port queue. Another example can be a fire pattern:
{
"firePatterns": [1, 1]
}
In this case, the component only processes messages if there is at least one message on each of its two input ports. A good example for this pattern is the Sum component:
The Sum component expects messages on both of its input ports before it can produce a sum of its inputs.
The following table lists all the possible fire pattern symbols:
Symbol
Description
*
(Any) The input port must have zero or more messages in the queue.
1
(Exists) The input port must have at least one message in the queue.
0
(Empty) The input port must have no message in the queue.
A
(All) The input port must have at least one message from all the connected components in the queue. This is a synchronization pattern that lets you specify that the component must wait for all the connected components to send a message before it can start processing. A typical example is a "Multiple-to-Single" join component. This component must wait for all the LoadCSV components to send a message before it can produce an SQL-like join schema.
Note that you can also define a set of fire patterns for a component, for example:
{
"firePatterns": [
['*', 1],
[1, 0]
]
}
When more fire patterns are used, there must be at least one fire pattern that matches before the component fires.
Quotas & Limits
The majority of APIs define limits on the API usage. Components that call APIs need to make sure that these limits are respected, otherwise their API calls would start failing quickly. The quota.js module allows you to specify what those limits are on a per-service, per-module or even per-component basis. The Appmixer engine uses this module to make sure API calls are throttled so that the usage limits are respected.
The quota module must be named quota.js and must be stored under either the service, module or component directory (i.e. [vendor]/[service]/quota.js , [vendor/[service]/[module]/quota.jsor [vendor/[service]/[module]/[component]/quota.js.
The quota definition above tells the engine to throttle the receive() call of the component to a max of 2000-times per day and 3-times per second.
Quota modules are NodeJS modules that return an object with one property rules.
An array of rules that define usage limits. Each rule can have the following properties:
Maximum number of calls in the time window specified by window.
The time window in milliseconds.
The throttling mechanism. Can be either a string 'window-sliding' or an object with type and getStartOfNextWindow function. Example of a quota module for LinkedIn:
An identifier of the resource to which the rule applies. The resource is a way for a component to pick rules that apply to that specific component. This can be done in the component manifest file in the quota.resources section.
Introduction
Appmixer SKD is a toolkit to embed workflow automation and integration capabilities into your products. Gain a whole new set of comprehensive features with ease.
UI & Widgets
Appmixer UI is a tool for building user interfaces with component-based widgets.
Configuration
Widgets are included in appmixer.ui instances made with Appmixer constructor:
Appmixer SDK allows you to change all the strings of all the UI widgets it provides (Designer, FlowManager, Insights, ...). This is especially useful to localize the entire Appmixer UI.
Setting Custom Strings
A strings object is represented as a JSON object that you set on your Appmixer SDK instance using the set('strings', myStrings) method:
var appmixer = new Appmixer({ baseUrl: BASE_URL });
appmixer.set('strings', STRINGS);
You can set the strings object anywhere in your application but usually, you'll do that right after initializing your appmixer instance. Note that you can even set the strings multiple times with different configurations in which case the Appmixer SDK will automatically re-render all the UI widgets using the configuration with new strings.
If you don't set strings, the default strings will be applied.
Structure of the Strings Object
The strings object is a JSON object (with one exception, see below) that contains references to various UI elements within the Appmixer UI. The final values of the JSON objects are the actual strings used in the UI.
For reference, we prepared a complete strings object for you to download and inspect to see all the possibilities for strings customization/localization.
For localization of time-related strings, a special time root scope of the strings object can be modified:
Please download the default strings object above to see all the possibilities for time localization. Notice in the code above that there is one specialty to the time localization which (if used) makes the strings object non-JSON compliant. That's the ordinal(number) function. Given a number, this function returns a string representing the number in ordinal form (i.e. 1 becomes "1st", 2 becomes "2nd", ...). Since this is hard to describe declaratively in JSON, the strings object may contain the oridnal(number) function for you to be able to localize ordinal numbers. The default implementation looks like this:
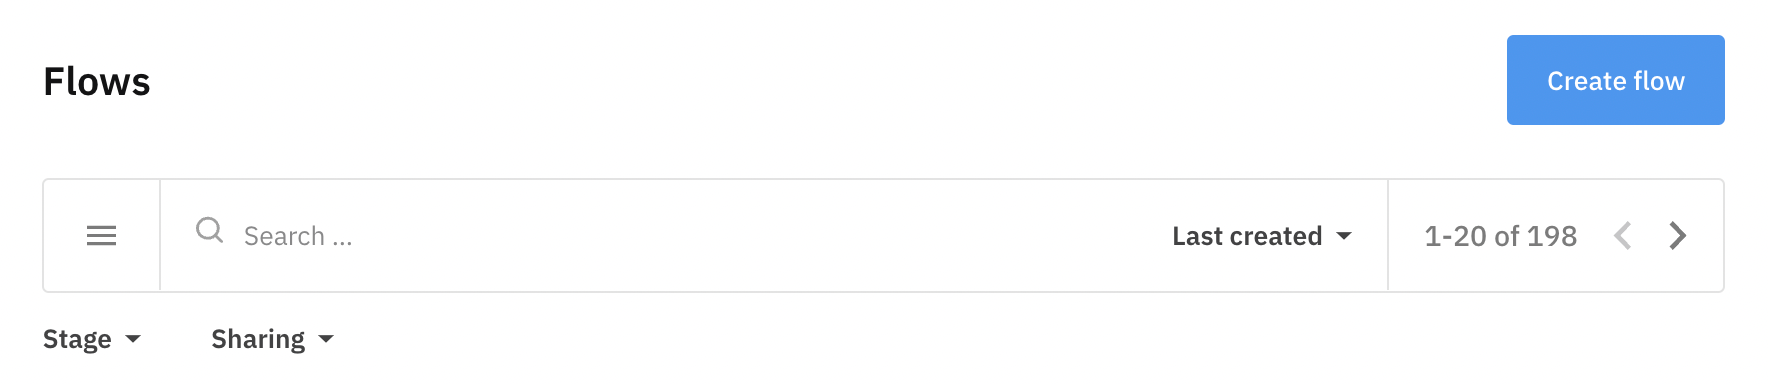
Some text can contain both singular and plural versions based on whether the number variable used inside the text equals 1 or not. For example, the pagination widget in the Flows Manager:
The "of 198 flows" string used above can vary based on whether the total number of flows is more than one or if it equals one. The two versions can be expressed using the | character in the strings object like so:
Also, notice the use of variables ({{total}} in the example above). Variables are always enclosed by two curly brackets and are replaced by the SDK with the actual numbers when used. See the Appmixer default strings object for all occurrences of variables.
Getting Started
Appmixer Backoffice is an administration UI for Appmixer. Use it to install, update and configure connectors, have an oversight of all the flows and users in Appmixer and set system configuration.
The Appmixer Backoffice is accessible via the "Admin" menu item in the Appmixer Studio:
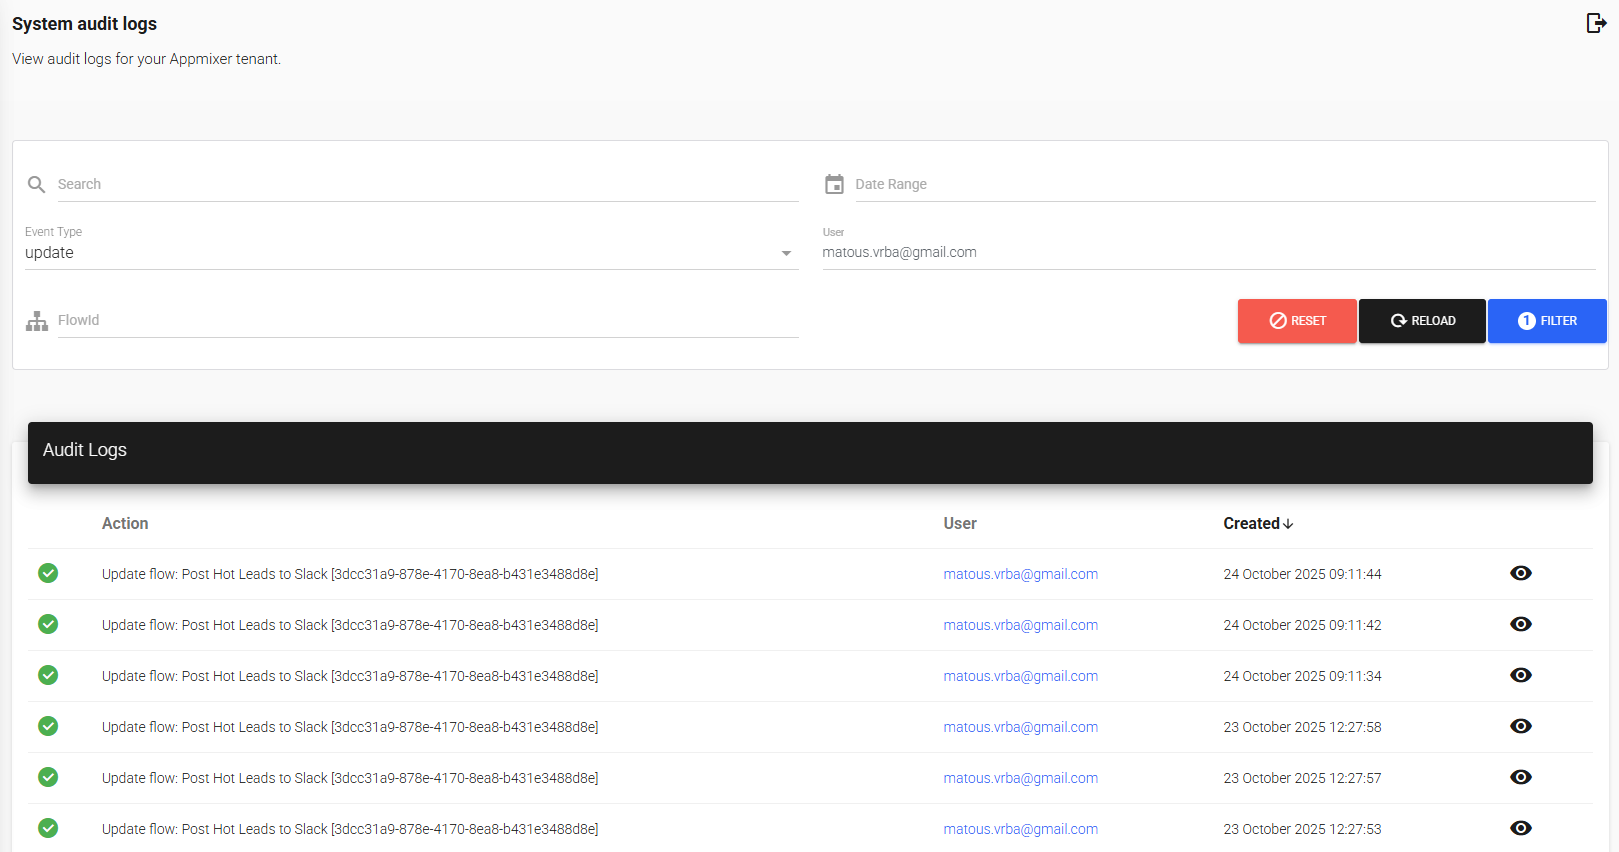
Audit Logs
Overview
Audit Logs provide a comprehensive record of all activities and changes within your Appmixer tenant. This feature enables administrators to track user actions, monitor system changes, and maintain security compliance by reviewing who did what and when.
Accessing Audit Logs
Navigate to System > Audit Logs to view the audit log interface for your tenant.
Using the Audit Logs Interface
Filtering Audit Logs
The Audit Logs page provides multiple filtering options to help you find specific events:
Search
Use the search bar to find audit log entries by keyword. This searches across action descriptions and related identifiers.
Date Range
Filter logs by selecting a specific date range. Click the Date Range selector to choose:
A custom date range
Event Type
Filter logs by the type of action performed. Select from:
Create - Events related to creating new resources
Update - Events related to modifying existing resources
Delete - Events related to removing resources
User
Filter logs by specific user to see all actions performed by that user.
Flow ID
Filter logs to show only events related to a specific flow by entering the Flow ID.
Set your desired filter criteria using any combination of the options above
Click the FILTER button to apply your filters
Use RESET to clear all filters and return to the full log view
The audit log table displays:
Action - Description of the event that occurred
User - The user who performed the action (displayed as email address)
Created - Timestamp when the event occurred
Appmixer tracks the following events across different areas of the system:
Configuration Updated
Configuration Deleted
ACL Rule Created/Updated
Component Access Assigned
Flow Created
Flow Updated
Flow Started/Stopped
Flow Deleted
Integration Template Created
Integration Template Updated
Integration Template Published
Published Integration Template Updated
Integration Template Test Started
Integration Template Test Stopped
Integration Template Test Deleted
Connector Installed
Connector Updated
Connector Uninstalled
User Created
User Updated
User Deleted
User Logged In
Review audit logs to maintain compliance with security standards and policies. Track who accessed what resources and when changes were made.
Identify when changes were made that may have caused issues. Track the sequence of events leading up to a problem.
Monitor user actions to ensure proper usage of the platform and identify any unusual activity patterns.
Maintain a historical record of all modifications to flows, templates, and system configurations for audit purposes.
Click RELOAD to refresh the audit log data
Details icon (eye icon) - Click to view additional details about the specific event including a diff table
Flow Cloned
Integration Template Deleted
Login Failed
Password Changed
Applying Filters
Viewing Audit Log Details
Logged Events
System Configuration
Access Control
Flow Management
Integration Template Management
Integration Template Testing
Connector Management
User Management
Use Cases
Security Compliance
Troubleshooting
User Activity Monitoring
Change Tracking
"components"
]
type
string
components | routes
type
string
components | routes
array
Body has to be an array of ACL rules, where each rule has the following structure:
{
role: string - admin
type
string
components | routes
type
string
components | routes
type
string
components | routes
resource
string
resource name - flows, appmixer.utils.controls.*, ...
// set properties by key or path
widget.state('foo', true)
widget.state('bar', { counter: 2 })
widget.state('bar/counter', 3)
// get properties by key or path
widget.state('foo') // true
widget.state('bar') // { counter: 3 }
widget.state('bar/counter') // 3
// get the entire state
widget.state() // { foo: true, bar: { counter: 3 } }
// reset the state to defaults
widget.reset() // { foo: false, bar: { counter: 1 } }
categoryIndex
App category index. By default, categories are sorted alphabetically, you can change that using this index property. Optional.
index
The app index within the category. This allows sorting the apps within the same category.
description
Description of your app.
icon
App icon in the Data URI format.
{
"name": "[vendor].[service]",
"label": "My App Label",
"category": "applications",
"categoryIndex": 2,
"index": 1,
"description": "My App Description",
"icon": "data:image/svg+xml;base64,PHN2ZyB3aWR0aD...."
}
name
The name of the service. The name must have the [vendor].[service] format where [vendor] is the Vendor name (See e.g. Enabling Users to Publish Custom Components for more details). Normally you'll have just one vendor or use the default 'appmixer' vendor. [service] is the name of your service. Example: "appmixer.google", "appmixer.twilio", ... .
label
The label of your app.
category
App category. By default, components shipped with Appmixer are divided into two categories "applications" and "utilities" but you can have your own custom categories too. Just use any custom category name in the service manifest file to create a new category and add your service to it. This category will become automatically visible e.g. in the Appmixer Designer UI.
{
"name": "[vendor].[service].[module]",
"label": "My App Label",
"category": "applications",
"categoryIndex": 2,
"index": 3,
"description": "My App Description",
"icon": "data:image/svg+xml;base64,PHN2ZyB3aWR0aD...."
}
name
The name of the module. The name must have the [vendor].[service].[module] format where [vendor] is the Vendor name (See e.g. Enabling Users to Publish Custom Components for more details). Normally you'll have just one vendor or use the default 'appmixer' vendor. [service] is the name of your service and [module] is the name of your module. Examples: "appmixer.google.gmail", "appmixer.google.calendar", .... . Note that the directory structure of your module must follow this name. In other words, if you have a module named "appmixer.myservice.mymodule", your directory structure will look like this: myservice/mymodule.
label
The label of your app.
category
App category. By default, components shipped with Appmixer are divided into two categories "applications" and "utilities" but you can have your own custom categories too. Just use any custom category name in the module manifest file to create a new category and add your app to it. This category will become automatically visible e.g. in the Appmixer Designer UI.
Directory Structure
Service Manifest File
Module Manifest File
Twilio service
Modules as separate apps.
A single app type of service.
Service manifest fields meaning.
Additionally, for components using OAuth2 authentication, you have the option to redefine the default callbackUrl (redirect URL). This flexibility allows you to customize the authentication process to better fit your application's workflow.
Google OAuth app
App Registration
documentation
After installing a connector, it's advisable to consult the connector's documentation to determine if additional configuration is necessary. Appmixer simplifies OAuth configuration by automatically handling it, unless specified otherwise in the connector's configuration. This is achieved through the internal Authentication Hub proxy, which utilizes Appmixer's own OAuth credentials for each connector to authenticate your end-users remotely via this proxy. This approach streamlines the connector installation process, eliminating the need to register your own OAuth applications with each service provider. However, if you prefer to use your own OAuth credentials, you should refer to the "Custom OAuth Credentials" section of the documentation for guidance.
By default, all users within your Appmixer tenant instantly gain access to any installed connectors. If you prefer to modify this default setting, you can do so by removing the user * * ACL rule from the ACL configuration. To access this option, navigate to System -> ACL from the left menu. Removing this rule will revoke all users' access to the connectors. Subsequently, you can utilize the "Add User Rules for Installed Connectors" button, which automatically establishes specific access rules for all installed connectors. This method is particularly useful because when you install a new connector in the future, it won't be immediately available to your end-users. This delay provides you, the admin user, with ample opportunity to properly configure and test the new connector before making it accessible to your end-users.
For enhanced clarity, the details page of each connector includes an "Access Control" section. This section outlines all the ACL (Access Control List) rules applicable to that specific connector, helping you understand who has access to it. To view a comprehensive list of all Access Control rules across connectors, you can navigate to the System -> ACL page via the left menu. This centralized view facilitates easier management and oversight of permissions and access within your Appmixer tenant.
You have the ability to uninstall any connector from your Appmixer tenant by clicking the "Remove Connector" button. This action will uninstall the connector and remove it from your Appmixer environment.
However, caution is advised when removing connectors. Any flows (whether integrations or automations) that include components from the connector you intend to remove will cease functioning. It's important to ensure that any such flows are halted before proceeding with the removal. The most straightforward method to verify this is to visit the Flows page in the Backoffice, applying filters by the connector name and running status, to identify and stop any active flows utilizing the connector in question.:
This process enables you to individually navigate to the Designer for each flow by clicking on the "Flows" link in the right menu for each listed flow, allowing you then to stop the flow directly from the Designer interface.
For more extensive connector cleanups or when manual management of flows is not feasible, you can leverage the Appmixer REST API. This allows you to retrieve flows using the connector with a GET request to https://api.YOUR_TENANT.appmixer.cloud/stats/component-usage?componentType=trello&stage=stopped&group=$flowId, and subsequently stop each flow individually with a POST request to https://api.YOUR_TENANT.appmixer.cloud/flows/:FLOW_ID, including a JSON body with { "command": "stop" } and setting "Content-Type": "application/json" in the header.
Failing to stop flows that depend on a connector before its removal will lead to errors in the running flows when the connector components are triggered. These errors will be reported to the System Webhook, to which you can subscribe for notifications. The impact of such failures varies by component type:
Trigger Components: These might continue to poll and fail. However, if the connector is re-installed, they can recover, allowing the flow to resume operation.
Action Components: These will fail to receive messages from other connected components. After a set period and a number of retries following an exponential backoff strategy, the message is discarded and moved to the dead-letter queue, accessible via the Unprocessed Messages API. Should the connector be re-installed before exhausting all retry attempts, the action component can recover and will continue to process messages.
When creating custom connectors for your Appmixer tenant, there are three methods available for uploading them. First, you can utilize the Appmixer CLI to package and publish your connectors; for detailed instructions, refer to the "Build a Custom Connector" section. Alternatively, you can publish your connector as a zip archive through the Appmixer REST API; for this method, consult the "Apps endpoints" documentation. Lastly, if you prefer a direct approach, you can manually upload the connector via the Backoffice by clicking the "Add Connector from your Filesystem" button located at the bottom of the Connectors page. Each method provides a convenient way to integrate your custom connectors into Appmixer, allowing you to choose the best approach based on your preferences and needs.
The Appmixer team diligently focuses on enhancing connectors and ensuring they remain compatible with updates to third-party APIs. Whenever new versions of connectors become available, all Appmixer customers are notified, with the notification including a list of both newly added and updated connectors. To explore these updates, you can visit the Connectors page in the Backoffice and use the "update status" filter. This will display a list of connectors that have updates ready for installation. This proactive approach helps maintain the efficiency and reliability of your integrations, keeping them aligned with the latest API changes and functionalities.
By visiting the Connector Details page, you have the option to update the connector by clicking the "Update Connector" button. For insights into what changes the update includes, such as fixes or improvements, refer to the Changelog section. This section provides detailed information on the modifications made in the latest version of the connector, helping you understand the enhancements or corrections applied.
Most updates to connectors are designed to be non-disruptive and do not introduce breaking changes, ensuring a smooth transition to the newer version. However, there are instances where updates may necessitate breaking changes. These changes could be required to enhance security, improve functionality, or comply with modifications in third-party APIs. In such cases, these updates are essential for the continued effectiveness and reliability of the connector, even though they may require adjustments in how the connector is used within your workflows.
When connectors and their components undergo significant upgrades, such as radical changes to third-party service API endpoints, shifts from API key authentication to OAuth, or the introduction of new required fields in API endpoints, a major version upgrade of the connector might be necessary. These upgrades often render the connector incompatible with flows created using its older version. Consequently, after upgrading to a new major version of a connector, existing flows cannot be automatically updated to accommodate the changes, as such modifications typically require action from the flow's owner. This might involve re-authenticating due to changes in the authentication protocol or configuring new required fields, among other adjustments.
Should you attempt to update a connector that includes such a breaking change, a confirmation dialog will appear, cautioning you about the introduced breaking change. It will also notify you that all active flows (both integrations and automations) will be automatically stopped to prevent them from malfunctioning due to the incompatibility with the upgraded connector version.
Upon confirming the update, a progress indicator will be displayed, informing you that the flows are in the process of being stopped.
Before proceeding with connector upgrades, it's recommended to configure the System WebhookWEBHOOK_FLOW_STOPPED to point to a URL endpoint within your own application or to a Webhook within an Appmixer automation designed specifically for this scenario. This setup is intended to notify end-users (i.e., the owners of the integration instance or automation) that their integrations require reconfiguration due to the update.
The payload of this webhook will contain relevant information to inform the user about the flow that has been stopped and potentially why it was stopped, providing a clear indication that action is needed on their part to update and restart their integrations. This proactive communication ensures users are aware of any necessary adjustments to maintain the functionality of their integrations after major updates.
{
"userId": "string",
"email": "string",
"title": "string",
"created": "Date",
"flowId": "string",
"flowName": "string",
"additional": {
"module": "string", # name of the module: appmixer.slack, for example
"moduleLabel": "string", # Slack, for example
"reason": "New non-compatible version of a module appmixer.slack has been installed."
}
}
Access Control
Removing a connector
Installing Connectors from your filesystem
Using the Appmixer CLI to build, test, and publish your connectors is highly recommended as it offers the most control and flexibility. However, if you're looking to quickly test a connector provided by the Appmixer team or a colleague, the UI option to upload your connector can be a convenient alternative. This approach is particularly useful for expedited testing or evaluation of connectors without the need for extensive setup.
Upgrading a Connector to a New Version
Connectors in Appmixer adhere to the Semantic Versioning Schema, which is structured as MAJOR.MINOR.PATCH. Updates that involve changes to the MINOR or PATCH version numbers generally do not impact existing integrations or automations, allowing for seamless updates. However, when there is a change in the MAJOR version number, it indicates that a breaking change has been introduced. Such changes can affect running integrations and automations that utilize the connector.
Upload file to Appmixer. Uploads by chunks are supported, and whether if sent file is treated as a chunk or a new file depends on the headers sent. Also, Content-type must be set to multipart/form-data.
Name
Type
Description
Content-type
string
Must be set to multipart/form-data
uploader-file-id
string
If set, the current file will be appended as a chunk to the file specified by this. If not present, a new file will be created. The response includes the resulting file's ID, so it can be used in subsequent requests to add chunks to the generated file.
By default, the endpoint returns only files (that are used in flows). Custom component source codes are stored as files as well, if the user owns some, they can be returned as well.
Example: DELETE https://api.appmixer.com/files?filter=filename:~invoice will delete all user's files with 'invoice' in the name.
Name
Type
Description
filter
String
Can be used to filter files.
{
// Response
}
Get file info
Path Parameters
Upload a file
Headers
Request Body
Get user files
Query Parameters
Get number of files
Query Parameters
Remove file.
Delete all user files.
Query Parameters
| Default:
null
Toggle a custom loading state.
Type: String | Default: null
Toggle a custom error message.
&#xNAN;filterLayout
Type: String | Default: 'expanded'
Controls whether the left filter panel is shown. Options: 'collapsed' or 'expanded'.
Example: Set the initial state and toggle it programmatically at runtime.
query
Type: Object | Default: {}
The current query of the widget. Changing it reloads both the histogram data and the logs table.
Example: Retrieving the current query from the widget's state.
Set an initial query in the widget's state:
When modifying the query, always merge it with the current query object.
Listen for changes triggered by UI interactions:
You can directly read or set nested query properties using a /-separated path.
appmixer.set('strings', {
ui: {
flowManager: {
pagination: '{{range}} of {{total}} flow|{{range}} of {{total}} flows'
}
}
});
Pluralization and Strings with Variables
inPorts
The definition of the input ports of the component. It's an array of objects.
Each component can have zero or more input ports. If a component does not have any input ports, we call it a trigger. Input ports allow a component to be connected to other components. Input ports receive data from output ports of other connected components when the flow is running and the data is available. Each input port has a name and configuration that has the exact same structure as the configuration of properties, i.e. it has schema , inspector or source objects. The difference is that the user can use placeholders (variables) in the data fields that will be eventually replaced once the actual data is available. The placeholders (variables) can be entered by the user using the "variables picker" in the Designer UI inspector (see below). Example:
The message from the example looks like this in the raw form:
As you can see, the placeholders for variables use a special format that the Appmixer engine eventually replaces with real values that come from the GetCurrentWeather component once the data is available.
Definition of the schema of the data that the input port expects. Please see the section for more details.
Definition of the inspector UI for this input port. Please see the section for more details.
Definition of the source of the variables or dynamic inspector that will be available in the designer UI for this input port.
An example of how the source property can be used to generate the input port Inspector dynamically for the appmixer.google.spreadsheets.CreateRow component. When showing the Inspector for the CreateRow, we need to know the structure (columns) of the Worksheet, the Inspector input fields will copy the columns in the Worksheet
Note how we mapped the configuration properties of the CreateRow component to the configuration properties of the ListColumns component that is called internally to retrieve the list of columns. The data.properties section defined property mappings. To map input port values, you can use the data.messages section instead. Let's see another example of a component, this time with input message mappings, the trello.list.CreateCard component inspector definition:
As you can see, the boardId (referenced to by the "inputs/in/boardId" syntax) configured by the end-user on the CreateCard component is mapped into the input port property of the same name of the ListBoards component ("in/boardId").
The target component being called by the source construct may require authentication. With this option, you can invoke it without requiring authentication—in that case, context.auth will be an empty object.
The target component being called by the source construct may require authentication. However, there are cases where you might want to call the component before the user is authenticated. In such scenarios, the component can return different results depending on whether the user is authenticated or not. If the authentication is now available, the context.auth and context.profileInfo will be an empty object.
This object allows you to control what variables will be available to this component in the UI and in the component receive() method. By default, variables are collected from all the components back in the chain of connected components. This might not be desirable in some cases. One can set scopeDepth to a number that represents the depth (levels back the graph of connected components) used to collect variables. rawValue can be used to tell the engine not to resolve variable placeholders to their actual values but to treat variable names as values themselves. Example:
Set the maximum number of links that can be connected to the input port. Maximum number of connections is infinite by default but in some applications, it might be desirable to set a limit on this, usually 1. The Appmixer Designer UI will not allow the user to connect more than maxConnections links to the input port.
MCP Servers
This guide will help you create and integrate a custom MCP (Model Context Protocol) server into Appmixer so that it can be used with the AI Agent component or as part of regular flows.
Understanding MCP Server Integration in Appmixer
In Appmixer, MCP servers can only be connected to dedicated mcp ports of AI Agent components. This restriction ensures that AI Agents can communicate with MCP servers through a controlled and consistent interface.
MCP Server Connector Components
Every MCP server connector in Appmixer is composed of three distinct components:
Component
Purpose
Important:
The AI Agent componentmcp port can connect only to MCPServer components.
ListTools and CallTool are helper components for the MCPServer, but CallTool has the added ability to be used independently in non-AI Agent flows.
To integrate your own MCP server, you will create an Appmixer connector that wraps your server code, following the structure of existing MCP server connectors in our public repository.
Use one of our open-source MCP server connectors as a template:
Repository:
Example:
The complete list of files of our Gitlab MCP Server connector looks like this:
Note: The GitLab example assumes that your MCP server uses the Stdio-style implementation of the MCP protocol. If your MCP server uses a different communication method, you may need to adjust the connector logic accordingly.
From the example connector, most files are generic and can be reused. You only need to modify:
lib.js
Points to the NPM package containing your MCP server. Your MCP server must be NodeJS based.
&#xNAN;If you do not have a public NPM package with your MCP server, you can also package the MCP server directory directly in the Appmixer connector. Just make sure to reflect this in the paths.
Replace GitLab-specific logic with your own (if you used a different existing MCP server as a foundation, replace that MCP's specific logic with your own).
You generally do NOT need to edit:
MCPServer/MCPServer.js
ListTools/ListTools.js
CallTool/CallTool.js
These files contain generic logic that works for all MCP servers.
Once you have updated the connector, follow the standard instructions to pack and publish your connector to your Appmixer tenant as described .
Before publishing:
Updated package.json with correct name and NPM MCP server dependency.
Updated module.json, bundle.json with correct name, metadata and icons.
Edited lib.js
Automation Hub
Manage automation flows, logs, and connected accounts in a unified hub.
Configuration
Set up a new instance with config parameters and set/get methods:
Icon size for template tiles. Valid values: "S", "M", "L".
Type: Object | Default: see below
Override initial widget state. See State below for supported keys.
Type: String | Default: "flows"
The active tab. Valid values: "flows", "logs", "accounts".
Type: String | Default: "grid"
Flow list display mode. Valid values: "grid", "list".
Type: String | Default: ""
Text filter applied to the flows list.
Type: Boolean | Default: false
When true, only running flow instances are shown.
Click to open a flow in the Designer. data.flow.flowId and data.flow.type identify the flow. data.isNew is true for newly created flows. There is no built-in handler — open an appmixer.ui.Designer instance in your handler.
Click to open a flow in the Wizard. data.flow.flowId and data.flow.type identify the flow. There is no built-in handler — open an appmixer.ui.Wizard instance in your handler.
Click to create a custom integration from a template. data.createFrom.sourceFlowId and data.createFrom.sourceFlowType identify the source template. Call next() to execute the default behavior (clone the template and open it in the Designer).
Click to start a stopped flow. data.flow.flowId and data.flow.type identify the flow. Call next() to execute the default start behavior.
Click to stop a running flow. data.flow.flowId and data.flow.type identify the flow. Call next() to execute the default stop behavior.
Click to clone a flow. data.flow.flowId and data.flow.type identify the flow. Call next() to execute the default clone behavior.
Click to rename a flow. data.flow.flowId and data.flow.type identify the flow. Call next() to open the built-in rename dialog.
Click to delete a flow. data.flow.flowId and data.flow.type identify the flow. Call next() to open the built-in delete confirmation dialog.
Click to view logs for a flow. data.flow.flowId and data.flow.type identify the flow. Call next() to navigate to the Logs tab for that flow.
Build a Custom Connector
Appmixer enables you to expand its default set of connectors with your own custom connectors. These connectors can interface with third-party APIs, your internal APIs, or provide utilities or business logic tailored to your product.
In Appmixer, connectors are implemented as Node.js modules, accompanied by JSON manifest files. These files contain metadata such as icons, descriptions, and input/output definitions.
Explore the public , which houses almost all Appmixer connectors, for inspiration for your own connectors. Additionally, you're invited to contribute by submitting a pull request (PR) to the repository. This collaborative approach allows you to not only benefit from the collective knowledge of the Appmixer community but also to share your innovations with others.
In this guide, we will demonstrate how to implement a basic connector, offering just one action component. We will create a connector for the Bored API, a public API that requires no authentication and provides a single HTTP GET endpoint. This endpoint returns a random activity suggestion for when you're feeling bored.
Our component will feature one input port, allowing it to connect with other components within your automations and integrations. It will also have one output port for linking to subsequent actions that might utilize the data from our GetActivity component. Additionally, our component will offer an option for users to specify the type of activity they wish to receive—be it "education," "recreational," or "cooking."
Modifiers
Modifiers are data transformation functions that can be used to transform data variables inside your flows. You can customize the list of modifiers or even define your own functions.
Get available modifiers. Appmixer is shipped by default with its own set of modifiers by default. Checkout this API to see what they are. You can then redefine the default set with the following API endpoint.
When a message processing fails, even after a certain number of retries, Appmixer stops processing the message and archives it. You can fetch, delete, and even retry those messages programmatically.
Get the list of the unprocessed messages for the current user.
Name
Type
Description
Variables
POST/variables/:flowId/fetch
Get variables. Variables are placeholders that can be used in component config or inputs. These placeholders are replaced either at runtime by data coming from components connected back in the chain (dynamic variables) or by real values (static variables).
Headers
Name
Value
}
uploader-file-name
string
The name of the file. This will be ignored in case that uploader-file-id header is present.
uploader-chunk-size
string
The size in bytes of the file/chunk being uploaded.
uploader-chunk-number
string
This header is uploader-chunk-number. The ordinal number of this chunk - e.g. the first chunk is 1, the second is 2 and so on.
uploader-chunks-total
string
This header is uploader-chunks-total. The total number of chunks that compose the file. If set to 1, it means that this is the complete file
sort
String
projection
String
includeComponentSourceFiles
Boolean
By default, the endpoint returns only files (that are used in flows). Custom component source codes are stored as files as well, if the user owns some, they can be returned as well.
Event handlers receive an object with event.data (event-specific fields) and event.next(). Calling event.next() executes the widget's built-in default behavior. If a handler is registered for an event, the default behavior is suppressed unless event.next() is called explicitly.
Ensure your MCP server package is listed in package.json dependencies
&#xNAN;(Unless you package your MCP server directly in the Appmixer connector directory, see above.)
auth.js
Define any required environment variables (API keys, credentials) for your MCP server.
These will be shown to the user in Appmixer Designer when they configure the connector.
Manifest & Metadata Files
package.json
Name following convention: appmixer.mcpservers.<your_mcp_server_name>
Add your public MCP server NPM package under dependencies.
module.json, bundle.json
Update name (use the same one as above, i.e. in the package.json file), label, description, and icons.
First, you need to install the Appmixer CLI tool, which enables you to build, test and deploy custom connectors. You can install the tool using npm:
Now, you need to initialize the CLI tool to configure it for your Appmixer tenant and log in with an admin account. Before you publish your components, verify that your admin account is associated with a "vendor." To do this, visit your Appmixer tenant's backoffice at https://backoffice.[YOURTENANT].appmixer.cloud. Navigate to the Users page, locate your user account, edit it, and add "appmixer" as the vendor. Without having the vendor assigned, you will not be able to publish components to your Appmixer tenant.
Please note that YOURTENANT refers to the tenant ID assigned to you during the signup process.
At this point, your CLI is initialized, and you are ready to start building, testing, and publishing your components.
To generate a boilerplate code for our connector, we will use the Appmixer CLI's generator tool:
In our example above, we used the tool to generate a component with the ID appmixer.boredapi.core.GetActivity. It's important to adhere to Appmixer's convention for fully qualified component names, which follows the pattern [VENDOR].[SERVICE].[MODULE].[COMPONENT]. The description is provided using the --description parameter. The author of the component is specified with the --author parameter, while --inPorts and --outPorts parameters are used to define comma-separated names of input and output ports, respectively (in this case, just one port for each type). The --iconUri parameter allows the passing of a URL for an icon that will be used for the component. Note also that the generator does more than just output the single component code and manifest file; it creates the necessary directory hierarchy and the service.json connector manifest file to complete our connector.
The resulting file structure should resemble the following:
Each component is comprised of two main files: a component.json manifest file that defines the metadata of the component, and a Node.js module (GetActivity.js in our case) that implements the behavior of our component, namely, how it processes inputs and produces outputs. In this guide, we will leave the package.json file as is, since our component does not require any dependencies (no third-party Node.js libraries are needed).
We can now proceed to edit the component.json manifest file, adding an input field to allow users to specify the type of random activity they wish to receive. This type field corresponds directly to the type query parameter of the Bored API endpoint.
Simultaneously, we will define the output of our component, which corresponds to the response received from the HTTP GET request to the /api/activity endpoint. While defining the output is optional, omitting it means users utilizing our component in their automations cannot reference specific values directly when connecting our component's data with other components.
Originally, our generated component.json manifest file looked like this:
After incorporating our changes, which include adding a type input parameter and defining the output, the manifest file will be updated as follows:
The schema.properties section defines a JSON Schema for our input while the inspector.inputs section defines the form to collect input from the user.
Type input
Output of GetActivity consumed in the connected SendEmail component
The final piece of our component is its behavior—specifically, how it responds to inputs and generates outputs. This is achieved through a Node.js module that exports functions recognized by Appmixer. The most crucial function is the receive(context) method, which Appmixer triggers whenever the component receives an input. Within this method, you can implement any business logic or make calls to third-party or internal HTTP endpoints (other protocols are also supported, essentially anything that Node.js can handle). When your component is prepared to output data (typically by using the response object from an HTTP call), it should use the built-in context.sendJson(object, PORT) function. The final GetActivity.js file will appear as follows:
The receive() function initiates an HTTP GET request to our API, incorporating the type input as a query parameter with the same name. All user inputs are accessible through the context.messages.[INPUT_PORT_NAME].content object. We also utilize the built-in context.httpRequest() method to simplify the initiation of HTTP requests. While you're free to use any Node.js library of your choice for making HTTP requests, the httpRequest() method offers a convenient alternative that includes easy request sending and proper error logging.
It's important to note that our code does not explicitly handle errors. This is because Appmixer is designed to automatically manage errors on behalf of the component. If the receive() function encounters an error, such as an HTTP request failing, Appmixer will retry the function automatically at a later time, employing an exponential backoff strategy.
Although your component is now ready to be published to your Appmixer tenant, it is advisable to first conduct local testing. Continuously updating your component code, republishing it, and reconfiguring or restarting your test flow for every test can be cumbersome. Consequently, the Appmixer CLI includes a tool that facilitates local testing of your component. In our scenario, we aim to test our component by providing the type input, allowing the component to execute its action (make an HTTP request), and then observe the output:
Below is the console output from our test:
Now, we are ready to publish the component to our Appmixer tenant. This will enable us to utilize it in our integration templates, internal automations, or make it available to our end-users through the embedded automation designer.
Finally, we can set up an automation that sends us an email every day at 17:00, providing ideas for cooking activities:
If you need to make changes to your connector, simply edit the files, re-pack, and re-publish. Your changes will then be reflected in your tenant.
$ appmixer init component appmixer.boredapi.core.GetActivity \
--description "Get a random activity to do when I am bored." \
--author "Appmixer Team <info@appmixer.com>" \
--inPorts in \
--outPorts out \
--iconUri "https://cdn.iconscout.com/icon/free/png-256/free-bored-267462.png" \
--serviceLabel BoredAPI \
--serviceDescription "Get random activities."
$ appmixer pack appmixer/boredapi # generates appmixer.boredapi.zip
$ appmixer publish appmixer.boredapi.zip
$ appmixer component ls | grep boredapi # optionally list all components
appmixer.boredapi.core.GetActivity
Install Appmixer CLI
Create your Component
Define Input and Output
Call 3rd Party HTTP API
Test your Component
Publish your Component
Change the modifiers and their categories as a whole. Restricted to admin users only. Before editing existing modifiers or adding new ones, checkout the GET /modifiers API to see the structure.
Name
Type
Description
categories
object
The object containing available modifier categories. Each category is composed by the following properties:
- label: label to be shown in the Modifier Editor. It can be overridden by string customization.
- index: position on which this category is displayed in the Modifier Editor.
modifiers
object
The object containing available modifiers. Each modifier is composed of the following properties:
- label: label to be shown in the Modifier Editor. Can be overridden by string customization.
- category: an array containing the categories which the modifier will appear under.
- description: short description of the modifier. It will appear under modifier's label. Can be overridden by string customization.
- arguments (optional): an array of objects describing the arguments for the modifier if there is any. For each argument, an inspector field is generated in the editor. The structure of each object is {name: String,type: String,isHash: Boolean, Optional}- returns (optional): an object with just one property type indicating the expected return type.
- isBlock (optional): boolean. Indicates if this is a block modifier.
- private (optional): boolean. Indicates if the modifier is private and therefore not available for users.
- variableArguments (optional): boolean. If set to true the modifier accepts any number of arguments. The inspector will render an "Add" button to add as many arguments as the user wants.
-
This endpoint can be used to test a helper function with the desired arguments, to check how it will behave under different conditions.
curl -XPOST "https://api.appmixer.com/modifiers/test" -H "Content-type: application/json" -H "Authorization: Bearer [ACCESS-TOKEN]" -d '{ "helperFn": "function(value) { return value && value.hasOwnProperty('\''length'\'') ? value.length : 0; }", "arguments": ["test"]}'
Name
Type
Description
helperFn
string
The Javascript helper function as a string.
arguments
array
The arguments to be passed to the helper function.
4
{
"statusCode": 400,
"error": "Bad Request",
"message": "The function returned \"undefined\""
}
{
...
"inPorts": [
{
"name": "in",
"schema": {
"type": "object"
},
"source": {
// The ListColumns component can return an array of columns in a
// Worksheet.
"url": "/component/appmixer/google/spreadsheets/ListColumns?outPort=out",
"data": {
// The ListColumns component needs two properties in order
// to get the list of columns, the Spreasheet Id and the
// Worksheet Id. Both will be taken from properties of the
// CreateRow component (the caller).
"properties": {
// Appmixer will replace 'properties/sheetId' with
// the actual value before making the call
"sheetId": "properties/sheetId",
"worksheetId": "properties/worksheetId"
},
// A transformer function 'columnsToInspector' from the
// ListColumns.js will be executed in order to transform a list
// of columns to the Appmixer Inspector.
"transform": "./ListColumns#columnsToInspector"
}
}
}
]
}
Categories allow you to organize integration templates in the Automation Hub marketplace. Each template can be assigned to multiple categories, which can then be used to create custom tabs and filters in the marketplace widget.
Overview
Categories are global/system-wide resources
Admin-only access for create/update/delete operations
All authenticated users can read categories
Templates can belong to multiple categories
Only integration templates and drafts can have categories
Deleting a category removes it from all associated templates
GEThttp://[API-URL]/categories
Get all categories. Available to all authenticated users.
GEThttp://[API-URL]/categories/:categoryId
Get details of a specific category. Available to all authenticated users.
POSThttp://[API-URL]/categories
Create a new category. Admin token required.
Name
Type
Description
PUThttp://[API-URL]/categories/:categoryId
Update an existing category. Admin token required.
Name
Type
Description
DELETEhttp://[API-URL]/categories/:categoryId
Delete a category. Admin token required. This will automatically remove the category from all templates that reference it.
Categories are assigned to integration templates through the Flow API. When creating or updating a flow, you can specify categories in the categories array.
POSThttp://[API-URL]/flows
PUThttp://[API-URL]/flows/:flowId
GEThttp://[API-URL]/flows/:flowId
When assigning categories to a template, the API validates:
Category Existence: All category IDs must reference existing categories
Flow Type: The flow must be an integration template or draft
Array Format: Categories must be provided as an array of category IDs
Categories are primarily used to organize templates in the Automation Hub marketplace:
Create categories for your use cases (CRM, Marketing, Finance, etc.)
Assign templates to relevant categories
Configure marketplace tabs in Hub Settings to display templates by category
All category operations are automatically logged in the audit trail:
Create: "Create category: [name]"
Update: "Update category: [name]"
Delete: "Delete category: [name]"
Each log entry includes:
Operation type (create/update/delete)
Before and after state (for updates)
Timestamp and performing user
See the documentation for more information.
Integrations
Manage flows used as integration templates and instances.
Integrations
Configuration
Set up a new instance with config parameters and set/get methods:
Filter the integrations with additional parameters:
The customFilter option can also be an array for templates and instances:
You can change the custom filter after the widget has already been initialized. For example, when a user selects a new category, you can update the filter and reload the widget:
Type: Boolean | Default: null
Toggle a custom loading state.
Type: String | Default: null
Toggle a custom error message.
Click a button to to create a new integration from template.
Click a button to edit integration.
Click a button to remove integration.
Click a button to start integration.
Click a button to stop integration.
Apps
This set of endpoints control the connectors that are installed in your Appmixer tenant. You can also publish new and uninstall existing connectors.
GEThttps://api.YOUR_TENANT.appmixer.cloud/apps
Returns all applications available to the authenticated user.
An "app" is either a module (e.g. appmixer.google.gmail) or a service that does not declare any modules (e.g. appmixer.calendly). When a service contains at least one module, the modules are returned as the apps and the service itself is omitted. The result is keyed by the app name and respects the user's ACL (private apps the user cannot see are filtered out).
curl "https://api.appmixer.com/apps" -H "Authorization: Bearer [ACCESS_TOKEN]"
outPorts
The definition of the output ports of the component. It's an array of objects.
Components can have zero or more output ports. Each output port has a name and optionally an array options that defines the structure of the message that this output port emits. Without the options object, the user won't be able to see the possible variables they can use in the other connected components. For example, a component connected to the weather output port of our GetCurrentWeather component can see the following variables in the variables picker:
An example of an outPorts definition can look like this:
).
Replace all occurrences of the GitLab connector path with your connector path.
Set your custom icon.
helperFn
: the javascript function as a string, which does the transformation of the variable. The function definition can have arguments being the first one always the variable value, and the subsequent each of the modifier's arguments, in the same order they are defined on
Default true. If true, the response object will contain input link variables for the given component IDs.
components.properties
boolean
Default true. If true, the response object will contains properties variables for the given component IDs.
End users browse templates organized by category in the marketplace widget
name*
string
Category name (1-100 characters), must be unique
description
string
Category description (max 500 characters)
name
string
Updated category name (1-100 characters)
description
string
Updated description (max 500 characters)
List Categories
Get Category
Create Category
Request Body
Unique Names
Category names must be unique across the system. If you attempt to create a category with a name that already exists, the API will return a 400 Bad Request error.
Update Category
Request Body
Delete Category
Automatic Cleanup
When a category is deleted, it is automatically removed from all integration templates and drafts that reference it. This ensures data consistency without requiring manual cleanup.
Assigning Categories to Templates
Create Flow with Categories
Update Flow Categories
Get Flow with Categories
Category Restrictions
Flow Type Restrictions
Categories can only be assigned to:
Integration templates (integration-template)
Integration drafts (integration-draft)
Attempting to assign categories to other flow types (e.g., flow, flow-template) will result in a 400 Bad Request error.
Admin only. When true, returns every app regardless of ACL. Non-admin users receive a 400 error.
{"appmixer.asana": {
GEThttps://api.YOUR_TENANT.appmixer.cloud/bundles
Returns the installed bundle versions. Each connector is packaged as a bundle (defined by its bundle.json); this endpoint reports the currently installed version of every bundle, keyed by the bundle name. It is useful for checking which connector versions are deployed in your tenant.
curl "https://api.appmixer.com/bundles" -H "Authorization: Bearer [ACCESS_TOKEN]"
Returns all components of a single app including their manifest files.
curl "https://api.appmixer.com/apps/components?app=appmixer.dropbox" -H "Authorization: Bearer [ACCESS_TOKEN]"
Name
Type
Description
app
string
Required. ID of an app as defined in service.json or module.json (e.g. appmixer.dropbox or appmixer.google.gmail).
Get all available components (including custom ones) that the user is allowed to use.
By default the endpoint returns the full manifest of every component. To retrieve only the list of component type names, set manifest=no. When full manifests are returned, the icon field is, by default, replaced by a URL pointing to the icon (instead of an inline base64 data URI) to keep the payload small — set compressIcons=false to keep the original inline icons.
curl "https://api.appmixer.com/components" -H "Authorization: Bearer [ACCESS_TOKEN]"curl "https://api.appmixer.com/components?manifest=no" -H "Authorization: Bearer [ACCESS_TOKEN]"
Name
Type
Description
manifest
string
When set to no, the endpoint returns only an array of component type names. Otherwise (default) it returns the full manifest of each component.
selector
string
Restrict the result to a subset of components. A [vendor].[service].[module].[component] selector (e.g. appmixer.google or appmixer.google.gmail).
Download the source files of a component, module or an entire service as a zip archive (application/octet-stream). Compiled code and internal node_modules.zip files are excluded from the archive. The user must own the selected component(s).
curl -XGET "https://api.appmixer.com/components/appmixer.myservice" -H "Authorization: Bearer [ACCESS_TOKEN]" -o appmixer.myservice.zip
Name
Type
Description
selector
string
A selector identifying what to download. It can target a whole service (appmixer.myservice), a module (appmixer.myservice.mymodule), a single component (appmixer.myservice.mymodule.MyComponent) or even an individual file (appmixer.myservice.mymodule.MyComponent/MyComponent.js).
(binary zip archive)
{
"error": "There is nothing that corresponds to appmixer.myservice."
}
Publish a new component, new module or an entire service or update an existing component/module/service. The uploaded entity must be zipped and must have a proper directory/file structure inside (See Basic Component Structure for more details). Note that you can use the Appmixer CLI tool to pack your component/service/module to a zip archive (appmixer pack command). Alternatively, you can also use a regular zip command line utility but you should omit the node_modules/ directories before archiving and the root directory of the zip archive must match the vendor name. The directory hierarchy must have a well defined structure: [vendor]/[service]/[module]/[component].
The size limit of the zip archive is configured per tenant (10MB by default).
Publishing a new component can take more time than a lifespan of a single HTTP request. Therefore, the result of the publishing HTTP call is a JSON object with ticket property. You can use the ticket to check for progress of the publish using the /components/uploader/:ticket endpoint.
curl -XPOST "https://api.appmixer.com/components" -H "Authorization: Bearer [ACCESS_TOKEN]" -H "Content-type: application/octet-stream" --data-binary @appmixer.myservice.zip
Name
Type
Description
compile
boolean
When true, the uploaded component code is compiled (minified) during publishing.
replaceAll
boolean
When true, existing files of the published service/module/component that are not present in the uploaded archive are removed (full replace).
Delete a component/module or an entire service.
curl -XDELETE "https://api.appmixer.com/components/appmixer.myservice" -H "Authorization: Bearer [ACCESS_TOKEN]" -H "Content-type: application/json"
Name
Type
Description
selector
string
A selector that uniquely identifies the service/module/component to delete. The selector is of the form [vendor].[service].[module].[component]. For example "appmixer.google.calendar.CreateEvent" (removes just one component) or "appmixer.google.calendar" (removes the calendar module) or "appmixer.google" (removes the entire Google service including all modules and components).
Name
Type
Description
doNotRemoveCollections
boolean
When true, the database collections associated with the deleted component(s) are preserved instead of being dropped.
{}
Get Apps
Query Parameters
Get Bundles
Get App Components
Query Parameters
Get All Components
Query Parameters
Download a Component/Module/Service
Path Parameters
Publish A Component/Module/Service
Query Parameters
Check for Publishing Progress
Path Parameters
Delete a Component/Module/Service
Path Parameters
Query Parameters
We support full schema definition for each option, so you can specify the structure of the data that is coming out from your component. You can add a schema property to each option, which contains a JSON Schema definition. For example:
As you can see, compared to the first example, we replaced the last 3 options with a single one, which is actually an array of items with three properties. Each of these items has title which determines the label that will be visible in the UI. Note that the type of these inner properties could be an object or array, and have their own nested schemas.
If the option is defined as an array and you want to work with that array using modifiers:
You will see the item properties among other variables.
And if you use the Each connector, you will see the item properties in the Variables picker.
Alternatively, you can define a schema at the top level instead of using the options property. For example:
When you define the structure of the data coming out from your component, the users of your component will have an easier time working with it, as they will be able to do things like selecting nested properties directly, selecting properties on iteration modifiers, and getting properties paths in modifiers. You can find more details about this in .
The definition is similar to the source source of properties. When used for the output port definition, it allows defining the output port schema dynamically.
There is one difference though. When defined in the output port, the source definition can reference both component properties and input fields, while the properties source definition can only hold references to other properties' values.
An example is a Google Spreadsheet component UpdatedRow. The output port options of this component consist of the column names in the spreadsheet. But that is specific to the selected Spreadsheet/Worksheet combination. Therefore it has to be defined dynamically.
Dynamic output port options.
Here is an example of the UpdatedRow output port definition.
Set the maximum number of outgoing links that can exist from the output port. The maximum number of connections is infinite by default but in some applications, it might be desirable to set a limit on this, usually 1. The Appmixer Designer UI will not allow the user to connect more than maxConnections links from the output port.
{
"outPorts": [
{
"name": "out",
"source": {
// We will call another component to construct the output port
// options, in this case, the GetRows component
"url": "/component/appmixer/google/spreadsheets/GetRows?outPort=out",
// Every Appmixer component can have 'properties' and input ports,
// the 'data' sections is used to create the input data object
// for the component
"data": {
// in this particular case, the GetRows component has an
// optional property called 'generateOutputPortOptions', we
// will pass that property with the value 'true'. The GetRows
// component will use this property to change its return value
// and instead of returning rows from Worksheet, it will
// return the 'options' array.
"properties": {
"generateOutputPortOptions": true
},
// the GetRows component expects the Spreadsheet ID and
// Worksheet ID as part of the message at its input port
// called 'in'. The UpdatedRow component is a trigger, it
// does not have an input port, but it has the same options like
// 'allAtOnce', 'withHeaders', ... and since it does not have
// an input port, it has these options defined in the
// 'properties' section. The next 'messages' section is used
// to construct an input port object for the GetRows component.
// It copies the user defined properties from the UpdatedRow.
// Appmixer will replace these with the actual values before
// calling the GetRows component.
"messages": {
"in/sheetId": "properties/sheetId",
"in/worksheetId": "properties/worksheetId",
"in/allAtOnce": "properties/allAtOnce",
"in/withHeaders": "properties/withHeaders",
"in/rowFormat": "properties/rowFormat"
}
}
}
}
]
}
outPort.source
outPort.maxConnections
appmixer.ui.Integrations({
/* ... */
options: {
customFilter: {
// displaying Integrations with a certain customField
'customFields.category': 'healthcare',
// that are shared with someone
'sharedWith': '![]'
// and in this example, that are shared throught the 'domain'
// options with a 'testdomain.com'
'sharedWith.domain': 'testdomain.com'
// or we could filter only Integrations that are shared with
// scope 'user'
// 'sharedWith.scope': 'user',
}
}
}
// Get the current widget options.
const currentOptions = integrations.get('options') || {};
// Override the custom filter and keep the rest of the options unchanged.
integrations.set('options', {
...currentOptions,
customFilter: {
'customFields.category': 'finance'
}
});
// Reload the widget to apply the updated filter.
integrations.reload();
You can natively embed Appmixer UI widgets into your application using the Appmixer UI JavaScript SDK. With just a few lines of code, you gain the ability to integrate not only the integration marketplace but also the fully-featured drag-and-drop automation designer. All widgets are customizable with your theme to align with your app's branding.
Install the Appmixer SDK
To incorporate the Appmixer SDK into your web page, follow these steps:
Note that YOUR_TENANTis the name of your tenant. For example, if the URL of your hosted version of Appmixer is , then YOUR_TENANTis eminent-emu-12345.
Please refer to our Installationpage for additional methods to integrate the Appmixer SDK into your page
Initialize the Appmixer SDK by using the Appmixer API URL provided during the sign-up process. For hosted tenants, the URL follows the pattern: https://api.YOUR_TENANT.appmixer.cloud.
const appmixer = new Appmixer({ baseUrl: 'https://api-TENANT_ID.appmixer.ai' });
Authenticate your end-users
Before presenting integrations to your end-users, it's necessary to first identify them. Achieve this by dynamically creating "Appmixer virtual users" in the background. These virtual users should be linked with the users in your own user management system.
let auth;
try {
auth = await appmixer.api.authenticateUser(username, usertoken);
appmixer.set('accessToken', auth.token);
} catch (err) {
if (err.response && err.response.status === 403) {
// Virtual user not yet created in Appmixer. Create one.
try {
auth = await appmixer.api.signupUser(username, usertoken);
appmixer.set('accessToken', auth.token);
} catch (err) {
alert('Something went wrong creating a virtual user. ' + err.message);
}
} else {
alert('Something went wrong authenticating a virtual user. '+ err.message);
}
}
Although creating virtual users directly from client-side code is feasible, we recommend enhancing the security of your Appmixer tenant by configuring the API_USER_CREATE_SCOPE system setting to the "admin" string. This ensures that only admin users have the capability to add new users. To create virtual users, you should use the POST /user API endpoint, accompanied by an access token from an Appmixer admin user, from your backend application code. For further details, please consult our documentation at .
The username and usertoken serve as credentials to authenticate Appmixer virtual users. It is advisable to utilize an email address (which can be fictional) as the username and a secret token as the usertoken. For instance, you might use MY_USER_ID_IN_MY_APP@yourappdomain.com as the email format. Appmixer does not send emails autonomously to virtual users.
To create a usertoken, consider using the function provided below:
Please ensure that you securely store these credentials alongside your user records associated with the Appmixer virtual users. This practice enables seamless authentication of your users with Appmixer upon their subsequent visits to your application.
The Automation Hub is an all-in-one widget that combines a marketplace for your automations, wizard for end-users interacting with the automations, logs and accounts.
Finally, you can embed your integration marketplace to your application. Utilize the ui.Integrations and ui.Wizard widgets offered by the Appmixer SDK to display the list of available and user activated integrations together with the Wizard web form, facilitating end-users in setting up new integrations or modifying existing ones:
Embedding the Integration Marketplace into your application is just the beginning. You can also incorporate the fully-featured drag-and-drop Automation Designer, granting your end-users unparalleled flexibility in integration and automation. Typically, when integrating the ui.Designer, it's beneficial to include the ui.FlowManager as well. This UI widget presents a list of automations previously created by your users, complete with capabilities for filtering, searching, and managing these automations.
The text within any UI widget embedded via the Appmixer SDK can be customized or translated into different languages. This is achieved by utilizing the strings object, which can be directly passed to the Appmixer SDK constructor or configured using the set('strings', CHANGES) method:
For more information on customizing text strings and a comprehensive JSON object listing all the text placeholders available for customization, please refer to the page in our documentation.
The Appmixer SDK offers a straightforward method to customize colors, fonts, and other visual attributes of the rendered UIs. To apply your custom theme, pass your theme object to the Appmixer SDK constructor, or configure it by using the set('theme', YOUR_THEME) method:
For more detailed information, please refer to the page in the documentation.
For additional code examples on integrating Appmixer into your application, please visit our public repositories:
Sign-in a user with credentials and get their access token.
curl -XPOST "https://api.appmixer.com/user/auth" -H "Content-type: application/json" -d '{ "username": "abc@example.com", "password": "abc321" }'
Name
Type
Description
Data Stores
Access Data Stores (built-in key-value store).
GEThttps://api.YOUR_TENANT.appmixer.cloud/stores
Get all key-value stores.
curl "https://api.appmixer.com/stores" -H "Authorization: Bearer [ACCESS_TOKEN]"
User Groups (also known as Workspaces) enable teams to collaborate by sharing resources such as flows, data stores, and files. All resources are owned by the group rather than individual users, while maintaining audit trails for individual user actions.
All group resources are shared among group members
Individual user actions are tracked in audit logs
Charts
Control the charts in a user dashboard (Insights UI).
POSThttps://api.YOUR_TENANT.appmixer.cloud/charts
This method is not meant to be implemented by applications embedding Appmixer SDK. Creating chart requires complex objects (options, query, traces), their structure goes beyond this documentation. appmixer.ui.InsightsChartEditor SDK component should be used to build Charts.
Name
Type
Description
Custom Component Strings
Appmixer lets you manage the components' inspector fields through the manifest or the strings object.
There are two ways how to customize component's strings:
Through a localization object inside the component's manifest
Adding custom strings to components namespace inside strings object
You can include custom strings inside the component's manifest using a localization object. The following is an example how to do it:
"name":"appmixer.asana",
"label":"Asana",
"category":"applications",
"description":"Asana is a collaborative information manager for workspace. It helps you organize people and tasks effectively.",
"description":"Calendly helps you schedule meetings without the back-and-forth emails. It does not work with the free Basic account. It works with Premium or Pro account.",
"description":"Dropbox is a home for all your photos, documents, videos, and other files. Dropbox lets you access your stuff from anywhere and makes it easy to share with others.",
"description":"Evernote is a powerful note taking application that makes it easy to capture ideas, images, contacts, and anything else you need to remember. Bring your life's work together in one digital workspace, available on all major mobile platforms and devices.",
Default true. When true, the icon field of each manifest is returned as a URL; set to false to return the original inline base64 icon.
ignoreACL
boolean
Admin only. When true, returns every component regardless of ACL. Non-admin users receive a 400 error.
password*
string
Password.
username*
string
Username, has to have an email format.
{"user": {
POSThttps://api.YOUR_TENANT.appmixer.cloud/user
Create user. By default, this endpoint is open (does not require authentication). This can be changed by setting the API_USER_CREATE_SCOPE system configuration. If you set the value of API_USER_CREATE_SCOPE to for example admin, then an admin token will be required to call this API.
curl -XPOST "https://api.appmixer.com/user" -H "Content-type: application/json" -d '{ "username": "abc@example.com", "email": "abc@example.com", "password": "abc321" }'
Admin token required. This operation stops all running flows and deletes all the user's data from the system - logs, accounts, tokens ... The response is a ticket, the operation may take a long time. You can use the ticket and poll for the result with the next API method.
{
"status": "in-progress | completed | failed | cancelled",
"stepsDone": 4, // can be used to display a progress bar
"stepsTotal": 10 // can be used to display a progress bar
}
Get number of records in a store.
curl "https://api.appmixer.com/store/count?storeId=5c6fc9932ff3ff000747ead4" -H "Authorization: Bearer [ACCESS_TOKEN]"
Name
Type
Description
storeId
string
Store ID.
{
"count": 681
}
GEThttps://api.YOUR_TENANT.appmixer.cloud/store
Get records. Supports search and pagination.
curl "https://api.appmixer.com/store?storeId=5b213e0ef90a6200113abfd4&offset=0&limit=30&sort=updatedAt:-1" -H "Authorization: Bearer [ACCESS_TOKEN]"
Name
Type
Description
storeId
string
Store ID.
sort
string
Store record parameter to sort by. Followed by ":" and the sort order -1 (descending) or 1 (ascending).
Create a new key-value store. Returns the newly created Store ID.
curl -XPOST "https://api.appmixer.com/stores" -H "Authorization: Bearer [ACCESS_TOKEN]" -H "Content-Type: application/json" -d '{ "name": "My Store" }'
Delete a store and all the records in the store.
curl -XDELETE "https://api.appmixer.com/stores/5c7f9bfe51dbaf0007f08db0" -H "Authorization: Bearer [ACCESS_TOKEN]"
Create a new value in the store under a key.
curl -XPOST "https://api.appmixer.com/store/5c7f9bfe51dbaf0007f08db0/mykey" -H "Authorization: Bearer [ACCESS_TOKEN]" -H "Content-Type: text/plain" -d "my value"
When operating in a group context, the JWT token includes:
id: The group user ID (resources are owned by this ID)
Get Available Contexts
Use Cases
Collaborative Teams
Admin Group
SSO Integration
Important Notes
Token Revocation
When a user is removed from a group, all issued JWT tokens for that user in the group context are automatically revoked. However, if a token is being used inside a running flow component, it will continue to work until the component execution completes.
Audit Trail
All actions performed by users in a group context are logged with the original user ID, ensuring full audit trail capability even when resources are shared.
Resource Ownership
When operating in a group context:
All created resources (flows, accounts, data stores, files) are owned by the group user ID
traces
object
The aggregations that are represented on the chart along with their sources (flows, components).
query
object
Object representing time range for the chart.
options
object
Object with the visualization options for the chart.
As you can see, there's a localization object at the end whose keys are language codes. This allows you to support multiple languages. Each value is an object whose keys are paths to the elements that will be customized (label, tooltip, placeholder, etc). The paths follow JSON path syntax.
You can customize the component's label and description. You can customize the component's input/output port labels, the inspector input field labels, and output variables as well.
There's a slightly different specification when localizing output variables. As you can see in the example, after outPorts[0].options the next path fragment is the option's value, instead of the index. This is because the component could have a dynamic output instead and different output variables can share the same index, so we use the value to specify them instead.
To switch the language in UI, you call the Appmixer instance set method:
Note that if you want to customize the whole UI, you must use this in conjunction with the strings object. Here's an example:
The alternative way to customize the component's strings is using the Strings Object. There is a root namespace components which contains all the custom strings definitions for components:
Each key in components object is the path to the component and the value is an object whose keys are the paths to elements (label, tooltip, placeholder, etc). This path follows the JSON path syntax. For more information about the Strings Object refer to the Custom Strings section.
Not only you can localize component's strings, but also services and modules. This allows you to change the label and description of the applications in the designer's left-side panel (the one you drag the applications from). To do it we can use either localization object in the service.json or module.json manifest or use the Strings Object.
It follows the same pattern as in components, but we use the service/module path as a key for the definition:
Labels of groups of application modules can be localized/changed without rewriting a single module.json file.
Use the localization strings to do so:
When rendering the component's inspector, the strings are resolved with the following priority:
Localization object in the manifest (component.json).
Strings object components namespace.
Property in the manifest (component.json).
For example, when resolving an input's label, it will first look if there is a localization object in the manifest with a path to that input's label. If not, it will search the Strings Object. If none of that is defined, it will use values from the manifest.
// Create an SDK instance
var appmixer = new Appmixer()
// Will use the strings under 'cs' key
appmixer.set('lang', 'cs')
// Will switch the strings to the ones under 'sk' key
appmixer.set('lang', 'sk')
var appmixer = new Appmixer();
var mySkStrings = { /* Strings definition for sk language */ };
var myCsStrings = { /* Strings definition for cs language */ };
// This function will be called when the user clicks on some
// "Switch to sk" button
function setLangToSk() {
appmixer.set('lang', 'sk');
appmixer.set('strings', mySkStrings);
}
// This function will be called when the user clicks on some
// "Switch to cs" button
function setLangToCs() {
appmixer.set('lang', 'cs');
appmixer.set('strings', myCsStrings);
}
{
"name": "appmixer.twilio",
"label": "Twilio",
"category": "applications",
"description": "Twilio is an easy tool for developers to send and receive SMS and voice calls.",
"icon": "data:image/svg+xml;base64,PHN2ZyB3aWR0aD0iMj...",
"localization": {
"cz": {
"label": "Modul Twilio",
"description": "Twilio je snadný nástroj pro vývojáře k odesílání a přijímání SMS a hlasových hovorů."
},
"sk": {
"label": "Modul Twilio",
"description": "Twilio je ľahký nástroj pre vývojárov na odosielanie a prijímanie SMS a hlasových hovorov."
}
}
}
"appmixer.twilio": {
"label": "Modul Twilio",
"description": "Twilio je snadný nástroj pro vývojáře k odesílání a přijímání SMS a hlasových hovorů."
}
Default - not yet themed - embedded Integration Marketplace
Appmixer Designer Embedded in your SaaS product
Appmixer Flow Manager Embedded in your SaaS product
Changed UI Strings in embedded Flow Manager
this section
Insights
Get list of all messages passing through your flows and usage information (telemetry).
Get Logs and Histogram
GEThttps://api.YOUR_TENANT.appmixer.cloud/logs
Get logs for a single flow or list of flows or all user's flows. Filtering and sorting supported. Logs contain data messages getting into the component's input port(s) and messages sent to the component's output port(s). They also contain any errors that occurred during the flow run or while trying to start/stop a flow.
curl "https://api.appmixer.com/logs?from=0&size=30&sort=gridTimestamp:desc&query=gridTimestamp:[2019-03-04+TO+2019-03-08]&flowId=9c4673d7-a550-45a2-91c1-ad057fac0385" -H "Authorization: Bearer [ACCESS_TOKEN]"curl "https://api.appmixer.com/logs?from=0&size=30&sort=gridTimestamp:desc&query=gridTimestamp:[2019-03-04+TO+2019-03-08]" -H "Authorization: Bearer [ACCESS_TOKEN]"
Pagination with searchAfter
For efficient pagination through large result sets, use searchAfter instead of from. Rather than skipping over results (which gets slower on deeper pages), searchAfter picks up exactly where the previous page left off.
How it works:
Make your first request normally (without searchAfter).
From the last log entry in the response, take its sort field value(s) and _id.
Pass those values back as searchAfter parameters in the next request.
Important: The number of searchAfter values must match the number of sort parameters. Each searchAfter value corresponds to a sort field in the same order. If they don't match, the API returns an error.
Example — paginating with gridTimestamp and _id as a tiebreaker:
https://api.appmixer.com/logs?flowId=9c4673d7-a550-45a2-91c1-ad057fac0385&size=30&sort=gridTimestamp:asc&sort=_id:asc&query=gridTimestamp:[* TO *]&searchAfter=2023-10-25T15:03:17.721Z&searchAfter=wC5cZ4sB5dpG2lX0gmxi
Here, searchAfter=2023-10-25T15:03:17.721Z matches sort=gridTimestamp:asc and searchAfter=wC5cZ4sB5dpG2lX0gmxi (the _id of the last log) matches sort=_id:asc. Using _id as a secondary sort ensures no duplicates or missed records when multiple logs share the same timestamp.
Get a detail of a log. Log detail gives you information on the actual data of the message between two components.
curl "https://api.appmixer.com/log/93198d48-e680-49bb-855c-58c2c11d1857/appmixer-201804/AWKbQ6Vr9I6rzDWu4NbG" -H "Authorization: Bearer [ACCESS_TOKEN]"
Name
Type
Description
POSThttps://api.YOUR_TENANT.appmixer.cloud/logs
This method works the same as its /GET counterpart, but it also allows to get aggregations within the matched data, by passing a request body specifying desired aggregations.
Get usage information.
curl "https://api.appmixer.com/telemetry?from=2018-03-17&to=2018-04-17" -H "Authorization: Bearer [ACCESS_TOKEN]"
Name
Type
Description
GEThttps://api.appmixer.com/telemetry/messages
Get usage information for a user identified by the userId query parameter. This call requires admin privileges.
curl "https://api.appmixer.com/telemetry/messages?userId=54324413432141432&from=2024-01&to=2024-02 -H "Authorization: Bearer [ACCESS_TOKEN]"
Get usage information for a flow identified by flowId. This call requires admin privileges.
curl "https://api.appmixer.com/telemetry/flows/ef4324-431ff-434fadf-424 -H "Authorization: Bearer [ACCESS_TOKEN]"
Custom Theme
Customize UI widgets. You can change the colors, the typography, and much more.
Basic usage
To customize the UI widgets, you need to specify a theme JSON object either in the Appmixer constructor:
If you wish to switch between themes, use the set("theme") method, this will automatically re-render the UI applying your new theme:
// change the theme of all widgets
appmixer.set('theme', {
variables: {
font: {
family: 'serif'
}
}
})
// or/and change the theme of a single widget
widget.set('theme', {
variables: {
colors: {
neutral: 'green'
}
}
});
Variables
The easiest way to change the overall styling is to use the theme variables. The following example shows a complete list of variables that you can set in your theme to match your product branding:
appmixer.set('theme', {
mode: 'light', // Determines the color mode of the theme: 'light' or 'dark'.
variables: {
// Font variables including font family, weights, and size.
font: {
family: '\'SF Pro Text\', \'Helvetica Neue\', \'Helvetica\', \'Arial\', sans-serif',
familyMono: '\'SF Mono\', \'ui-monospace\', Menlo, monospace',
weightRegular: 400,
weightMedium: 500,
weightSemibold: 600,
weightBold: 700, // Added key for bold font weight.
size: 14
},
// Color variables for various UI elements, with light and dark mode defaults.
colors: {
background: '#FFFFFF', // Color of the background. The areas accomodate surfaces.
surface: '#FFFFFF', // Color of the surfaces above background and other surfaces.
separator: '#E0E0E2', // Separator is a special color for various borders and lines.
neutral: '#1F2338',
primary: '#2A64F6', // Colors for primary, secondary and tertiary actions of the user.
secondary: '#6B7EB3',
tertiary: '#8C6C87',
error: '#B3261E',
warning: '#B56C09',
success: '#08B685',
modifier: '#C558CF', // Special color for variables that have been modified via Modifiers.
highlighter: '#FFA500'
},
// Shadow variables for different elevation levels and UI elements.
shadows: {
level0: '0 0 4px 0 rgba(60, 64, 67, 0.3)', // Shadows from level 0 to 5 serve to assist with elevation levels between surfaces.
level1: '0 0 1px rgb(125 125 126)',
level2: '0 1px 2px 0 rgba(60, 64, 67, 0.3), 0 1px 3px 1px rgba(60, 64, 67, 0.12)',
level3: '0 2px 4px 0 rgba(60, 64, 67, 0.3), 0 2px 6px 1px rgba(60, 64, 67, 0.12)',
level4: '0 3px 9px 0 rgba(60, 64, 67, 0.15), 0 3px 12px 1px rgba(60, 64, 67, 0.12)',
level5: '0 4px 8px 0 rgba(60, 64, 67, 0.3), 0 4px 12px 1px rgba(60, 64, 67, 0.12)',
backdrop: 'rgba(0 0 0 / 88%)', // Backdrop is a special shadow to cover the background of modals and popups.
blur: 'rgba(0 0 0 / 10%)', // Blur is an alternative for "backdrop" when the background is blurred instead.
popover: '0 3px 9px rgba(0 0 0 / 12%)', // Popover is a special shadow for popups that should be at the maximum elevation.
icon: '0 1px 3px rgb(0 0 0 / 6%)'
},
// Radius variables for element and container corners.
corners: {
elementRadiusSmall: '3px',
elementRadiusMedium: '6px',
elementRadiusLarge: '9px',
elementRadiusRound: '300px',
containerRadiusSmall: '3px',
containerRadiusMedium: '6px',
containerRadiusLarge: '9px'
},
// Border width variables for UI elements.
dividers: {
regular: '1px', // Width of border lines and separator lines in the UI.
medium: '2px',
semibold: '3px',
bold: '6px',
extrabold: '9px'
}
}
})
Shapes
Shapes of connectors in diagrams are customizable by choosing a preset in your theme.
Change the values of the entries to switch between presets. Here are built-ins per shape type:
Special version of actions and triggers that works better on dark backgrounds.
Special version of vertical actions and triggers that works better on dark backgrounds.
Charts (used in the Insights widgets - , and ) are customizable by a unique set of non-CSS properties. The values default to the current theme variables, except for colorway. The colorway option specifies the dynamic colors automatically picked by charts.
The theme JSON object references the entire Appmixer SDK UI in a complex tree of selectors. Elements use a hash symbol (#) prefix and dynamic states use the at sign (@). Each branch in the tree may hold nested selectors and any valid CSS properties for the element. The selectors are available for advanced customizations, but the structure may change between the Appmixer versions.
The numbers in the names of colors refer to a foreground opacity of the color over the base background color:
neutral96 is a foreground color with 96% opacity over the background neutral00.
Some colors need a negative color NG on top. For example, a white text on a blue button.
The numbers in size of the font refer to the defaults in pixels: size13 variable default is 13px.
For reference, we prepared a dark theme for all the Appmixer UI widgets that you can use as a quick overview of all the UI elements that you can set your custom theme for:
Screenshots of the dark theme for some of the UI widgets:
API Module
The Appmixer SDK uses this API module internally to connect to the REST API.
Name
Description
Flow Manager
Browse and manipulate flows that are accessible to the current user.
Set up a new instance with config parameters and set/get methods:
Type: Object | Default: DefaultOptions
Type: Object[] | Default: []
originalUserId: The actual user ID (for audit logging)
groups: Array of group IDs the user belongs to
This ensures proper resource ownership while maintaining audit trails.
All group members have equal access to these resources
Switching back to personal context shows only personally-owned resources
Authenticate a user to Appmixer. Note that this can be a "virtual" user that exists for the sole purpose of associating a real user of your own product to a user in Appmixer. Each user in Appmixer can have a set of flows, can run and stop flows, and can see data going through their flows. The returned promise is either resolved with an object that contains a token (which you need to set with appmixer.set('accessToken', token) to be able to make calls to the API backend. Or the promise is rejected with an error object. If the error object returns a 403 status code (i.e. err.response.status === 403), the user does not exist in Appmixer.
Similar to the api.authenticateUser, but uses email instead of username.
Create a new user in Appmixer. The returned promise is either resolved with an authentication object (containing the token property) or rejected if the sign-up fails. If the email parameter is not provided, then the username will be copied as email.
appmixer.api.createFlow(name, [descriptor], [properties])Create a new flow in Appmixer. The returned promise resolves to the ID of the newly created flow. The properties object can contain your own custom metadata inside the customFields property. This is especially useful for filtering flows based on your own custom metadata.
Delete an existing flow identified by flowId.
Get flow. The returned promise resolves to an object with the following information: { id, flow, name, stage, btime, mtime, thumbnail }, where flow is the Flow Descriptor, stage is either 'running' or 'stopped', btime is the time the flow was created ("birth" time), mtime is the time the flow was modified and thumbnail contains a thumbnail image (self-contained, in the Data URI format).
Get all flows of the user or filter them by query. query is an object with the following properties: limit, offset, pattern (a string to filter flows containing pattern in their names), sort, projection (allows you to exclude properties from the returned flow objects), sharedWithPermissions and filter.Example:
Get the number of all flows of the user or filter them by query. query is an object with pattern property that can include a string to filter flows containing a pattern in their names. Example: { "pattern": "dropbox" }.
Update an existing flow. update can contain the following information: { flow, name, customFields }, where flow is the Flow Descriptor of the flow and customFields is an object with your own custom metadata for this flow.
Start a flow.
Stop a flow.
Create a copy of an existing flow. The returned promise resolves to the ID of the newly created flow.
Get current user. The returned promise resolves to an object with username.
Get all the data stores. The returned promise resolves to an array of stores each an object with name and storeId properties.
Get one store. The returned promise resolves to an object with name and storeId properties.
Get the number of records in a store. query is an object with storeId and pattern properties where pattern is a string to filter records that contain the string in their keys or values.
Get store records. query is an object with storeId, pattern (string to search for in keys/values), limit , offset and sort properties. Example:
Create a new store. The returned promise resolves to the ID of the newly created store.
Delete a store.
Rename an existing store.
Create a new record in a store.
Delete store items. items is an array of objects each having a key and storeId properties identifying the item and store from which the item should be removed.
Create a custom account.
Get a list of connected accounts of the user. filter is a custom query string (see the GET /accounts for an example). The returned promise resolves to an array of objects of the form { accountId, name, displayName, service, icon, profileInfo }.
Get a list of accounts connected to a specific component.
Get a list of flows this account is used in. The returned promise resolves to an array of objects with flowId and name properties.
Rename a connected account. Note that this name is displayed in the Accounts widget and also in the Inspector UI of the Designer.
Get logs. The query is an object of the form { from, size, sort, query }:
Get logs of a specific flow:
Get one log. logId and index are values returned from getLogs().
Get all tasks of the user. query.role can be either "approver" or "requester" and allows you to filter tasks based on the role. query.pattern filters returned tasks by a term that must be contained in the task title. Settingquery.secret to either the approverSecret or requesterSecret allows you to get a list of tasks of a different user for which you have the secret (other than the one identified by the access token, i.e. the currently signed-in user).
Returns the number of tasks based on the query. See getPeopleTasks(query) for more info.
Return one task identified by id.
Approve a task identified by id. params is an optional object that can contain the secret property (approver secret). Having the secret allows you to approve a task of any user for which you have the secret, not just the currently signed-in user.
Reject a task identified by id. params is an optional object that can contain the secret property (approver secret). Having the secret allows you to reject a task of any user for which you have the secret, not just the currently signed-in user.
Returns all the Insights charts of the user.
Return one Insights chart identified by chartId.
Delete an Insights chart identified by chartId.
This request will return an object with all the components in the flow that have auth section with all the available accounts.
The event is triggered when a request fails with an error or when the access token is invalid.
The event is triggered when API validation fails with a warning.
{
from: 0,
size: 30,
sort: "@timestamp:desc",
query: "@timestamp:[2018-01-01 TO 2018-01-01] AND +flowId:FLOW_ID"
}
await appmixer.api.getLog(logId, index)
await appmixer.api.getPeopleTasks(query)
await appmixer.api.getPeopleTasksCount(query)
await appmixer.api.getPeopleTask(id)
await appmixer.api.approveTask(id, [params])
await appmixer.api.rejectTask(id, [params])
await appmixer.api.getCharts()
await appmixer.api.getChart(chartId)
await appmixer.api.deleteChart(chartId)
await appmixer.api.getFlowAuthentication(flowId)
appmixer.api.on(event, handler)
appmixer.api.on('error', error => {
if (error.code === 401) {
/* A request failed because the current access token is invalid ... */
}
}
appmixer.api.on('warning', warning => { ... }
Repeat for each subsequent page.
excludes
string
A comma separated field names to exclude from the log objects returned.
includes
string
A comma separated field names to include from the log objects returned.
query
string
Query string. Uses the Lucene query syntax: https://lucene.apache.org/core/2_9_4/queryparsersyntax.html
sort
string
A parameter to sort the result. Optionally followed by ":desc" to change the order. asc by default. This parameter can be passed multiple times to use multiple sortings.
size
number
Maximum number of logs returned. Useful for pagination. 50 records by default.
from
number
Index of the first log returned. Useful for pagination.
searchAfter
string
Cursor-based pagination parameter, more efficient than from for deep pagination. Pass the sort value(s) and _id of the last document from the previous page. The number of searchAfter values must match the number of sort parameters. It is recommended to always use _id as a secondary sort to avoid duplicates. See the section above for details.
includes
string
A comma separated field names to include from the log objects returned.
query
string
Query string. Uses the Lucene query syntax: https://lucene.apache.org/core/2_9_4/queryparsersyntax.html
sort
string
A parameter to sort the result. Optionally followed by ":desc" to change the order. asc by default. This parameter can be passed multiple times to use multiple sortings.
size
number
Maximum number of logs returned. Useful for pagination.
from
number
Index of the first log returned. Useful for pagination.
search_after
string
Cursor-based pagination parameter, more efficient than from for deep pagination. Pass the sort value(s) and _id of the last document from the previous page. The number of searchAfter values must match the number of sort parameters. It is recommended to always use _id as a secondary sort to avoid duplicates. See the section above for details.
userId
string
A user ID.
portType
string
string: in or out . Or it can be array portType=in&portType=out. Used to filter only input messages or output messages. in and out by default.
flowId
string
The flow ID to filter on. This parameter can be used multiple times to filter on more flows. If not present, it will return logs for all user's flows (even flows that are being shared with signed in user).
While the advanced theme styling gives you the most flexibility in customizing Appmixer UIs, we cannot guarantee that in some cases, the structure and nesting of the selectors might change between Appmixer versions. It is therefore recommended to use theme.variables instead.
Add a dropdown menu input to each flows to trigger built-in and custom events:
Flow Manager Menu
Type: Object | Default: DefaultShareTypes
Override default sharing dialog types.
Type: Object[] | Default: DefaultSharePermissions
Override default sharing dialog permissions.
Type: Object[] | Default: []
Create dropdown inputs with built-in query filters:
Flow Manager Filters
Type: Object | Default: {}
Filter the flows with additional parameters:
This is especially useful in connection with customFieldsmetadata to display multiple different Flow Managers each listing a different category of flows:
In Appmixer 6, the FlowManager widget is meant to display Automations only. These are regular flows, not the Integrations. This can be overwritten with the customFilter:
Type: Object[] | Default: []
Create dropdown inputs with built-in sorting:
Flow Manager Sorting
Type: Boolean | Default: null
Toggle a custom loading state.
Type: String | Default: null
Toggle a custom error message.
Type: String | Default: grid
Change layout of the widget.
Type: Object | Default: DefaultQuery
Set custom query parameters.
Select a flow to open in Designer widget.
Click Create Flow button.
Toggle flow stage button.
Toggle flow stage button.
Click menu item to clone a flow.
Click menu item to open sharing of a flow.
Click menu item to rename flow.
Click menu item to remove a flow.
Add menu item with flow:share event for a configurable flow sharing dialog:
The optionalicon property is a URL of an image or a base64 string.
config.options.shareTypes
config.options.sharePermissions
config.options.filters
config.options.customFilter
config.options.sorting
Instance
Learn about widget instance .
State
loader
error
layout
query
Events
flow:open
flow:create
flow:start
flow:stop
flow:clone
flow:share
flow:rename
flow:remove
Sharing
Example
Handle Flow Errors
When errors arise in running automations or integrations, Appmixer does not automatically send emails to your end-users. Instead, it offers complete customization of communication with your end-users, enabling you to send your own branded emails or other types of notifications. This approach allows you to maintain consistency in your communication strategy and ensure that all messages align with your brand identity.
It's worth noting that you can set up your own Appmixer automation to manage error notifications. Simply utilize the Webhook trigger as the starting point for your automation and register the Webhook URL with the WEBHOOK_FLOW_COMPONENT_ERROR System Webhook configuration in the Backoffice. This method allows you to automate the notification process effectively, tailoring it to meet your specific needs and and avoid implementing a new endpoint in your own backend application.
To manage errors within running integrations or automations, configure the WEBHOOK_FLOW_COMPONENT_ERROR system variable with a custom URL in the Appmixer Backoffice interface. Appmixer will then send an HTTP POST request to this URL each time an error occurs in a flow, enabling you to respond or notify as necessary based on the error details provided. This setup provides a streamlined way to monitor and address issues in real-time.
The payload that Appmixer sends to the registered URL when an error occurs in a flow has the following structure:
Recommendation for End-User Error Notification Content
While the error message from Appmixer provides comprehensive details about the issue, it's important to communicate this information to your end-users in a more digestible format. To ensure your notifications are user-friendly and avoid overwhelming your end-users with technical jargon, we recommend structuring your communications as follows:
Given a scenario where the SendEmail component in a flow mistakenly references the Start time output of the OnStart trigger instead of an email address in the To field, a runtime error will occur. This mistake results in the flow attempting to use a timestamp as the recipient's email address, which is invalid. Consequently, this misconfiguration triggers a runtime error, which is then accurately recorded and can be reviewed in the log viewer.
When an unrecoverable error occurs, such as the one described with the SendEmail component misconfiguration, Appmixer will package the error details into a JSON object. This JSON payload is then sent via an HTTP POST request to the URL specified in the WEBHOOK_FLOW_COMPONENT_ERROR system variable. The structure of this payload is designed to provide comprehensive information about the error, including the component that caused it, the nature of the error, and any relevant data to identify and address the issue:
If the flow is configured correctly with a valid email address but encounters a network error preventing Appmixer from sending the email, this situation represents a temporary or external issue rather than a misconfiguration within the flow itself. In such cases, Appmixer will attempt to handle the error based on its retry policies or error-handling mechanisms. If the error persists and is deemed unrecoverable for that instance of execution, Appmixer may report this failure through the WEBHOOK_FLOW_COMPONENT_ERROR system variable, if configured. The notification sent to the specified webhook URL will detail the error, indicating it was a network issue affecting the email send action, allowing for appropriate troubleshooting or user notification.
Users can then review this error within the log viewer or under Insights, where all flow activities and errors are documented for analysis.
Appmixer sends out a JSON payload to the registered URL containing detailed information about the error:
It's important to note that Appmixer employs an automatic retry mechanism for handling network errors when sending messages. This involves multiple attempts to resend the message, following an exponential backoff strategy to optimize the timing of retries. Thus, the error notification sent via the WEBHOOK_FLOW_COMPONENT_ERROR system variable, along with the detailed JSON payload to the registered URL, occurs only if all retry attempts fail. This approach ensures that temporary issues have ample opportunity to be resolved before escalating the error, aiming to maintain the reliability of your automations and integrations without immediate interruption from transient network issues.
When are enabled, Appmixer can notify you when users approach or exceed their storage quotas. These notifications are sent via system webhooks, allowing you to proactively manage capacity and communicate with users about their storage usage.
Configure the following system webhook variables in the Appmixer Backoffice to receive storage quota notifications:
Triggered when a user reaches the warning threshold (default: 90% of soft limit).
Payload example:
Triggered when a user exceeds their soft limit but remains below the hard limit.
Payload example:
Triggered when a user exceeds their hard limit. At this point, write operations are blocked, jobs are paused, and incoming webhooks are rejected.
Payload example:
System-wide capacity events notify administrators when the entire system approaches or reaches capacity limits.
Triggered when system storage utilization reaches the warning threshold (default: 80%).
Payload example:
Triggered when system storage utilization reaches the critical threshold (default: 95%). At this point, the circuit breaker activates and blocks write operations system-wide.
Payload example:
Storage quota notifications respect a cooldown period (default: 24 hours) to prevent notification spam. Once a notification is sent for a specific user and event type, the same notification will not be sent again until the cooldown period expires, even if the user remains in the same quota state.
Storage quota webhooks enable you to:
Send branded emails to users about their storage usage
Trigger automated cleanup processes
Alert administrators about users approaching limits
The configuration properties of the component. Note that unlike properties specified on input ports (described later on in the documentation), these properties cannot be configured by the user to use data coming from the components back in the chain of connected components. In other words, these properties can only use data that is known before the flow runs. This makes them suitable mainly for trigger type of components.
Component Configuration
Configuration properties are defined using two objects schema and inspector.
properties.schema
schema is a JSON Schema definition (http://json-schema.org) of the properties, their types and whether they are required or not. An example looks like this:
The JSON Schema gives you enough flexibility to describe your property types and the required format, possibly using regular expressions or other mechanisms. When the user fills in the forms in the Designer UI inspector to configure their components, the Designer automatically validates all inputs using the schema. If any of the properties are invalid, the Designer UI gives an immediate feedback to the user that they should correct their configuration:
inspector tells the Designer UI how the input fields should be rendered. The format of this definition uses the . Example:
As you can see, fields (e.g. interval in this case) are nested inside the inputs object and have the following properties:
type can be any of the built-in types. See below for more details. (Custom inspector fields are also possible for on-prem installations. See the Custom Inspector Fields page for more details.)
group is an identifier of an Inspector group this field belongs to. As you can see in the example above, you can have one or more custom groups (like config in this case) that you can define in the groups object. Groups will render in the Inspector UI in an accordion-like fashion. This is handy to organize your fields.
A single line input field.
A multi-line text input field.
A numerical input field. Additional configuration includes min, max and step numbers.
A field for entering key-value text pairs. Additional pairs can be added or removed dynamically. Produces a single string representing a stringified object from the entered key-value pairs.
A menu of options. Options are defined in the options array each item having content and value properties. Note that content can be HTML. You can optionally provide placeholder that is displayed if no option is selected. Default values can be defined with defaultValue. If you need one of the items to clear the value of the select input field, use { "clearItem": true, "content": "Clear" } as one of the objects in the options array.
Similar to select type, multiselect defines options the user can choose from. The difference is that with multiselect, the user can select multiple options, not only one. The value stored in the flow descriptor is an array of values the user selected. Supported options are options and placeholder.
A date-time input field allows the user to select a date/time using a special date/time picker interface. The date-time input field can be configured to support different type of formats or modes (only date or date-time combination). The configuration is stored in the "config" object. The following table shows list of all the available options:
Option
Description
A toggle input field allows the user to switch between true/false values.
A menu of colors. Colors are defined in the options array each item having content and value properties, where values must be a color in any of the (named-color, hex-color, rgb() or hsl()).
A group of toggle buttons. Both single and multiple selection is allowed (can be controlled with the multi flag). Buttons are defined in the options array each item having value, content and icon properties.
A multi-field type field that allows for the definition of logical expressions (OR/AND) or dynamic field definitions. This field accepts a list of other inspector field types (text, textarea, number, toggle, ....) and renders a "field builder" UI that enables the user to dynamically create nested fields.
The value of this field has the following structure:
Note that by specifying the levels option, you can define the nesting. Currently, a maximum of 2 levels of nesting is supported. The common use case is to use just one level. In that case, set e.g. "levels": ["ADD"].
The exclusiveFields is an optional property that defines the fields that will use variables in an exclusive way. For example, let's say that the component has variableA and variableB available for use in its fields. Now if the myText field is in exclusiveFields array which means that you can use each variable once across all the fields inside the expression groups. To clarify this further, imagine the following scenario configuring an expression type:
Click the ADD button to create a second group.
Select variableA on the myText field inside the first group using the variables picker.
The expand option in source. The select inputs in the expression can have dynamic values retrieved with the configuration (just like an ordinary select input). Sometimes you may want to define different dynamic values for every expression box based on another field(s) in that box:
This is how it is done:
An input that allows selecting and uploading files from the user's computer. When clicked, it will open the browser's file selector, and the file selected will be uploaded to Appmixer and referenced on the input.
Similar to the filepicker input, this one allows users to select files or folders on their Google Drive accounts. When clicked a Google Drive file picker is opened, showing the user's Google Drive content. When selecting a folder/file, the input value becomes an object which includes the Id of the folder/file which should be used on Google API calls to reference that asset.
You can use googlepicker to pick folders instead of files:
This input type needsappmixer.google.drive.GooglePicker component to be installed.
Similar to the googlepicker, this one allows users to select files or folders from their OneDrive accounts. When clicked, an OneDrive file picker is opened, showing the user's OneDrive content. When selecting a folder/file, the input value becomes an object which includes the id of the folder/file which should be used on OneDrive API calls to reference that asset.
The view property works similar to the same property on googlepicker. It can be used to determine what is shown on the picker. You can use 3 values: files, folder, all. As their names indicate, if select files, only files will be shown, if you select folder it will show only your folders and if you select all it will show both. This input type needs appmixer.microsoft.onedrive.OneDrivePicker component to be installed.
There are some cases when you want to show input fields depending on other values in the inspector. This allows to a better UX for component configuration. For this we use the whenproperty in the field we want to be conditional:
The when field has the following structure: { op: { field: comparisonValue }}.
op: Is the operand that will be used to determine if the condition holds true or false. The following operands are supported:
eq: Equality between the values.
As it was mentioned, conditional fields also work with expression types, allowing to control the field rendering inside those expressions:
Sometimes the structure of the inspector is not known in advance and it cannot be hardcoded in the manifest. Instead, the inspector fields are composed dynamically based on the data received from an API. A good example is the google.spreadsheets.CreateRow component where the inspector renders fields representing columns fetched from the actual worksheet. For this to work, we can define the source property in the manifest that calls a component of our choosing in a so called "static" mode. For example:
In the example above, we call the ListColumns component and we're interested in the output coming from the output port out.Since this is just a normal component, we need to transform the result into the inspector-like object, i.e.:
We need to tell Appmixer where it can find the transformation function. For this we use the transform property which tells Appmixer to look for the transformers.js file inside the ListColumns/ directory. The transformer must return an object with a function named columnsToInspector that can look like this:
A special URL that identifies a component that should be called in a "static" mode. It has to be of the form /component/[vendor]/[service]/[module]/[component]. It should also contain outPort in the query string that point to the output port in which we're interested to receive data from. Example:
Messages that will be sent to the input port of the component referenced by the properties.source.url. Keys in the object represent input port names and values are any objects that will be passed to the input port as messages.
Properties that will be used in the target component referenced by the properties.source.url. The target component must have these properties defined in its manifest file. The values in the object are references to the properties of the component that calls the target component in the static mode. For example:
The transformation function used to transform the output of the target component. It should return an inspector-like object, i.e.:
Example:
The transform function is pointed to be a special format [module_path]#[function], where the transformation module path is relative to the target component directory.
Example: Webhook Trigger
This tutorial shows you how you can implement your own custom webhook trigger component. The component will register its own webhook URL with a 3rd party API (possibly your own) and start accepting HTTP requests at that URL to further process and send to its output port. Moreover, we also show how to implement an API key based authentication for our component.
Throughout our example, we'll be using a non-existing Todo API service. This imaginary API provides the following endpoints and functionality:
Authentication: API key based authentication. All requests must provide the X-Api-Key HTTP header that contains an API key that identifies a particular user.
Example: twilio.SendSMS
Here's a how a full example of a component that sends SMS via the Twilio service can look like:
Defines how the component reacts on incoming messages.
Defines the component properties and metadata.
Our component uses the twilio NodeJS library. Therefore, we need to list it as a dependency.
Metadata about the Twilio service. The Appmixer UI uses this information to display the Twilio app in the Apps panel of the Designer UI.
Defines the authentication for the Twilio service. This information is used both for rendering the Authentication dialog (displayed when the user clicks on "Connect New Account" button in the Designer UI inspector) and also for the actual authentication to the Twilio API and validation of the tokens.
label is a short text that appears above your input field. This is a great place to tell your users what your field is.
maxDate
String representing the maximum date that a user can pick to (inclusive).
minDate
String representing the minimum date that a user can pick to (inclusive).
mode
Mode of the date/time picker. Possible values are "single", "multiple", or "range".
time_24hr
Boolean. Displays time picker in 24 hour mode without AM/PM selection when enabled.
weekNumbers
Boolean. Enables display of week numbers in calendar.
When opening the variables picker in myText field inside the second group, only variableB will be available, because variableA is already been used.
equal
:
Equality between the values by deep comparison. Used for objects and arrays.
ne: Values are not equal.
regex: Check if the value in given field matches the regex in the comparisonValue.
text: Check if the value in the given field contains the string in the comparisonValue.
lt: Check if the value in the given field is less than the comparisonValue.
lte: Check if the value in the given field is less or equal than the comparisonValue.
gt: Check if the value in the given field is greater than the comparisonValue.
gte: Check if the value in the given field is greater or equal than the comparisonValue.
in: Check if the value in the given field is included on the given comparisonValue array.
nin: Check if the value in the given path is not included in the given comparisonValue.
field: The field that is used for comparison, there are several ways to reference the field:
field: The same form presented in the example. It will search the given fields in current input port fields.
properties/someProperty: Refer to a property inside component properties.
./field: It will refer to sibling fields of the current field. Specially useful when working with expression types.
comparisonValue: The value used to compare the field against.
{
...
"inspector": {
"inputs": {
"expressionWithSource": {
"type": "expression",
"label": "Dynamic Expression",
"tooltip": "Dynamic Expression with a <b>source</b> call.",
"exclusiveFields": [ "select" ],
"index": 1,
"levels": [ "AND", "OR" ],
"fields": {
"text": {
"type": "text",
"label": "Text",
"tooltip": "A plain text field with <b>required: true</b>. The <b>value</b> of this field will be part of the variables in the select box <b>Dynamic Select</b>. If the <b>value</b> is <b>break</b> the component will throw an error that has to be visible in the UI.",
"required": true,
"index": 1
},
"select": {
"type": "select",
"label": "Dynamic Select",
"tooltip": "Dynamic Select options have to be available.",
"index": 2,
"source": {
"url": "/component/test/test/source/ExpressionWithExpand?outPort=out",
// The "expand" value is actually a path to an array
// in the flow JSON, that array is generated by this
// "expression", the Appmixer engine will then expand
// this array and call the "source" for each item in it.
// If you have different "levels" in your expression,
// then you have to use yours here.
"expand": "$.expressionWithSource.AND.OR",
"data": {
"properties": {
"generateOptions": "select",
// it will find the correct "text" input value
// in the same "box" and use it in the "source"
// call
"text": "./text"
},
"transform": "./ExpressionWithExpand#fieldsToSelectArray"
}
}
}
}
}
}
}
...
}
"inputs": {
"fileId": {
"type": "filepicker",
"label": "Select file",
"index": 1,
"tooltip": "Pick a CSV file to import into the flow"
}
}
"inputs": {
"file": {
"type": "googlepicker",
"index": 1,
"label": "File",
"placeholder": "Choose a file...",
"tooltip": "Choose a file to export."
}
}
"input": {
"folder": {
"type": "onedrivepicker",
"index": 1,
"label": "Folder",
"placeholder": "Choose a folder...",
"tooltip": "Choose a folder to upload the file to.",
"view": "folders"
}
}
"inputs": {
"field1": {
"type": "toggle",
"label": "This input controls rendering of field2",
"index": 1
},
"field2": {
"when": { "eq": { "field1": true }}
"type": "text",
"label": "This field will be only rendered if field1 is set to true",
"index": 2
}
}
POST /webhooks HTTP endpoint with { url: SOME_URL } payload to register a new webhook URL that will be called by the Todo API server every time there's a change in the user's todo list (new todo item, deleted todo item, updated todo item). This endpoint returns the webhook ID in its response ({ id: WEBHOOK_ID }).
DELETE /webhooks/:id HTTP endpoint that unregisters a previously registered webhook identified by its ID.
GET /me HTTP endpoint that returns the user's profile.
Webhook callbacks: Our TODO API server calls registered webhooks every time there's a change in the user's todo list. The following events (webhook request payloads) are supported:
Components in Appmixer are organized in a three level hierarchy: service, module, component. For example, a component that creates new rows in a Google Spreadsheet is organized as google.spreadsheets.CreateRow. This hierarchy allows for sharing e.g. configurations or authentication mechanism between components by placing them either on the service or module level (in our example, all Google components use the standard Google OAuth 2 mechanism for authentication, therefore, the authentication module (auth.js file) is inside the google/ directory). The component hierarchy is also reflected in the directory structure when you implement new services/modules/components. The directory/file structure of our demo component looks like this:
The top level directory is called tododemo (our service), under which we have one module called core and one component called NewTodo.
The service directory contains two files, one that defines our authentication mechanism (remember our Todo API uses API key based authentication and we want to get the API key from the user) and one with our service manifest (service.json) with metadata such as icon, label and description.
Our module (core) contains just one component that resides the NewTodo directory. The component is defined with two files, component manifest ( component.json ) and component behaviour (NewTodo.js).
Let's now have a look at all the files in more detail.
The entire service.json manifest for our connector looks like this:
The most important field in the service manifest file is the name field. This field must follow the service naming syntax of the form [vendor].[service]. In our case, we use appmixer vendor name but you can create your own vendor too. Only keep in mind that to be able to publish a component with a certain vendor name, you must set this vendor name in the user profile via the Backoffice admin panel. See https://docs.appmixer.com/appmixer/appmixer-self-managed/installation#enabling-users-to-publish-custom-components for details. Our service name is simply tododemo.
The rest of the fields mainly define how this service will be displayed in the UI. Once we publish our service to Appmixer, you'll notice a new connector in the left panel of the Designer UI:
As you can see, the metadata fields are displayed in the UI: the label ("Todo Demo"), description ("Appmixer Todo Demo Connector"), icon (represented as a Data URI scheme instead of a URL link for better portability, see https://en.wikipedia.org/wiki/Data_URI_scheme) and the connector is displayed in the collapsible "Applications" category in the left panel.
The next file in our tododemo directory is the auth.js authentication module. This module defines how our users authenticate to our service. In our case, the Todo API requires API key based authentication so we want to collect the API key from the user when they use our NewTodo component in their flows/integrations:
Our auth.js file looks like this:
As you can see, the authentication module is a NodeJS module that exports a JavaScript object with the definition of our authentication scheme. The top level type field defines the type of the authentication scheme that Appmixer understands (see https://docs.appmixer.com/appmixer/component-definition/authentication#authentication-module-structure for details). In our case, we want to use the apiKey authentication type. The definition.auth section then describes the fields of the form that will be displayed to the user when they click on "Connect account", i.e. the API key that we want to collect from them. Note the key of each field is then used to reference the values in our component behaviour (see below). In our case, this is just one field with the key apiKey.
The UI of the form looks like this:
As you can see, the form contains only one field with the label "API Key" (definition.auth.apiKey.name) and tooltip "Your Todo app account ..." (definition.auth.apiKey.tooltip). The type of the form field is text.
The definition.validate section of our authentication module tells Appmixer how to validate the user provided credentials (the api key in this case). The section can be defined as a templated HTTP request with url, method, headers and data fields (Appmixer actually uses the axios library to make the request so any axios request configuration field is supported: https://github.com/axios/axios#request-config). As you can see, you can use fields from the definition.auth object by enclosing them with the {{ and }} brackets. We take advantage of that by injecting the user provided api key in the X-Api-Key HTTP header. Moreover, notice the url field and the use of {{config.baseUrl}}. The {{config.CONFIG_KEY}} allow us to use service configuration values defined in the Backoffice admin panel. This is very handy if you don't want to hardcode certain values in your service/module/component definition and instead, make those values configurable via Backoffice. To do that, visit your Appmixer tenant Backoffice interface, go to "Services", click "Add" to add a new service configuration, provide the correct service ID in the form [vendor]:[service] and add your custom configuration key/values by clicking on the "burger" icon:
At this point, our service definition is complete. We can start defining our NewTodo trigger component. Note that our core module does not have any definitions. In our example, we don't need to have separate modules under our service with their own definitions. We treat our entire service as a module. However, the core/ directory must still exist (or a directory with a different name that you choose).
Let's now have a look at the component.json manifest file:
As you can see, the component manifest contains metadata about our component. Again, following the same convention, the name of the component must be of the form [vendor].[service].[module].[component] and it must follow the same directory structure our component lives in (core/NewTodo). The author field just contains the author of the component, possibly including their email address between < and > brackets. icon field is again an image icon represented with the Data URI scheme. The webhook: true field tells Appmixer to accept external HTTP requests on the component internal webhook URL (see below the context.getWebhookUrl() function that gives us the component URL endpoint). The auth.service field points to our authentication module and must be of the form [vendor].[service] (or [vendor].[service].[module] in case the auth.js authentication module is defined under the module directory (which is not our case).
The outPorts section defines the component output ports. In our NewTodo trigger component, we only have one output port (out) (In general, Appmixer supports an arbitrary number of output ports.):
The options section of our out output port then defines the variables that users can use in other connected components to reference output fields from our NewTodo component. For example, let's say we want to send a Slack message for each new todo. We can create a flow that looks like the one below and use the variables from our component when composing the Slack message:
As you can see, the variables that show up in the variables picker are the ones that we defined in our options section ("Todo ID" and "Todo Label"). The special "Raw Output" variable was added automatically by Appmixer to allow the user to use the raw JSON output of the component (which can be useful in some cases). Also note that the options field is an array of objects with the label and value fields. The label field simply defines the label of the output variable (e.g. "Todo Label"). The value field references a key of the component output object, i.e. the object passed to the context.sendJson(obj, outputPort) function in the first argument (see below the Component Behaviour section for more details).
The last missing piece to our demo Todo connector is the actual component behaviour, i.e. what the component actually does. The component behaviour is implemented as a NodeJS module. In other words, anything that you can implement in NodeJS can be a component in Appmixer (file conversions, business logic utilities, any API calls, ...). In our example, our NewTodo.js file looks like this:
The module exports functions known to the Appmixer engine that the Appmixer engine calls at the right times. See Component Behaviour for more details: https://docs.appmixer.com/appmixer/component-definition/behaviour. For our example component, we export three virtual methods (naming convention for the exported functions):
receive(context) that the Appmixer engine calls when the component receives an input (in our case, since our component does not have any input ports, the only input it can receive is from the component webhook URL, i.e. HTTP requests to the context.getWebhookUrl() endpoint).
start(context) that the Appmixer engine calls when the flow starts. This is the place where we initiate the HTTP request to the Todo API to register the component webhook URL so that our component is notified of changes in the user todo list (the actual changes are received in the receive() method).
stop(context) that the Appmixer engine calls when the flow stops. This is the place where we unsubscribe our webhook from the Todo API to properly clean up after ourselves (remove the webhook from the Todo API).
At this point, we have our entire service ready to be packed and published to our Appmixer tenant. To pack and publish services/modules, use the Appmixer CLI tool (https://docs.appmixer.com/appmixer/appmixer-cli/appmixer-cli). In short, the process is pretty straightforward and looks like this:
You should now be able to see the "Todo Demo" connector in the left panel of the Designer UI:
TIP: during debugging of your component, you'll be often re-packing/re-publishing the component and running a sample flow to see if it behaves correctly. Use the Log panel of the Designer UI to see the activity in your flow:
TIP 2: use the await context.log({ "foo": "bar" }) function to log any JSON object anywhere in your component behaviour file (our NewTodo.js). This allows you to print your own custom log messages in the Log panel.
You can download our sample service below. It's important to note that the service will not work without modifications since we used a dummy, non-existing Todo API. You should modify the service/component to fit your own needs and point it to your own API.
module.exports = {
async receive(context) {
// Components defined with webhook: true in the component.json file
// are eligible to receive HTTP requests to the context.getWebhookUrl().
// The headers and data of that request is available to us in the
// context.messages.webhook.content object.
if (context.messages.webhook) {
const { data } = context.messages.webhook.content;
// Remember the webhooks of the example Todo API contain a payload
// of the form { event, todo: { id, label } }. In the line below,
// we're interested only in todo-created events since our
// NewTodo component is supposed to trigger when new todo items are
// added.
if (data.event === 'todo-created') {
// If indeed a new todo item was created, send an output to the
// only component output port 'out'. The output object the
// todo object { id, label } which fields correspond to the
// 'options' list from our output port definition in component.json.
return context.sendJson(data.todo, 'out');
}
}
},
async start(context) {
// In our start() method, we register the component webhook with our
// Todo API so that we're notified of changes.
// Note the context.auth object gives us the values the user filled in
// in the authentication form defined in our tododemo service auth.js
// file.
const { apiKey } = context.auth;
// context.config object allows us to use the dynamic configuration
// from the Backoffice, the same way as we used it in our auth.js file.
const url = context.config.baseUrl + '/webhooks';
// context.getWebhookUrl() gives us the component webhook URL that
// 3rd parties (our Todo API) can call to reach our component and send
// input to it.
const { data } = await context.httpRequest.post(url, { url: context.getWebhookUrl() }, {
headers: {
'X-Api-Key': apiKey,
'Content-Type': 'application/json'
}
});
// context.saveState(myState) allows us to save a temporary state.
// This state (an arbitrary JSON object) is persisted only for the
// period the component is running (i.e. from the start of the flow
// until the flow stops. See https://docs.appmixer.com/appmixer/component-definition/behaviour#component-state
// for details.
// For our purposes, we need to store the webhook ID that we received
// from the webhook subscription endpoint so that we can later
// unsubscribe it in the stop() method below. Note that you can't
// just store the webhook ID in the NodeJS module local variable since
// it is not guaranteed by the Appmixer engine that it will keep the
// NodeJS module in memory. Moreoever, if Appmixer is running in a cluster
// environment, different nodes can execute the start() and stop() methods.
return context.saveState({ id: data.id });
},
async stop(context) {
const { apiKey } = context.auth;
const url = context.config.baseUrl + '/webhooks';
// The component state object is available to use in the context.state
// property. This property contains the object that we previously
// saved using the context.saveState(myState) method.
return context.httpRequest.delete(url + '/' + context.state.id, {
headers: {
'X-Api-Key': apiKey
}
});
}
};
$ npm install -g appmixer
$ appmixer url https://api.your-tenant.appmixer.cloud # or any other custom endpoint in case of self-managed Appmixer installation
$ appmixer login your-admin-user@example.com # note the user must have the "appmixer" vendor set in Backoffice
$ appmixer pack tododemo/
$ appmixer publish appmixer.tododemo.zip
Our auth.js module uses the twilio NodeJS library. Therefore, we need to list it as a dependency.
This is a helper component that is used to list the phone numbers registered in the user's Twilio account. You can see that this component is called in the "static" mode in the SendSMS component manifest. Note that this component is not used out of necessity but more as a convenience for the user. Thanks to this component, the user can just select a phone number from a list of all their registered phone numbers in the Designer UI inspector. An alternative would be to let the user enter the phone number in a text field. However, that might result in errors to the API calls to Twilio if the phone number does not exist in the user's list of registered phone numbers in their Twilio account.
Variables dynamically populated at design time with available Twilio phone numbers.
Note the component is marked as "private" meaning that it will not be available in the Designer UI as a standalone component.
The numbers output port of our helper component returns a list of numbers. However, when the component is called in a static mode from our SendSMS component Inspector UI, the expected value is a list of objects with label and value properties so that it can be rendered by the UI. Alternatively, we could have just skip the transformer altogether and use this array structure right in our context.sendJson() call in our ListFromNumbers.js file. The advantage of using transformers is that we can use the ListFromNumbers component as a regular component (i.e. not private) and so allow the user to put the component in their flows. In other words, the same component can be used for static calls (to show a list of available phone numbers in the Inspector UI of the SendSMS component) as well as in a normal mode (as a regular component that can be put in a flow).
{
"name": "appmixer.twilio",
"label": "Twilio",
"category": "applications",
"description": "Twilio is a cloud communications platform as a service.",
"icon": "data:image/png;base64,iVBORw0KGgoAAAANSUhEUgAAAGQAAABkCAYAAABw4pVUAAAABmJLR0QA/wD/AP+gvaeTAAAACXBIWXMAAAsTAAALEwEAmpwYAAAPEElEQVR42u2df5RVVRXHP+85MyA/hBBLkHO1pGsqCqL9wsRqlSmWUVFqGEiR/VyZQVlp1kL7g5X9tlZqRZpkJrmszFr2a6EtTE1+iGAdMexcbMxAMkdkBpjpj7Mv3m5v3rvn3PNm3iB7rbfWc+Tdc87+3rN/nb33qdAClEQxyuj83zqA4UAHcChwAhDLZxLwQmA8cCAwTH7WDTwLbAWeALYAWj5rgMeBHmCnMrqn0RwGgyqtBEQSxQcDRwNTgOnyOU5ACUE9wHpgtXweBB5SRm9rFWAqLQLE6cBcYCpwGDBugKbyJPAYsA5Yroz+9WADUxksIJIoHg18GLgYeAGtQduBpcC3ldFPDwYwAw3IMGAysAC4EGijNWk38HVgGbBJGd09UANXm70jMt9nAtcC9wKLWhgMZG6LZK7Xytz/b01DZoekk1ZGk0TxGOC7wCxgBEOTdgC3AwuV0U9l19fSgOSAaAfOA65p8d3gKsouAG5QRu9qBjCVkGBkFPZ04HPAbPZNuhW4XBm9OrTiDy6ykiheDHwCmMC+TZ3AV5TRV7aUyMoouQ4RT/MG2+EcQOoDrhcx1hNCfFXLAiETmAj8AZj/PAIjfaHny9onZkT2oO6QU4HrgMN5ftPfgfnK6JUDLrJSJZZE8euBm7BBvmbTLuA+YC3wF+BR4J9Al4iOdD2jgBcBRwAvA6YBLwfaB2COW4GzldG/91X0FR8g5PvLgT81ybnsBfYI028AViijNzZyPuvJ8CSKjwHmiCl+BHBAE+f+KmX0fT4WmO8OeT3wmyYs6D/AA8AdwI3K6E1NclwnA+cCpwHHAwc1AZQ3KqN/37QdkhFTpwIrAoupXcDV8tz7ldFdNQyHoI6r/Pco4ETZOR8ILNa2AnOU0StddknFcTETgVWBFfhNwGKgUxm9pxlAFADmAPGbrgTODqzoZwD/KLqWatHJi59xcyAw+rAHRScro89RRm8RnbGXUc0Medd4/h5l9BZl9DnAyTK3vgBDHS486yhqDleLKnFx+mYEmGQX8AXg1croVc3eDUUByqx3FfBqmWNXgMfPEN6lIr+8YyjhkHkBJrcOOEUZvUQZ/UyrnGNngZE5PaOMXgKcInMuS/OEh/46JKPEpwO3BYhN/Qo4Nw1ftxIQDdY/BrgROCNA7OvNyujV9dbfSGS1Y6O2ZcG4DjhzqICR2y1PAWfKGsrQBOBzwlM3kZVh2nmUD6Ffqow+XxndN1TAqAFKnzL6fODSko+cDZxXT5fUE1ljxJYuc7h0KbBUGb17qIHRj/hqwyZlXFHicbuB8bLznAC5WRwmbzElb9U+R0kU/wAb5fWlFcrod7qIrJnYM/AyCnxBUdt7KO0UoQWyRl+alU2c6BeQJIrTVJ2F+CckrBNrqpDOKAJYCFBDjJPVKRIL8zWJRwALkygelh+zUmNSx2LTX3wA6RI/Y21RMDJO2YnAW7FppCOAf8k8blFGP1bDUXWS//L9UODtwCuxucHPAhuBXwD3ZBheVKdMA+7ChvxdaQfwCmX0hpo7JLcdfcDoA75UBIzMWAclUXx2EsUPA38WE/ttwJvEwvsGsCWJ4l8mUfyKdL6ub3sSxSclUXyr+ALfEif3dBnrEuwxwuYkis8DxjYaIwPcWuBLnmGWEbXEeiW3iNHYfFcfy2q9hEOeKfh2xcDXHByu3cBXgcuU0TsL7o52CYEs4rkM+Ub0W+DjyugNBXfLSOBubFK4j8U1Lk1bpcYb9+ESZu4H03BIAUZNBH7q6P22AZ8EvplEcUe9cUQXtguAn3UAA+ANwC1JFKuC4vAZ4IOePGsTnu/FoJoL7F3s+eCb0kBhARlfwaaUTvEcayEwtz/nKjOHOcBHPMeIsdkk1YJKfhX2GMGHLs5iUE0XJSUBPlnou7DnGUX1xrySJjXAd5IoPqTWeMKksdgDrzL02vzb2x8oQouFF670AuE9SRRTzTxwrufErwY6i5iMQl8O4BJ0AEtqKO/062eA0QHGuSKJ4o6CpntniZdgbsqjVIccjC2WcaX/iNe5p4g5mkTxWYQrxlmQ35WZ7x8JNMZBwDuKxLzktHOF8MSVpgoGe2XkMdjKJVd6ALjfUQyEovYkil9VA/TjCJdlXwFOdXBO7xeeuNJhgsFeQI71eHN7gTuU0V0OnvRLCJfZWJHn5enIwBGTFzfSjxljogubMdPrOMY4wYCqVLtO95joHuzBjQsND8ysYQMwhmvB6Y1k8gMcaHoSxR1VWYAPIJuV0ZscwxnbAzPr3zX+9iRhEhSyetIlzrUJ2OwDCDC8Km+Aj5e53FPnhGJWpZ/g3gMBxWKaHeMaQ/PhzXFARxVblO9TB77CY6I/C8iszcrov9V4Ux+XgGEo0H9e9B9neLHCUzQeWsV2SHB2BvvLtW0w4Y3APYGYVc8PuSzQGA8qo+/1XKePk3hCVcIErnRfWf+hJG1QRv8gr78ycvyWknNM6XwHkzcEj2JfQNb6zFCY9RDwqRJM2k6x49OF2DMVX/q8Mvr+ErkAa30BmeTxw7/4zDATEPwa8BWPR+zGFsX0y6jMLnkAe6biU/T/bWBpycQMHx5NasOenLnSo76zlAXuAhYlUbwZewhVRNH/A5viv7ERozKg3CEnoL+jeE7yJwMVcvrw6IVt+JUV/LPMTDP5vFclUXyLKOGT5eUYjS2m6QaewrZY+mnKpKJvbQaUR4Ajkii+EJvZPgl7KjhMHLguEW13A0uU0SZQvrEPj8ZXkijeidsBThpq2Vg2zyp33n0wtg/KeGydxg5sf6u/pr1GApypdwBHYbMIR4gI3Ao8ooz+l+8Y/bxwxwAbHH/a3eYBBqGcu2xSgfSs2tZgR5XRW0jTsvWps1cPvEBOpXMoqKnNZ1qFhlLGZJvIatddEsTbrtE/KxVZbdgUnU7gYWV0b1mRldkpcU5kbROR9VTRNKAm8qi7kkTxdlFyLvRKHw82J4Iqkkw3Fpv+8zpsOfNo7LFAjyh1gy0A/Y4rKDnA3wu8R6ytsRKq6BWl/gRwpyj1rSGUuqQtuUYl/l2RnKjJjj88Sxn9iwA7ZB62dVORYstHgDcoox91TGabiE3tObrAGL3Ah5TR1wRY21tc4mBCm9rk7XAF5IiSu6MNmy91icNPjwQeSqL4LGX0b+qBkgFjJrbP1ciCY1SBq5Mofik2fWhXiV3iw6MnqmLnu9JRJXXGhxzBSGk4sDyJ4uPr1VjI/zsa+LEDGFlaDFxUpCYwMI+2VLE9bV3J50ArZdSR4p370iHA9xs5ndhCyzKVX0uTKJ5SYof48Ej7AnJSiYV+P4AFc2ISxefk3+CMqDoTeE2AccqUsZ3kC8gajx+2S+8QV5EVAzMDmexL8pZQ5vsXA40xPYniEzzWeQx+XSHWVHmu/bYrzcmJiCI0m3BHuC9NovjwGsw4BNu/JJS3PdsBiP/hjSP1AI+n9v56jwf4ZDpOJex597Qaf59G2HP7qR4vng9v1gM9VWAntg+6K704ieLJjpZI6Bbi4/r5W8iudmOLOIkZ/TUZyeVypNXAzqoE3HwAOQBb1uW6LUNSzyCNUY/OFd44A6KM7kmDixuw+UwuVAVOS6J4lINp+LeA4qSP2vlPIccAOWgqmJc1CtuDyzVo+6RgsPeHG7G3BLjS8dh+U0XpzoCM2iN1GXnGrMPv2LY/0O9yiGud6GlQPCYY7C3Y2YZfRelBwJwkig8oqEd+Ru1sQx/6Yf7NzXy/OtAYXdhKr4b6Q3puzcGvO9269A6TamYRyz0n/QFgQkGl14ut3ShLvUibi378kCvEWClLlyujdxSsfZkgvPCh5SmP9hbsyGUmPrm37dhObEUrja7FJh2UoY8qozvrlLRtw8bLytA9FCguyszhSk9ncHt6kUy2YGdv/MZz8mcnUTyjoAncC7wXeNhzrBuAZY3SgIAfAd8rocjfLXMtElWegX9rwKVZDAazLHoKNsj4OocxrgI+3WiMzFgHApcDFzlYPn8EPqaMXjNoZdEZRj2NvVnGh6Zg68GLFt0/iC0Xex8256oe3SUxsIscSq9RRj+LzZI8BWjUsvUJbHnzbGX0mkaWVWYOi/CvKP66MvrpfhsHyEAD3lojieK0dOxt2BSjkcKge4GbldE6++8dA33ZY9wjgXdhW2u8CJtqtFGsvz8oo/cMdmuNSg3Uh4nifY8n6uuAU4t2j3NpUON7NlH0945gjAFW4lcsm5rt7we6s2NW+hl0Jrb9kG/x5O3Y/oJ9Q7lxWYMdfRv+9fY7gDOU0XfWCn/UkvN3ClN9aRb2hrN9BozcWpZRrvnB7bXAoIHlsVCsAF+an0TxJdIWb0g3Mst0u2hLovgSynWT2y28pTAgmW6cF5RcyxVkenkMRVByIrdsv0WAC7I3veWp0uCtaAd+QvnOpNcBC4aaTsnpjGUldwbYy8TeRZ30okbdbnaJY9VZciLzgduSKB4zVHZKzpq6LQAYnRIbq1t7WC3gwK3GVjuVPWOYBaxMonhaiLuamq0vMn7GSsp3L+rD3ui2upGEKBROkGKZ6wOsdypwVxLFlyVRPLLVdktmV4xMovgycfqmBnj09UWrsgo16EqVEfbukLI0CptGencakBzs3ZLbFTMkNvUFTw88T6tS46iI/tx/oQutdaHL/iuPhuqVR7mF7b8UrD41/1KwvAwcoGvzNmOPN0NemzcXmze1T12bN1gXS/4Zm0P2V4pdLHkUNgv9JPbFiyX7AWf/1avPKfDSV6+GuJx4pVgSq57HYKwCZqRgDPblxOnX/dd3B7AI919wXy42FfyC+2pAILJhljdjI5v7Kt2KPRFtmI82qDskF4Jox7ZHuoZy91i1Eu0W8XSDMnpXMyIKTZH1OWDGYGvRZxGuwfFA0w7skfbC7OFSM0I7TVW+OUdyJvbo8h1DCJgd2GTr76Zn4M0+YBtQa0jut5qM7bt4YQuLst3YhMFlwKa0PdRA0EB3A+pWRm9QRi/Glp59hvDNlcvQdpnTOGX0Ykli6x7ICQyKv5Df9nJ/xlzsYdBhhK9F7I+exBbLrAOWp1noAyGaWgqQOsAcjO3Ediw2BjUd6fgcaMi04ni1fDZgO+NtG2wgWgKQekyQdnzDBYwJ2HLnWD6TsP0ZxwMH8ly/r25sn62t2NzgLdhOFRrbtrVTQNkpxa60ChAp/RdLBDnJ9t9abQAAAABJRU5ErkJggg=="
}
Directory Structure
Component Behaviour (sms/SendSMS/SendSMS.js)
Component Manifest (sms/SendSMS/component.js)
Component Dependencies (sms/SendSMS/package.json)
Service Manifest (service.json)
Service Authentication Module (auth.js)
const twilio = require('twilio');
module.exports = {
type: 'apiKey',
definition: () => {
return {
tokenType: 'authentication-token',
accountNameFromProfileInfo: 'accountSID',
auth: {
accountSID: {
type: 'text',
name: 'Account SID',
tooltip: 'Log into your Twilio account and find <i>API Credentials</i> on your settings page.'
},
authenticationToken: {
type: 'text',
name: 'Authentication Token',
tooltip: 'Found directly next to your Account SID.'
}
},
validate: context => {
let client = new twilio(context.accountSID, context.authenticationToken);
return client.api.accounts.list();
}
};
}
};
{
"name": "appmixer.twilio.sms.ListFromNumbers",
"author": "David Durman <david@client.io>",
"description": "When triggered, returns a list of numbers from user.",
"private": true,
"auth": {
"service": "appmixer:twilio"
},
"inPorts": [ "in" ],
"outPorts": [ "numbers" ]
}
{
"name": "appmixer.twilio.sms.ListFromNumbers",
"version": "1.0.0",
"description": "Appmixer component for twilio to get a list of phone numbers of a user.",
"main": "ListFromNumbers.js",
"author": "David Durman <david@client.io>",
"dependencies": {
"twilio": "^3.14.0"
}
}
API for Automation Hub configuration and shareable link management
The Automation Hub API provides endpoints for managing hub settings, analytics, and shareable link authentication for public marketplace access.
Overview
The Automation Hub API includes three main areas:
Settings: Configure hub appearance, behavior, and access controls (admin only)
Analytics: Track template usage and performance metrics (see Analytics API)
Shareable Links: Enable public access via email-based authentication with OTP tokens
GEThttp://[API-URL]/automation-hub/settings
Retrieve the current Automation Hub settings. All authenticated users can read settings, but sensitive fields (like email allow lists) are filtered for non-admin users.
Field Filtering:
Admin users: See all settings including sharing.allowedEmails
Regular users: Sensitive fields are automatically filtered from the response
POSThttp://[API-URL]/automation-hub/settings
Create or update Automation Hub settings. This endpoint performs an upsert operation. Admin token required.
Name
Type
Description
DELETEhttp://[API-URL]/automation-hub/settings
Delete all Automation Hub settings and reset to defaults. Admin token required.
Settings successfully deleted.
Shareable links allow you to provide public access to your Automation Hub marketplace using email-based authentication with one-time passwords (OTP). Users receive activation links via email to authenticate without traditional login credentials.
Email Allow List: Admin configures allowed emails in hub settings
Request Login: User requests access with their email
Activation Link: System sends time-limited activation code
Activate the link, create or find virtual user, and return JWT token. No authentication required. Rate limited by IP address.
Name
Type
Description
The JWT token includes an otp: true flag and can be used for authentication.
Each activation link can only be used once.
The activation code is invalid or the link has expired.
Rate limit exceeded for IP address.
Rate Limits:
Per IP: Configurable via AUTOMATION_HUB_RATE_LIMIT_ACTIVATE_IP (default: 10 requests per minute)
Virtual Users:
Automatically created on first activation
Username and email set to the activation email address
Flagged as virtual users in the system
Can access only the Automation Hub marketplace
POSThttp://[API-URL]/automation-hub/share/refresh
Request a new activation link for users with expired tokens. Works exactly like /request-login but intended for users who already have an expired session. No authentication required. Rate limited by email and IP address.
Name
Type
Description
Rate Limits:
Per email: Configurable via AUTOMATION_HUB_RATE_LIMIT_REFRESH_EMAIL (default: 5 requests per minute)
Per IP: Configurable via AUTOMATION_HUB_RATE_LIMIT_REFRESH_IP (default: 20 requests per minute)
SMTP (Option 1):
Cloud Email API (Option 2):
The system automatically uses SMTP if SMTP_HOST is set, otherwise falls back to Cloud Email API.
Enable public users to access your Automation Hub marketplace:
Configure custom theme and branding:
Dynamically manage email access:
The email allow list provides the primary access control mechanism:
Only emails on the list can request activation links
Verify Cloud Email API configuration (URL, API key)
Review server logs for detailed error messages
Ensure firewall allows outbound email connections
System Configuration
Appmixer offers a variety of system configuration options for advanced use cases, allowing you to finely tune the behavior of its underlying workflow and integration engine. To access and set these configuration options, navigate through the interface to the "System -> System Configuration" page.
Please be aware that certain configuration changes may not take immediate effect without restarting the Appmixer engine. For customers with a Self-Managed Appmixer installation, restarting the engine can be done at your convenience to apply the new settings. For those with a hosted Appmixer tenant, it's advisable to reach out to our support team at support@appmixer.com. Our team can provide guidance on how to effectively set these configuration options and assist with any necessary engine restarts to ensure your configurations are applied as intended.
Below is a list of available configuration options, accompanied by a brief explanation for each and their default values. These defaults are used by Appmixer in instances where no specific value is provided:
Key
Token Generation: User activates link to receive JWT token with OTP flag
Virtual User: System creates virtual user account automatically
Email sending failed (SMTP or Cloud Email API error).
Random Codes: Cryptographically secure token generation
flag for identification
settings*
object
Settings object with flexible schema
settings.sharing.allowedEmails
array
Email addresses allowed to access Hub via share link
email*
string
Email address (max 255 characters)
code*
string
Activation code from email link
email*
string
Email address (max 255 characters)
Hub Settings
Get Settings
Update Settings
Request Body
Flexible Settings Schema
The settings object supports any properties, allowing you to add custom fields without backend changes. Only settings.sharing.allowedEmails has validation (must be array of valid email addresses).
Delete Settings
Shareable Links
Architecture
Request Login
Request Body
Activate Link
Query Parameters
Refresh Link
Request Body
Refresh vs Request Login
Both endpoints function identically but serve different use cases:
/request-login: Initial access request
/refresh: Token renewal for existing users
Both share the same allow list validation and rate limiting.
# Get current settings
CURRENT=$(curl -s -XGET "http://[API-URL]/automation-hub/settings" \
-H "Authorization: Bearer [ADMIN_TOKEN]")
# Add new email to allow list
curl -XPOST "http://[API-URL]/automation-hub/settings" \
-H "Authorization: Bearer [ADMIN_TOKEN]" \
-H "Content-type: application/json" \
-d '{
"settings": {
"sharing": {
"allowedEmails": [
"existing@example.com",
"new-user@example.com"
]
}
}
}'
Automation hub settings updated.
Automation hub settings deleted.
{
"error": "Email not authorized. Please contact your administrator."
}
{
"statusCode": 429,
"error": "Too Many Requests",
"message": "Too many requests for this email address. Please try again in a few minutes."
}
{
"error": "Invalid or expired activation link"
}
{
"error": "Activation link has already been used"
}
Detail
Default value
Needs restart
API_USER_CREATE_SCOPE
By default, the POST /user API is open to enable the sign-in feature for everyone. This option can restrict the access to this endpoint. It takes a list of scopes (comma-separated). If the value is not null, then a JWT token has to be used to call this API. Typically, the value is set to admin.
null
APP_NAME
This will for example appear in the head title of a sign-in popup for Api Key services.
Appmixer
AUTH_HUB_AUTOMATIC
If the auth-hub system plugin is on and this value is true, all OAuth requests for unconfigured services will go through the Authentication Hub. It means that if you install Slack, for example, and do not configure the clientId and clientSecret the engine will use the Appmixer Authentication Hub for Slack authorization.
GC_FILES_RULES
Configuring Single Sign-On (SSO) for Appmixer allows your users to authenticate using their existing identity provider. Appmixer supports OpenID Connect (OIDC) and SAML standards for seamless integration.
Required Configuration Parameters
To set up SSO, you'll need to gather the following information from your Identity Provider (IdP):
idp_type: This specifies the authentication method. It can be either oidc or saml.
authorization_url: This is the URL where users will be redirected to log in via your IdP.
client_id: An identifier for your client application.
Appmixer-Specific Parameters
The following parameters are typically not part of a standard IdP configuration and will likely need to be added manually:
domains: A list of domains for which you want to enable SSO. Any user with an email address from a domain listed here will be redirected to your IdP's authentication page. For example: ["yourcompany.com", "example.org"]
role_mapping: This object maps roles from your IdP to Appmixer's roles. Appmixer currently supports admin and user roles. For example, if your IdP uses "administrator" for admins and "member" for users, your mapping might look like: {"admin": "administrator", "user": "member"}
Parameters Based on Authentication Type
You'll also need additional parameters depending on whether you're using SAML or OIDC:
SAML
,certificate: The certificate used to sign SAML requests.
reauth_method : What method to use to re-authenticate a user when their session expires. Can be either popup or iframe . While a hidden iframe is the neat way of handling this situation, this method is not allowed by some identity providers, so popup is used instead to ensure wider compatibility. If you are not sure about your provider's policy, you should use popup .
OIDC
issuer: A unique string that identifies your identity provider.
client_secret: A secret identifier for your client application.
token_url: The URL where Appmixer can obtain a new OIDC token.
metadata_url: A publicly accessible URL provided by your IdP that contains essential information for the authentication process.
Important Considerations
Most of these parameters will be provided when you download the configuration from your Identity Provider. You'll primarily need to manually add the domains and role_mapping fields.
It's crucial that your metadata_url is publicly accessible. This is generally true for cloud-based identity providers like AWS IAM and Google ID. However, if you're self-hosting your IdP, you might need to adjust your network configuration to ensure its public accessibility. Appmixer does not currently support configuring a proxy to access an IdP; this must be handled via your hosting machine's network settings. If you encounter issues, please contact our support center.
Configuration Examples
Once you've gathered all the necessary information, your configuration JSON should resemble one of the following examples:
Paste your finalized configuration JSON as a new Appmixer System Configuration with the key IDP_CONFIG.
Additional Parameters
handle_roles: Identity Providers (IdPs) may manage either Authentication and Authorization or just Authentication. By default, Appmixer delegates only authentication to the IdP. To allow the IdP to manage authorization as well (importing roles from the IdP), set this variable to true . By doing this, the roles in Appmixer will be ignored for all users who sign in through IdP, meaning some users might not be able to sign in if the proper role isn't granted to them. Please check auto_grant_user_role, below.
auto_grant_user_role: Works in combination with handle_roles. If this is set to true then all users that are allowed to log in will be granted the minimum permissions needed to operate Appmixer. If this is false such users will be denied access until they get the appropriate permissions.
enforce_sso: By default, we do not disable the legacy email access. If you'd rather have users log in exclusively using Single Sign-On, you can do so by setting this variable to true .
disable_legacy_signup : This property is similar to enforce_sso, but only applies to new users. If set to true the option to sign up will be removed, and new users will only be able to access through Single Sign-On, while existing users will retain the ability to sign in with email and password. This is a weaker check than enforce_sso, so if both are active, this check will be ignored.
roles_path: (Only required if handle_roles is true) This is the path within your IdP's authentication response where a user's roles can be found. The value varies between Identity Providers. Refer to the table below for common IdPs:
Identity Provider
Roles Path
Keycloak
realm_access.roles
Google ID
<not supported>
Google Workspace
depends on configuration
SAML
default_redirect: This should be the URL of your login page. It's used as a fallback if an authentication error prevents Appmixer from retrieving a valid redirect URL from the identity provider.
expects_signed_assertions : Whether each single assertion will be signed separately. Defaults to false .
This section explains how to set up Single Sign-On using Google Workspace.
In the menu on the left, select Apps -> Web and Mobile Apps
Now, in the new tab, select Add App -> Add Custom SAML app
.
Choose a name for your app and note all the details provided by Google; we will need them later.
On step 3 of the procedure, when prompted to provide the service provider details, please follow the screenshot, replacing <your-tenant-url> with the actual URL of your application.
Leave everything blank on the last step Attribute Mapping for now.
Now that our SAML application is ready, we need to enable it for the users in our tenant. You can do it as you would for any other application (like Gmail, Drive, and so on).
Finally, let's set up the roles needed to log in to Appmixer.
Go to Directory -> Users -> More options -> Manage custom attributes
On the next page, select Add Custom Attribute on the top right.
Configure the attribute as shown in the screenshot. You can use any value you want for Category and Description. You can also change the name of your field.
Choose a user you want to assign roles to and expand the Users Informations tab.
You will find the newly created attribute. If you scroll down, you can write any string here; they will have to match the content of the role_mapping in your configuration on Appmixer (Step 15).
Now go back to the app we created earlier and edit the attribute mapping to expose the newly created attribute. If you decided to use Roles like in the example, you can follow the screenshot in this case too; otherwise, please replace the role in the left drop-down of the screenshot with the one you created before. Keep the value of App attributes to Role .
When creating the configuration JSON for Appmixer, please use the following format:
\ (*)<ENTITY ID>is the one provided on point 5 of this guide, not the one shown in the App's metadata. They are called in the same way, and this can cause confusion, but they are completely different values.
Please feel free to choose any value for enforce_sso and disable_legacy_signup and auto_grant_user_role based on your company policies.
Minify the JSON and add it to the Appmixer configuration under the name IDP_CONFIG .
[
{
"scope": "user",
/**
* The GC will never delete files created in the past TTL (in hours). By default,
* set to 720 hours. The reason is to prevent the GC from removing files that could be needed by the
* flows.
*/
"ttl": 720, // 30 days
/**
* The user will be blocked from saving any files if the limit is reached.
*/
"hardLimit": 2000000000 // 2 GB
}
]
You can have different rules for different user scopes:
[
{ "scope": "user:, "ttl": 720, "hardLimit": 2000000000 },
{ "scope": "admin", "ttl":1440, "hardLimit": 90000000000 }
]
Configuring Single Sign-On
Providers Configuration
Google Workspace
true
DEFAULT_USER_VENDOR
Vendor assigned to newly created users.
No value
AUTH_POPUP_DISPLAY_ERR
Whether to display validation errors from the authentication modules.
true
AUTH_POPUP_TIMEOUT_ERR
How many seconds before automatically closing the Connecting Account Failed popup window.
5
BROKER_MESSAGE_ACK_TIMEOUT
Timeout for message processing.
1500000
COMPONENT_FACTORY_TIMEOUT
An attempt to create a component will fail after this timeout.
300000
COMPONENT_RECEIVE_TIMEOUT
A message will be retried if the receive() function does not return within this timeout.
1380000
LIMIT_FLOW_UPDATE_BYTES
The max size in bytes of a flow descriptor to be able to be saved.
2097152
LIMIT_CC_ARCHIVE_MAX_BYTES
Maximum size in bytes for custom components.
10485760
LIMIT_WEBHOOK_BYTES
Maximum payload size in bytes for webhook components.
1048576
WEBHOOK_REQUEST_TIMEOUT
Timeout in milliseconds for webhook component requests.
10000
LIMIT_COMPONENT_STATIC_CALL_MAX_BYTES
Maximum size in bytes of the payload for component static calls.
104857600
PUBLIC_FILES_PREFIX
(needed usually for domain verification) can be served from different paths. Path prefixes have to be separated by :
/:/.well-known
RETRY_BACKOFF
In case of an error, a message for a Component is rescheduled for another attempt. A back-off strategy is used. This value defines the number of attempts and the number of minutes between them.
1,5,60,300,720
DISPATCHER_PREFETCH_COUNT
The maximum number of Rabbit messages being dispatched at the same time.
500
INPUT_QUEUE_PREFETCH_COUNT
The maximum number of outgoing Rabbit messages waiting for aknowledgement at the time in the Input Queue. Subsequent incoming messages will not be sent until pending messages are aknowledged.
300
WEBHOOK_PREFETCH_COUNT
This is for webhooks from Appmixer to registered URLs. This is the amount of webhook messages that will be processing at a time.
50
WEBHOOK_RETRY_COUNT
Number of times that Appmixer will retry sending a webhook. Applies for all webhooks.
20
WEBHOOK_RETRY_INTERVAL
Initial interval in milliseconds for retries. Subsequent retries will take longer (multiplied by an internal factor).
30000
WEBHOOK_RETRY_MAX
Maximum interval in milliseconds between retries.
1800000
WEBHOOK_USER_CREATED
URL that will be called when new user is created (sign-up).
No value
WEBHOOK_FLOW_COMPONENT_ERROR
URL that will be called when a running flow encounters an error.
No value
WEBHOOK_FLOW_COMPONENT_ERROR_INCLUDE_QUOTA
Include quota errors among the errors sent to the registered webhook URL.
false
WEBHOOK_FLOW_COMPONENT_ERROR_INCLUDE_RETRY
Include retry attempts among the errors sent to the registered webhook URL. If false, the error will be sent, when all 30 attempts to process a message fail. If true, every failed attempt will be sent.
false
WEBHOOK_FLOW_STOPPED
URL that will be called when a flow is stopped due to an incompatible module upgrade.
No value
STRICT_COOKIES
If set to true, the engine will reject any incoming HTTP requests that have cookies that don't comply with the HTTP cookies RFC specification.
false
GARBAGE_COLLECTOR_CONTINUITY_SCOPES_TTL
The maximum time in days before continuity scopes are garbage collected. A continuity scope is a state of a flow including data from the flow runtime needed to continue the flow from a certain component onwards. For example, the Plivo.SendSMSAndWaitForReply sends an SMS and waits for an event (webhook) from Plivo that contains an SMS with a reply. The continuity scope contains all the data needed to continue the flow at a later time (when the webhook from Plivo is received which can take hours to days.
Get the list of accounts the user has previously authenticated with for this component type.
curl "https://api.acme.com/auth/appmixer.slack.list.SendChannelMessage?componentId=e15ef119-8fcb-459b-aaae-2a3f9ee41f15" -H "Authorization: Bearer [ACCESS_TOKEN]"
Name
Type
Description
Field
Type
Format / Notes
_id
string
Elasticsearch document id
_index
string
Elasticsearch index name
es_index
string
Source index name
flowId
Observed as the regular component-level data event, typically outbound, with id = "component" and type = "data". In the sample, portType is out for this variant.
Field
Type
Format / Notes
_id
string
Elasticsearch document id
_index
string
Elasticsearch index name
Observed as the inbound queue-style data event, with id = "input-queue" and type = "data". In the sample, portType is in for this variant.
Field
Type
Format / Notes
_id
string
Elasticsearch document id
_index
string
Elasticsearch index name
Observed as the flow-level event with id = "flow" and type = "flow".
Field
Type
Format / Notes
_id
string
Elasticsearch document id
_index
string
Elasticsearch index name
Observed as a component-related error with id = "component", severity = "error", and without type in the sampled minimal form.
Field
Type
Format / Notes
_id
string
Elasticsearch document id
_index
string
Elasticsearch index name
Observed as the system-level retry error with id = "retry" and indexPrefix = "system".
Get the list of all accounts the user has authenticated with to any component.
curl "https://api.appmixer.com/accounts" -H "Authorization: Bearer [ACCESS_TOKEN]"
Update account information. Currently, only the display name can be updated. The display name is visible in the Designer inspector when selecting available accounts for a component type and also on the Accounts page.
curl -XPUT "https://api.appmixer.com/accounts/5a6e21f3b266224186ac7d03" -H "Authorization: Bearer [ACCESS_TOKEN]" -H "Content-Type: application/json" -d '{ "displayName": "My Account Name" }'
This can be used to create an account. Usually, an account is created when the user authenticates a component. There are scenarios where it is beneficial to create an account without user interaction (Integrations). There has to be an authentication module (auth.js) installed in Appmixer corresponding to the `service` ID. All the built-in authentication types are supported (Oauth1, Oauth2, API Key).
Name
Type
Description
validateScope
string
If false, then the scope of the token from the body won't be validated against components installed in Appmixer.
requestProfileInfo
string
If false, then the auth module requestProfileInfo function won't be called.
Name
Type
Description
displayName
string
Display name property of the account. This overrides the name of the account in the frontend.
name
string
Name of the account, the authentication will determine the name of the account using the accountNameFromProfileInfo property.
Below is an example of a request to create s Slack (Oauth2) account.
The profileInfo object is optional. If you provide it it will be used. If you do not provide it then the requestProfileInfo from the authentication module will be used to get the profile info. Slack access tokens do not expire, therefore there is neither an expiration date nor a refresh token in the request.
Below is another example, this time for Google (Oauth2) account with access token expiration:
Test account. Check if all the credentials (tokens) are still valid for the account.
curl -XPOST "https://api.appmixer.com/accounts/5a6e21f3b266224186ac7d03/test" -H "Authorization: Bearer [ACCESS_TOKEN]"
Remove the account and stop all the flows that this account is used in.
curl -XDELETE "https://api.appmixer.com/accounts/5a6e21f3b266224186ac7d03" -H "Authorization: Bearer [ACCESS_TOKEN]"
List all the flows where the account is used.
curl "https://api.appmixer.com/accounts/5a6e21f3b266224186ac7d03/flows" -H "Authorization: Bearer [ACCESS_TOKEN]"
Generate an authentication session ticket. This is the first call to be made before the user can authentication to a service. The flow is as follows:
1. Generate an authentication session ticket.
2. Get an authentication URL.
3. Start an authentication session.
4. Open the authentication URL in a browser to start the authentication flow.
5. Once the user completes the authentication flow, the browser redirects the user to a special Appmixer page which posts a message of the form "appmixer.auth.[success/failure].[ticket]" via the window.postMessage() call: https://developer.mozilla.org/en-US/docs/Web/API/Window/postMessage.
Note that this is a low-level mechanism that you don't have to normally deal with. The Appmixer JS SDK handles all this for you.
curl "https://api.appmixer.com/auth/ticket" -H "Authorization: Bearer [ACCESS_TOKEN]"
Get an authentication URL.
curl "https://api.appmixer.com/auth/appmixer.slack.list.SendChannelMessage/auth-url/58593f07c3ee4f239dc69ff7:1d2a90df-b192-4a47-aaff-5a80bab66de5" -H "Authorization: Bearer [ACCESS_TOKEN]"
Clear authentication associated with the component. Note that this call does not remove the account, it only removes the association of an account with a component.
curl -XDELETE "https://api.appmixer.com/auth/component/e25dc901-f92a-46a2-8d29-2573d4ad65e5" -H "Authorization: Bearer [ACCESS_TOKEN]"
Assign an account to a component.
curl -XPUT "https://api.appmixer.com/auth/component/e25dc901-f92a-46a2-8d29-2573d4ad65e5/5a6e21f3b266224186ac7d03" -H "Authorization: Bearer [ACCESS_TOKEN]"
Share your account with an integration template so that instances created from the template can use your account. This is useful when you want template users to access shared resources (like a database or API) without requiring them to provide their own credentials.
Name
Type
Description
accountId
string
ID of the account to share
Name
Type
Description
flowId*
string
ID of the integration template to share the account with
componentIds*
array
Array of component IDs that should use this shared account
Account sharing is done at the component level, not the template level. This allows you to share your account for specific components while requiring users to connect their own accounts for other components in the same template.
For example, in a template that syncs data between your S3 bucket and the user's S3 bucket, you can share your account for the trigger component while users provide their own account for the action component.
Security & Scope Validation
Shared accounts are locked to specific component types for security
Components can only access tokens with the required scopes
Use Cases
Unshare Account
Path Parameters
Request Body
Immediate Effect
Unsharing an account immediately affects all template instances. Components using the shared account will lose access and flows may stop working. Ensure users are notified before unsharing critical accounts.
Public files
string
UUID-like string
gridTimestamp
string
ISO 8601 UTC datetime
id
string
Constant-like discriminator, observed values include component, input-queue, flow, retry
indexPrefix
string
Constant-like discriminator, observed values include logstash, system
severity
string
Constant-like discriminator, observed values include info, error
tenantId
string
Tenant identifier
timestamp
string
ISO 8601 UTC datetime
componentId
string
UUID-like string
componentType
string
Component type identifier
correlationId
string
UUID-like string
es_index
string
Source index name
flowId
string
UUID-like string
flowName
string
Flow name
flowType
string
Observed constant value: automation
gridTimestamp
string
ISO 8601 UTC datetime
id
string
Observed constant value: component
indexPrefix
string
Observed constant value: logstash
level
integer
Optional in sample, present in newer-looking records
messageId
string
UUID-like string, optional in sample
port
string
Port name, observed values include request, out, item, done
portType
string
Observed constant value in this variant: out
senderId
string
UUID-like string
senderType
string
Sender component type identifier
severity
string
Observed constant value in this variant: info
tenantId
string
Tenant identifier
timestamp
string
ISO 8601 UTC datetime
type
string
Observed constant value: data
userId
string
User identifier
bundleId
string
UUID-like string
componentId
string
UUID-like string
componentType
string
Component type identifier
correlationId
string
UUID-like string
es_index
string
Source index name
flowId
string
UUID-like string
flowName
string
Flow name
flowType
string
Observed constant value: automation
gridTimestamp
string
ISO 8601 UTC datetime
id
string
Observed constant value: input-queue
indexPrefix
string
Observed constant value: logstash
level
integer
Optional in sample
messageId
string
UUID-like string, optional in sample
port
string
Observed constant value in this variant: in
portType
string
Observed constant value in this variant: in
senderId
string
UUID-like string
senderPort
string
Port name, observed values include out, item
senderType
string
Sender component type identifier
severity
string
Observed constant value in this variant: info
tenantId
string
Tenant identifier
timestamp
string
ISO 8601 UTC datetime
type
string
Observed constant value: data
userId
string
User identifier
dataMessageType
string
Observed constant value in sample: componentLog
es_index
string
Source index name
flowId
string
UUID-like string
flowName
string
Flow name
flowType
string
Observed constant value: automation
gridTimestamp
string
ISO 8601 UTC datetime
id
string
Observed constant value: flow
indexPrefix
string
Observed constant value: logstash
level
integer
Optional in sample
severity
string
Observed constant value in sample: info
tenantId
string
Tenant identifier
timestamp
string
ISO 8601 UTC datetime
type
string
Observed constant value: flow
userId
string
User identifier
componentId
string
UUID-like string
componentType
string
Component type identifier
correlationId
string
UUID-like string
es_index
string
Source index name
flowId
string
UUID-like string
gridTimestamp
string
ISO 8601 UTC datetime
id
string
Observed constant value: component
indexPrefix
string
Observed constant value: logstash
senderId
string
UUID-like string
senderType
string
Sender component type identifier
severity
string
Observed constant value: error
tenantId
string
Tenant identifier
timestamp
string
ISO 8601 UTC datetime
userId
string
User identifier
componentId
string
UUID-like string
es_index
string
Source index name
flowId
string
UUID-like string
gridTimestamp
string
ISO 8601 UTC datetime
id
string
Observed constant value: retry
indexPrefix
string
Observed constant value: system
severity
string
Observed constant value: error
tenantId
string
Tenant identifier
timestamp
string
ISO 8601 UTC datetime
data
out
Input queue data event
input-queue
logstash
info
data
in
Flow event
flow
logstash
info
flow
—
Component error event
component
logstash
error
—
—
System retry error event
retry
system
error
—
—
Shared account credentials are automatically masked in logs for non-owners
Users cannot change component types to access unauthorized data
ID (vendor:service) of the service - `appmixer:google` for example.
token
object
The structure of this object depends on the authentication type (Oauth1, Oauth2, API Key).
profileInfo
object
Can be provided directly. If not, requestProfileInfo from the authentication module will be called.
Getting Started
Appmixer command-line tool.
Use the Appmixer CLI tool to interact with the Appmixer engine remotely from the command line. It can be used to list flows, start/stop flows but more importantly, to develop and publish custom components.
Installation
Download and install NodeJS: https://nodejs.org (version 18 is required)
npm install -g appmixer
Help
Display the command options with the -h option:
Each command has its own help information:
First set the Appmixer API URL. This is the URL of your hosted Appmixer engine instance or your own custom URL where the self-managed engine is located. If you have a trial package or local installation, you can use .
Login to your Appmixer account and enter your password:
The best way to start implementing your own custom components is to use the generator tool to generate a sample component. This gives you the basic skeleton of your component/service that you can later tweak. Use the appmixer init example command to generate a sample component:
As you can see, we have to give this command a type of example we want to generate. We will start with the most simple service type that does not use any authentication (OAuth1, OAuth2, API keys). In other words, the component will not ask the user to connect any account in the Inspector panel when using the component in a flow.
The command prints all the generated files and the directory structure. Note that we have just generated a working component with the myservice.mymodule.MyComponent type.
Now we're ready to pack our service (i.e. create a zip archive with all the generated files) using the appmixer pack appmixer/myservicecommand:
The pack command generated the appmixer.myservice.zip file in the current directory.
The last step is to publish our component for our users to use. This is done using the appmixer publish command:
Our component is now published and ready to be used:
Notice the labels and icons of the service in the component panel on the left and of the component in the Inspector selector match our definitions from the myservice/service.json and myservice/mymodule/MyComponent/component.json manifest files.
To see all the available components uploaded to Appmixer, use the appmixer component ls command:
If you decide your component is no longer needed, you can remove your component from the system with the appmixer remove command:
The remove command lets you specify any portion of the fully qualified component type. For example, if you want to remove the entire service, you can do that with:
You can re-publish (appmixer publish) your component which effectively replaces the old component with the new one.
Writing/updating code of your component, re-publishing it and re-configuring/restarting your flow every time you need to test your component would be a long process. Therefore, the Appmixer CLI tool provides a command to test your component locally on your machine, before publishing it to Appmixer. The appmixer test command allows you to test your component by sending messages to it, configuring properties and testing authentication methods:
We'll start by exploring the component testing tool:
Let's say we want to send a message to our component and see how it reacts, i.e. what is the output of our component. We know our component has an input port called in and requires the sourceData property as part of the incoming messages (see the component.json file of your MyComponent, especially the inPorts section). We can use the test command for this:
The command prints out a lot of useful information, for example, the output of the component (see "Component sent a message to its output port: out"). Since our component just forwards the same data that it received, we see the same object we sent to it: { sourceData: 'foo' }.
Now suppose we have a bug in our code in MyComponent.js, a syntax error:
Now re-running the test gives us:
When your component is published, you can always download it back to your local file system. To download the source code of your component, use the appmixer download command:
In our case, the download command would look like:
You can list all your flows using the appmixer flow ls command:
If you want to see just one flow and its stage (running/stopped), you can pass the ID of the flow in the flow ls command:
To see the flow descriptor of a flow (i.e. JSON object that represents the entire configuration of the components in the flow and their connections), add the --descriptor or -d flag:
You can start and stop flows using the appmixer flow start and appmixer flow stop commands:
To remove flows, use the appmixer flow remove command:
You need admin privileges to run these commands. You should not modify Modifiers if there are any running flows using them. Such an operation would break the flows.
The next command will download modifiers from Appmixer and save them into the modifiers.json file.
The next command will publish modifiers into Appmixer.
The next command will delete existing modifiers from Appmixer. The next time Appmixer starts, it will load the default set of Modifiers.
Flows
GEThttps://api.YOUR_TENANT.appmixer.cloud/flows
Return all flows of a user.
curl "https://api.appmixer.com/flows" -H "Authorization: Bearer [ACCESS_TOKEN]"
Name
Type
Description
filter
string
Filter flows by their property values. Example: "userId:123abc" returns only flows who's owner is the user with ID "123abc" (i.e. shared flows are excluded). Note that you can also search on nested fields. This is especially useful with the customFields metadata object. For example: "filter=customFields.category:healthcare".
sharedWithPermissions
string
Filter flows by their sharing setting. Example: "read,start". All possible permission are currently "read", "start", "stop".
Prefix for flow clone name. The original flow name will be used with this prefix as a name for the new flow.
projection
String
Properties to be filtered from the flow model.
Example: "-thumbnail,-sharedWith". With this projection string, the thumbnail and sharedWith property will not be cloned.
{
"cloneId": "cloned-flow-id"
}
Flow Drafts allow you to create editable versions of flows without affecting the original running flow. Drafts are primarily used for making changes to integration instances while the original continues to run.
Draft Types: automation-draft and integration-instance-draft
Workflow: Create draft → Make changes → Publish to update original flow
Safety: Only one draft per flow can exist at a time
Component ID Mapping: Drafts maintain a mapping to original component IDs for seamless publishing
POSThttp://[API-URL]/flows/:id/clone
Create a draft by cloning an existing flow with special draft parameters.
Name
Type
Description
id*
String
Flow ID to create draft from
Name
Type
Description
setOriginFlowId*
Boolean
Must be true to link draft to original flow
setComponentIdMap*
Boolean
Must be true to map component IDs for publishing
{
"cloneId": "draft-flow-id"
}
{
"cloneId": "existing-draft-flow-id"
}
Note: If a draft of the same type already exists for this flow, the existing draft ID is returned instead of creating a duplicate.
POSThttp://[API-URL]/drafts/:draftFlowId/publish
Publish a draft to update the original flow with the draft's changes.
Name
Type
Description
draftFlowId*
String
Draft flow ID to publish
{
"success": true,
"flowId": "original-flow-id"
}
{
"statusCode": 403,
"error": "Forbidden",
"message": "You do not have permission to publish this draft."
}
{
"statusCode": 404,
"error": "Not Found",
"message": "Draft not found or invalid draft type."
}
When you publish a draft, the following operations occur automatically:
Component ID Mapping: Draft component IDs are mapped back to the original flow's component IDs
Flow Update: The original flow is updated with the draft's configuration
Draft Deletion: The draft flow is automatically deleted after successful publishing
Account Connections: If accounts were connected during draft creation, they are preserved
Editing Integration Instances
Create a draft of a running integration instance
Make and test changes in the draft without affecting the live instance
Start or stop an existing flow.
curl -XPOST "https://api.appmixer.com/flows/9089f275-f5a5-4796-ba23-365412c5666e" -H "Content-Type: application/json" -d '{ "command": "start" }'
Name
Type
Description
id
string
Flow ID.
Name
Type
Description
background
boolean
Will trigger the stop command, but won't wait for it to finish. Then you can use GET /flows/{flowId}/coordinator/status to check the status of that operation.
Name
Type
Description
command
string
The command to send to the flow coordinator. It can be either "start" or "stop".
{
"flowId": "26544d8c-5209-44ac-9bdf-ef786924b07b",
// equals the flowId if the background=true is sent in the query
"ticket": "26544d8c-5209-44ac-9bdf-ef786924b07b"
}
If "true" then the response to this request will be returned as soon as the requests is enqueued in the engine. It will not wait for the component to process the request and create the response. The response code is 202 in this case. The default value is "false".
If "true" then the response to this request will be returned as soon as the requests is enqueued in the engine. It will not wait for the component to process the request and create the response. The response code is 202 in this case. The default value is "false".
If "true" then the response to this request will be returned as soon as the requests is enqueued in the engine. It will not wait for the component to process the request and create the response. The response code is 202 in this case. The default value is "false".
{
// Response
}
{
// Response
}
The notes property holds the definitions of note blocks displayed on the Designer canvas. Notes are purely visual — they let flow authors annotate a canvas with Markdown-formatted text to explain intent, guide end-users, or document template behaviour.
The Designer writes this object automatically when notes are created or edited. You can also construct or patch it programmatically via the Create Flow and Update Flow endpoints.
notes is a map of note ID → note object. Each key is a UUID that uniquely identifies the note block.
Property
Type
Description
x
number
Horizontal position of the note block on the canvas (pixels, can be negative).
y
number
Vertical position of the note block on the canvas (pixels, can be negative).
A flow becomes an Integration Template when it has a non-empty wizard property. The wizard object defines the configuration form that end-users fill in when they activate an integration — rendered by the appmixer.ui.Wizard widget.
The Wizard Builder in the Designer writes this object automatically. For programmatic template creation — importing templates, scripting bulk updates, or building custom tooling — you can construct or patch the wizard field directly via the Create Flow and Update Flow endpoints.
fields is an ordered array of field objects. The Wizard widget renders them top to bottom. Authentication (account) fields are always sorted to the top of the form regardless of their position in the array.
Every field object shares a common set of properties:
Property
Type
Description
type
string
Field type. See the field types below.
label
string
Label shown to the end-user.
Exposes a single component input field to the end-user. This is the most common field type.
source format: <componentId>.<descriptorPath>, where descriptorPath mirrors the config transform path in the flow descriptor — for example a0828f32.config.transform.in.76a77abf.out.lambda.channelId.
Renders an account/authentication selector for one or more components that share the same auth service. Account fields are always displayed at the top of the Wizard form.
attrs property
Type
Description
service
string
The auth service identifier, e.g. "appmixer:slack".
components
string[]
A field not bound to a specific component inspector input. Useful for injecting arbitrary data into a flow (e.g. via customFields).
attrs property
Type
Description
type
string
Input type, e.g. "text".
path
string
A non-interactive content block — a heading or informational paragraph displayed inside the Wizard form.
attrs property
Type
Description
format
string
Content format, e.g. "header".
text
string
A static image displayed inside the Wizard form.
attrs property
Type
Description
image
string
Image URL or path.
The following example creates an Integration Template programmatically. The flow has a Scheduler component (76a77abf) and a Slack SendChannelMessage component (a0828f32). The wizard exposes the Slack account selector and two input fields — the scheduled hour and the Slack channel.
An Integration Template is a flow that has a non-empty wizard property and no templateId property. To list all published templates:
To list a user's integration instances (flows created from a template):
If "true" then the response to this request will be returned as soon as the requests is enqueued in the engine. It will not wait for the component to process the request and create the response. The response code is 202 in this case. The default value is
GET /flows?filter=templateId:!&filter=wizard.fields
GET /flows?filter=templateId
Get Flow
Path Parameters
Get Flows Count
Create Flow
Request Body
Update Flow
Path Parameters
Query Parameters
Request Body
Delete Flow
Path Parameters
Clone Flow
Path Parameters
Request Body
Flow Drafts
Overview
Create a Draft
Path Parameters
Request Body
Draft Uniqueness
The API ensures only one draft per flow and type can exist. If you attempt to create a draft when one already exists, the API returns the existing draft's ID instead of creating a duplicate.
Publish a Draft
Path Parameters
Publishing Process
Publishing Impact
Publishing a draft will immediately update the original flow. If the original flow is running, the changes will take effect.
Use Cases
Start/Stop Flow
Path Parameters
Query Parameters (only for the stop command)
Request Body
Get the status of the stop flow command
Send GET request to a component
Send POST request to a component
Send PUT request to a component
Flow Notes
The notes object
Note object properties
Flow Wizard
The wizard object
Field reference
inspectorField
account
customField
text
image
Complete example
Filtering Integration Templates
For a guided walkthrough of building and publishing templates using the no-code Studio, see .
Send DELETE request to a component
$ appmixer -h
Usage: appmixer [options] [command]
Appmixer command line interface.
Options:
-v, --version output the version number
-h, --help output usage information
Commands:
download|d Download component.
flow|f Flow commands.
init|i Initialize component.
login|l Login into Appmixer API.
logout|o Logout from Appmixer API.
pack|p Pack component into archive.
publish|pu Publish component.
remove|rm Remove component.
test|t Test component, authentication module, ...
url|u <url> Set Appmixer API url.
help [cmd] display help for [cmd]
Go to https://docs.appmixer.com/appmixer/ to find more information.
$ appmixer flow -h
Usage: appmixer flow <command>
Flow commands.
Options:
-h, --help output usage information
Commands:
start|s <flowId> Start flow.
stop|t <flowId> Stop flow.
remove|r <flowId> Remove flow.
ls|l [flowId] Ls flow.
help [cmd] display help for [cmd]
$ appmixer init example
Usage: appmixer init example <type> [path]
Options:
--vendor [vendor] Your vendor name.
--verbosity Verbosity level of the generated output log. Number in [0 - 2] range. Defaults to 1.
-h, --help output usage information
Examples:
$ appmixer init example no-auth
Environment Variables:
AM_GENERATOR_COMPONENT_PATH Components base directory. [path] argument overrides this variable if used.
$ appmixer init example no-auth
Created directory structure ./appmixer/myservice/mymodule/MyComponent
Creating component appmixer.myservice.mymodule.MyComponent
Created component manifest file ./appmixer/myservice/mymodule/MyComponent/component.json.
Created component package file ./appmixer/myservice/mymodule/MyComponent/package.json.
Created component behaviour file ./appmixer/myservice/mymodule/MyComponent/MyComponent.js.
Created service manifest file ./appmixer/myservice/service.json.
Created quota module file ./appmixer/myservice/quota.js.
Example successfully generated.
my-components
└── appmixer
└── myservice
├── mymodule
│ └── MyComponent
│ ├── MyComponent.js
│ ├── component.json
│ └── package.json
├── quota.js
└── service.json
You can now use appmixer pack appmixer/myservice && appmixer publish commands to upload it.
$ appmixer pack appmixer/myservice
Packing component directory: /Users/daviddurman/Projects/appmixer/my-components/appmixer/myservice
Files found in /Users/daviddurman/Projects/appmixer/my-components/appmixer/myservice
- mymodule
- quota.js
- service.json
You are in a directory with service.json file.
I'm going to create directory structure based on name in your service.json file.
3866 total bytes
appmixer.myservice.zip
$ appmixer test -h
Usage: appmixer test <command>
Dev tools for testing your files.
Options:
-h, --help output usage information
Commands:
dump|d <moduleName> Get stored authentication data from previous commands.
auth|a <authModuleFile> Authenticate service.
component|c <componentFile> Test component.
help [cmd] display help for [cmd]
$ appmixer test component -h
Usage: appmixer test component [options] [componentDir]
Options:
-f, --transform [transform] specify transformer
-i, --input [input] input test message object (default: [])
-m, --mime [mime] mime type, application/json by default
-p, --properties [properties] component properties (JSON format)
-s, --no-state do not show component's state
-t, --tickPeriod [tickPeriod] tick period (in ms), default is 10000 ms
-h, --help output usage information
Examples:
Following example will send input message { "to": "your@email.com" } to component's input port 'in'.
You always have to specify to which input port you want to send message.
$ appmixer test component [path-to-your-component-directory] -i '{ "in": { "to": "your@email.com" } }'
This is how to specify transformer function from transformer file.
$ appmixer test component [path-to-component] -i '{}' -f './transformers#channelsToSelectArray'
How to set properties and tick period:
$ appmixer t c [path-to-component] -p '{ "channelId: "123XYZ" }' -t 2000
You can send more than one message:
$ appmixer t c [path-to-component] -i '{ "in": { "to": "first@email.com" }}' -i '{ "in": { "to": "second@email.com" }}'
You can run appmixer command in your component's directory:
$ appmixer test c
Directory has to contain component.json file and component's source code file.
If you're developing component that needs authentication, use 'appmixer test auth' before.
If you're developing Oauth2 component you might need to refresh access token before calling this command.
Use 'appmixer test auth refresh' for such purposes.
Some of the feature (context.store, context.componentStaticCall, ... will work only if you are logged in into Appmixer.
If you want to test them in your component, call appmixer login first.
For more information, checkout our documentation at:
https://docs.appmixer.com/appmixer/component-definition/authentication
https://docs.appmixer.com/appmixer/appmixer-trial/custom-component-helloappmixer
$ appmixer test component appmixer/myservice/mymodule/MyComponent -i '{ "in": { "sourceData": "foo" } }'
Testing /Users/daviddurman/Projects/appmixer/my-components/appmixer/myservice/mymodule/MyComponent
Validating properties.
Test server is listening on 2300
Starting component.
Calling receive method with input message:
in:
-
properties:
correlationId: null
gridInstanceId: null
contentType: application/json
contentEncoding: utf8
sender: null
destination: null
correlationInPort: null
componentHeaders:
signal: false
content:
sourceData: foo
scope:
{"name":"component","hostname":"MacBook-Pro.local","pid":26397,"level":30,"msg":"{\"properties\":{\"correlationId\":\"8f2ce09e-3f6d-48dd-81bd-e80189f70bb4\",\"gridInstanceId\":null,\"contentType\":\"application/json\",\"contentEncoding\":\"utf8\",\"sender\":{\"componentId\":\"70eb49e9-88df-4d0e-9549-d4e4f0f755c0\",\"type\":\"appmixer.myservice.mymodule.MyComponent\",\"outputPort\":\"out\"},\"destination\":null,\"correlationInPort\":null,\"componentHeaders\":{},\"signal\":false},\"content\":{\"sourceData\":\"foo\"},\"scope\":{\"_walkthrough\":[{\"targetId\":\"70eb49e9-88df-4d0e-9549-d4e4f0f755c0\",\"links\":[]}]}} { componentId: '70eb49e9-88df-4d0e-9549-d4e4f0f755c0',\n flowId: 'c5d05118-13b5-4ec8-a8fe-2e6ef51fdd52',\n userId: '5da735715abc4a671dfb592f',\n componentType: 'appmixer.myservice.mymodule.MyComponent',\n type: 'data',\n portType: 'out',\n port: 'out',\n inputMessages: { in: [ [Object] ] },\n annotatedMsg: { sourceData: 'foo' } }","time":"2019-10-16T15:21:22.169Z","v":0}
Component sent a message to its output port: out
{ sourceData: 'foo' }
Component's receive method finished in: 45 ms.
Return value from receive method:
undefined
Component's state at the end:
State is empty, component did not store anything into state.
Stopping component.
Destroying component.
You can pack the entire service or just the module or even individual components by providing the path to the appmixer pack command.
Publish your component
Before you publish a component. Your user account has to have property vendor set to a string or an array of strings. The value depends on what vendor is used in component(s) you're about to publish. More about that in . In the examples in this section we use appmixer as a vendor, but you should use your own. If your company is called acme then the vendor property should be set to acme as well. You can use Backoffice for that as shown in the next picture.
List all available components
Remove your component
It's important to note that removing a component that is used in any of the running flows will cause the flows to stop working. The flows will start generating errors that will be visible in the Insights section. The remove command does not automatically stop the flows. Always make sure the component is not used in any of the running flows before you remove it.
IMPORTANT: Removing a component cannot be undone!
Updating your component
Note that if you "dramatically" change your component, e.g. removing ports, flows using the component type might require re-configuration since the ports that were used to connect to other components will not exist. The same goes for other major changes: changing output parameters that are used in connected components, changing inspector config and properties, etc.
Testing your component
If want to run the next commands on Windows, make sure you escape the JSONs correctly. For example, instead of
appmixer test component HelloAppmixer -i '{"in": {"text": "abc"}}'
you have to use
appmixer test component HelloAppmixer -i "{\"in\": {\"text\": \"abc\"}}"
Downloading your component
Working With Flows
Listing Flows
Starting and Stopping Flows
Removing Flows
Note that the removed flow will be automatically stopped if it was running. Also, note that this action cannot be undone.
"text":"Site {{{$.e15ef119-8fcb-459b-aaae-2a3f9ee41f15.up.target}}} is back UP.\nDowntime: {{{$.e15ef119-8fcb-459b-aaae-2a3f9ee41f15.up.downTimeText}}}\nHTTP Status Code: {{{$.e15ef119-8fcb-459b-aaae-2a3f9ee41f15.up.statusCode}}}",
"subject":"Appmixer: Site UP ({{{$.e15ef119-8fcb-459b-aaae-2a3f9ee41f15.up.target}}})"
}
}
}
}
}
}
},
"416150af-b0d4-4d06-8ad1-75b17e578532":{
"type":"appmixer.utils.email.SendEmail",
"label":"SendEmail",
"source":{
"in":{
"e15ef119-8fcb-459b-aaae-2a3f9ee41f15": [
"down"
]
}
},
"x":320,
"y":195,
"config":{
"transform":{
"in":{
"e15ef119-8fcb-459b-aaae-2a3f9ee41f15":{
"down":{
"type":"json2new",
"lambda":{
"from_email":"info@appmixer.com",
"subject":"Appmixer: Site DOWN ({{{$.e15ef119-8fcb-459b-aaae-2a3f9ee41f15.down.target}}})",
"text":"Site {{{$.e15ef119-8fcb-459b-aaae-2a3f9ee41f15.down.target}}} is DOWN.\nHTTP Status Code: {{{$.e15ef119-8fcb-459b-aaae-2a3f9ee41f15.down.statusCode}}}"
Wizard configuration for Integration Templates. See for the full schema.
notes
object
Note blocks displayed in the Designer canvas. See for the full schema.
connectAccounts
Boolean
If user accounts (like Gmail account for SendEmail component) connected to the source flow components should also be connected to cloned flow components. Default is false. Accounts can be connected only if the owner of the cloned flow is the same as the owner of the original flow.
isTemplateInstance
Boolean
If source flow is an instance of template (related to Integrations). Default is false
setOriginFlowId
Boolean
Default false. If true, the originFlowId property of the clone will be set to the original flow.
setComponentIdMap
Boolean
Default true. Stores a map of the component IDs from the original flow to the component IDs in the clone. This is later used in Integrations when performing updates of the Integration Templates.
additional
Object
sharedWith, type and wizard properties can be set in this object.
connectAccounts*
Boolean
Recommended true to copy account connections
additional*
Object
Must include type field set to "automation-draft" or "integration-instance-draft"
width
number
Width of the note block in pixels.
height
number
Height of the note block in pixels.
content
string
Full CommonMark Markdown displayed inside the note block. Supports headings, bold, italic, inline code, fenced code blocks, links, images, tables, and lists.
tooltip
string
Optional tooltip text.
placeholder
string
Optional input placeholder text.
source
string
Path to the bound component input: <componentId>.<descriptorPath>. Not used by all field types.
attrs
object
Type-specific attributes. Shape varies by type — see below.
options
object
Additional display or behaviour options.
IDs of flow components that should use the selected account.
sharedAccountId
string
Optional. When set, the Wizard pre-selects a specific shared account instead of prompting.
Connectors that require authentication from the user must implement the authentication module. The authentication module must be named auth.js and must be stored under either the service or module directory (i.e. [vendor]/[service]/auth.js or [vendor/[service]/[module]/auth.js. Appmixer currently supports four types of authentication mechanisms out-of-the-box that are common for today's APIs: API key, Password, OAuth 1, and OAuth 2.
Appmixer provides an easy way to configure authentication modules. Most of the time, it's only about configuring a 3rd party service provider URLs for authentication, requesting access tokens, and token validation.
Authentication Module Structure
Each authentication module is a NodeJS module that returns an object with type and definition properties. type can be either apiKey, pwd, oauth (for OAuth 1) and oauth2 (for OAuth 2). definition is either an object or a function (useful in cases where there's a code that you need to run dynamically).
The type of authentication mechanism. Any of apiKey, pwd, oauth and oauth2.
The definition of the authentication mechanism is specific to the API service provider. An object or a function. This differs significantly between authentication mechanisms.
If the definition property is specified as a function, it has one argument called context. It is an object that contains either consumerKey, username and password, consumerSecret (OAuth 1) or clientId, clientSecret (OAuth 2) and it always contains callbackUrl property. This will be shown later in the examples.
As was mentioned in the beginning, Appmixer authentication supports four mechanisms: API Key, Password, OAuth 1, and OAuth 2. Each of them has a different definition.
In the following examples, we will show how a particular property of the definition object can be specified as a function, object, or string. Let's demonstrate that on a requestProfileInfo property since it is common for all authentication mechanisms.
This is the most basic type of third-party authentication. In order to use this mechanism, type property must be set to apiKey. Here is an example from Freshdesk components:
Next, we explain the fields inside the definition object:
This is the definition for the Web Form that will be displayed to the user to collect information required by the third-party application. Freshdesk requires the domain name and the API key in order to authenticate the user. So we define two fields representing these two items and we define the label and tooltip that will appear in the form for each field. In this case, the auth definition will make Appmixer render a form like this:
The values configured by the user will be exposed in the object with the same keys as in the auth object. In this case, we will be able to access the values as context.domain and context.apiKeyin our component .
While this field is optional, is recommended for a better UX since it is used to request the user profile information from a 3rd party API and together with accountNameFromProfileInfo show the display name of the 3rd party account in Appmixer UIs.
See that implement this method.
This field is the dot-separated path in the object returned by requestProfileInfo that points to the value that will be used as the account name. Following the example, the object returned by requestProfileInfo would have a structure like this:
We want to use the email to identify the Freshdesk accounts in Appmixer, so we set accountNameFromProfileInfo as contact.email.
If requestProfileInfo is not defined, the auth object will be used instead. The account name will be the resolved value for the property specified by accountNameFromProfileInfo.
Similar to requestProfileInfo. This property is used to validate if the authentication data entered by the user is correct. For this purpose you can call any endpoint that requires authentication, you can even use the same endpoint as requestProfileInfo. If the data is correct, this function should resolve to any value. Otherwise, throw an error. You can also define validate as an object. In that case, the object has the same structure as the object passed into the axios library. For example:
If the validate function throws an exception and the exception contains message property, the message will be shown in the Connecting Account Failed page.
If validate is specified as an object, the response error can vary from API to API. Appmixer will use internal heuristics to try to find the error message in the response object. If the error message is not shown on the Connecting Account Failed page, then the validate response can always be parsed and a proper exception thrown in the auth.js module using the validateErrCallback function:
The password-based authentication is almost similar to key-based authentication as explained in the above section. The only difference is that you will use username and password inputs. The auth property inside definition will need to have two inputs as shown in the below-given code snippet. The validate method is used to validate the input values provided. You can make API call by using the context.username and context.password properties. If the API you are validating returns a token, it will have to be returned from the validate method as shown below.
The pwd type can be used for the HTTP Basic Authentication. Here's a sample code:
Then the username and password is available in the components:
In order to use this mechanism, type property must be set to oauth. Here is an example from Trello components:
Note that in this case, the definition is a function instead of an object, but it still returns an object with the items needed for OAuth 1 authentication, similar to API key authentication. Now we explain the fields from the definition object:
Works exactly the same way as described in the section.
This must be a function (or an object, or just a string URL as explained ) that returns a promise which must resolve to an object containing requestToken and requestTokenSecret the same way that is shown in the example above. These are needed to get the access token and become exposed by the context - context.requestToken and context.requestTokenSecret.
This must be a function (or an object, or just a string URL as explained ) that returns a promise which must resolve to an object containing accessToken and accessTokenSecret the same way that is shown in the example. Usually, you will be using the requestToken and requestTokenSecret inside this function, as they are required by the OAuth 1 flow in this step. Similarly to requestRequestToken function, accessToken and accessTokenSecret will become exposed by the context - context.accessToken and context.accessTokenSecret.
URL returning auth URL. Appmixer will then use this URL to redirect the user to the proper authentication page. The requestToken is available in the context. The example shows the authUrl declaration using the token provided by the context.
Works exactly the same way as described in the section.
This property serves the same purpose as property in the API Key mechanism. This is used by Appmixer to test if the access token is valid and accepted by the third-party app. You have access to context.accessToken and context.accessTokenSecret to make authenticated requests. If the token is valid, this function should resolve to any value. Otherwise, throw an error.
The latest OAuth protocol and industry-standard, OAuth 2.0 improved many things from the first version in terms of usability and implementation, while maintaining a high degree of security. It is easier to implement in Appmixer as well. In order to use this mechanism, type property must be set to oauth2. Here is an example from :
The requestAccessToken is used to get the access token while the refreshAccessToken is used to refresh the access token later. Next, see the definition object's properties explained in more detail:
Works exactly the same way as described in the section.
Similar to OAuth 1, we should provide the authentication URL for the third-party app. However, due to the different authentication flows supported by OAuth 2, the way this is defined may vary according to the third-party implementation. If the OAuth 2 implementation is standard, you can define the authUrl with just a string like:
Standard means, there is a response_type parameter set to code, the client_id, redirect_uri, state and scope parameters. If the OAuth 2 implementation requires any other parameters (or the standard ones use different names), then you have to define this property as a function and provide all the additional parameters. See, for example, the .
The same logic applies to the following property requestAccessToken.
This function should return a promise with an object which contains accessToken, refreshToken (optional, some OAuth 2 implementations do not have refresh tokens) and accessTokenExpDate or expires_in (also optional if the implementation does not have tokens that expire). Inside this function, you should call the endpoint which handles the access tokens for the application. The following context properties are available to you in this function: clientId, clientSecret, callbackUrl and authorizationCode. See, for example, .
Works exactly the same way as described in the section.
Part of the OAuth 2 specification is the ability to refresh short-lived access tokens via a refresh token that is issued along with the access token. This function should call the refresh token endpoint on the third-party app and resolve to an object with accessToken and accessTokenExpDate (and refreshToken if needed) properties, as shown in the example. You have access to context properties clientId, clientSecret, callbackUrl and refreshToken.
Has the exact same purpose as the same method in the .
String or an array of strings.
String. The default one is , and you can change it to ' ' for example.
Sometimes the OAuth 2 needs a scope or a different scope delimiter. Here is a full example of the Microsoft authentication module with a different than the default scope delimiter:
By default, Appmixer will try to refresh the access token five minutes before its expiration. This is fine for most of the OAuth2 implementations, where an access token is usually valid for hours or days. However, there are OAuth2 implementations with stricter rules. With this property, you can define how many minutes (default, see refreshBeforeExpUnits) before the access token expiration should Appmixer refresh the token. Appmixer will not try to refresh the token before this value.
Works in cooperation with the refreshBeforeExp property. Useful if you need to go down to seconds. See the example above.
When you're developing an OAuth 2 application, at some point you have to register an app in the 3rd party system. For that, you need the redirect URI that points to the Appmixer API. The format of the redirect URI is https://[APPMIXER_TENANT_API_URL]/auth/[service]/callback.
For example, if the service you're developing is called myService then the redirect URI will be https://[APPMIXER_TENANT_API_URL]/auth/myService/callback.
The redirect URI can be changed per module in the Backoffice -> Connector Configuration page:
Context properties are different for each authentication type. But some of them are common for all types.
Wrapper around the library, making it easy to initiate HTTP requests without the need to import a 3rd party library:
Just like in a component, this can be used to create a log record that is visible in the Insights. This is useful for debugging auth.js files.
Appmixer allows you to redefine the Connect Account button in the Designer and Integration Wizards. This is especially useful if the 3rd party has specific requirements for branding of the sign-in buttons, such as .
This is done with an optional connecAccountButton: { image: 'data uri' } property. Example from the :
To set your OAuth applications secrets, follow the guideline.
Behaviour
Components receive incoming messages, process them, and generate outgoing messages. The way messages are processed is called component behaviour. It defines what components do internally and how they react to inputs.
Components are implemented as NodeJS modules that return an object with a set of methods (Component Virtual Methods) that the Appmixer engine understands. Let's start with a simple example, a SendSMS component that has one input port (message), no output ports and its purpose is to send an SMS using the Twilio API.
const twilio = require('twilio');
module.exports = {
receive(context) {
let { fromNumber } = context.properties;
let { accountSID, authenticationToken } = context.auth;
let message = context.messages.message.content;
let client = new twilio(accountSID, authenticationToken);
return client.message.create({
body: message.body,
to: message.to,
from: fromNumber
});
}
};
Component Virtual Methods
As was mentioned in the previous paragraph, components are simple NodeJS modules that can implement a certain set of methods the Appmixer engine understands. The one most important method is the receive() method. This method is called by the engine every time messages are available on the input ports and the component is ready to execute. The method must return a promise that when resolved, acknowledges the processing of the input messages. If the promise is rejected, the Appmixer engine automatically retries to send the messages later using an exponential back-off strategy that prolongs intervals between the retries.
Messages that have been rejected 5-times are put in a special internal "dead-letter" queue and never returned to the flow for processing again. They can be managed and recovered using the Appmixer REST API.
For trigger-type of components, the most important virtual methods to remember is tick() and start().
Virtual Method
Description
All virtual methods have one argument, the context. The context object contains all the information you need to process your messages and send new messages to the output ports.
(applies toreceive())
Incoming messages. An object with keys pointing to the input ports. Each message has a content property that contains the actual data of the message after all variables have been resolved (replaced with actual data). For example:
Remember, if before running the flow, the input port message was defined in the Inspector using variables:
where the flow descriptor would contain something like this:
the context.messages object contains the result of replacing variables with actual data that was sent through the output port of the connected component, i.e.
Each message also contains the correlation ID in the context.messages.myInputPort.correlationId property.
Call this method to emit a message on one of the components output ports. The first argument can be any JSON object and the second argument is the name of an output port. The function returns a promise that has to be either returned from the receive() , tick() or start() methods or awaited.
A convenient method for sending an array of objects to an output port. Note that this method does not send the entire array to the output port in one go but rather sends items in the array one-by-one to the output port. Therefore, your output port schema definition should contain the schema of the items of the array, not the array itself.
The authentication object. It contains all the tokens you need to call your APIs. The authentication object contains properties that you defined in the auth object in your Authentication module (auth.js) for your connector or implicit properties in case of OAuth (context.auth.accessToken). For example, if our authentication module for our service (auth.js) looks like this:
we can use the context.auth.accountSID and context.auth.authenticationToken in the component virtual methods to access the values for those properties that Appmixer requested from end-users when they authenticated to the connector:
When you configure your connector in the Backoffice, you can access the values in the context.auth or context.config objects. context.config is an alias to the original context.auth. This is especially handy for any configuration that you might want to have dynamically changed without the need to redeploy your connector with new configuration.
The configuration properties of the component. This corresponds to the properties object from the component manifest file. For example, if our component defines the following properties in the manifest file:
context.properties.fromNumber will contain the value the user entered in the Designer UI Inspector:
A persistent state of the component. Sometimes you need to store data for the component that must be available across multiple receive() calls for the same component instance. If you also need the data to be persistent when the flow is stopped and restarted again, set the state: { persistent: true } property in your component manifest, otherwise, the context.state will be cleared when the flow containing the component stops.
context.state is a simple object with keys mapped to values that are stored in the internal Appmixer database. This object is loaded on-demand in each receive() call. It is not recommended to store large amounts of data here. Example:
The context.state is especially useful for trigger-type of components when polling an API for changes to e.g. store the ID of the latest processed item from the API.
Load the component's state from internal DB. Normally, you do not need to call this method explicitely since the component's state is loaded just before the component is triggered and the state is available in context.state. However, there are cases when a component needs to reload its state from the DB where this function is useful.
Save an updated state object. See context.state for details. The function returns a promise that resolves if storing of the state was successful.
Set a state key to hold the value. key must be a string. value can be any JSON object.
Get a state value stored under key.
Remove a value under key.
Clears the entire state.
Add value into set under key.
Remove value from set under key.
Increment value under key. The second parameter is optional and can be used to set the increment value. The function return by default the new value (after incremented), if returnOriginal is set to true, it will return the value before the increment.
Similar to the component state, this state is available to all components in the flow.
Load the state from the DB.
Set a state key to hold the value. key must be a string. value can be a string, number or a JSON object.
Get a state value stored under key.
Remove a value under key.
Clears the entire state.
Add value into a Set stored under key.
Remove value from Set stored under key.
Increment value under key. The second parameter is optional and can be used to set the increment value. The function return by default the new value (after incremented), if returnOriginal is set to true, it will return the value before the increment.
This is similar to the component state, but the service state is available across all components in the connector.
Load the state from the DB. The returned value is an array of state items each having the key and value properties, e.g. [{ key: "A", value: 1 }, { key: "B", value: 2 }].
Set a state key to hold the value. key must be a string. value can be anything that can be stored in Mongo DB.
Get a state value stored under key.
Remove a value under key.
Clears the entire state.
Add value into a Set stored under key.
Remove value from Set stored under key.
Increment value under key. The second parameter is optional and can be used to set the increment value. The function return by default the new value (after incremented), if returnOriginal is set to true, it will return the value before the increment.
This method has been deprecated. Useinstead. Save a file to the Appmixer file storage. This function returns a promise that when resolved gives you a UUID that identifies the stored file. You can pass this ID through your flow (send it to an output port of your component) so that later components can load the file from the Appmixer storage using the file ID.
Save a file to the Appmixer file storage. The function returns a Promise that resolves with the ID of the stored file ({ fileId }). This is a more efficient and recommended version of context.saveFile(name, mimeType, buffer).
The structure of the returned object looks like this:
See, for example, the component for an example of how safeFileStream() can be used.
Replaces the content of the file. Returns a Promise with the ID of the file { fileId }. The fileId remains the same.
Return object:
Returns a promise, which when resolved returns the file information (name, length, content type...).
Example return object:
Load a file from the Appmixer file storage. The function returns a promise that when resolved, returns the file data as a Buffer.
This method has been deprecated. Useinstead. Read a file stream from the Appmixer file storage. The function returns a NodeJS read stream that you can e.g. pipe to other, write streams (usually to a request object when uploading a file to a 3rd party API). This is a more efficient and recommended version of context.loadFile(fileId).
Read a file stream from the Appmixer file storage. The function returns a Promise, which when resolved, returns a NodeJS read stream that you can e.g. pipe to other, write streams (usually to a request object when uploading a file to a 3rd party API). This is a more efficient and recommended version of context.loadFile(fileId).
Remove a file from the Appmixer file storage. The function returns a promise.
Get a URL that you can send data to with HTTP POST or GET requests. When the webhook URL is called, the receive() method of your component is called by Appmixer with context.messages.webhook object set and context.messages.webhook.content.data containing the actual data sent to the webhook URL:
The full context.messages.webhook object contains the following properties:
Property
Description
Send a response to the webhook HTTP call. When you set your component to be a webhook-type of component (webhook: true in your component.json file), context.getWebhookURL() becomes available to you inside your component virtual methods. You can use this URL to send HTTP POST or GET requests to.
When a request is received by the component, the context.messages.webhook.content.data contains the body of your HTTP request. In order to send a response to this HTTP call, you can use the context.response() method. See context.getWebhookUrl() for details and examples.
Since it is very common for components to initiate HTTP requests, Appmixer provides a convenient method to do so. The httpRequest object/function is a wrapper around the well known library.
Get the list of user's Data Stores.
Get value from the Data Store, stored under the key.
Set value to the Data Store under the key.
Remove the key from the Data Store.
Clear all data from the Data Store.
Find items in the Data Store.
Get a cursor.
Register Data Store webhook. If no events are specified, then the component will get all events from the Data Store. Possible events are insert, update and delete.
And the same functionality with registering only for the insert events.
Unregister a webhook.
Set a timer that causes the component to receive messageContent in the receive() method in the special context.messages.timeout.content object. delay is the time, in milliseconds, the timer should wait before sending the messageContent to the component itself. This is especially useful for any kind of scheduling components.
The context.setTimeout() function works in a cluster environment as opposed to using the global setTimeout() JavaScript function. For example, a component that just slows down incoming messages before sending them to its output port, waiting e.g. 5 minutes, can look like this:
You can also access the correlation ID of the timeout message which can be useful in some scenarios. The correlation ID is available in the context.messages.timeout.correlationId property.
The return value from this context method is a timeout Id (a UUID string). Each timeout has its own unique identifier. That can be used to clear the timeout.
Clear (cancel) a scheduled timeout.
Call an Appmixer REST API endpoint. You can call any of the Appmixer endpoints defined in the . The main advantage of this method (as opposed to calling the API endpoint manually) is that the method automatically populates the "Authorization" header of the request to the access token of the user who owns the flow this component runs in. For example:
Stop the running flow. Example:
The ID of the component.
The ID of the flow the component runs in.
The flow descriptor of the running flow. This allows you to access configuration of the entire flow within your component virtual methods. To get the configuration of the component itself, you can use context.flowDescriptor[context.componentId]. Note that this is normally not necessary since you can access the properties of the component with context.properties and the current input message with context.messages.myInPort.content but it can be useful in some advanced scenarios.
Flow properties are available in this object.
This function lets you evaluate a JavaScript code in a sandbox. The first argument is the JavaScript code and the second is an object with data available to the code. The object is then available under $data variable.
To support components that receive inputs and wait for some future asynchronous response to continue the flow execution from the state of the flow at the time the inputs arrived, Appmixer internally stores a data structure called Continuity scope. The Continuity scope is a document stored in the Appmixer internal DB and contains all the data the flow produced until it reached the component with the first message.
For example, some components receive an input message, call a 3rd party API, and wait for an asynchronous push-type of webhook call originating from the 3rd party API - that arrives at a later time - to receive at the component webhook URL. When the webhook arrives, the component produces a JSON and sends it to its output port. At this point, the component must have the state of the flow (all the related data from the same flow "run") to be able to resolve variables and continue execution.
The Continuity scope documents are deleted after a certain time (by default 100 days). If you need to have a component that can wait more than 100 days for the incoming webhook to resume the flow, you can use this function to adjust the timeout. The function excepts Date, number or a string. If the argument is a number, it is considered to be the number of milliseconds from now (the time of the function call). If it is a string, it will be converted to Date object using new Date(string)function.
Load variables in your component. Variables are data available from components connected back in the chain. loadVariables() returns a promise that resolves to an array that looks like this:
The array has as many items as there are other components connected to this component.
Example:
Log a message. The log message will be available to the end-users in the log panel of the Designer UI or in the Insights page of the Appmixer Studio. The argument has to be an object that can be stringified into JSON.
Example:
And the object can be seen in the log panel as:
This method allows components to create a cluster lock. This is useful when creating a mutually exclusive section inside the component's code. Such a thing can be achieved in Appmixer using either (you can define a quota the way that only one receive call can be executed at a time) or using locks. This method returns the lock instance. Don't forget to call lock.unlock() when you're done. Otherwise, the lock will be released after TTL.
lockName string will be automatically prefixed with vendor.service:. If a component type is appmixer.google.gmail.NewEmail, the lockName will be prefixed with appmixer.google:. This allows you to create a lock that is shared among all components within a service and prevents possible collisions between components from different vendors or services.
The first parameter is required, the second (options) is optional with the following optional properties:
ttl, number, 20000 by default (ms)
retryDelay, number, 200 by default (ms)
maxRetryCount, number, 30 by default
Example:
Every function a component implements may throw an exception (or return a rejected promise).
If this function throws an exception, Appmixer will try to process the message that triggered this receive call again later using an exponential backoff strategy. In total, Appmixer will try to process the failing message 5 times before it is saved into collection. Every unsuccessful attempt will be logged and visible in Insights.
Sometimes you, as a developer of a component, know that there is no point in retrying a message since no matter how many times Appmixer tries, the message will fail repeatedly. In such cases, you can tell Appmixer to cancel the message by throwing the context.CancelError(reason) error object. This instructs Appmixer not to apply the auto-retry mechanism and the message will simply be discarded.
If a tick function throws an exception, the exception will be logged (and visible in Insights). Appmixer will not apply the auto-retry mechanism since it assumes the developer handles the error manually inside the component code next time the tick() function is executed.
Appmixer won't start a flow if any component in the flow throws an exception in the start function. Such error will be logged and visible in Insights.
Appmixer will stop the flow even when a component in the flow throws an exception in the stop function. Such errors will be logged and visible in Insights.
stop(context)
Called when Appmixer signals the component to stop (when the flow stops). This is the right place to do a graceful shutdown if necessary. Webhook-based trigger components use this place to unregister their webhook URLs with 3rd a party API.
content.query
Object with query parameters, i.e. query string parsed into a JSON object.
content.data
Object with the body parameters of the request.
correlationId
A special ID generated by Appmixer that uniquely identifies the input message which resulted in generating the webhook URL. In other words, if you call context.getWebhookUrl() in the receive() method in a reaction to an input message that arrived on an input port of the webhook component, the correlationId will be part of the returned webhook URL. This allows you to later associate the input message with the HTTP call to the webhook. A common pattern is to store the input message in the context.state object and later use the context.messages.webhook.correlationId to retrieve it back. For example, if you have an input port named myInPort, you can get the correlationId of the input message that just arrived by accessing the context.messages.myInPort.correlationId.
receive(context)
Called whenever there are new messages on input ports that the component is ready to consume. This method must return a promise that when resolved, tells Appmixer that the messages were successfully processed. When rejected, the engine retries to send the messages to the component again later.
tick(context)
Called whenever the polling timer sends a tick. This method is usually used by trigger Components to implement a API polling mechanism or for schedulers.
start(context)
Called when Appmixer signals the component to start (when the flow starts). This method is usually used by trigger components that might schedule an internal timer to generate outgoing messages in regular intervals or to register a webhook URL (context.getWebhookUrl() with a 3rd party API).
{
async receive(context) {
// Emit a message only once per day for this component instance.
const day = (new Date).getDay();
const state = context.state;
if (!state[day]) {
state[day] = true;
await context.saveState(state);
return context.sendJson({ tick: true }, 'out');
}
}
}
{
receive(context) {
// getAttachment() is an example function that retrieves a file from an API
return getAttachment(context.auth, context.messages.attachment.content.id)
.then((file) => {
return context.saveFile(file.name, file.mimeType, Buffer.from(file.data, 'base64'));
})
.then((result) => {
return context.sendJson({ fileId: result.fileId }, 'file');
});
}
}
{
receive(context) {
return context.loadFile(context.messages.file.content.fileId)
.then((fileContent) => {
// uploadFileToAPI() is some function that uploads a file to an API
return uploadFileToAPI(context.auth, content.messages.file.content.fileName, fileContent);
});
}
}
module.exports = {
async receive(context) {
if (context.messages.webhook) {
// Webhook URL received data.
await context.sendJson(context.messages.webhook.content.data, 'myOutPort');
// Send response to the webhook HTTP call.
// Note: you can also skip sending response immediately and send it
// in other connected components in the flow.
// If context.response() is not called, the engine waits for the first component
// that sends the response (in the same "session", i.e. the same "message flow").
return context.response('<myresponse></myresponse>', 200, { 'Content-Type': 'text/xml' });
}
// Otherwise, normal input port received data.
const input = context.messages.myInPort.content;
// The webhook URL. Do something with it (send to your API, send to other connected,
// components, send to your backend, ...)
const url = context.getWebhookUrl();
}
};
content.method
HTTP method of the request.
content.hostname
Hostname of the Appmixer API.
content.headers
HTTP headers of the request.
module.exports = {
async receive(context) {
const { data } = await context.httpRequest({
url: "https://some-url.com/api",
method: "POST",
data: {
username: "someuser",
password: "somepass",
},
headers: { Authentication: "some"}
});
// it is also possible to execute dedicated http methods
// see here https://axios-http.com/docs/api_intro
// for example
// context.httpRequest.get(url[, config])
const { data } = await context.httpRequest.get("https://url", { params: { name: "some" }, headers: {}});
// context.httpRequest.post(url[, data[, config]])
const { data } = await context.httpRequest.post("https://url", { username: "some" }, headers: {});
return context.response(data);
}
}
module.exports = {
async receive(context) {
// whenever there is an item added/updated/removed from the data
// store, this component will get triggered with data on the
// context.messages.webhook.content
const data = context.messages.webhook.content.data.currentValue;
if (context.messages.webhook.content.data.type === 'insert') {
await context.sendJson({
key: data.key,
storeId: data.storeId,
value: data.value,
updatedAt: data.updatedAt,
createdAt: data.createdAt
}, 'item');
}
return context.response('ok');
},
async start(context) {
// register without specifying 'events'.
await context.store.registerWebhook(context.properties.storeId);
},
async stop(context) {
await context.store.unregisterWebhook(context.properties.storeId);
}
};
module.exports = {
async receive(context) {
const data = context.messages.webhook.content.data.currentValue;
await context.sendJson({
key: data.key,
storeId: data.storeId,
value: data.value,
updatedAt: data.updatedAt,
createdAt: data.createdAt
}, 'item');
return context.response('ok');
},
async start(context) {
// register only the 'insert' events on the data store.
await context.store.registerWebhook(context.properties.storeId, ['insert']);
},
async stop(context) {
await context.store.unregisterWebhook(context.properties.storeId);
}
};
'use strict';
module.exports = {
receive(context) {
const code = `
function sum(a, b) {
return a + b;
}
sum(parseInt($data.number), 100);
`;
let sum = 0;
// You can call the context.evalJavascript multiple times in receive()
for (let i = 0; i < 3; i++) {
const result = context.evalJavaScript(code, context.messages.webhook.content.data);
sum = sum + result;
}
return context.response({ result: sum });
}
};
/**
* Example of context.CancelError
*/
module.exports = {
async receive(context) {
let data = context.messages.in.content;
try {
// In this component is trying to create a record in a 3rd party
// system.
const resp = await someAPI.createSomething(data);
await context.sendJson(resp, 'out');
} catch (err) {
// And there might be a unique constraint, let's say an email
// address. And the 3rd party API will return an error with a
// message saying that this record cannot be created.
if (err.message === 'duplicate record') {
// In this case, we can tell Appmixer to cancel the message.
// Because next attempt would fail again with the same result.
throw new context.CancelError(err.message);
}
// In case of any other error, rethrow the exception. Appmixer will
// then try to process it again.
throw err;
}
}
};
Context
Input/Output message(s)
context.messages
correlationId is a "session ID" that associates all the messages in one pass through the flow. Every time a trigger component sends a message to the flow (e.g. webhook, timer, ...) and the message does not have a correlation ID yet, the Appmixer engine assigns a new correlation ID to the message. This correlation ID is then copied to all the messages that were generated as a reaction to the original trigger message.
async context.sendJson(messageContent, outPort)
async context.sendArray(arrayOfObjects, outPort)
Authentication
context.auth
Backoffice configuration
context.config
Properties
context.properties
Component State
context.state
The context.state object should not be used to store large amounts of data. The state is loaded with each received message on a component input port. The maximum limit is 16MB but storing such large objects will heavily slow down the processing of the component input messages.
async context.loadState()
async context.saveState(object)
async context.stateSet(key, value)
async context.stateGet(key)
async context.stateUnset(key)
async context.stateClear()
async context.stateAddToSet(key, value)
async context.stateRemoveFromSet(key, value)
async context.stateInc(key, value = 1, returnOriginal = false)
Flow State
async context.flow.loadState()
async context.flow.stateSet(key, value)
async context.flow.stateGet(key)
async context.flow.stateUnset(key)
async context.flow.stateClear()
async context.flow.stateAddToSet(key, value)
async context.flow.stateRemoveFromSet(key, value)
async context.flow.stateInc(key, value = 1, returnOriginal = false)
Note: The context.getWebhookUrl() is only available if you set webhook: true in your component manifest file (component.json). This tells Appmixer that this is a "webhook"-type of component.
Authentication UI dialog for the above auth.js definition
API section
// or any library you want to perform API requests
const request = require('request-promise');
module.exports = {
definition: {
// ...
// requestProfileInfo can be defined as a function. In this case, you
// can do whatever you need in here and return object with user's
// profile information (in promise)
requestProfileInfo: async context => {
// curl https://mydomain.freshdesk.com/api/v2/agents/me \
// -u myApiKey:X'
return request({
method: 'GET',
url: `https://${context.domain}.acme.com/api/v2/agents/me`,
auth: {
user: context.apiKey // 'context' will be explained later
},
json: true
});
},
// or you can specify it as an object. In this case, the object follows
// the 'request' (https://www.npmjs.com/package/request) javascript library
// options.
requestProfileInfo: {
method: 'GET',
url: 'https://acme.com/get-some-records/app_id={{appId}}',
headers: {
'Authorization': 'Basic {{apiKey}}' // {{apiKey}} explained later
}
},
// and finally, if a string is used, it is to specify just the URL.
// In this case, Appmixer will perform GET request to that URL.
requestProfileInfo: 'https://acme.com/get-profile-info?apiKey={{apiKey}}'
// Note that if you define 'requestAccessToken' property in an Oauth2 authentication
// module with a string that contains a URL, then a POST request will be
// sent to that URL. In other words, what will happen, when a property
// is defined as a string, depends on the context (Oauth vs ApiKey ...).
}
}
module.exports = {
type: 'apiKey',
definition: {
tokenType: 'authentication-token',
auth: {
domain: {
type: 'text',
name: 'Domain',
tooltip: 'Your Freshdesk subdomain - e.g. if the domain is <i>https://example.freshdesk.com</i> just type <b>example</b> inside this field'
},
apiKey: {
type: 'text',
name: 'API Key',
tooltip: 'Log into your Freshdesk account and find <i>Your API Key</i> in Profile settings page.'
}
},
accountNameFromProfileInfo: 'contact.email',
requestProfileInfo: async context => {
// curl https://mydomain.freshdesk.com/api/v2/agents/me \
// -u myApiKey:X'
return context.httpRequest({
method: 'GET',
url: `https://${context.domain}.freshdesk.com/api/v2/agents/me`,
auth: {
user: context.apiKey,
password: 'X'
},
json: true
});
},
validate: async context => {
// curl https://mydomain.freshdesk.com/api/v2/agents/me \
// -u myApiKey:X'
const credentials = `${context.apiKey}:X`;
const encoded = (new Buffer(credentials)).toString('base64');
await context.httpRequest({
method: 'GET',
url: `https://${context.domain}.freshdesk.com/api/v2/agents/me`,
headers: {
'Authorization': `Basic ${encoded}`
}
});
// if the request doesn't fail, return true (exception will be captured in caller)
return true;
}
}
};
{
contact: {
email: 'appmixer@example.com',
name: 'Appmixer example',
// More properties here...
}
// There can be more properties here as well...
}
'use strict';
module.exports = {
type: 'apiKey',
definition: {
tokenType: 'apiKey',
accountNameFromProfileInfo: 'appId',
auth: {
appId: {
type: 'text',
name: ' APP ID',
tooltip: 'Log into your account and find Api key.'
},
apiKey: {
type: 'text',
name: 'REST API Key',
tooltip: 'Found directly next to your App ID.'
},
cert: {
// just to show, that a 'textarea' input is supported as well
type: 'textarea',
name: 'TLS CA',
tooltip: 'Paste text content of <code>.crt</code> file'
}
},
// In the validate request we need the appId and apiKey specified by the user.
// All properties defined in the previous 'auth' object will be
// available in the validate call. Just use {{whatever-key-from-auth-object}}
// anywhere in the next object. Appmixer will replace these with the
// correct values.
validate: {
method: 'GET',
url: 'https://acme.com/get-some-records/app_id={{appId}}',
headers: {
'Authorization': 'Basic {{apiKey}}'
}
}
}
};
validate: {
'method': 'GET',
'uri': 'https://api.apify.com/v2/users/{{apiUserId}}?token={{apiToken}}'
},
validateErrCallback: err => {
if (err?.someNestedObject?.message) {
throw new Error(err.someNestedObject.message); // message for the UI
}
throw err;
}
'use strict';
module.exports = {
type: 'pwd',
definition: {
// As opposed to the 'apiKey' module, the 'auth' property inside the
// definition object is optional for the 'pwd' type. If omitted, it will
// have the following structure. If you want to change name of the field,
// change the content of the tooltip or add another field, you can do
// that here.
auth: {
username: {
type: 'text',
name: 'Username',
tooltip: 'Username'
},
password: {
type: 'password',
name: 'Password',
tooltip: 'Password'
}
},
// the only mandatory property for the 'pwd' authentication type
validate: async context => {
const { username, password } = context
const { data } = await context.httpRequest.post(
// the URL for the username/password authentication
'https://service-server-api-url/auth',
{ username, password }
);
// verify authentication works
if (!data.isValid) {
throw new Error("Invalid username/password combination.");
}
// if the API does not return a token for exchange, then return here.
// in such case, the components using this authentication module
// will have to use the username/password to perform each request.
// There will be properties context.auth.username and
// context.auth.password available in the context object in a component.
// if the API returns a token and expiration then return them using
// the following way - object with 'token' and 'expires' properties.
const { token, expiresIn } = data;
// the token and expiration (if provided) will be available in a
// component's context object under context.auth.token and
// context.auth.expires
return {
token,
// expires can be a Date - token expiration date (timestamp),
// or number/string with seconds representing a token lifetime.
// Appmixer will use this to request a new token (using stored
// username and password) when the current one is about to expire
expires: expiresIn
};
// if the API returns a token that does not expire, just return
// that token
// return { token };
}
}
};
'use strict';
const OAuth = require('oauth').OAuth;
const Promise = require('bluebird');
module.exports = {
type: 'oauth',
// In this example, 'definition' property is defined as a function.
definition: context => {
let trelloOauth = Promise.promisifyAll(new OAuth(
'https://trello.com/1/OAuthGetRequestToken',
'https://trello.com/1/OAuthGetAccessToken',
context.consumerKey,
context.consumerSecret,
'1.0',
context.callbackUrl,
'HMAC-SHA1'
), { multiArgs: true });
return {
accountNameFromProfileInfo: 'id',
authUrl: context => {
return 'https://trello.com/1/OAuthAuthorizeToken' +
'?oauth_token=' + context.requestToken +
'&name=AppMixer' +
'&scope=read,write,account' +
'&expiration=never';
},
requestRequestToken: () => {
return trelloOauth.getOAuthRequestTokenAsync()
.then(result => {
return {
requestToken: result[0],
requestTokenSecret: result[1]
};
});
},
requestAccessToken: context => {
return trelloOauth.getOAuthAccessTokenAsync(
context.requestToken,
context.requestTokenSecret,
context.oauthVerifier
).then(result => {
return {
accessToken: result[0],
accessTokenSecret: result[1]
};
});
},
requestProfileInfo: context => {
return trelloOauth.getProtectedResourceAsync(
'https://api.trello.com/1/members/me',
'GET',
context.accessToken,
context.accessTokenSecret
).then(result => {
if (result[1].statusCode !== 200) {
throw new Error(result[1].statusMessage);
}
result = JSON.parse(result[0]);
// get rid of limits for now
// may and will contain keys with dots - mongo doesn't like it
delete result.limits;
return result;
});
},
validateAccessToken: context => {
return trelloOauth.getProtectedResourceAsync(
'https://api.trello.com/1/tokens/' + context.accessToken,
'GET',
context.accessToken,
context.accessTokenSecret
).then(result => {
if (result[1].statusCode === 401) {
throw new context.InvalidTokenError(result[1].statusMessage);
}
if (result[1].statusCode !== 200) {
throw new Error(result[1].statusMessage);
}
result = JSON.parse(result[0]);
if (result['dateExpires'] === null) {
return;
}
throw new context.InvalidTokenError('Invalid token.');
});
}
};
}
};
'use strict';
const request = require('request-promise');
module.exports = {
type: 'oauth2',
// function definition is used in this case because of the 'profileInfo'
// property that we want to locally store and reference between
// the 'requestAccessToken' and 'requestProfileInfo' functions.
definition: () => {
let profileInfo;
return {
accountNameFromProfileInfo: context => {
return context.profileInfo['email'] || context.profileInfo['id'].toString();
},
authUrl: 'https://app.asana.com/-/oauth_authorize',
requestAccessToken: context => {
// don't put params into post body, won't work, have to be in query
let tokenUrl = 'https://app.asana.com/-/oauth_token?' +
'grant_type=authorization_code&code=' + context.authorizationCode +
'&redirect_uri=' + context.callbackUrl +
'&client_id=' + context.clientId +
'&client_secret=' + context.clientSecret;
return request({
method: 'POST',
url: tokenUrl,
json: true
}).then(result => {
profileInfo = result['data'];
let newDate = new Date();
newDate.setTime(newDate.getTime() + (result['expires_in'] * 1000));
return {
accessToken: result['access_token'],
refreshToken: result['refresh_token'],
accessTokenExpDate: newDate
};
});
},
requestProfileInfo: () => {
return profileInfo;
},
refreshAccessToken: context => {
// don't put params into post body, won't work, have to be in query
let tokenUrl = 'https://app.asana.com/-/oauth_token?' +
'grant_type=refresh_token&refresh_token=' + context.refreshToken +
'&redirect_uri=' + context.callbackUrl +
'&client_id=' + context.clientId +
'&client_secret=' + context.clientSecret;
return request({
method: 'POST',
url: tokenUrl,
json: true
}).then(result => {
profileInfo = result['data'];
let newDate = new Date();
newDate.setTime(newDate.getTime() + (result['expires_in'] * 1000));
return {
accessToken: result['access_token'],
accessTokenExpDate: newDate,
// Some services return a new refresh token, if so, it can
// be returned here and Appmixer will replace the old one.
refreshToken: result['refresh_token']
};
});
},
validateAccessToken: {
method: 'GET',
url: 'https://app.asana.com/api/1.0/users/me',
auth: {
bearer: '{{accessToken}}'
}
}
};
}
};
module.exports = {
type: 'oauth2',
definition: () => {
// telling Appmixer it cannot refresh it sooner than 30 seconds
// before access token expiration
refreshBeforeExp: 30,
refreshBeforeExpUnits: 'seconds', // 'minutes' by default
// the rest is business as usual
authUrl: 'https://www.acme.com/oaut2/authorize'
...
}
}
module.exports = {
type: 'pwd',
definition: {
// the only mandatory property for the 'pwd' authentication type
validate: async context => {
const { username, password } = context;
const { data } = await context.httpRequest.post(
// the URL for the username/password authentication
'https://service-server-api-url/auth',
{ username, password }
);
// verify authentication works
if (!data.isValid) {
throw new Error("Invalid username/password combination.");
}
return true;
}
}
};
'use strict';
const GoogleApi = require('googleapis');
const Promise = require('bluebird');
module.exports = {
type: 'oauth2',
definition: initData => {
return {
// The auth.js 'definition' object can have an optional
// 'connectAccountButton' property, which has to contain the 'image'.
connectAccountButton: { image: 'data:image/png;base64,iVBORw0KGgoAAAANSUhEUgAAAX4AAABcCAYAAABpyd51AAAAAXNSR0IArs4c6QAAHvtJREFUeAHtXQmYFNW1/qvXWRnWYQYHBMdRhHEQkEXDaCCIGty+MRHUCCbikodxS4TkkfceWdSEGI1PeZFgVBQjfu/Bp4njU8HlgYphBJR9G0dkGVaZjZnptd653V3dVdVV001P90w3nPt91V1113P/e+vcc8899xbAjhFgBBgBRoARYAQYAUaAEWAEGAFGgBFgBBgBRoARYAQYAUaAEWAEMhEBKU6i440XZ3YcjRFgBBgBRiBFCMix8o3F0K2UgSV0ibix4scqj8MZAUaAEWAEUoOAYPji8ocun1kxZoxc+FtH3fH24B6DLv6dZHFMkCyW/maZsD8jwAgwAoxA9yMg+/2HZb/7o6bDm3++4b8mfkUUCeYfNQMwY/yC6Q8pGHLpOkmy9Or+6jAFjAAjwAgwAvEiIMv+hhP7Ph37+aIpX1KaKMnfZpKRLX/gyAWC6Y89x4qHvutAvx5C48PODIGjTX488ZYb676MwtgsCfszAowAI5ASBIh39ywoHvF7yvxmuqKYkhE3F7MAh8WS9S1BETN9gUJsJwZGgRU7RoARYATSAYEQDxdMKUqzY8r4Jau1UBDPkn78TchYxY8Vx2QEGIHUIhDi4afE+M1UQKmllHNnBBgBRoARSCYCgpfHLfEbzQSSSQznxQgwAowAI5B6BAQvj4vxC1KiIqaePi6BEWAEGAFGIMkIGPJyluyTjDJnxwgwAoxAuiPAjD/dW4jpYwQYAUYgyQgw408yoJwdI8AIMALpjgAz/nRvIaaPEWAEGIEkI8CMP8mAcnaMACPACKQ7Asz4072FmD5GgBFgBJKMADP+JAPK2TECjAAjkO4IMONP9xZi+hgBRoARSDICzPiTDChnxwgwAoxAuiPAjD/dW4jpYwQYAUYgyQgw408yoJwdI8AIMALpjgAz/nRvIaaPEWAEGIEkI8CMP8mAcnaMACPACKQ7Asz4072FmD5GgBFgBJKMQNp/cMV3uB7umk/h2b4Z3j27IDecgL+5CbBIsPTqA0vvPrAWFsExehwcYy+h575JhoizYwQYAUbg9EIgLRm/LMtwfbgS7W+ugOeLDaaI++sPQFzerZvg+uDdQDzb0OHImT4DzgkTTdNxACPACDACZzICacf43ev/iZZF/wnfl7sTahfvjq1omj8XtrKhyL3rJ3CMHJNQPpyIEWAEGIHTFYG00fHLbjean3kcjXN/kjDTVzeSd/cOND48GydfeBay368O4ntGgBFgBM5oBNJC4vc3NaLxF/fBu3N70huj9ZXn4a3bg4JfP570vDlDRoARYAQyEYFuZ/z+E9+gYc5s+OpqU4Ofw4ns629KTd6cKyPACDACGYhAtzJ+2eNB4388nFKmX/CbP5LFz9gMbBommRGID4ExI+245TwLPF7AbpOx5n03VhyNLy3HOnUE8gfY8PNKK+yEN4iDHtvqxoIt8qln1I0pupXxtyz8I7zbNsdVfdt5F8Ax7lsQVjuWXr0Bsvzxk2mnd9d2uNd9Au/2Ldp8SNI/3Zn+ZHrhp1xgxVm9JNH/AOqIza1+1H3lwxsbvNhyUgtJ4KmfDUt+4ERJNj35ZLzzRhsW7MicTnvzNVmYVWENVKVhnxtzXvYgRXNFA/CS75WM+gy7wI6KwVKYuOyvPcT4U9em+f2suONSG0YWWZCl4iAnjvmwfqsXi7ec3mtqhWdZMb40UnGvw0eMX4wCmeMi1HcxzW4y0xTmmrGcbdiFyLv7ftiHVxhGddJgkHvbLHjIpLNl0VPBgeQ0Z/rl5Xb821QH+gb5nwaXvn0sGDLQhkmVTuzf6sK9b3jRrIoxeZw9yPSFn1XClZfbiPF7VDHS+NZhxTUhpi+o7DnQjqv6ebAwU6XbJNXH7dO2mZD8U+Mk3HmjE9PPN+h4VGDfAgvKSu2YfoUPK/7uwsLa1A0+qalfnLnq8G3X4R9nLt0arVsYv9/nRcvTj8WsePb0mcj90Y8hWWIbH4mBoeeTi3Dyr38ObuY6TdU7Yyqz8DuaZsbjSoY7sayHhKkkFSvOqdwo/7aIpKh4Zc6/jJZI1TKHbFNK9fWRMP/uHFT2ockcMReb1Y/nnmrDq0YzOdM8kxVgwYL7sjE6L478sq2ompaDc1e24sGa05T5xwFDOkeJzVFTQf2Jd+AsX0092XxKmH3TbcibNTsupq+QKFltyBO2+6cp00c/O35pwPRbjosptgeb9vmFtkfjsgY6sGRyZKBYvdmLBlWM9ev0KVSB6XZLou0nX0UYibfRj23qyqQbvbHoiaM+BTnBTGyBJpSQZ4+VaWrC58wyYvoyqRW9+HSnF4daIu2iUFBxRRaqcpUn/k8nBLpF4pfrl8J54Qk6aqENJ1cMIV29Vg7NuqYqwMDTCah0oGXqOBrYNIT4sezFNiw+qPJ0WPDID7MxnqRExZVcaEPpKl9AF96814MbH/WgOFdCy0lZowZS4qfz/8K/tWKhQ0IxZNS705nS+GiLVR/9hMat94ivmE7Fyi914MpCbRbtRzyY/5wbNSrv8nIHHrnOruqjFtx6lRUrlmegLkRVr9PxtssZv+xpgHzszQCWtv7t6PHDnTj55tnw7C4I+El5+cidde/piHXS63Rok1vL9EUJbj/mLXVh+f1O9FRKpKn3BHqoFdJxrgU3D7PAEQo7RgvB1YYLgRKqKu2YONiCoJAp49B+H17+wIvWs0nXXighwHfb/FhBi3nKOkLxACumnBVUHzmIOb9fQwNOTyseoLWEoaR2CjhaVN68iXTzCSwCjhlqw7D8EPFeGe9u9KE+9JiysmmguXmENYxZ8zekw9bpr8uJrkuILje9Ucf2eAnTEFGhv8qRNpyjvG1E9wqiW2BmXB/CfowVTq+EUrEIH3YSLhprg7uFPJp9eNVkUd7bRuG5VsyZTGUqmFO/WP+FB4tN0oSLMLiZcZlCeCiQ9Gv3EdOv1cXdssWNx2nBd/7YyAyz5yASOhAUOnTRA4+TCZcJ51hRlBPsGx6ic8cuH14K4WOURu0nFpqnU9sMK7SAujk5GceP+vHBpx6sijkbTKyPq8uPdZ/f04LpF1OfDdFnI/oO1/vw+movarpRcNG1aKxqdD5cPrIc8LvCGUlZfuTeWIf2tYVoX12M7O/fCkueVq4NRz7Db5yR9ymIhJmW5qQPOxplXEwwen0SskCMOSQplg6zY9YVkWb37nOh+mVdRsLyZyZZ/iijQwj3Mlo0rrzIjmM0qwgvLNN6zfotLig2VVO+7cQMlYXJ6EFeDDnfFrQ6UrVf2WAbpozx4KEXohmIKpruVsKM650YFsZBhqOuFYtDL3iqys6nReRZV6h0LEfIXLJWLXpb8ECVE0MUaodLqH5OGz7zalU4tcexrW2odpvUB2Q1c4WT2i3aVVziRMDMgXDfvCOCuzpmxaQsVOeRxY3ak/IUC69XkSXUvbTmowyWmihGD7lkKFAcGrBD4evfN7ekWrOW1u+I8Yff4GwLhlI/qtUxufKRDvxqih0kE+gcMXGis+o7Piz7bxcW741WIQUTWDDvtixMGqilTYSVDQTGj3Lgtp1k3LBca9wQLqwTfTycR4c3Eh6YloVrS6O16cL4YvxYB9Z/0I45a83V3R1m38nACAfoZEbxJpcbPo6KKlHbZV96BLbB1NmrpkeFG3l89mXnpo90uCdGDYnqdUZFpY1fk0v7EhSNcmJBo1HnkTFvYasx3ToeH2WR0NOG5XeqZgv6XOhF7qv2oxdaCJiK01uYlBHTN3N5xXY8eo0P096Mvy3bBANRScFqfpKqsptrfdhP854SpSJ9rBgDT0TNQTMg4jURV2jFZApfpfiQVFqs3NO/97gXq0OEm9VH10yq1HHcRjH9SJqetObz+FV+3Pp2/JhHUtOdz4d/dGSzftKLexb7UaKMkx45SrItHePEUyrhQ5O/8kAWT9NvzcHgv7diXlR5UlwLzSXnO/H63RbctUgnXHSyjyskmv9LmEeL8pNU6tbouBJGT8zGktx2zCQ1bFc787cyRZTILYpsGF2Ao6ICUnZoNSs6WOMzd1m75jmRh7fn5sBOJo2Z4lZt9+HhUVaV9BzsPO+M8WF1jQfL1tOUWs0JE6jYnO8ZMH1S52w76EchSSp9dbMAEiTjcvv3edFks2BYsVYC6jvcjkpi/GviyiWxSJ0v24eN9TJKFMnXasHYfkBNSJ0zldZQtC+SFROHSlgVUquUn6uVvg/RQKKoxgxr1CpjJ6kDepCqp2ygFq+GIz4cJT7hoZ+9hokjnqLebTRNLCO1nNoVldswhhi/Wj+vDlff51P5pCWMOFLTHYw8Gd7Vk6rFdEZBM4hHDZj+flok/oZwrdDVd/x1WZi6S8yOIkVVXZ8VZV3kbfFh2wEZhaRaKlIJBugTLVykqo8rFFZOdkYx/XYyRKindu1FQkNP1TtUMtaJmWtbsaSLLbW0/VWhPJX/rgOmuUv5o03DUhHQQIub/RQdaCoKSHaetDD727VWzL9Ey21teVZMmiguoKXRh3UbPHh+bUT3HTcZZDV0uW4R7xhNl6fRdDno3HjgtmxcazC9Ni9DuwBdTNP456Y5ImoIetmHEmdZE1Mfa16CeUjyyv54jx/XFiu4S7iQmDmIwQESLj1Hy5wFPUOHU9wdQdxGa2aWMjZuizG9p6nLnBeCUuAjD+ZifJiRyfifl9rxqooJGtfdj5cWt2FJaGAqJl3Li1X2yOBE0vRFhHlNHJgLlY2oRZhRuGWYzCWNSdH5Vl1F+0/Ufj6i9fkIrfln2/HirQ7VYGPBjClWVCuzQho4bh2uxfsQ7Ve5lfarBJ0Ld5Ip6fTSyGDXt8KBqnfbsELglpI+rq6QFfeo1jhESN26dswKS/U0GyDji4j6TMIUstRbkugMTF30KdxrETyFhAlH9TaaJ3X0Nw9LQcgJYvyZ5taQXvCxNV6YzXfyCsQAkIWlNJt5xMD0s6P6jim3RhiyiEiLeA+Emb7wkPGnl9uwLSbjEXGDbjfRq7Y6qq/1gtTbGncK2WnSxXpIZtk1O3wazAcKxi8cKanLwwrtoFfAm5h9eeCRFmT7R5iQWHz/OJbIHM5GCi2shz2QF8eEeNvK9jDTFynraYPetkQxJ44fZvqUV8thnTRPg8jTs3OwfHY2Xou6cvDGbCdor2HIWTBxiAoL8v30DS2twupszkqFiQeT9aWF89JQDuUVNtWgQJ7UR+8JM/1gpMWvtWGTpr4WVNK6i3Cp6OPBUoO/pbRYXaT2aPSomL4IkPHImx5NXyo6T6sKVCdP1X3XM/5U1SSBfE9G1pgTSN19SVatcWHq461YscmHFjMySIU1njZ7vXGLomw1ixjx16th6sjm32jK3nYKKsnoXaQyth7umgE3qWUf9WKXaoTK6m8NMKNyUvMY8H2AGOLkAYQt/Q8KS+xA+0Gy5ohAfsp3KhJOIa2MbQlinmPXMuqsfAmKUVWAALLGGVQgoSft2hU7d7UX7TsgQWSAMliRhcug8CBAqWm94HUDK6NaUlvWqfsYGROMCKUbPUTLsuo2Gi3ektXU5+oMgMKzgulS0cfVDTGWmLjG0RhWRaq1m2lACF/najEFWY11uBygyTA5D+rBPDk5xsrFRmabntAcVB/XfVjvk9LnHtm6BkhpaUnOnKbcC99spwuoJInosuE2jD2XrCl0/S5vMG3gosW8mXFMJfWLo20Gm3KSUQt9OcnIM948Ei9bxrp9MioUFQIxdDLMQG/V8QUNX3lwsK8dwwIjgYSRZDaLOq2O/MvdWoYUL92djUcq8MScjkPYiHmfTTmpV+p0UaLKCQ9WtNArBJXwQEl9+Juo2MKD/CnRkPCASYxRDB7kp2+/ZpM+uqdBK1zkhVS6+vSp6uPhatEaw+zrwk+mN5oJimms5AXEarPklaTk5DzLlPHLzeuVWF3y3zsvgxm/CqE1pEsWl3BT6Yyeuyq1UmjJCHtci3kusi8XOmvFtWln3Ir3Gfv/4S4fZoUP5yLGPtoG+uRz2O34pwefXEQ22+cHMSwabMNMWtCOOBmfbdMypEhYet7VHvEH1BJq01ANk2rw4a8rXegT4iRuWpCeMsmBIp0AYlS7lsPm9v36+OHBQxewZ78xnsokQxcdadnHCavwGKcnOEXPXc74pbxyyC2fG1Znd8M+DPK0IcceG4ZLy2L3rKNNMnaTTtLICXNOZTu8UXja+dGGnPnX2FBAzNhDrWZvpxMBSbepV8VUkxqo+ms/qmmBLPyy0gJqPIt5Tt25PfEridIOrZQQVE+M/9jVZNkUyn30ZU466E4pyo9PaFPXajqr96Hzg8jZCm2o6hkZSNHixbtdbL2hUJfw/7GglB7uSw4bbjzbhQV7lRxJrVKjlhAkDJ9AjN/oFSa1UVjap+R5AXWZN2ojmJKz+l+tIVL7n1tC+BpuQFTHitx3eR+nNR1hEdeh9SCdqHs8QmKX3HU94+/5LciHlmoqRycs4+W2c7Go9Wzcvfst/GjYjZpwo4fffD/cFY2CA37PvucyZfz9SS9pERsIMsTlkwhVGZY2iWiauvcxYPyB6uwVA4IjsqGIPM0kJnX19dLQgEEkrdIOSnYhBGhj3HayTagUm8wFLGGmT5YvR2i3rohGi8ARm39idMSxgges0Y7evQlYWok8u9Op6xyi43LaybtAv+kvHhppT5t6iIDJ5i6x61i7Y5l245qYEgV09wZ9VK9rbychULhU93FXuygnwlcO7XDjJ4pFUoCC9PhRz0O7hCKp8EbIEklKIdfit2FO81j8uXUY7WeUsHTH39Hi7rxY5CV749X0Epq5saWqt9YsUhr5Nx/yaw5Xg9WGeytNmo92JfbT0W4mMamjrd2pnR31He5QWWSEYtJmJO1Lqc7hdL+X8dHeEEai+6i6V91O5cGHj2gtQO2CB6wBe3T4quOY3Xf/rEtGNRkRqF3WQCeenWj2/kjoYRYkdpQLJX/YWXDTpOjIVZNpR284Dt3QhreVIcnlw61aWooq7LRZTufI5PMGZS0mFLSJ9sAIl+o+vpZm22pXVOHEnfqXUUSgNaKn6bTTeeWRQUKdLtX3JpwjdcVK9p7w9r4yUMAebw/c3nA5PnJHDKCaPSfx9KZXOk1A9edeHKZjC8zcOFoIzShHOyLXHNFSXFaZjVfIJn7qALK0IM6eTwevTb3EgeU/cmim1HRGBnbEYbNdTx+T2K8pwoKH7svCTMpfuFKywX+to129mrSn58M/N/siUmu4C8lYuznywr+/RcucgkjQyaIGFiwdoyTjc401DunPJ9gCB+yV5nacMpmhNaQ+pGOhNK7skiwsv436Xj86MC/U9yaPseOVn2WjTCdlRB5lvKqTzktGZeHZq6hOgdwlzKQP7czW2elvoo8KNYdKr9/igXZ93IpfPJiFm0N9tJi+jrXkx86wOi6QjBarltUGM0h1H6/fqKdPwvQ7czBvpCVsDVVJ39N4jWgeRjusJ11HZtcju575d7mqR8DvKbwJKw9swIKWEXCp58vBtqFzUN5FLun57xtxW8jn1P720KLRovd0PVWVhZNqPZK22Wea+9OrLlxCh68pOmZBfxEx44fE1UFl9q/zYE0H4ZEgOoRtgx+/GKWSB0gymXF7DmZEIp3Rd82kRtvns4PM9CNO6O5VA2stfYVKvRYgInrp6OzVkRRx3+mtUIQEuVQc1uP24q7HXXHpx+MuzDSijAf/5kb17ap1I4orPoTz0J0x5iS0QYuOUwq7LWIQuTgHFao1gDI6emQpXUINFMWQyA5+geZMfz+eed+rPfKBTmebRX30dhpvldlVuEC6WfO/6iMbUt3H/fjDu178hdaCIk7CpKtp09bVQVWXOkTEueg86kxkltqVTvWGd12xOf2r8DfrDYZMX6Hi5R1v4JkvlsIvRyQpJayj/y37fJj7ajvp8sxjXUfWGA7dQqZ57DQKIal/2mIX6JDMuN2xWjqoKrxrMHayVW+34x06nqArXUQijF2qns2cSlqj3E89vR8bj2jxOUSLvppFduLW63WzM7NjGmLV583PTDryKfSBpNT7IG1Eoq2vGk2NUcZqP9rw8cQz7VilkcFoEPlLO3ZrTIOCifQMUdhuPrbYrcWWom6pceGJddEAGDF9sWt2vm6mleo+XrvRFdhkqYZCuY+qIw1sc18zaWMlUQr+u4Xx20g//fCoO2JWZ8mO1zHrvV9i07GdMePubT6IR2qexf0rn8eJVnMgc2l54ZZLT/11j0lAV0WgjUQzf9+K59Z6DD9+oZDRQHrRZa+1Yhp1KmWaLMJa1YdG0nN71O5lGQteoPw3qFQaSqb0v5s++EKfVo049T35BhfPIsFNBi94RFcSjKfhC5GkhnetmvK0X6xKddkKQf+nWTuS8YlOBy7ivUVSf8TRHgCTYxo6qo9I30yHL4md2urcAvmqZhxdVW+xA/h62ji4bBN9zKeDRmug2c37tGP7hifbUW20XEe6/nuepHxIX2+4A53W53ZvctGMRj9oRBCtXtWOH7ziQp2JHb/4OJHo/5GjEiJpxT6BzvTx2O8QIDZZ3vAizW50QkKYCnFM9jqKs9Ct2RMRDk/xjZFySQxKhZMeaTkgyn7vX1OnTHzss78E1Drx1PGCXqWYMGAUhvcuQ++sAtr57sGBlsPYT9f2b2rxcf0Gas6gJGZtK0P24dmw+HpFZT1roh03kx48Ve47jxr19FSVFtTrD+1Lh4DR5hjQhjQn2eLX1fs7d1ib+NAJba6pp8X2yUMtaDwuo6CPhDo6EbXWbkM1qZvCNlWkcrifVA5bUldFzlkgQG0yWZwJRAO3YPR7qI27+0M0xf0sGE4boxrbqH9Q32tsorUkMq1UCxqxG0/CmFILmSnLaKT+luXx4/ODp5aHoGMU9c8jop/2oD1zZAhRG+s17MI+LtbextHhcy5hWUQ4tR/30zlJ2lljbJwSi/H+vDzaOAUx/9TIDlEzj8SyTyzVz0b+ELsbvsLm47tiZrD9RC3EFY/zZe/GyZJ/DzB/W/vQcJIRZJ74vbH6yXU4OCNvmkliryEJKnmOjry9J4dOP6TDs+jrXksU6Taw2VrCHPX+ACrU2+Bnpp888M1zooF4ldIW5rG6NCRwCqfJJvz4CaH+S6eVdsYJOsIfvomLnq7t4+IdTbe261bGb7fa8fiEufiXD3+F2savO9P2UWllWxNaB/wOzm9ugrPhuxhEEsGvv5fV8UaKqFzOPI87b1G+rUqnIt6ei0l0DMFHu2mdhSwQvj3ajiLdZOmLTzWCxJkHGNc44xDgPm6wiN7VrSjUNosm/gr3rf4ttpHKJqlOkuHq8xpKChvw2OQ7kJdlpNlKaokZn1mv0CfwlIqUDLZj+mDlSfdPC1NPRn0kQxeHHxmBNEOA+zjQLYu7+n5Q4MzH4km/xU1lZO+UZDeheDQWXTsdRXS4FLvYCCx4jk79rI1tSXWIFh3vooUpjTVL7Ow5BiPQ7QhwH08DiV/pBQ5S+whLn8sGXIynvniJdP97laCE/ns6e+AOOvphWtl3IWXQ0QwJVTapiejUTzrP/CU6Z37GeBtGllggJCRhKid2Qx89QJ/eI4uialqAY8cIZCYC3Me7Vcdv1GnGFY3A0v5/wMqvPyHJcyU2HN1qFM3Ur39OX9xy3lRUlU5Blo1sN9klhEAznbq48O3OLbolVDAnYgS6CIEzuY+nHeMXbW6RLLjy7AmBq/7kUaw99Dm2kOXPzhN1OOFqQpM7uI2kt7MAvbJ6oDC7D0YVDsd4GjSG9Cjpom7DxTACjAAjkJkIpCXjV0NZnNuPpPcrApfan+8ZAUaAEWAEEkOAVzwTw41TMQKMACOQsQgw48/YpmPCGQFGgBFIDAFm/InhxqkYAUaAEchYBJjxZ2zTMeGMACPACCSGADP+xHDjVIwAI8AIZCwCzPgztumYcEaAEWAEEkOAGX9iuHEqRoARYAQyFgFm/BnbdEw4I8AIMAKJIcCMPzHcOBUjwAgwAhmLADP+jG06JpwRYAQYgcQQYMafGG6cihFgBBiBjEWAGX/GNh0TzggwAoxAYggw408MN07FCDACjEDGIsCMP2ObjglnBBgBRiAxBJjxJ4Ybp2IEGAFGIGMRYMafsU3HhDMCjAAjkBgCzPgTw41TMQKMACOQsQiYMX7Z7/UcE7U62uTP2Mp1NeGMVVcjzuUxAoyAGQIhHi4bhRsxfhHR52k7tkEkeOItNzN/I+R0foLpC6zYMQKMACOQDgiEeLiPaIli/pIBgWIwKBgwbtbF513zh+UWiz3fIA57MQKMACPACKQpArLP07TzHz+98WDN8+uJxEa6NKobqwnd1uYDG9xtJ776uMdZF/WXrNkFFqst2yQuezMCjAAjwAikAQI+j+sbd/OBT3f946dzD218ZSeR1ExXlCrCSOIX5DvoEpJ+H7oK6MqiS8wEzOJTEDtGgBFgBBiBbkRAqHSEZN9Ol5Dyj9NlyPhtFGDkvOR5MhTgon/B+MXsgBl/CBT+YwQYAUYgzRAIrM8STYLxt9AleLjg5VGuI0YuwuyhSwwQLPFHwccejAAjwAikDQKKxC+YvSd0RS3sCmo7YvwiXDgRR7kCHvzDCDACjAAjkJYICEavXGlJIBPFCDACjAAjwAgwAowAI8AIMAKpRuD/AebmxjtTus0OAAAAAElFTkSuQmCC' },
scope: ['profile', 'email'],
accountNameFromProfileInfo: function(context) {
return context.profileInfo.email;
},
...
}