System Configuration
Appmixer offers a variety of system configuration options for advanced use cases, allowing you to finely tune the behavior of its underlying workflow and integration engine. To access and set these configuration options, navigate through the Appmixer Backoffice interface to the "System -> System Configuration" page.
Please be aware that certain configuration changes may not take immediate effect without restarting the Appmixer engine. For customers with a Self-Managed Appmixer installation, restarting the engine can be done at your convenience to apply the new settings. For those with a hosted Appmixer tenant, it's advisable to reach out to our support team at [email protected]. Our team can provide guidance on how to effectively set these configuration options and assist with any necessary engine restarts to ensure your configurations are applied as intended.
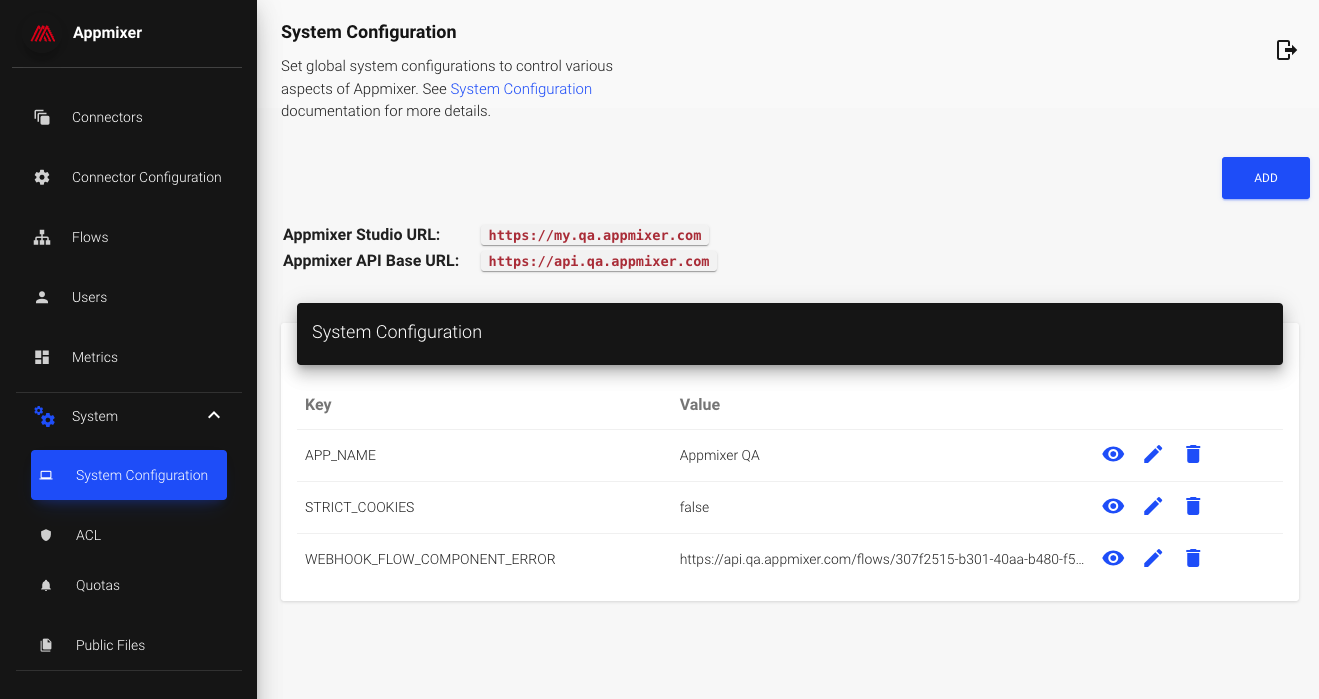
Configuration options
Below is a list of available configuration options, accompanied by a brief explanation for each and their default values. These defaults are used by Appmixer in instances where no specific value is provided:
API_USER_CREATE_SCOPE
By default, the POST /user API is open to enable the sign-in feature for everyone. This option can restrict the access to this endpoint. It takes a list of scopes (comma-separated). If the value is not null, then a JWT token has to be used to call this API. Typically, the value is set to admin.
null
APP_NAME
This will for example appear in the head title of a sign-in popup for Api Key services.
Appmixer
AUTH_HUB_AUTOMATIC
If the auth-hub system plugin is on and this value is true, all OAuth requests for unconfigured services will go through the Authentication Hub. It means that if you install Slack, for example, and do not configure the clientId and clientSecret the engine will use the Appmixer Authentication Hub for Slack authorization.
true
DEFAULT_USER_VENDOR
Vendor assigned to newly created users.
No value
AUTH_POPUP_TIMEOUT_ERR
How many seconds before automatically closing the Connecting Account Failed popup window.
5
BROKER_MESSAGE_ACK_TIMEOUT
Timeout for message processing.
1500000
COMPONENT_FACTORY_TIMEOUT
An attempt to create a component will fail after this timeout.
300000
COMPONENT_RECEIVE_TIMEOUT
A message will be retried if the receive() function does not return within this timeout.
1380000
LIMIT_FLOW_UPDATE_BYTES
The max size in bytes of a flow descriptor to be able to be saved.
2097152
LIMIT_CC_ARCHIVE_MAX_BYTES
Maximum size in bytes for custom components.
10485760
LIMIT_WEBHOOK_BYTES
Maximum payload size in bytes for webhook components.
1048576
WEBHOOK_REQUEST_TIMEOUT
Timeout in milliseconds for webhook component requests.
10000
LIMIT_COMPONENT_STATIC_CALL_MAX_BYTES
Maximum size in bytes of the payload for component static calls.
104857600
PUBLIC_FILES_PREFIX
Public files (needed usually for domain verification) can be served from different paths. Path prefixes have to be separated by :
RETRY_BACKOFF
In case of an error, a message for a Component is rescheduled for another attempt. A back-off strategy is used. This value defines the number of attempts and the number of minutes between them.
DISPATCHER_PREFETCH_COUNT
The maximum number of Rabbit messages being dispatched at the same time.
500
INPUT_QUEUE_PREFETCH_COUNT
The maximum number of outgoing Rabbit messages waiting for aknowledgement at the time in the Input Queue. Subsequent incoming messages will not be sent until pending messages are aknowledged.
300
WEBHOOK_PREFETCH_COUNT
This is for webhooks from Appmixer to registered URLs. This is the amount of webhook messages that will be processing at a time.
50
WEBHOOK_RETRY_COUNT
Number of times that Appmixer will retry sending a webhook. Applies for all webhooks.
20
WEBHOOK_RETRY_INTERVAL
Initial interval in milliseconds for retries. Subsequent retries will take longer (multiplied by an internal factor).
30000
WEBHOOK_RETRY_MAX
Maximum interval in milliseconds between retries.
1800000
WEBHOOK_USER_CREATED
URL that will be called when new user is created (sign-up).
No value
WEBHOOK_FLOW_COMPONENT_ERROR
URL that will be called when a running flow encounters an error.
No value
WEBHOOK_FLOW_COMPONENT_ERROR_INCLUDE_QUOTA
Include quota errors among the errors sent to the registered webhook URL.
false
WEBHOOK_FLOW_COMPONENT_ERROR_INCLUDE_RETRY
Include retry attempts among the errors sent to the registered webhook URL. If false, the error will be sent, when all 30 attempts to process a message fail. If true, every failed attempt will be sent.
false
WEBHOOK_FLOW_STOPPED
URL that will be called when a flow is stopped due to an incompatible module upgrade.
No value
STRICT_COOKIES
If set to true, the engine will reject any incoming HTTP requests that have cookies that don't comply with the HTTP cookies RFC specification.
false
GARBAGE_COLLECTOR_CONTINUITY_SCOPES_TTL
The maximum time in days before continuity scopes are garbage collected. A continuity scope is a state of a flow including data from the flow runtime needed to continue the flow from a certain component onwards. For example, the Plivo.SendSMSAndWaitForReply sends an SMS and waits for an event (webhook) from Plivo that contains an SMS with a reply. The continuity scope contains all the data needed to continue the flow at a later time (when the webhook from Plivo is received which can take hours to days.
100
GC_FILES_ENABLED
If the Garbage collector for files is enabled.
true
GC_FILES_RULES
Rules for the Gargabge collector.
See below.
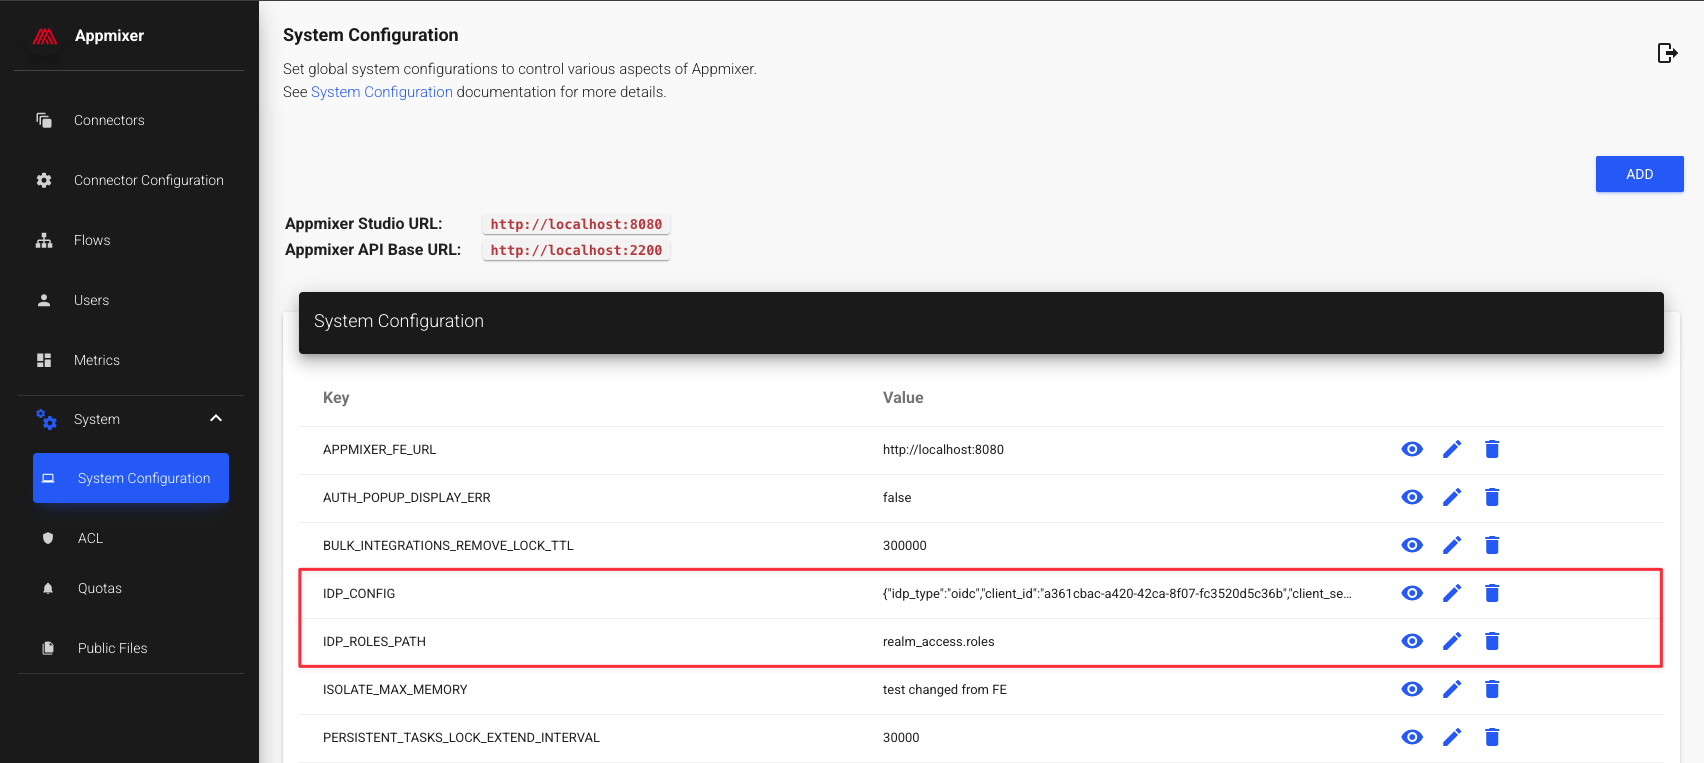
IDP_CONFIG
Identity provider configuration. Please see Configuring Single-Sing-On for more informations.
No value
IDP_ROLES_PATH
Identity provider configuration. Please see Configuring Single-Sing-On for more informations.
No value
IDP_DEFAULT_REDIRECT
Identity provider configuration. Please see Configuring Single-Sing-On for more informations.
No value
GC_FILES_RULES
Configuring Single Sign-On
Configuring Single Sign-On (SSO) for Appmixer allows your users to authenticate using their existing identity provider. Appmixer supports OpenID Connect (OIDC) and SAML standards for seamless integration.
Required Configuration Parameters
To set up SSO, you'll need to gather the following information from your Identity Provider (IdP):
idp_type: This specifies the authentication method. It can be eitheroidcorsaml.authorization_url: This is the URL where users will be redirected to log in via your IdP.client_id: An identifier for your client application.
Appmixer-Specific Parameters
The following parameters are typically not part of a standard IdP configuration and will likely need to be added manually:
domains: A list of domains for which you want to enable SSO. Any user with an email address from a domain listed here will be redirected to your IdP's authentication page. For example:["yourcompany.com", "example.org"]role_mapping: This object maps roles from your IdP to Appmixer's roles. Appmixer currently supportsadminanduserroles. For example, if your IdP uses "administrator" for admins and "member" for users, your mapping might look like:{"admin": "administrator", "user": "member"}
Parameters Based on Authentication Type
You'll also need additional parameters depending on whether you're using SAML or OIDC:
SAML
,certificate: The certificate used to sign SAML requests.reauth_method: What method to use to re-authenticate a user when their session expires. Can be eitherpopuporiframe. While a hidden iframe is the neat way of handling this situation, this method is not allowed by some identity providers, so popup is used instead to ensure wider compatibility. If you are not sure about your provider's policy, you should usepopup.
OIDC
issuer: A unique string that identifies your identity provider.client_secret: A secret identifier for your client application.token_url: The URL where Appmixer can obtain a new OIDC token.metadata_url: A publicly accessible URL provided by your IdP that contains essential information for the authentication process.
Important Considerations
Most of these parameters will be provided when you download the configuration from your Identity Provider. You'll primarily need to manually add the domains and role_mapping fields.
It's crucial that your metadata_url is publicly accessible. This is generally true for cloud-based identity providers like AWS IAM and Google ID. However, if you're self-hosting your IdP, you might need to adjust your network configuration to ensure its public accessibility. Appmixer does not currently support configuring a proxy to access an IdP; this must be handled via your hosting machine's network settings. If you encounter issues, please contact our support center.
Configuration Examples
Once you've gathered all the necessary information, your configuration JSON should resemble one of the following examples:
Applying Your Configuration
Paste your finalized configuration JSON as a new Appmixer System Configuration with the key IDP_CONFIG.
Additional Parameters
handle_roles: Identity Providers (IdPs) may manage either Authentication and Authorization or just Authentication. By default, Appmixer delegates only authentication to the IdP. To allow the IdP to manage authorization as well (importing roles from the IdP), set this variable to true . By doing this, the roles in Appmixer will be ignored for all users who sign in through IdP, meaning some users might not be able to sign in if the proper role isn't granted to them. Please check auto_grant_user_role, below.
auto_grant_user_role: Works in combination with handle_roles. If this is set to true then all users that are allowed to log in will be granted the minimum permissions needed to operate Appmixer. If this is false such users will be denied access until they get the appropriate permissions.
enforce_sso: By default, we do not disable the legacy email access. If you'd rather have users log in exclusively using Single Sign-On, you can do so by setting this variable to true .
disable_legacy_signup : This property is similar to enforce_sso, but only applies to new users. If set to true the option to sign up will be removed, and new users will only be able to access through Single Sign-On, while existing users will retain the ability to sign in with email and password. This is a weaker check than enforce_sso, so if both are active, this check will be ignored.
roles_path: (Only required if handle_roles is true) This is the path within your IdP's authentication response where a user's roles can be found. The value varies between Identity Providers. Refer to the table below for common IdPs:
Keycloak
realm_access.roles
Google ID
<not supported>
Google Workspace
depends on configuration
Amazon IAM
-
SAML
default_redirect: This should be the URL of your login page. It's used as a fallback if an authentication error prevents Appmixer from retrieving a valid redirect URL from the identity provider.
expects_signed_assertions : Whether each single assertion will be signed separately. Defaults to false .
Providers Configuration
Google Workspace
This section explains how to set up Single Sign-On using Google Workspace.
First, log in to your Google Admin control panel
In the menu on the left, select
Apps -> Web and Mobile Apps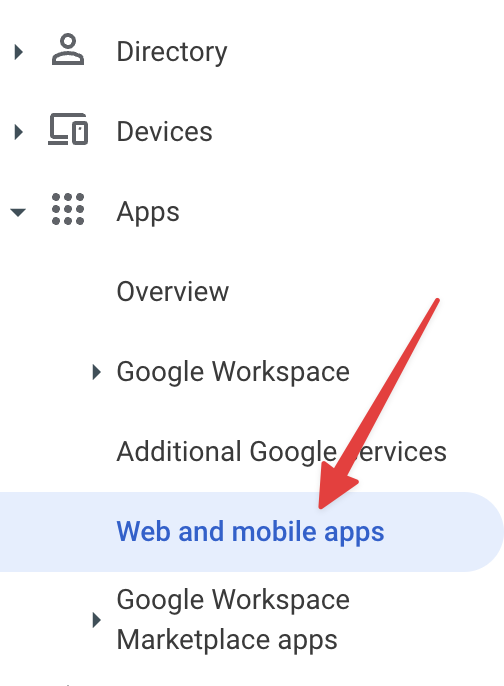
Now, in the new tab, select
Add App -> Add Custom SAML app.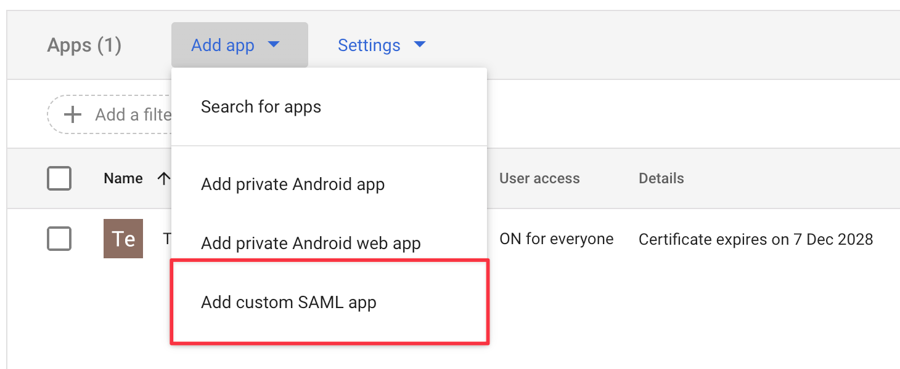
Choose a name for your app and note all the details provided by Google; we will need them later.
On step 3 of the procedure, when prompted to provide the service provider details, please follow the screenshot, replacing
<your-tenant-url>with the actual URL of your application.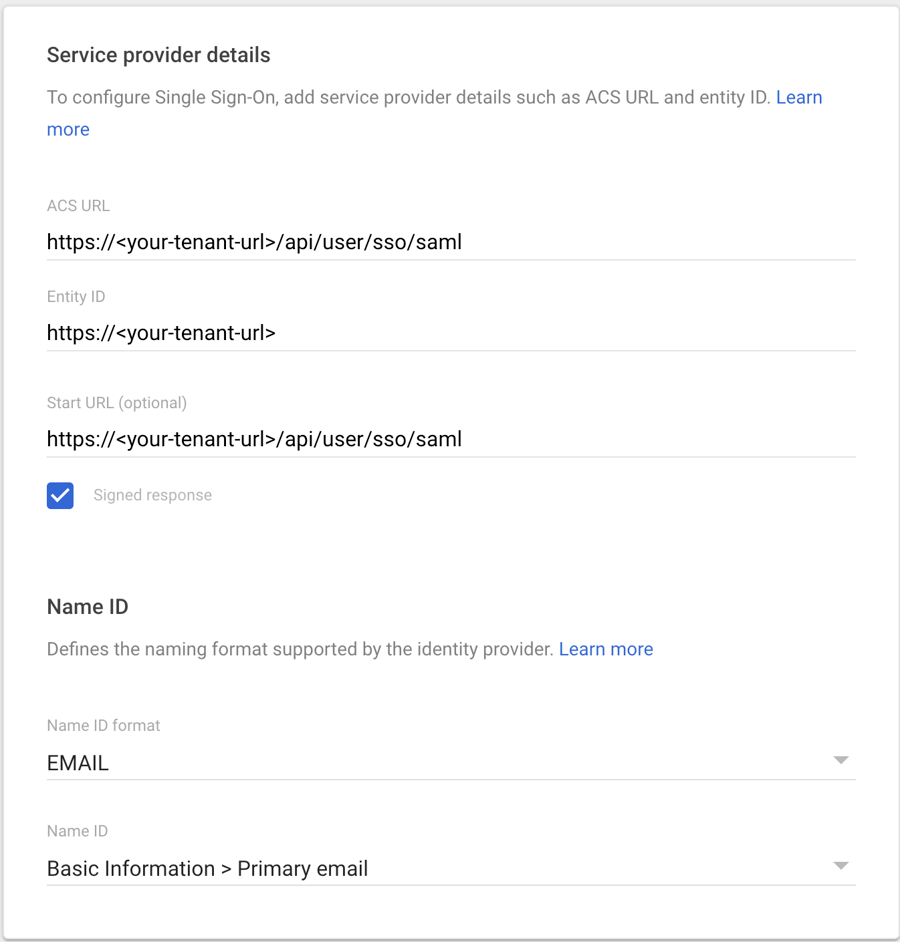
Leave everything blank on the last step
Attribute Mappingfor now.Now that our SAML application is ready, we need to enable it for the users in our tenant. You can do it as you would for any other application (like Gmail, Drive, and so on).
Finally, let's set up the roles needed to log in to Appmixer.
Go to
Directory -> Users -> More options -> Manage custom attributes
On the next page, select
Add Custom Attributeon the top right.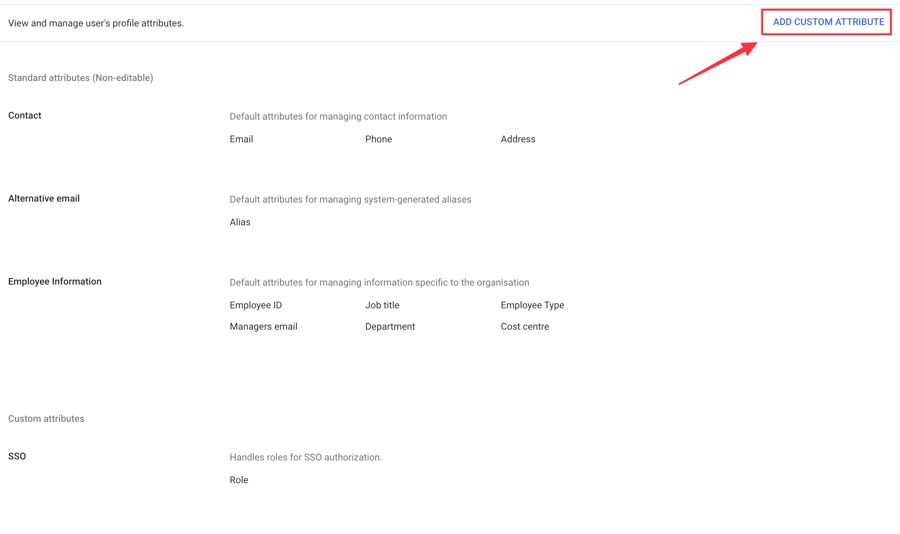
Configure the attribute as shown in the screenshot. You can use any value you want for
CategoryandDescription. You can also change the name of your field.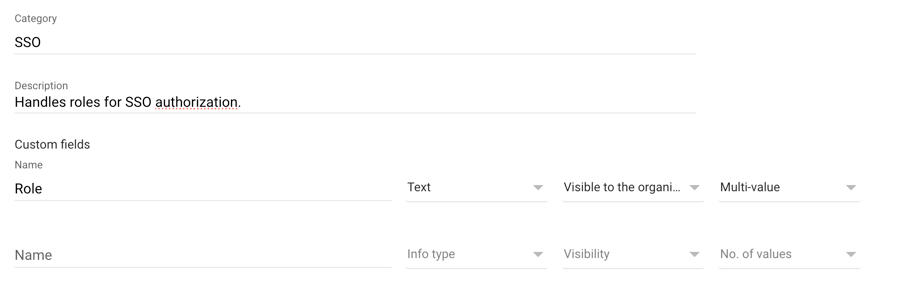
Choose a user you want to assign roles to and expand the
Users Informationstab.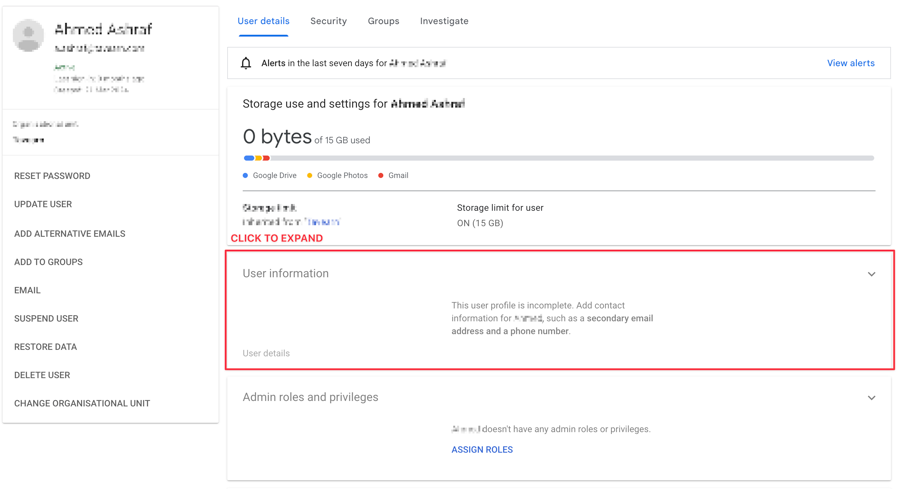
You will find the newly created attribute. If you scroll down, you can write any string here; they will have to match the content of the
role_mappingin your configuration on Appmixer (Step 15).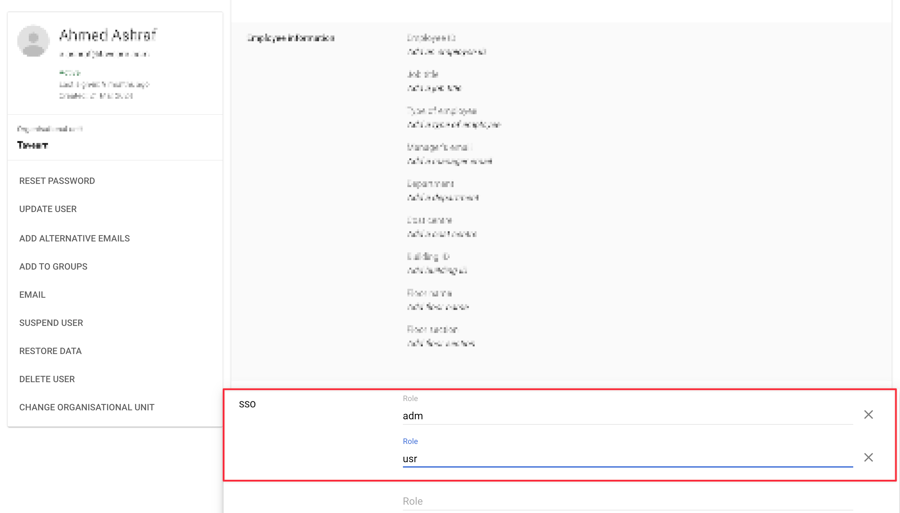
Now go back to the app we created earlier and edit the attribute mapping to expose the newly created attribute. If you decided to use
Roleslike in the example, you can follow the screenshot in this case too; otherwise, please replace the role in the left drop-down of the screenshot with the one you created before. Keep the value ofApp attributestoRole.
When creating the configuration JSON for Appmixer, please use the following format:
(*) <ENTITY ID> is the one provided on point 5 of this guide, not the one shown in the App's metadata. They are called in the same way, and this can cause confusion, but they are completely different values.
Please feel free to choose any value for
enforce_ssoanddisable_legacy_signupandauto_grant_user_rolebased on your company policies.Minify the JSON and add it to the Appmixer configuration under the name
IDP_CONFIG.
Was this helpful?
