> For the complete documentation index, see [llms.txt](https://docs.appmixer.com/llms.txt). Markdown versions of documentation pages are available by appending `.md` to page URLs; this page is available as [Markdown](https://docs.appmixer.com/connector-configuration/zendesk-chat.md).
# Zendesk Chat
## OAuth app properties
| Property | Value |
| ----------------------- | ---------------------------------------------------------------------------------------------------------------------------------------------------------------------------- |
| **Multi-tenant** | **No.** An OAuth client is created in one Zendesk Chat account. Each user enters the client ID, client secret and subdomain of their own account's client when they connect. |
| **Vendor review** | **None.** |
| **Review time** | Not applicable. |
| **Users before review** | No limit. |
| **App owner** | An administrator of the Zendesk Chat account (**Settings → Account → API**). |
| **Regions** | One client works worldwide, within its own Chat account. |
| **Client secret** | No expiry documented. The full secret is shown only once, right after the client is created. |
| **Rate limits** | 200 requests per minute per endpoint. |
| **Checked** | 2026-11-13 |
**Limitations**
* Every Appmixer user needs an OAuth client from an administrator of their own Zendesk Chat account.
* Zendesk Chat retires on 2028-01-31 for customers on Chat + Support and Suite plans, who move to Zendesk messaging. Zendesk will announce the date for legacy Chat-only plans separately.
Sources: [Chat API introduction](https://developer.zendesk.com/api-reference/live-chat/introduction/), [Chat OAuth authentication](https://developer.zendesk.com/documentation/live-chat/getting-started/auth/), [Zendesk Chat end-of-life](https://support.zendesk.com/hc/en-us/articles/10934638765466-Chat-EOL-announcement). What the rows mean: [OAuth app properties](https://docs.appmixer.com/connector-configuration/oauth-app-properties.md).
### **Setup the App and Administrator account**
Sign up with Zendesk:
### **Register OAuth app / API client**
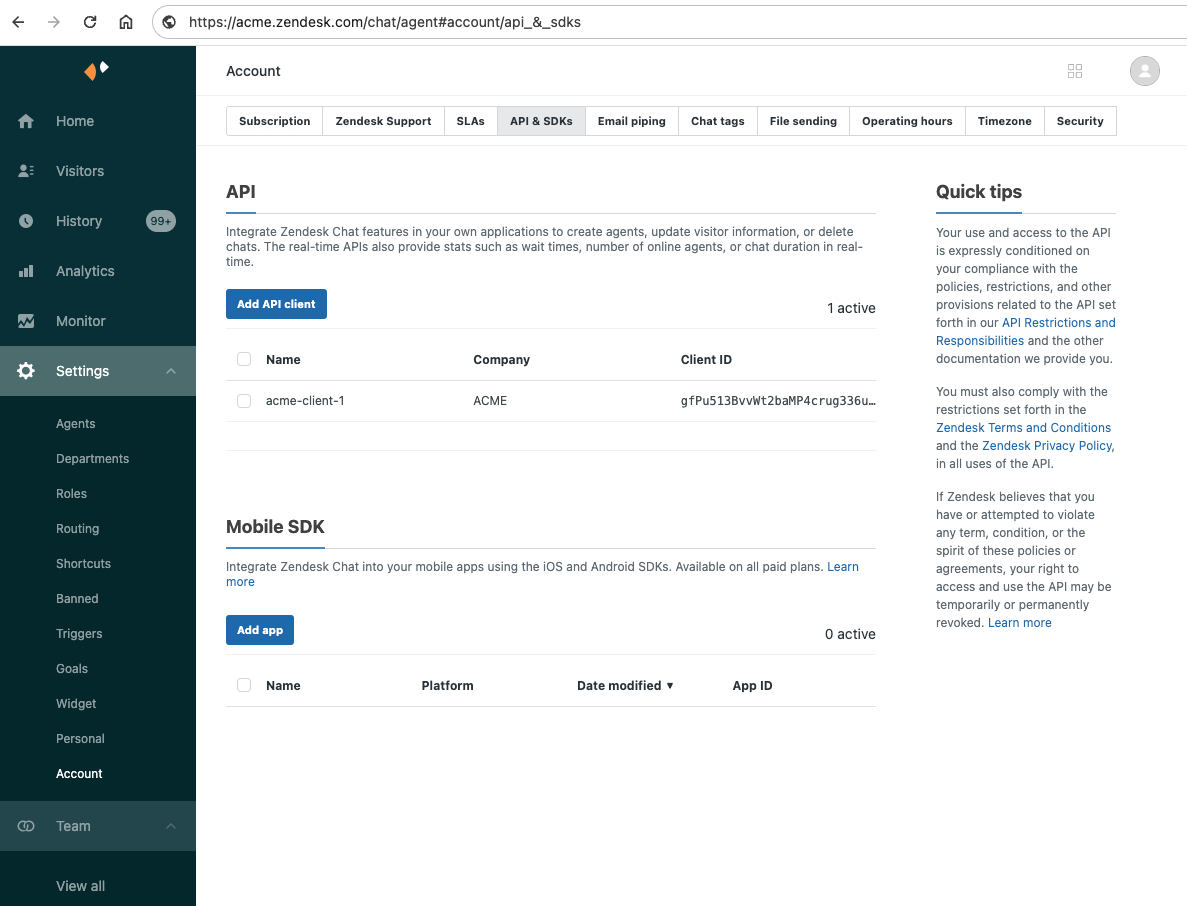
Now you need to add an OAuth application in Settings. In Settings navigate to: Account > API & SDKs and its API section.
Click **Add API client**.
API & SDKs
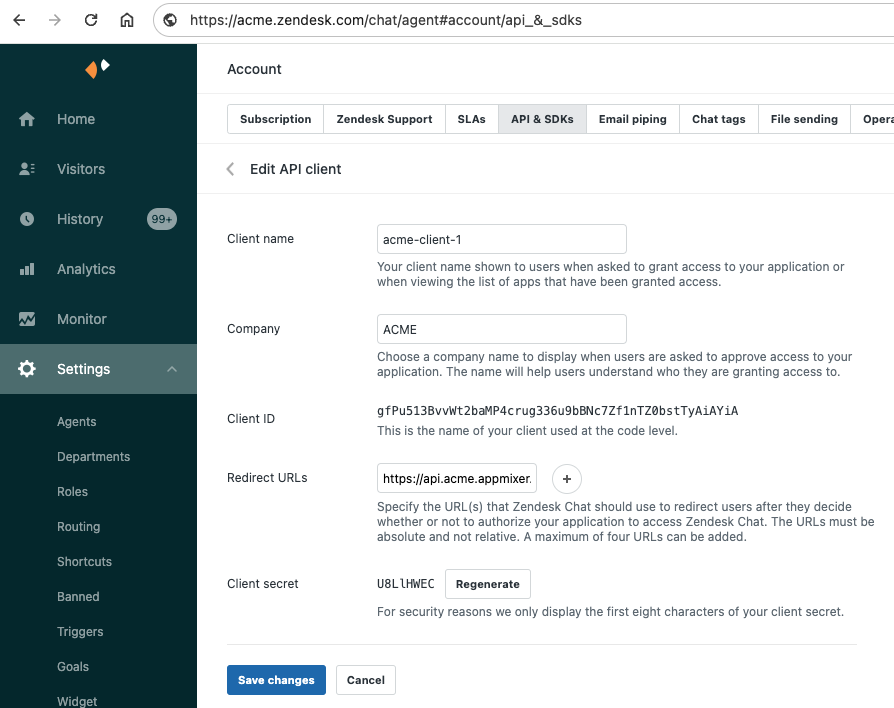
#### Specify client details
Specify client name, company and redirect URLs
#### Specify Client ID and Redirect URL(s)
You need to specify the Client ID and redirect URLs. The redirect URL should be `https://api.acme.appmixer.cloud/auth/zendesk/callback` (replace `acme` with your subdomain).
Client ID and secret are generated automatically. Once your OAuth client is now ready, you can see it in the list of OAuth clients. Make sure to copy the client ID and secret.
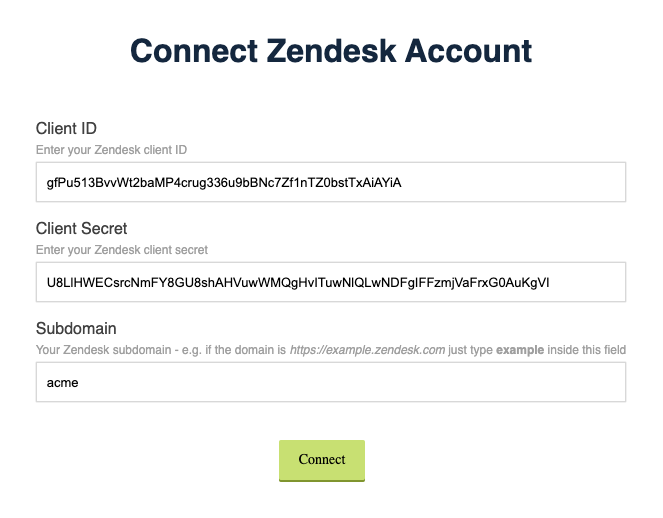
#### Set `clientId`, `clientSecret` and `subdomain` when connecting account
The last step is to configure clientId, clientSecret and subdomain while connecting Zendesk Chat component in a flow.
Note that the `subdomain` is the first part of your Zendesk URL. For example, if your Zendesk URL is `https://mycompany.zendesk.com`, then your subdomain is `mycompany`. In our example, the subdomain is `acme`.
Connect Zendesk Account dialog
## Backoffice configuration
No Backoffice configuration is required. The client ID, client secret and subdomain are entered when the account is connected.
---
# Agent Instructions
This documentation is published with GitBook. GitBook is the documentation platform designed so that both humans and AI agents can read, navigate, and reason over technical content effectively. Learn more at gitbook.com.
## Querying This Documentation
If you need additional information that is not directly available in this page, you can query the documentation by asking a question.
Perform an HTTP GET request on the following URL with the `ask` and `goal` query parameters:
```
GET https://docs.appmixer.com/connector-configuration/zendesk-chat.md?ask=&goal=
```
`ask` is the immediate question: it should be specific, self-contained, and written in natural language.
`goal` is what the user is ultimately trying to achieve, the reason they need the answer. Sharing it helps GitBook give you a better, more relevant answer. A goal is most helpful when it describes the outcome the user wants rather than restating the question. For example, with `ask=how do I create an API token`, a goal like `automate deployments from our CI pipeline` lets GitBook tailor the answer to that use case.
The response will contain a direct answer to the question and relevant excerpts and sources from the documentation.
Use this mechanism when the answer is not explicitly present in the current page, you need clarification or additional context, or you want to retrieve related documentation sections.