> For the complete documentation index, see [llms.txt](https://docs.appmixer.com/llms.txt). Markdown versions of documentation pages are available by appending `.md` to page URLs; this page is available as [Markdown](https://docs.appmixer.com/connector-configuration/zendesk-tickets.md).
# Zendesk Tickets
The Zendesk Tickets connector (`appmixer.zendesk.tickets`) connects to Zendesk Support with OAuth 2.0. You register an OAuth client in the Zendesk Admin Center and put its credentials into the Appmixer Backoffice.
### 1. Set up a Zendesk account
Sign up with Zendesk: . You need an **administrator** account to create OAuth clients.
{% hint style="info" %}
A Zendesk OAuth client belongs to the Zendesk account (subdomain) it was created in, and it can only authorize users of that account. If your end users connect their own Zendesk accounts (different subdomains), you have two options:
* register a [global OAuth client](https://developer.zendesk.com/documentation/marketplace/building-a-marketplace-app/set-up-a-global-oauth-client/) (Zendesk has to approve it, and its identifier starts with `zdg-`), or
* set `globalKeys` to `false` (see [Backoffice configuration](#backoffice-configuration)). Then every user registers an OAuth client in their own Zendesk account and enters its Client ID and Client Secret when they connect the account in Appmixer.
{% endhint %}
### 2. Register an OAuth client
In the Admin Center, go to **Apps and integrations > APIs > OAuth clients** and click **Add OAuth client**.
OAuth Clients - empty
#### Client details
Fill in the name, description, company and logo. Users see them on the Zendesk consent screen.
Specify name, description, company and logo
#### Identifier, client kind and redirect URL
* **Identifier**: the client ID that Appmixer sends to Zendesk (`clientId` in the Backoffice). It must be unique.
* **Client kind**: select **Confidential**. Appmixer authenticates with the client secret and does not use PKCE. A **Public** client requires PKCE, and the connection fails.
* **Redirect URLs**: `https://api./auth/zendesk/callback`, for example `https://api.acme.appmixer.cloud/auth/zendesk/callback`. If your Appmixer uses the Auth Hub, the redirect URL is on the Auth Hub domain instead: `https:///auth/zendesk/callback`, for example `https://auth-hub.acme.appmixer.cloud/auth/zendesk/callback`.
Specify unique client ID and redirect URLs
#### Scopes
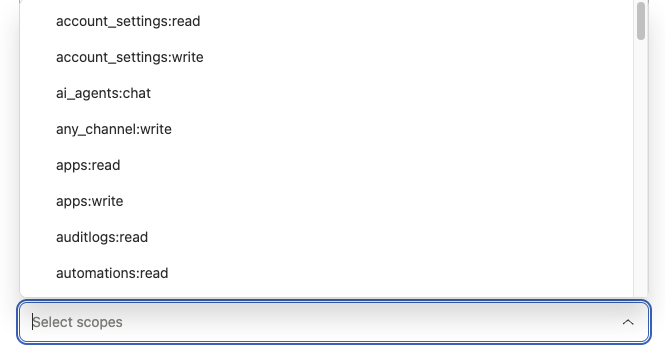
The **Scopes** field limits which scopes the client may request. You can leave it empty, which allows all scopes. If you restrict it, select **every** scope from the list below. When Appmixer asks for a scope that is not selected, Zendesk rejects the authorization with an `invalid_scope` error, and the user cannot connect the account.
Scopes field of the OAuth client
Appmixer asks for the scopes of the components used in the flow, and always for `users:read` (to read the connected user's profile).
* `read`: all Find components (**FindTickets**, **FindTicketComments**, **FindUsers**, **FindOrganizations**, **FindGroups**), **CreateTicket**, **UpdateTicket**, **AddCommentToTicket**, **AddTagsToTicket**, **MakeApiCall**
* `users:read`: account connection, **WatchUsers**
* `tickets:read`: **WatchTickets**
* `organizations:read`: **WatchOrganizations**
* `tickets:write`: **CreateTicket**, **UpdateTicket**, **DeleteTicket**, **AddCommentToTicket**, **AddTagsToTicket**, **MakeApiCall**
* `users:write`: **CreateUser**, **UpdateUser**, **MakeApiCall**
* `organizations:write`: **CreateOrganization**, **UpdateOrganization**, **MakeApiCall**
* `webhooks:write`: **WatchTickets**, **WatchUsers**, **WatchOrganizations**
* `triggers:write`: **WatchTickets**
The full list to select: `read`, `users:read`, `tickets:read`, `organizations:read`, `tickets:write`, `users:write`, `organizations:write`, `webhooks:write`, `triggers:write`.
{% hint style="info" %}
The Watch components register a Zendesk webhook (and, for **WatchTickets**, a Zendesk trigger) when the flow starts, and remove them when it stops. Only Zendesk administrators can manage webhooks and triggers, so these components need an account connected by an admin.
{% endhint %}
#### Client secret
Save the OAuth client. Zendesk generates the **Secret**. Copy it now: it is shown in full only once. Later you only see its first characters, and you have to regenerate it.
Make sure to copy the secret
Your OAuth client is now ready and appears in the list of OAuth clients.
OAuth client in the list
### 3. Connect an account
When a user connects a Zendesk account in Appmixer, they enter their Zendesk **subdomain**, the first part of the Zendesk URL. For `https://acme.zendesk.com`, the subdomain is `acme`. The subdomain is not part of the Backoffice configuration.
## Troubleshooting
* **`Invalid Authorization Request` / `invalid_request` ("The request is missing a required parameter …")** on the Zendesk page when connecting an account: the OAuth client's **Client kind** is **Public**. Zendesk then requires PKCE, which Appmixer does not send. Change the client kind to **Confidential**.
* **`invalid_scope`**: the **Scopes** field of the OAuth client is restricted and does not contain a scope Appmixer asks for. Add the missing scope (see [Scopes](#scopes)) or leave the field empty.
## Backoffice configuration
Configuration ID: `appmixer:zendesk:tickets`. For how to set connector configuration values, see [Connector Configuration](https://docs.appmixer.com/getting-started/services).
* `clientId`: the **Identifier** of the OAuth client.
* `clientSecret`: the **Secret** of the OAuth client.
* `globalKeys`: optional, default `true`. With `true`, all users authorize through the OAuth client from `clientId` and `clientSecret`. With `false`, Appmixer ignores `clientId` and `clientSecret`, and every user enters the Client ID and Client Secret of their own Zendesk OAuth client when connecting the account.
```bash
appmixer service-config set appmixer:zendesk:tickets -u -d '{"clientId": ""}'
appmixer service-config set appmixer:zendesk:tickets -u -d '{"clientSecret": ""}'
```
---
# Agent Instructions
This documentation is published with GitBook. GitBook is the documentation platform designed so that both humans and AI agents can read, navigate, and reason over technical content effectively. Learn more at gitbook.com.
## Querying This Documentation
If you need additional information that is not directly available in this page, you can query the documentation by asking a question.
Perform an HTTP GET request on the following URL with the `ask` and `goal` query parameters:
```
GET https://docs.appmixer.com/connector-configuration/zendesk-tickets.md?ask=&goal=
```
`ask` is the immediate question: it should be specific, self-contained, and written in natural language.
`goal` is what the user is ultimately trying to achieve, the reason they need the answer. Sharing it helps GitBook give you a better, more relevant answer. A goal is most helpful when it describes the outcome the user wants rather than restating the question. For example, with `ask=how do I create an API token`, a goal like `automate deployments from our CI pipeline` lets GitBook tailor the answer to that use case.
The response will contain a direct answer to the question and relevant excerpts and sources from the documentation.
Use this mechanism when the answer is not explicitly present in the current page, you need clarification or additional context, or you want to retrieve related documentation sections.