Build and Run an AI agent
What This AI Agent Does
In the following sections, you'll learn how to build a support AI agent that can access your data—specifically, support tickets and details about your development teams, including their roles and the contact information of the team lead.
This AI agent can analyze support tickets (e.g., identifying the biggest pain points your customers faced in the past month) and take action—such as suggesting product improvements based on the most common issues and sending those suggestions to the relevant team lead responsible for that part of your application.
Sounds useful? Let’s build it!
Step 1: Setting Up the AI Agent
To begin, we'll create a new workflow in Appmixer, our no-code AI agent builder.

Choosing a Trigger
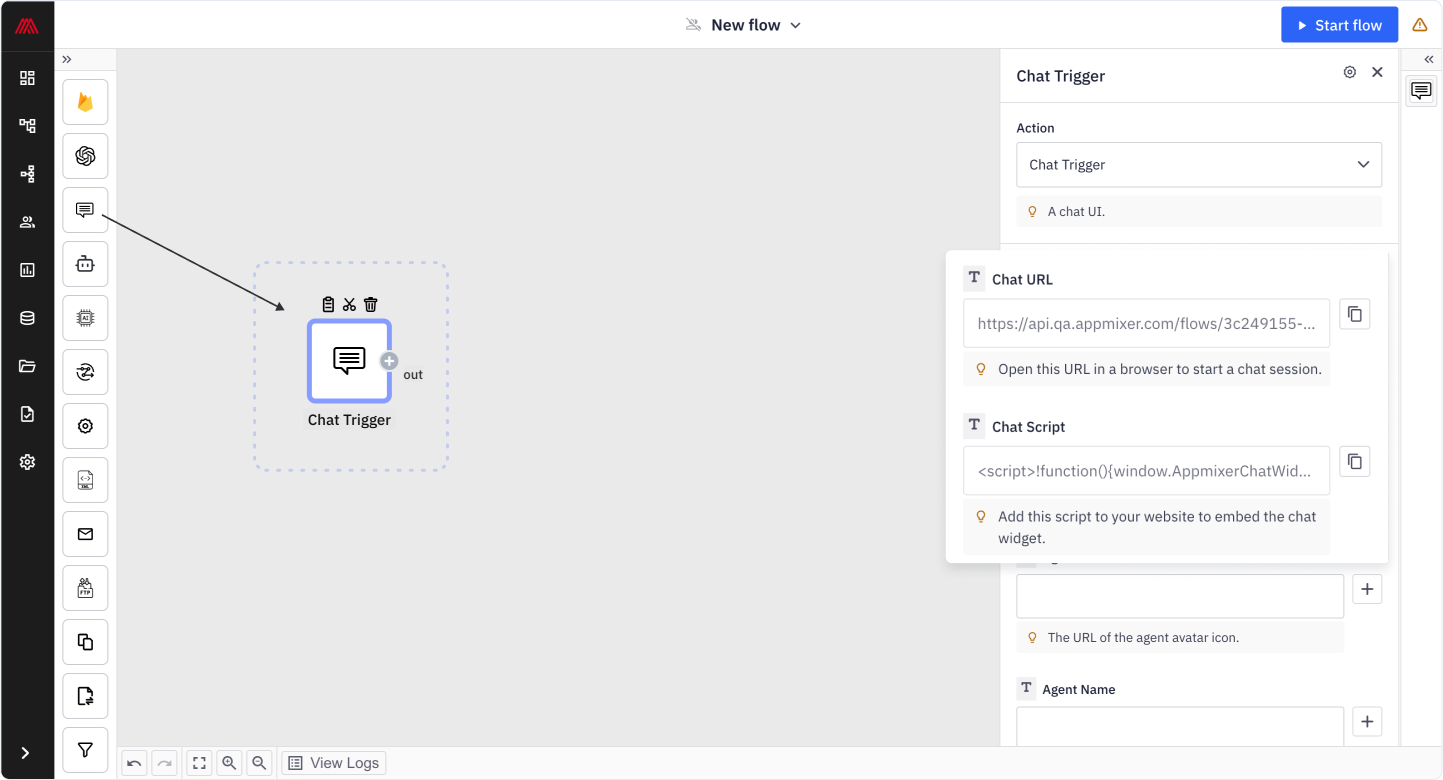
The first step is defining what will activate the agent. In this demo, we use a chat widget as the trigger, but you can also trigger the agent based on other events—for instance, new emails, new tasks, or scheduling the agent to run at a specific date and time.
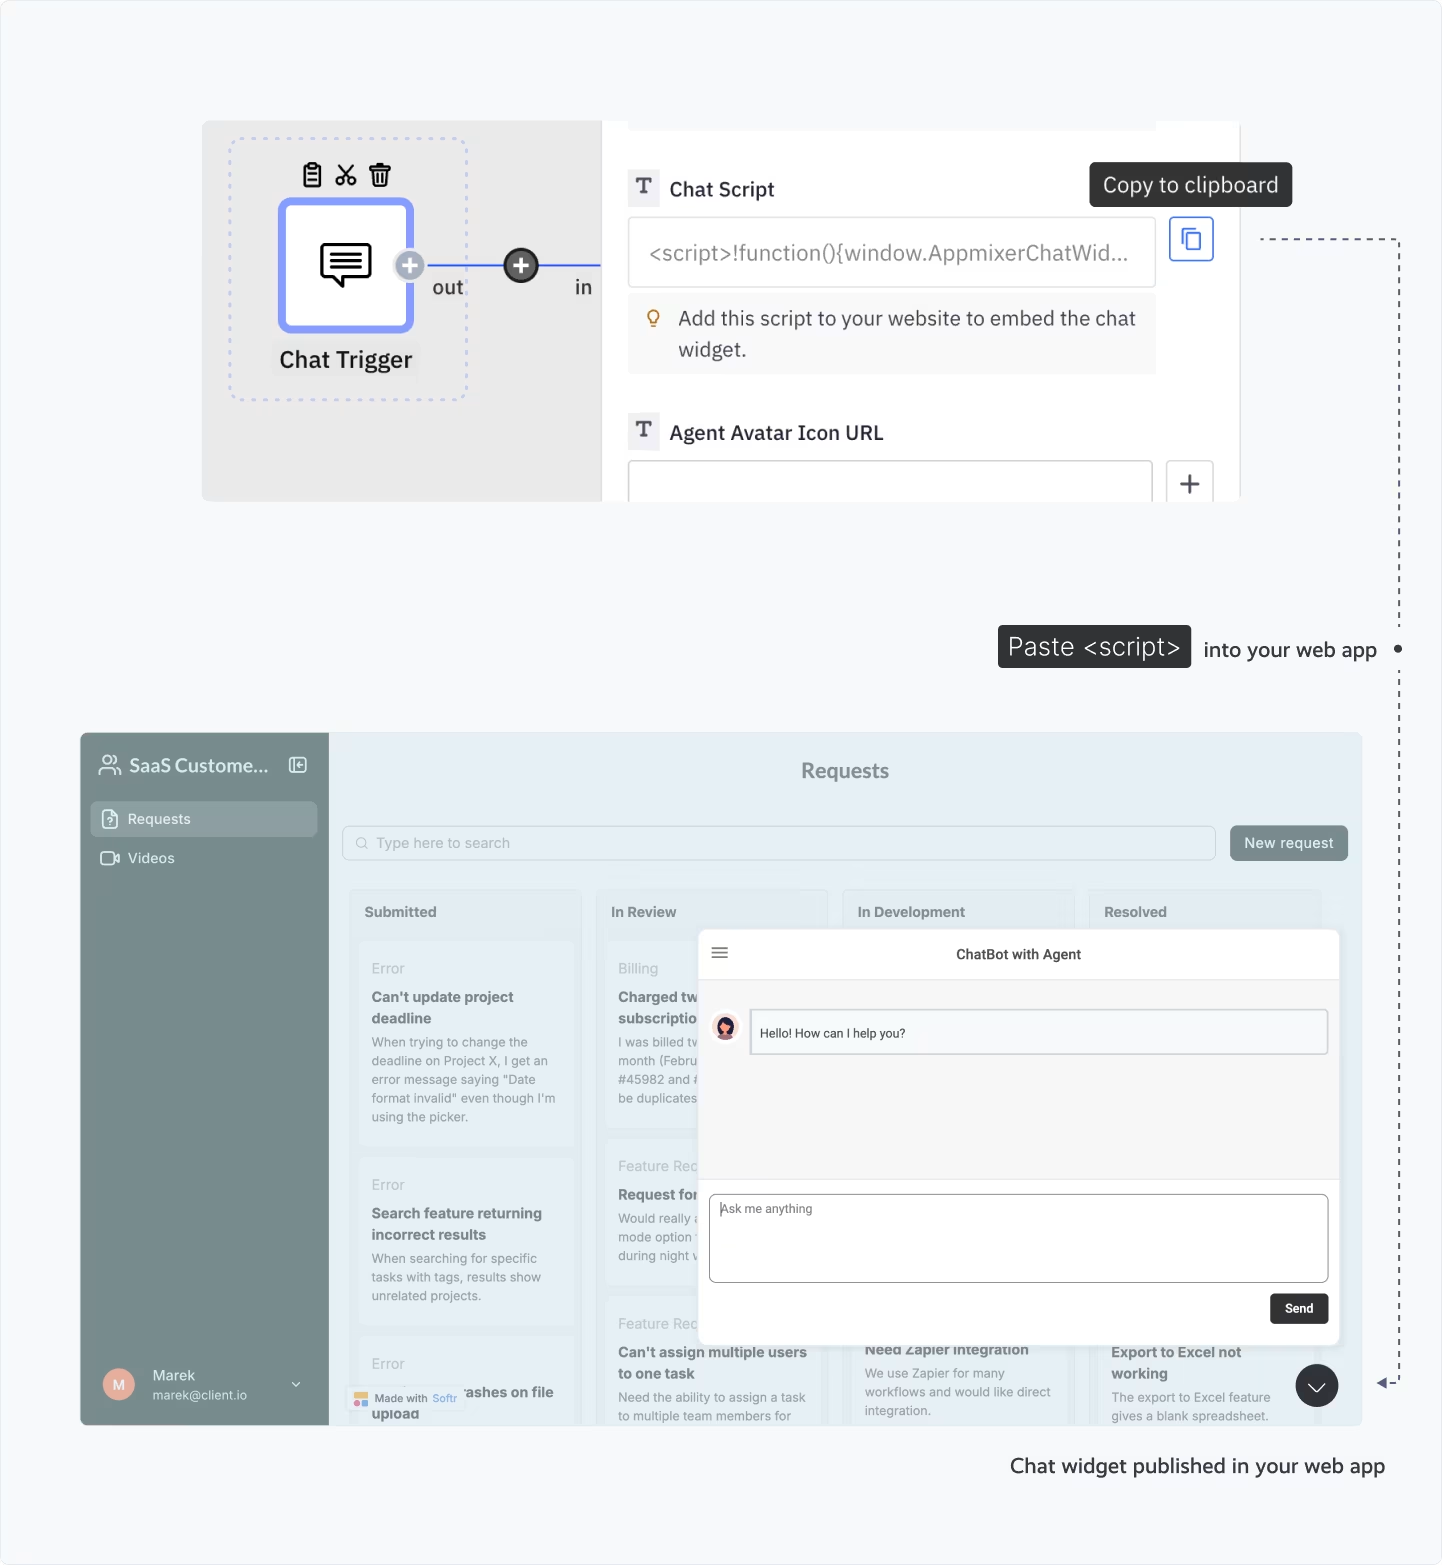
Once the chat trigger is selected, Appmixer provides a chat URL and a chat script that allows you to integrate the chat widget into any web application.
Adding the AI Agent
Now, let’s add the central component—the AI agent itself. Appmixer supports various large language models (LLMs), including OpenAI, Claude, Gemini, and more. For this demo, we'll use an OpenAI model.
We define the agent's instructions, specifying its role and scope. The key to building a reliable AI agent is providing detailed and structured instructions so that responses are consistent and accurate. Each message from the chat is processed based on these instructions, ensuring contextual understanding.
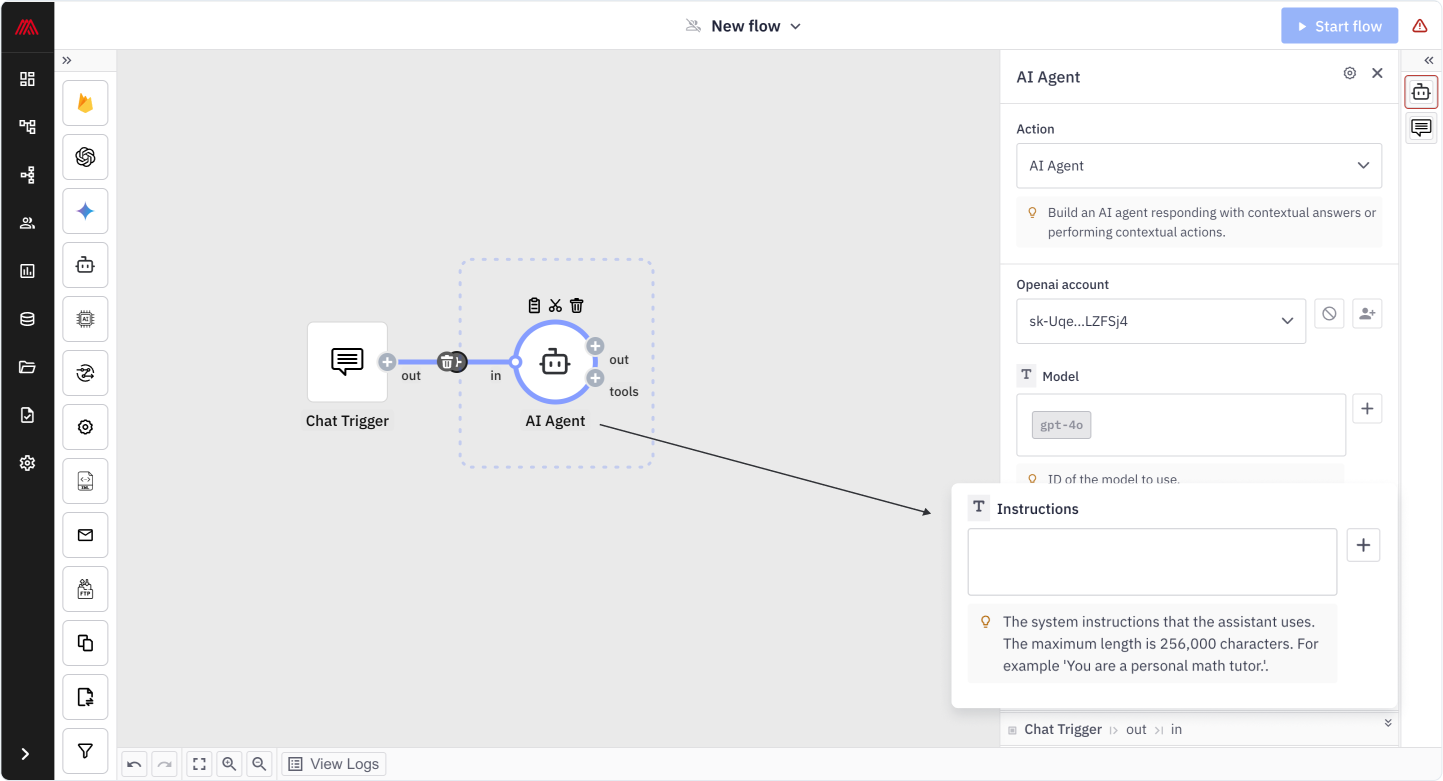
Instructions: This field defines how the AI agent should behave each time it performs a task. It specifies the agent’s role, scope, and operational constraints, ensuring it follows predefined guidelines while executing its tasks.
👉 Copy and paste the instructions to build the same AI agent in Appmixer:
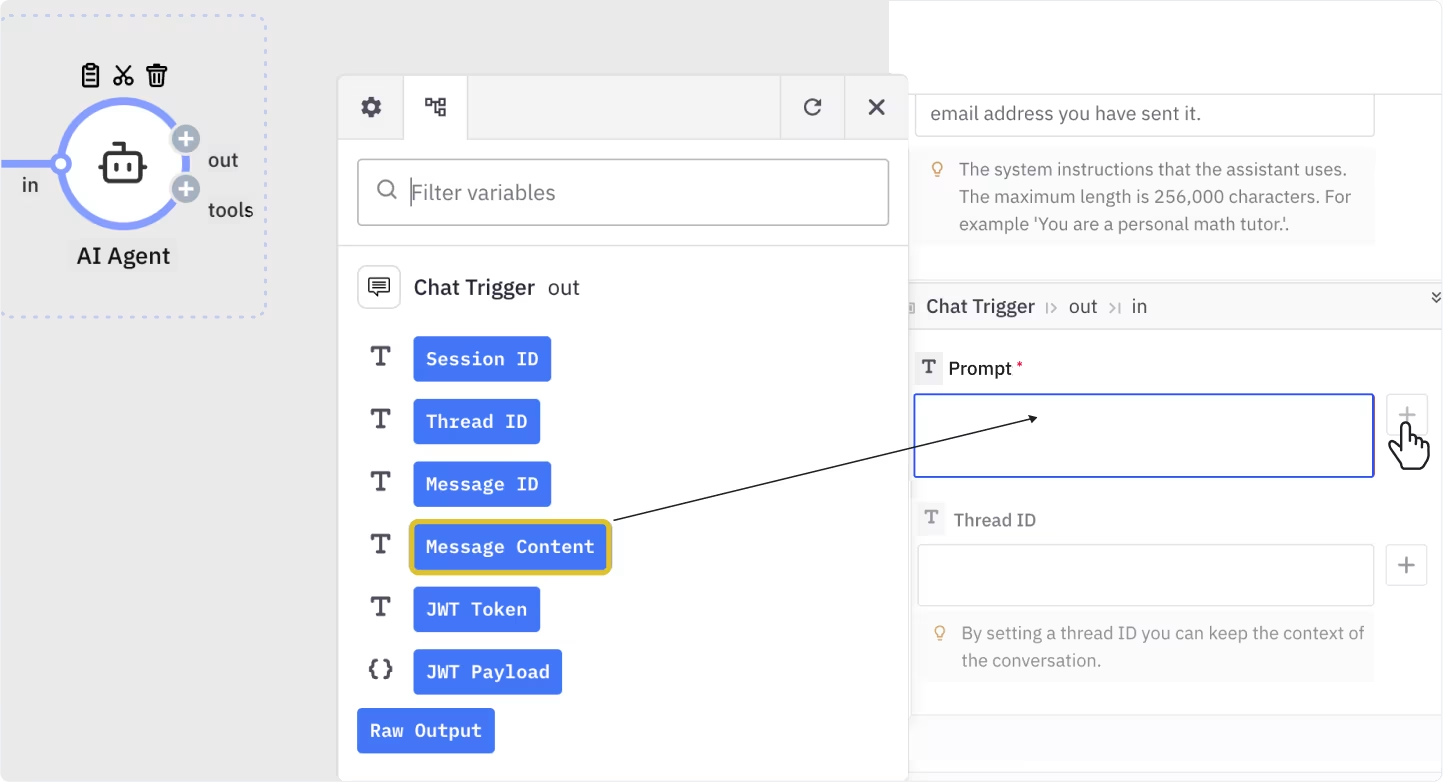
In the Prompt field, we'll use the dynamic field from the Chat trigger. This will be the actual message that you or your users type in the chat.
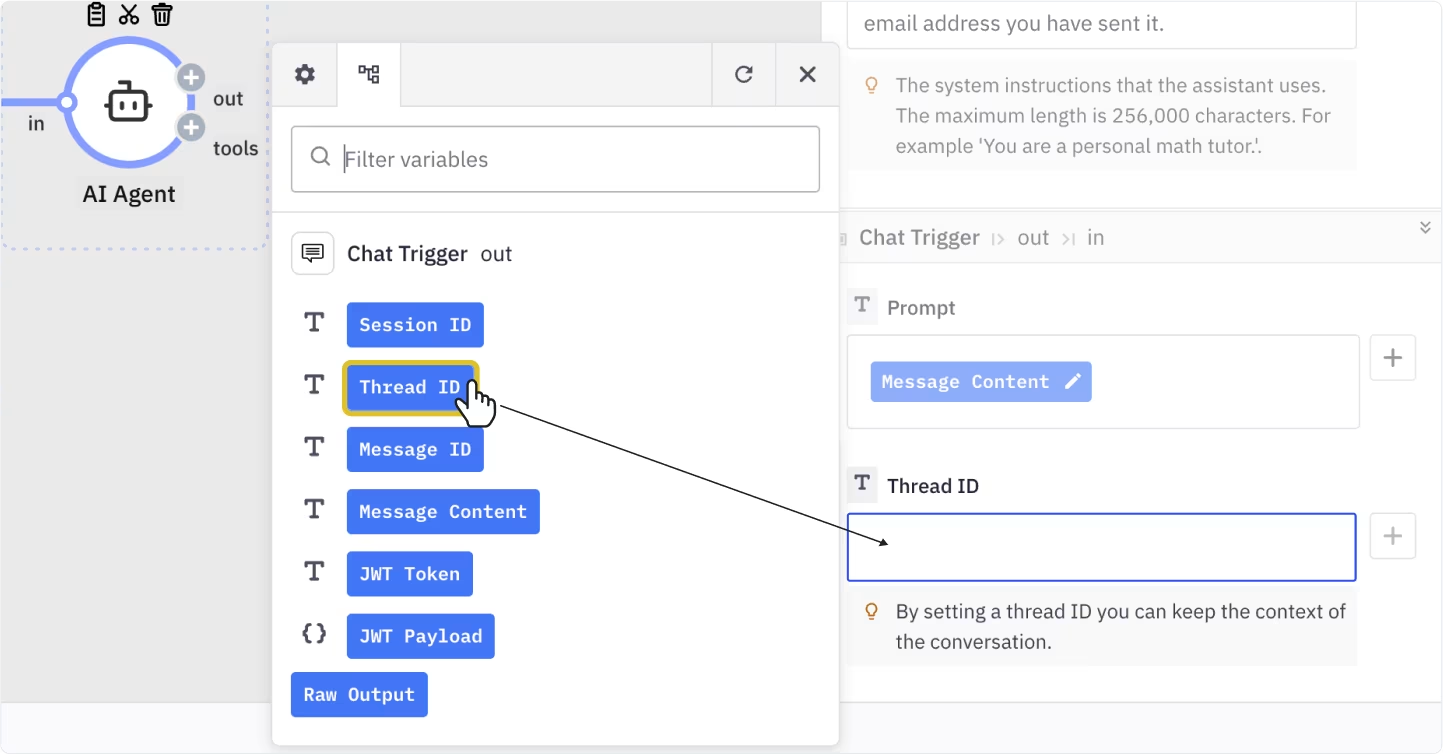
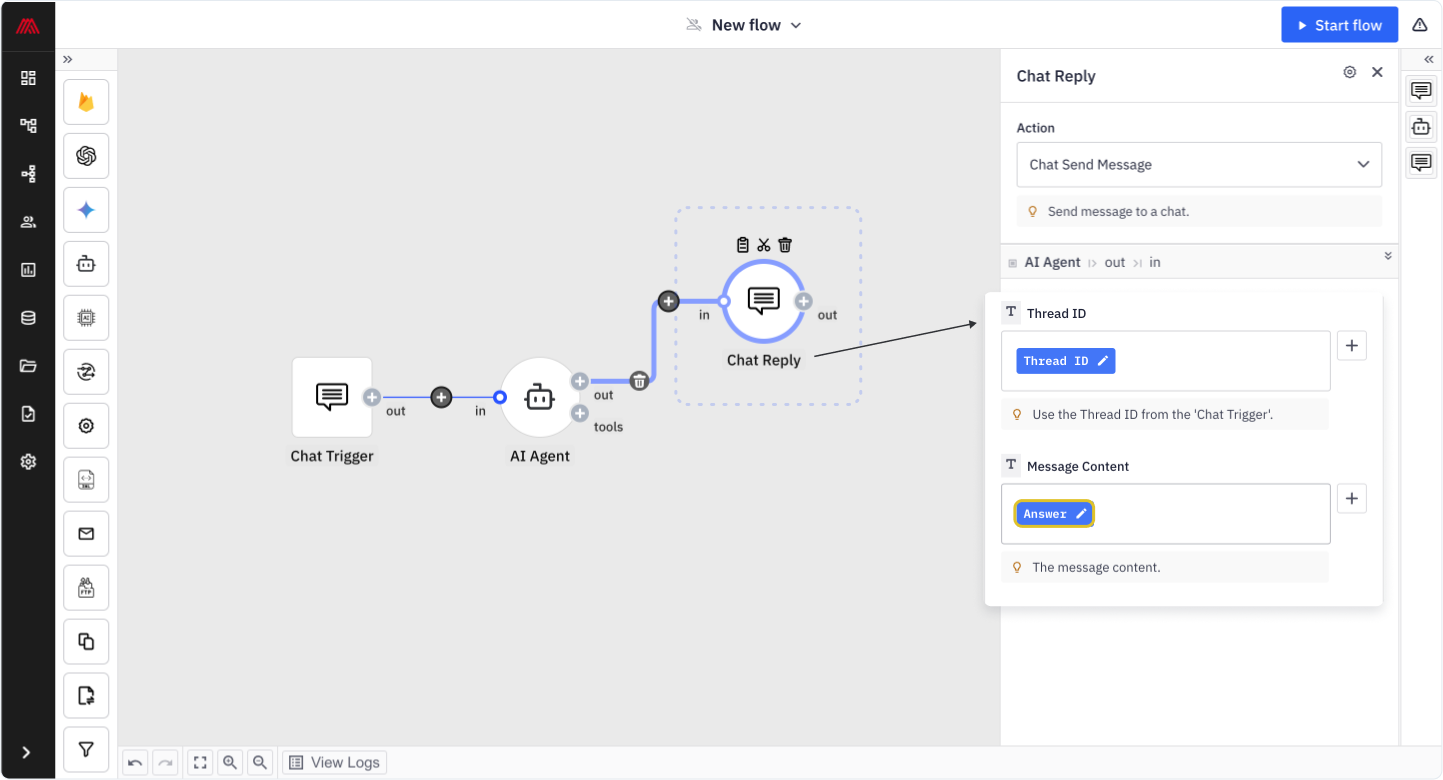
To maintain conversation continuity, we set the Thread ID field, which allows the agent to remember the context of ongoing interactions.
Handling the Agent’s Responses
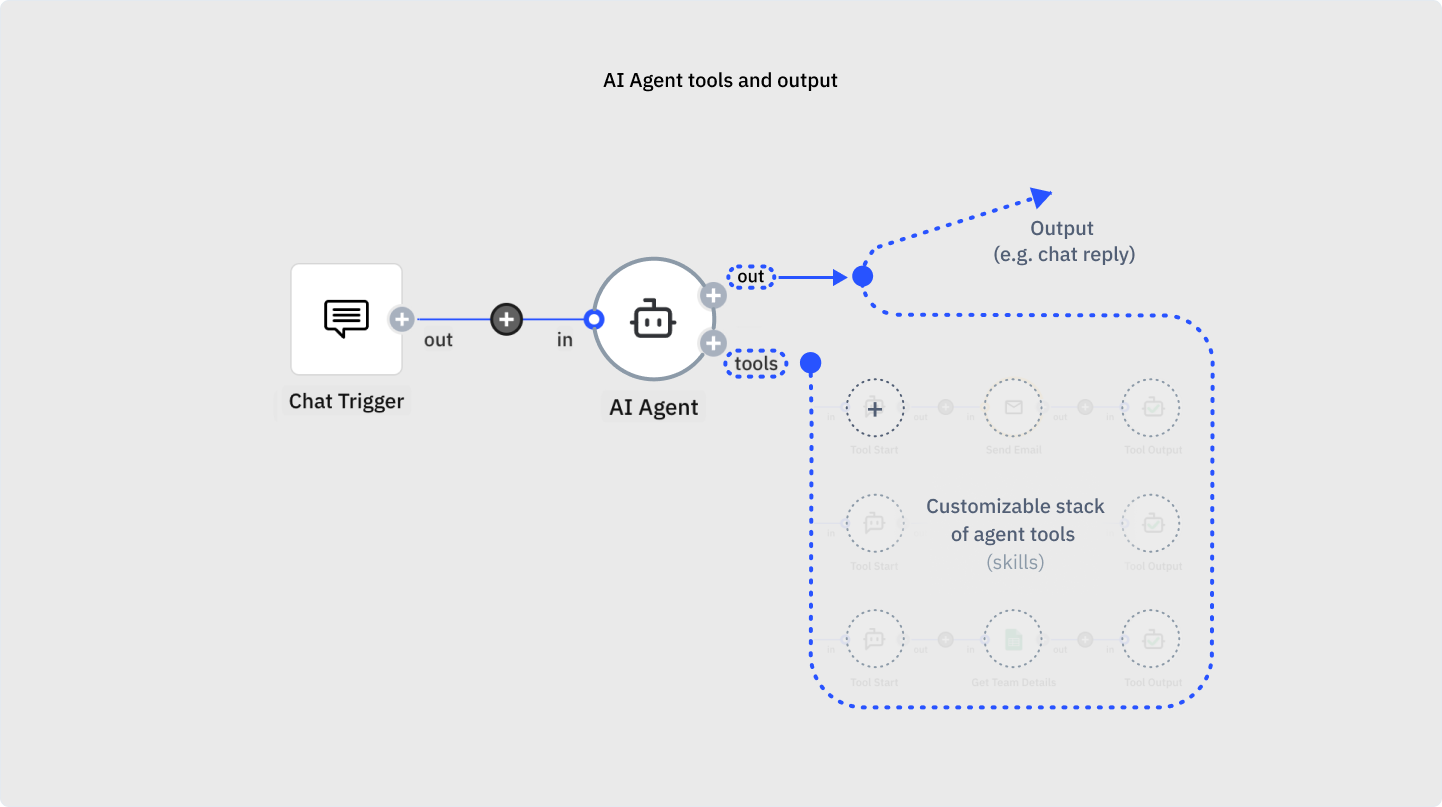
The agent has two output ports:
Out: This sends the agent's answers to the chat widget (or any other tool, such as sending a message to Slack).
Tools: This is where we connect the agent to our data and services, whether first-party or third-party.
To complete the chat functionality, we add a Chat Reply component, linking it to the thread ID and the agent’s response output.
Step 2: Adding Skills to the AI Agent
While our agent can now respond to general questions, we want it to perform real tasks, such as analyzing data and sending emails.
Connecting to External Tools
Under the Tools port, we can add multiple integrations. Whenever the AI agent receives a request, it checks for relevant tools and uses them as needed.
In order to add tools to the AI agent, you need to get familiar with two terms:
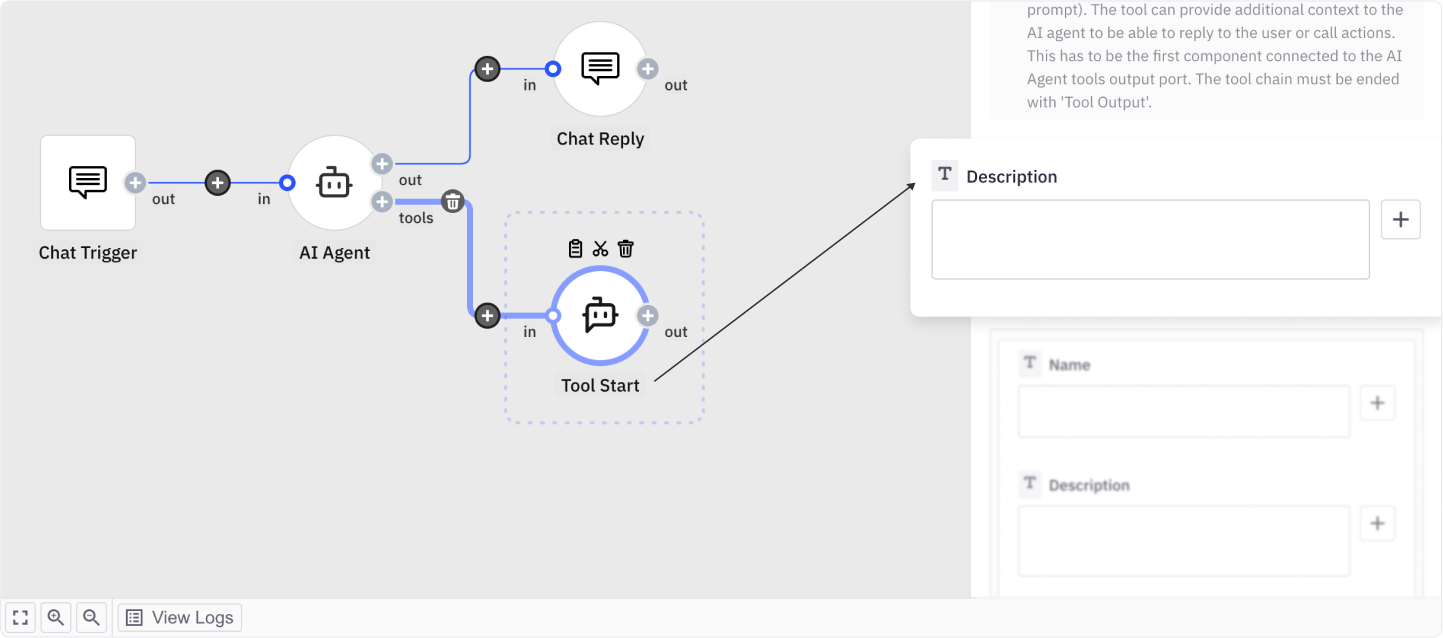
Tool description: This serves as a guideline for the AI agent, explaining what a specific tool does. It is set at the Tool Start component level. For example, if a tool sends notifications to Slack, its description could be: "This tool sends notifications to Slack." The AI agent uses this information to determine when to utilize the tool to complete a task.
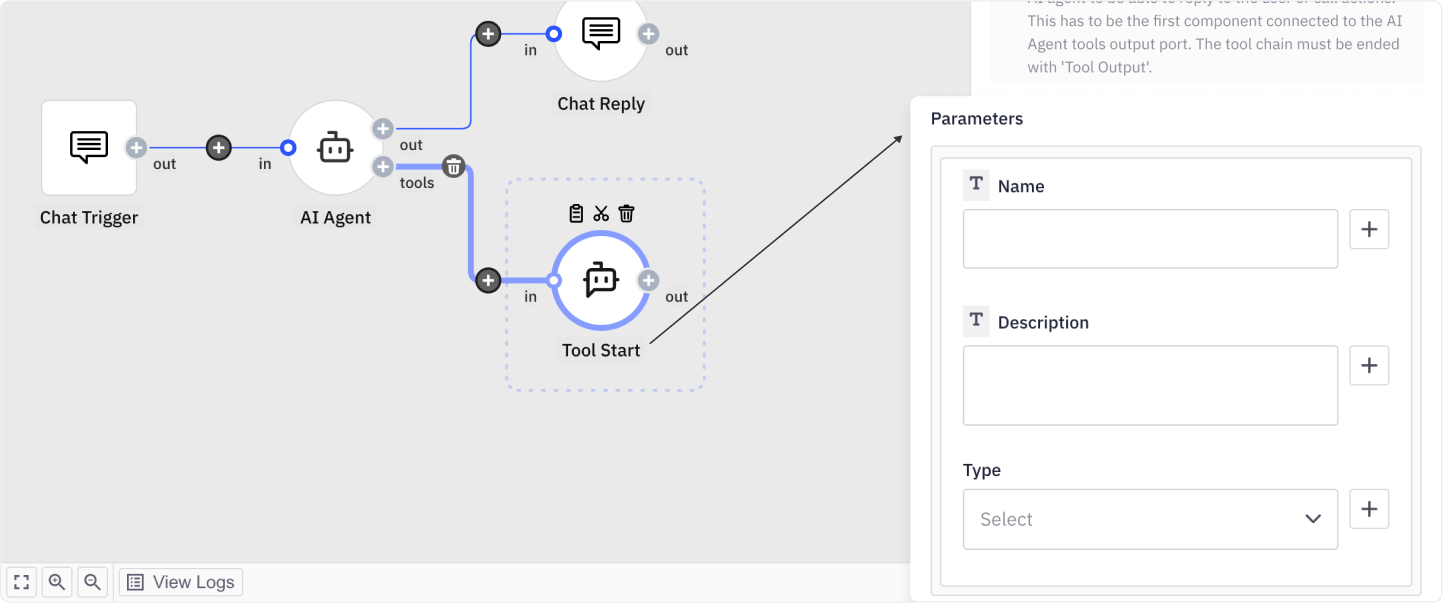
And second, we use something called Parameters in the Tool Start component.
Parameters: Dynamic fields that we want the AI agent to figure out from the user prompt and then later use in the tools. For instance, if we want the agent to lookup products in our database, we need to set up Product Name on the Tool Start level, let the agent fill the value from the user prompt and then use it to do the lookup.
Sending Emails
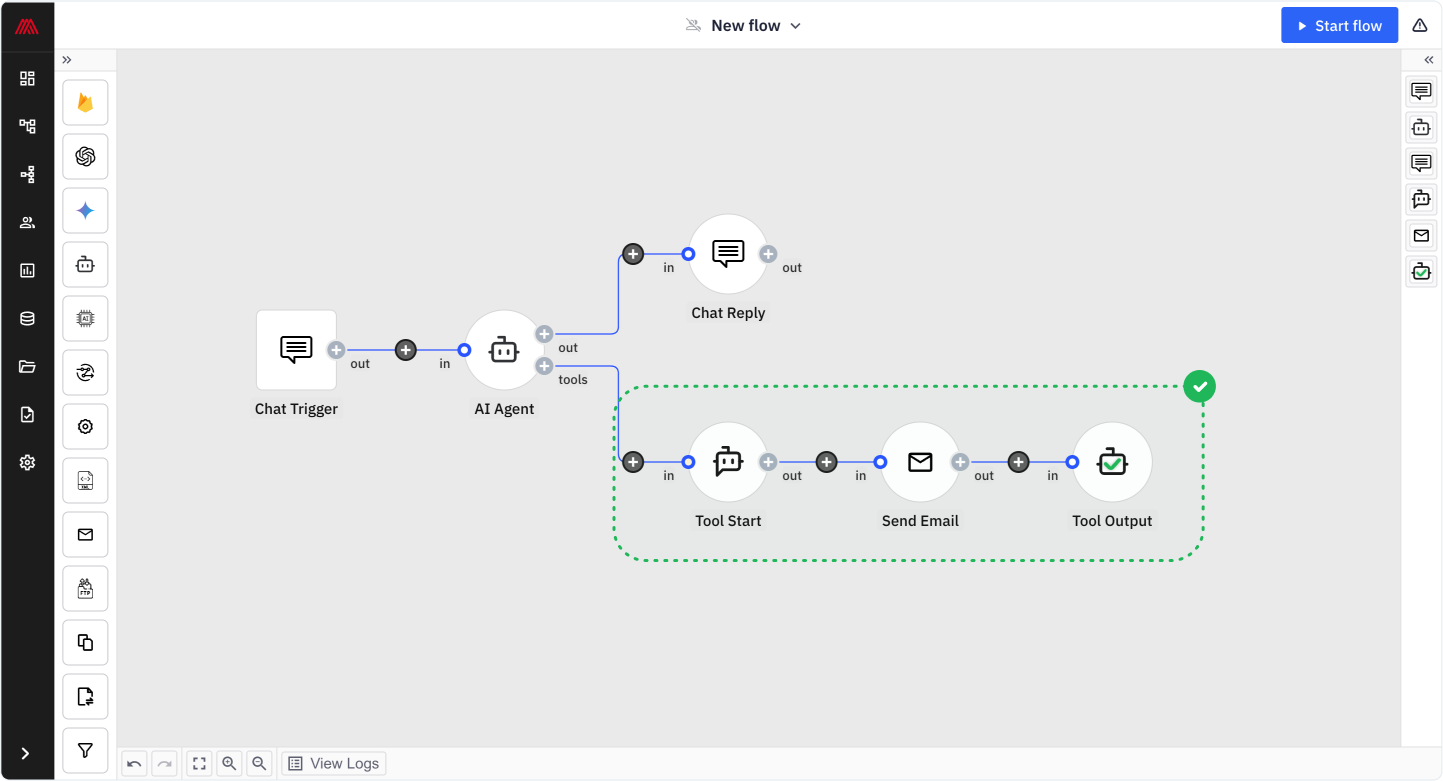
Add a Tool Start component and define it as “Send emails to the product team.”
Define parameters such as recipient, subject, and body, allowing the AI to dynamically generate content.
Use the Send Email step to structure and send the email.
Add a Tool Output component to send confirmation back to the agent.
👉 Copy and paste the tool description to build the same AI agent in Appmixer:
Analyzing Support Tickets
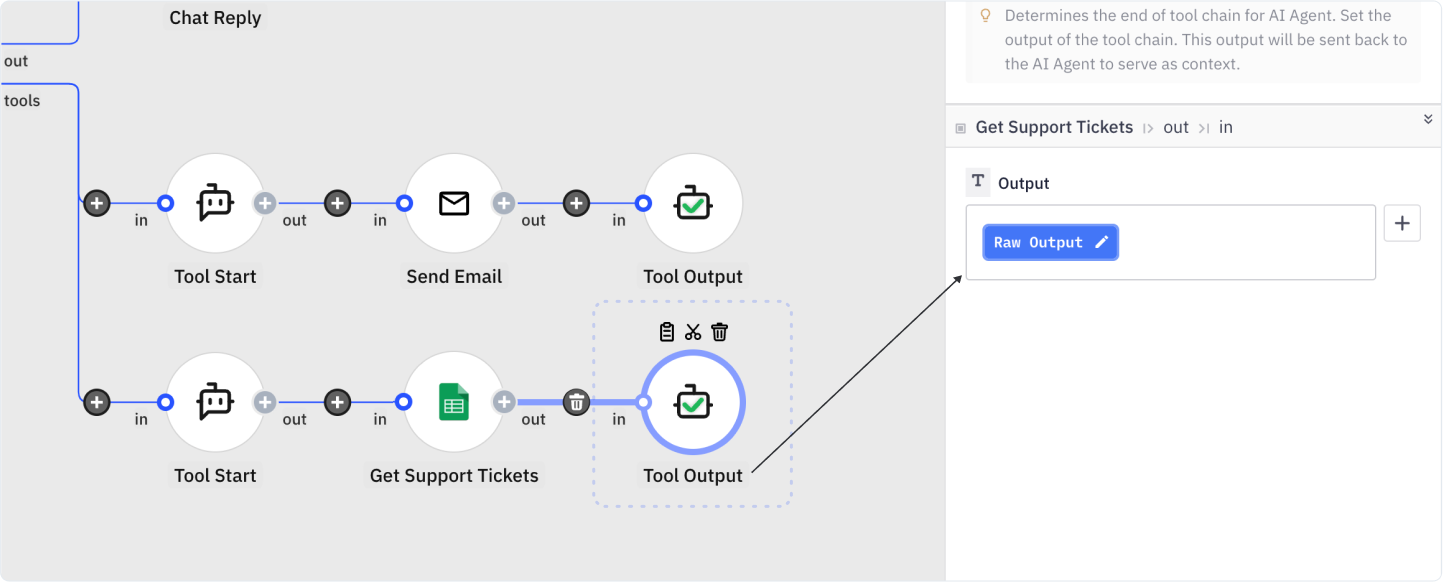
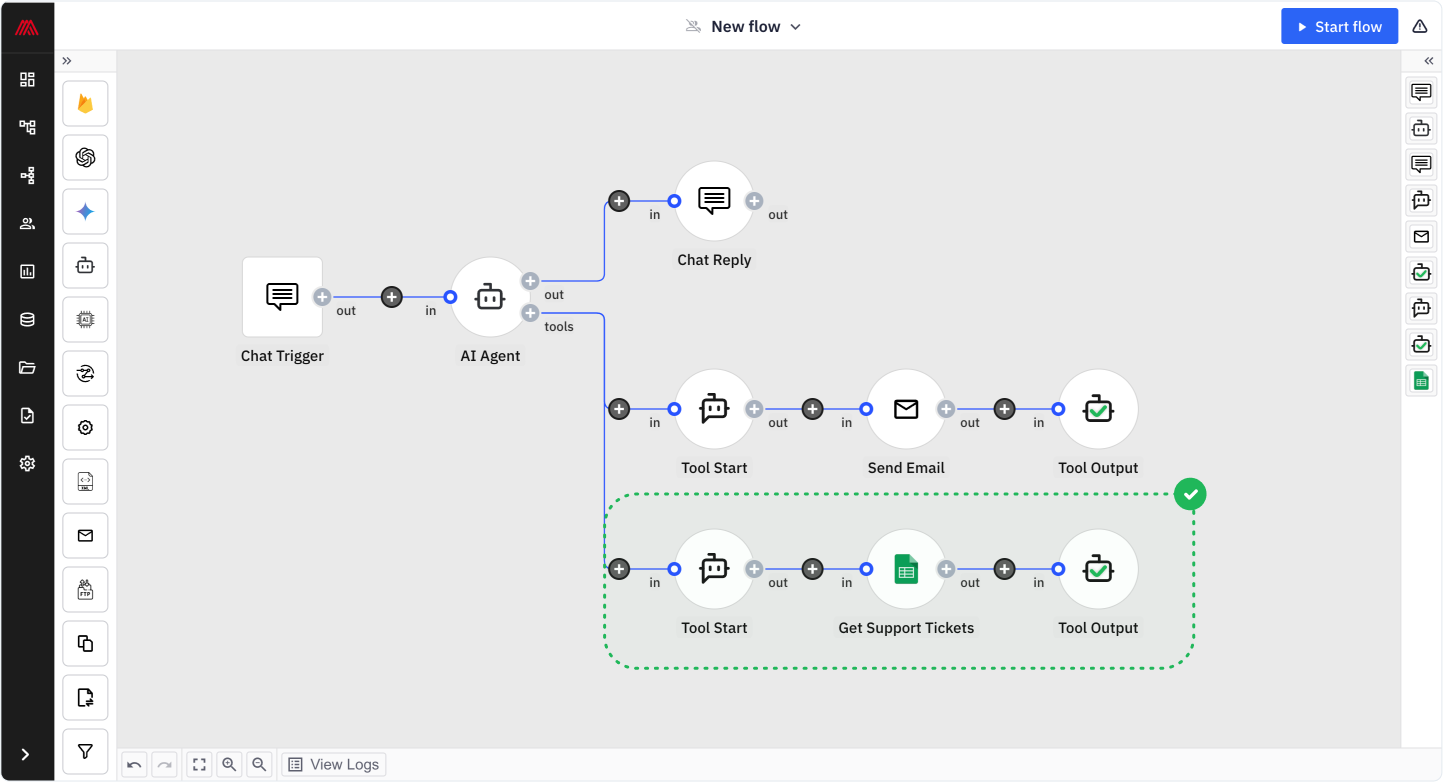
Add another Tool Start component and describe its function as retrieving support tickets.
Connect a Google Sheets Get Rows component to fetch past support tickets.
Configure the Tool Output to send ticket data to the agent, enabling it to analyze trends.
👉 Copy and paste the tool description to build the same AI agent in Appmixer:
📄 Copy our Google Sheet with 100 demo support tickets and connect it to Appmixer to build the same AI agent as above: https://docs.google.com/spreadsheets/d/1zWsRnL4-Sj-Rh-j3wlu9XdoIrj17uPWC7nMvL3vfskA/edit?usp=sharing
Understanding Product Teams
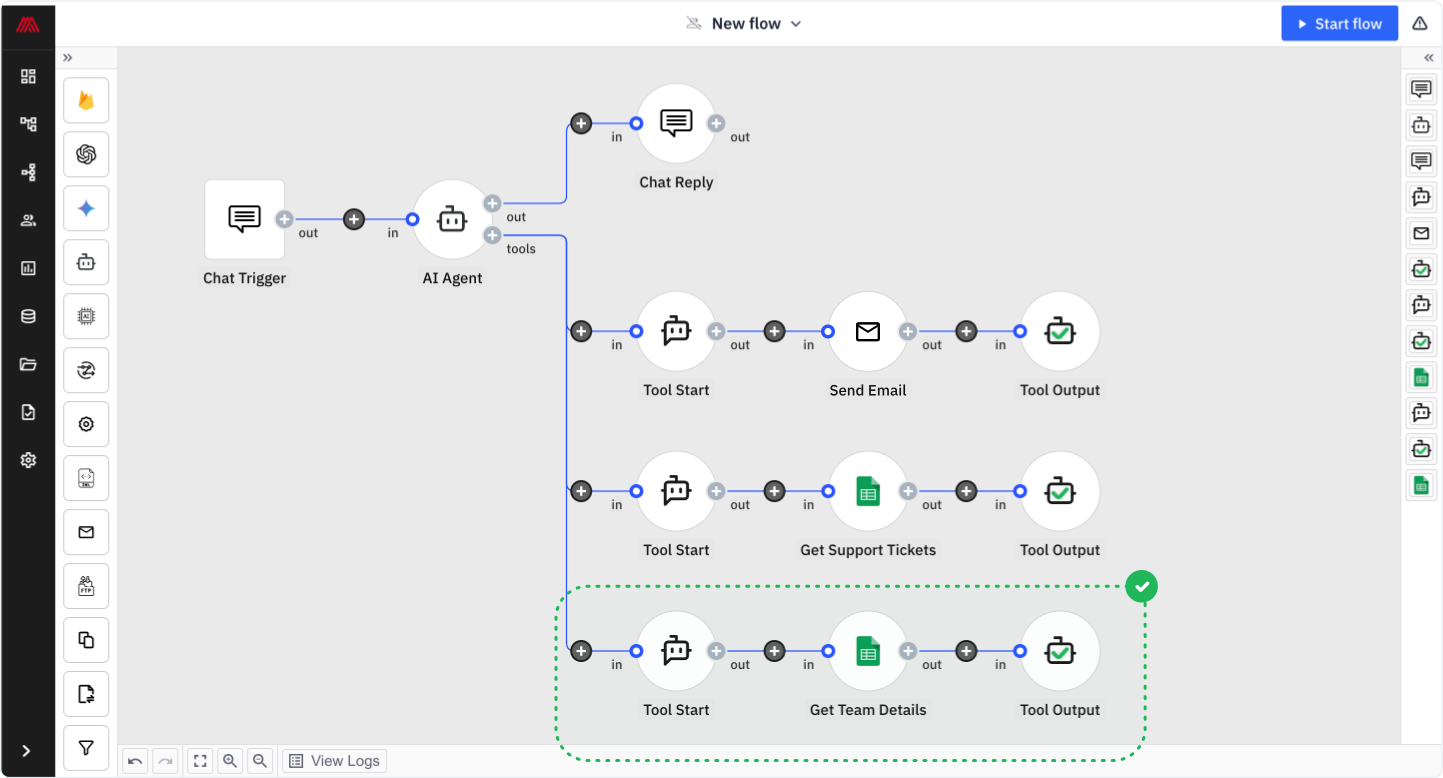
Similar to the support tickets, add a Tool Start component for product teams.
Use another Google Sheets Get Rows component to retrieve team details.
Map the data so that the agent can provide insights into which team is responsible for which product features.
👉 Copy and paste the tool description to build the same AI agent in Appmixer
📄 Clone our Google Sheet team details and connect it to Appmixer to build the same AI agent as above: https://docs.google.com/spreadsheets/d/1JmyOaQxho-mBNS8iLm0uwL-X30G5tO4EK3Ha0MsLu7Q/edit?usp=sharing
Step 3: Testing and Deploying the AI Agent
Once all components are set up, it’s time to test our AI agent using the Chat URL.
For example, we can:
Ask it about common issues in the mobile app from past support tickets.
Request product improvement suggestions based on user feedback.
Instruct it to send these suggestions to the mobile app team.
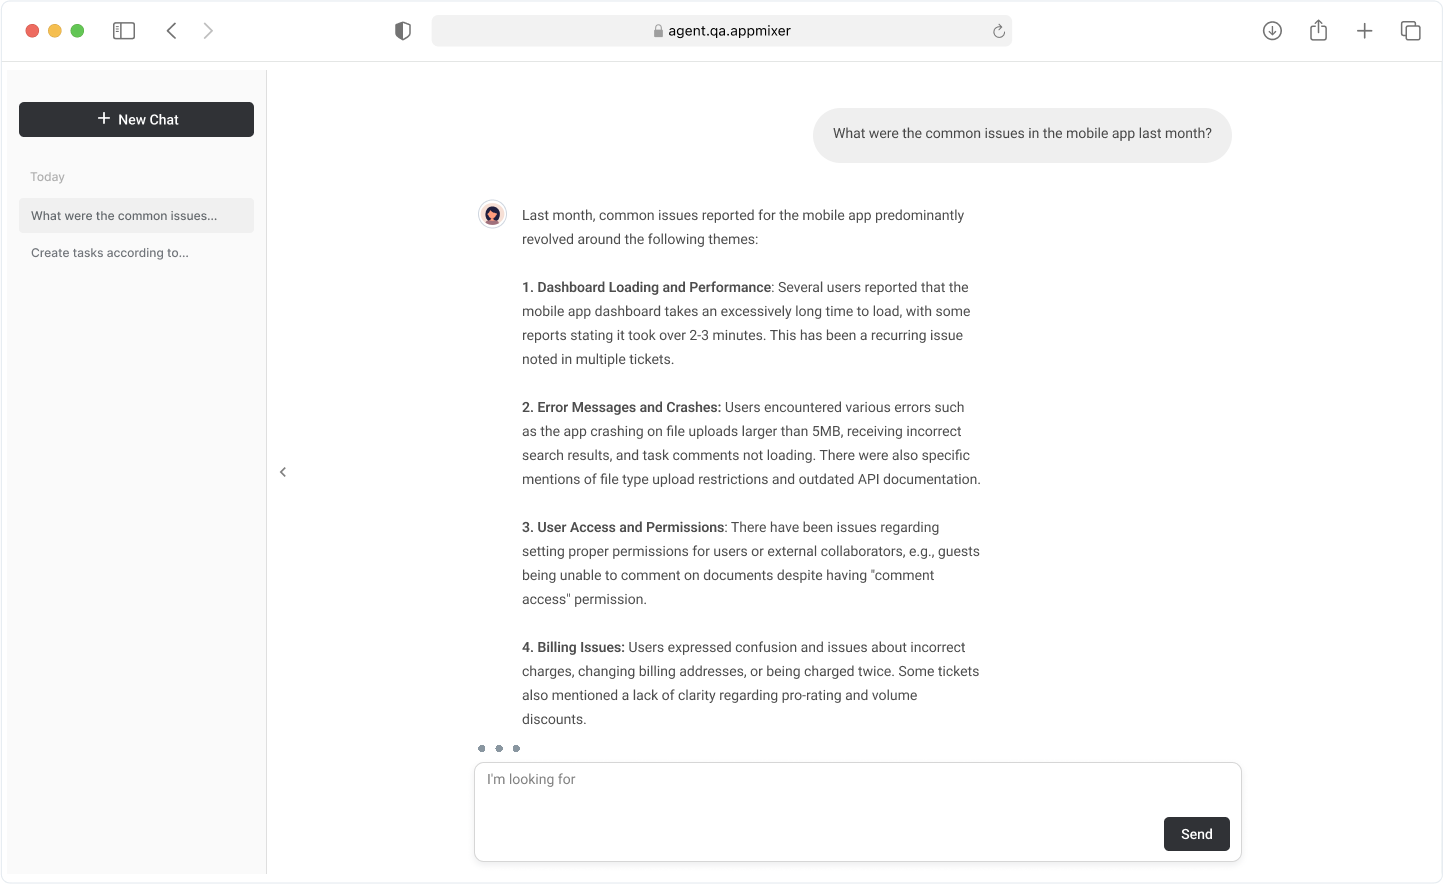
For deployment, we take the provided HTML embed script from the chat trigger setup and add it to our web application. This allows our AI agent to be accessible wherever it is needed, providing automated insights and executing tasks in real time.
Expanding Your AI Agent’s Capabilities
The modular nature of Appmixer's no-code builder allows for easy expansion.
For instance, you can:
Integrate vector database for large-scale data retrieval.
Connect additional execution tools like task assignment in Asana, ClickUp, or Jira.
Create multi-agent workflows where each AI agent specializes in a different function, such as:
Scraping websites
Generating marketing content
Analyzing market trends
Writing product specifications
Last updated
Was this helpful?
